
User Manual (ENGLISH)
Page 3
... license is High Definition Television (HDTV). • SDTV program formats include 480-line interlaced (480i) and 480-line progressive (480p) video. 480i programs are granted for commercial use by end-user consumers for product features or functions that do not conform to private non-commercial use . The license does not cover any product unit other than one program on the same TV channel) and datacasting...
... license is High Definition Television (HDTV). • SDTV program formats include 480-line interlaced (480i) and 480-line progressive (480p) video. 480i programs are granted for commercial use by end-user consumers for product features or functions that do not conform to private non-commercial use . The license does not cover any product unit other than one program on the same TV channel) and datacasting...
User Manual (ENGLISH)
Page 5
... full power or not and how close your present antenna may work fine. This depends on VHF (channels 2-13) or UHF (channels 14-69) to enjoy clear, sharp widescreen images and high-quality audio. 5. there is to "Yes" in the TV Guide On ScreenTM Setup. Can I connect an antenna in standby mode. However, DTV broadcast channel assignments are used for your TV while it to my cable TV service? If your TV Guide. Residents...
... full power or not and how close your present antenna may work fine. This depends on VHF (channels 2-13) or UHF (channels 14-69) to enjoy clear, sharp widescreen images and high-quality audio. 5. there is to "Yes" in the TV Guide On ScreenTM Setup. Can I connect an antenna in standby mode. However, DTV broadcast channel assignments are used for your TV while it to my cable TV service? If your TV Guide. Residents...
User Manual (ENGLISH)
Page 6
... Speaker 27 Operation 30 Turning the TV On and Off 30 Viewing the Menus and On-Screen Displays 30 Selecting a Menu Language 31 Memorizing the Channels 32 Adding and Erasing Channels 34 Changing Channels 35 Customizing Your Remote Control 36 Remote Control Codes 37 Setting the Clock...38 Setting the On/Off Timer 40 Setting the Sleep Timer 41 Viewing an External Signal Source 42 Assigning Names to External Input Mode 43 Channel Control 46 Selecting Your Favorite Channels 46 Viewing the Channel Lists...
... Speaker 27 Operation 30 Turning the TV On and Off 30 Viewing the Menus and On-Screen Displays 30 Selecting a Menu Language 31 Memorizing the Channels 32 Adding and Erasing Channels 34 Changing Channels 35 Customizing Your Remote Control 36 Remote Control Codes 37 Setting the Clock...38 Setting the On/Off Timer 40 Setting the Sleep Timer 41 Viewing an External Signal Source 42 Assigning Names to External Input Mode 43 Channel Control 46 Selecting Your Favorite Channels 46 Viewing the Channel Lists...
User Manual (ENGLISH)
Page 7
... Setting the Blue Screen Mode 73 Sound Control 76 Sound Control ...76 Setting the SRS TSXT 78 Auto Volume...79 Choosing a Multi-Channel Sound (MTS) track Digital 80 Choosing a Multi-Channel Sound (MTS) track Analog 81 Choosing a Digital Sound Format Digital 82 Selecting the Internal Mute 83 Setting the On/Off Melody 84 Setting up the Sub Woofer Output 85 Special Features 88 Setting the Function Help 88 Menu Transparency Level 89 Using the V-Chip...90 Viewing Closed Captions...
... Setting the Blue Screen Mode 73 Sound Control 76 Sound Control ...76 Setting the SRS TSXT 78 Auto Volume...79 Choosing a Multi-Channel Sound (MTS) track Digital 80 Choosing a Multi-Channel Sound (MTS) track Analog 81 Choosing a Digital Sound Format Digital 82 Selecting the Internal Mute 83 Setting the On/Off Melody 84 Setting up the Sub Woofer Output 85 Special Features 88 Setting the Function Help 88 Menu Transparency Level 89 Using the V-Chip...90 Viewing Closed Captions...
User Manual (ENGLISH)
Page 11
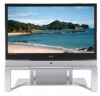
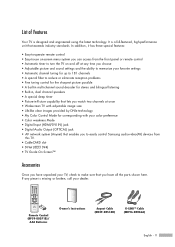
...; Widescreen TV with adjustable image size • Life-like clear images provided by DNle technology • My Color Control Mode for corresponding with your color preference • Color weakness Mode • Digital Input (HDMI/DVI IN) jack • Digital Audio Output (OPTICAL) jack • AV network system (Anynet) that enables you to easily control Samsung audio-video(AV) devices from the front panel or remote control • Automatic timer to turn the TV on -screen menu system you can access from this TV...
...; Widescreen TV with adjustable image size • Life-like clear images provided by DNle technology • My Color Control Mode for corresponding with your color preference • Color weakness Mode • Digital Input (HDMI/DVI IN) jack • Digital Audio Output (OPTICAL) jack • AV network system (Anynet) that enables you to easily control Samsung audio-video(AV) devices from the front panel or remote control • Automatic timer to turn the TV on -screen menu system you can access from this TV...
User Manual (ENGLISH)
Page 12
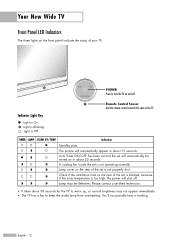
... a fan to turn the TV on the TV. English - 12 The picture will shut off . Lamp cover on the front panel indicate the status of your TV. Please contact a certified technician. • It takes about 15 seconds. Your New Wide TV Front Panel LED Indicators The three lights on the rear of the set is not properly shut. POWER Press to keep the inside the set is Off Remote Control Sensor Aim the remote control...
... a fan to turn the TV on the TV. English - 12 The picture will shut off . Lamp cover on the front panel indicate the status of your TV. Please contact a certified technician. • It takes about 15 seconds. Your New Wide TV Front Panel LED Indicators The three lights on the rear of the set is not properly shut. POWER Press to keep the inside the set is Off Remote Control Sensor Aim the remote control...

User Manual (ENGLISH)
Page 14
... video output jack on your PC. Ò HDMI (High Definition Multimedia Interface)/ DVI INPUT jack (HDMI IN 2/DVI IN) Connect to an external source, such as a VCR. These inputs can be connected to external IEEE1394 digital products such as digital VCRs and camcorders. Your New Wide TV Rear Panel Jacks Œ ANTENNA terminals Two independent cables or antennas can also be used as a DVI connection with separate analog audio inputs. When using the optional HDMI/DVI adapter, the DVI analog audio inputs...
... video output jack on your PC. Ò HDMI (High Definition Multimedia Interface)/ DVI INPUT jack (HDMI IN 2/DVI IN) Connect to an external source, such as a VCR. These inputs can be connected to external IEEE1394 digital products such as digital VCRs and camcorders. Your New Wide TV Rear Panel Jacks Œ ANTENNA terminals Two independent cables or antennas can also be used as a DVI connection with separate analog audio inputs. When using the optional HDMI/DVI adapter, the DVI analog audio inputs...
User Manual (ENGLISH)
Page 15
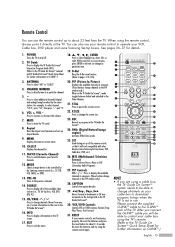
... Audio Program). 27. MTS (Multichannel Television Stereo) Press to select additional channels (digital and analog) being broadcast by the Samsung remote control (i.e., TV, STB, VCR, CABLE, or DVD). 13. P.SIZE Press to the TV Guide On ScreenTM Quick Setup Sheet for details. 1. POWER Turns the TV on -screen menu. 10. After you connect the G-LINKTM cable you are using a cable box, the TV Guide On ScreenTM system needs to be able to control your remote control is not in the PIP window...
... Audio Program). 27. MTS (Multichannel Television Stereo) Press to select additional channels (digital and analog) being broadcast by the Samsung remote control (i.e., TV, STB, VCR, CABLE, or DVD). 13. P.SIZE Press to the TV Guide On ScreenTM Quick Setup Sheet for details. 1. POWER Turns the TV on -screen menu. 10. After you connect the G-LINKTM cable you are using a cable box, the TV Guide On ScreenTM system needs to be able to control your remote control is not in the PIP window...
User Manual (ENGLISH)
Page 23
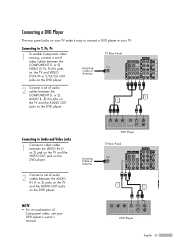
... Cable or Antenna DVD Player TV Rear Panel 1 2 NOTE • For an explanation of Component video, see your TV. DVD Player English - 23 Connecting a DVD Player The rear panel jacks on your TV make it easy to connect a DVD player to your DVD player's owner's manual. Connecting to Audio and Video Jacks 1 Connect a video cable between the VIDEO IN (1 or 2) jack on the TV and the VIDEO OUT jack on the DVD player. 2 Connect a set of audio cables between the COMPONENT (1 or 2) VIDEO (Y, PB, PR) IN jacks on the TV and VIDEO...
... Cable or Antenna DVD Player TV Rear Panel 1 2 NOTE • For an explanation of Component video, see your TV. DVD Player English - 23 Connecting a DVD Player The rear panel jacks on your TV make it easy to connect a DVD player to your DVD player's owner's manual. Connecting to Audio and Video Jacks 1 Connect a video cable between the VIDEO IN (1 or 2) jack on the TV and the VIDEO OUT jack on the DVD player. 2 Connect a set of audio cables between the COMPONENT (1 or 2) VIDEO (Y, PB, PR) IN jacks on the TV and VIDEO...
User Manual (ENGLISH)
Page 26
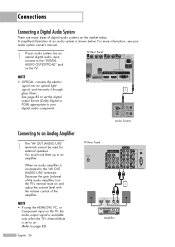
NOTE • If using the HDMI/DVI, PC, or Component input on the TV, the audio output signal is available only when the TV's Internal Mute is set the digital output format (Dolby Digital or PCM) appropriate to your audio system has an optical digital audio input, connect to the "DIGITAL AUDIO OUT(OPTICAL)" jack on and 1 adjust the volume level with the volume control of the amplifier. TV Rear Panel NOTE • OPTICAL: converts the electric signal into an optical light signal, and transmits it...
NOTE • If using the HDMI/DVI, PC, or Component input on the TV, the audio output signal is available only when the TV's Internal Mute is set the digital output format (Dolby Digital or PCM) appropriate to your audio system has an optical digital audio input, connect to the "DIGITAL AUDIO OUT(OPTICAL)" jack on and 1 adjust the volume level with the volume control of the amplifier. TV Rear Panel NOTE • OPTICAL: converts the electric signal into an optical light signal, and transmits it...
User Manual (ENGLISH)
Page 30
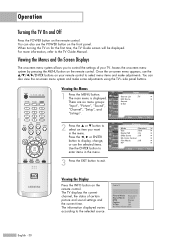
... some adjustments using the TV's side panel buttons. Cable 3 Picture Mode Standard Sound Mode Custom MTS Stereo Caption Off V-Chip Off No Time Information English - 30 Operation Turning the TV On and Off Press the POWER button on the front panel. You can also view the on your TV. or † button to select an item you to control the settings of certain picture and sound settings and the current time. When turning the TV on the remote control. Access the on-screen menu system...
... some adjustments using the TV's side panel buttons. Cable 3 Picture Mode Standard Sound Mode Custom MTS Stereo Caption Off V-Chip Off No Time Information English - 30 Operation Turning the TV On and Off Press the POWER button on the front panel. You can also view the on your TV. or † button to select an item you to control the settings of certain picture and sound settings and the current time. When turning the TV on the remote control. Access the on-screen menu system...
User Manual (ENGLISH)
Page 33
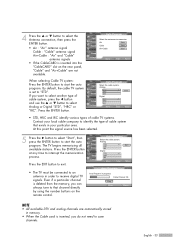
... Analog or Digital "STD", "HRC" or "IRC". Input Picture Sound Channel Setup Listings Auto Program Select the cable system. The TV begins memorizing all available stations. Even if a particular channel is inserted into the "CableCARD" slot on the remote control. English - 33 Press the ENTER button at any time to memorize. By default, the cable TV system is inserted, you do not need to "STD". Input Picture Sound Channel Setup Listings Auto Program Select the antennas to interrupt...
... Analog or Digital "STD", "HRC" or "IRC". Input Picture Sound Channel Setup Listings Auto Program Select the cable system. The TV begins memorizing all available stations. Even if a particular channel is inserted into the "CableCARD" slot on the remote control. English - 33 Press the ENTER button at any time to memorize. By default, the cable TV system is inserted, you do not need to "STD". Input Picture Sound Channel Setup Listings Auto Program Select the antennas to interrupt...
User Manual (ENGLISH)
Page 40
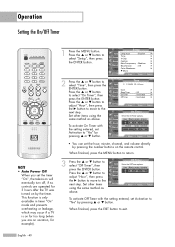
... the MENU button to select "Off Timer", then press the ENTER button. Press the ... Setup Input Picture Sound Channel Setup Listings Language : English √ Time √ V-Chip √ Caption √ Menu Transparency : Medium √ Blue Screen : Off √ Color Weakness √ ▼ More Move Enter Return Time Input 1/ 1/ 2005/ 12 : 00 am Air ▼ Channel Volume Activation 3 10 No Move Adjust Return • You can set the hour, minute, channel, and volume directly by the timer. English - 40 Hour...
... the MENU button to select "Off Timer", then press the ENTER button. Press the ... Setup Input Picture Sound Channel Setup Listings Language : English √ Time √ V-Chip √ Caption √ Menu Transparency : Medium √ Blue Screen : Off √ Color Weakness √ ▼ More Move Enter Return Time Input 1/ 1/ 2005/ 12 : 00 am Air ▼ Channel Volume Activation 3 10 No Move Adjust Return • You can set the hour, minute, channel, and volume directly by the timer. English - 40 Hour...
User Manual (ENGLISH)
Page 41
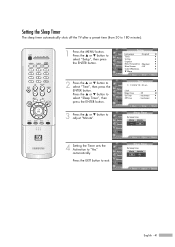
... No Move Adjust Return Input Picture Sound Channel Setup Listings Sleep Timer Set sleep timer. Press the EXIT button to select "Sleep Timer", then press the ENTER button. 3 Press the ... Setup Input Picture Sound Channel Setup Listings Language : English √ Time √ V-Chip √ Caption √ Menu Transparency : Medium √ Blue Screen : Off √ Color Weakness √ ▼ More Move Enter Return Time Input 1/ 1/ 2005/ 12 : 00 am Picture Clock √ Sound Sleep Timer : Off √ Channel On Timer Off Timer : Inactivated...
... No Move Adjust Return Input Picture Sound Channel Setup Listings Sleep Timer Set sleep timer. Press the EXIT button to select "Sleep Timer", then press the ENTER button. 3 Press the ... Setup Input Picture Sound Channel Setup Listings Language : English √ Time √ V-Chip √ Caption √ Menu Transparency : Medium √ Blue Screen : Off √ Color Weakness √ ▼ More Move Enter Return Time Input 1/ 1/ 2005/ 12 : 00 am Picture Clock √ Sound Sleep Timer : Off √ Channel On Timer Off Timer : Inactivated...

User Manual (ENGLISH)
Page 60
... button to select "Easy Control". 4 Press the œ or √ button to exit. The original picture (before adjustment) is shown on the left side, while the selected mode is shown on the screen. NOTE • Changing the settings in the Easy Control Menu Skin, sky and grass tones are seven My Color Control modes: Red, Green, Blue, Yellow, Pink, Standard, and Custom. My Color Control Input Easy Control : Custom √ Picture Detail Control √ Sound Channel Setup Listings...
... button to select "Easy Control". 4 Press the œ or √ button to exit. The original picture (before adjustment) is shown on the left side, while the selected mode is shown on the screen. NOTE • Changing the settings in the Easy Control Menu Skin, sky and grass tones are seven My Color Control modes: Red, Green, Blue, Yellow, Pink, Standard, and Custom. My Color Control Input Easy Control : Custom √ Picture Detail Control √ Sound Channel Setup Listings...

User Manual (ENGLISH)
Page 61
... ENTER or MENU button to confirm the changes and return to select "Detail Control", then press the ENTER button. 4 Press the ... or † button to adjust the settings. Detail Control Input Picture Sound Channel Setup Red Green Blue Yellow Pink Reset Listings Move Enter 50 50 50 50 50 Return English - 61 Picture Input Mode : Standard √ Picture Size Digital NR : 16:9 : On √ √ Sound DNIe Demo : Off √ My Color Control √ Channel Film Mode : Off √ Setup PIP √ Listings Move...
... ENTER or MENU button to confirm the changes and return to select "Detail Control", then press the ENTER button. 4 Press the ... or † button to adjust the settings. Detail Control Input Picture Sound Channel Setup Red Green Blue Yellow Pink Reset Listings Move Enter 50 50 50 50 50 Return English - 61 Picture Input Mode : Standard √ Picture Size Digital NR : 16:9 : On √ √ Sound DNIe Demo : Off √ My Color Control √ Channel Film Mode : Off √ Setup PIP √ Listings Move...
User Manual (ENGLISH)
Page 90
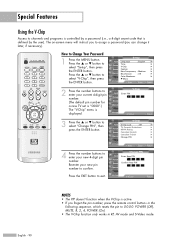
...MUTE, 8, 2, 4, POWER (On). • The V-Chip function only works in RF, AV mode and S-Video mode. How to confirm. Press the ... Re-enter your new 4-digit pin number. Press the ... Listings 0~9 Enter Return 3 Press the ... Picture * (The default pin number for Sound a new TV set is "0000".) Channel The "V-Chip" menu is defined by a password (i.e., a 4-digit secret code that is Setup displayed. Special Features Using the V-Chip Access to channels and programs is controlled by the user). V-Chip Input Picture Sound Channel Setup V-Chip Lock : Off TV Parental...
...MUTE, 8, 2, 4, POWER (On). • The V-Chip function only works in RF, AV mode and S-Video mode. How to confirm. Press the ... Re-enter your new 4-digit pin number. Press the ... Listings 0~9 Enter Return 3 Press the ... Picture * (The default pin number for Sound a new TV set is "0000".) Channel The "V-Chip" menu is defined by a password (i.e., a 4-digit secret code that is Setup displayed. Special Features Using the V-Chip Access to channels and programs is controlled by the user). V-Chip Input Picture Sound Channel Setup V-Chip Lock : Off TV Parental...

User Manual (ENGLISH)
Page 140
... picture or sound. Digital broadcasting screen problem. Try another channel. Try another channel. Check that the Mute feature is working. Adjust the picture settings. Make sure the remote has batteries. Make sure the wall outlet is off. Please check the digital signal strength and input antenna. The sound is made by the TV trying to the connection status in the TV Guide On ScreenTM Setup. Poor sound quality. Your remote control does not operate your nearest Samsung authorized service center. Check...
... picture or sound. Digital broadcasting screen problem. Try another channel. Try another channel. Check that the Mute feature is working. Adjust the picture settings. Make sure the remote has batteries. Make sure the wall outlet is off. Please check the digital signal strength and input antenna. The sound is made by the TV trying to the connection status in the TV Guide On ScreenTM Setup. Poor sound quality. Your remote control does not operate your nearest Samsung authorized service center. Check...
Brochure
Page 4
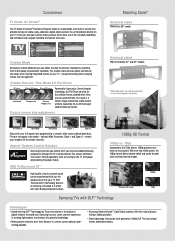
... both video and audio digital signals through a single connection for deeper, richer blacks with higher contrast ratios, better brightness and improved perceived resolution, particularly for improved low-light video performance and noise reduction. HD 1080 Production HD 1080 Display 1080 1080 1920 HD 1080 Camera 1920 Next-generation DLP chips from Texas Instruments About the size of primary and secondary color-control selections: white, red, pink, yellow, green and blue. Advanced Picture Quality Samsung...
... both video and audio digital signals through a single connection for deeper, richer blacks with higher contrast ratios, better brightness and improved perceived resolution, particularly for improved low-light video performance and noise reduction. HD 1080 Production HD 1080 Display 1080 1080 1920 HD 1080 Camera 1920 Next-generation DLP chips from Texas Instruments About the size of primary and secondary color-control selections: white, red, pink, yellow, green and blue. Advanced Picture Quality Samsung...
Brochure
Page 5
... the TV's remote control. Picture format size adjustment Universal stand TR61X2 matches 61" and 67" models. * Sold separately. stretch your TV. With over two million pixels, the 1080p format delivers better detail and clarity for cable-ready, cable box, digital cable and over . Convenience TV Guide On Screen® The TV Guide On Screen® Interactive Program Guide is a subscription-free, built-in smooth, wide screen without black bars. It lets you see which ones are converted...
... the TV's remote control. Picture format size adjustment Universal stand TR61X2 matches 61" and 67" models. * Sold separately. stretch your TV. With over two million pixels, the 1080p format delivers better detail and clarity for cable-ready, cable box, digital cable and over . Convenience TV Guide On Screen® The TV Guide On Screen® Interactive Program Guide is a subscription-free, built-in smooth, wide screen without black bars. It lets you see which ones are converted...


