User Manual (ENGLISH)
Page 7
...D-Net control panel 118 Operating Tips ...120 Recording Tips...122 Tips on stopping recording 122 Troubleshooting (D-Net 123 PC Display 128 Using Your TV as a Computer (PC) Display 128 Adjusting the Picture Quality 131 Changing the Picture Position 132 Adjusting the Picture Quality and Position Automatically ... the Picture Size (PC Mode 134 Viewing the Current Resolution 135 Initializing the Picture Settings 136 Appendix 138 Replacing the Lamp 138 Troubleshooting 140 Cleaning and Maintaining Your TV 142 Using Your TV in Another Country 142 Specifications ...142 English - 7
...D-Net control panel 118 Operating Tips ...120 Recording Tips...122 Tips on stopping recording 122 Troubleshooting (D-Net 123 PC Display 128 Using Your TV as a Computer (PC) Display 128 Adjusting the Picture Quality 131 Changing the Picture Position 132 Adjusting the Picture Quality and Position Automatically ... the Picture Size (PC Mode 134 Viewing the Current Resolution 135 Initializing the Picture Settings 136 Appendix 138 Replacing the Lamp 138 Troubleshooting 140 Cleaning and Maintaining Your TV 142 Using Your TV in Another Country 142 Specifications ...142 English - 7
User Manual (ENGLISH)
Page 12
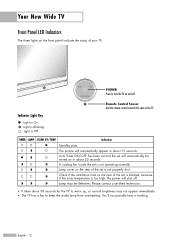
... remote control towards this spot on the front panel indicate the status of your TV. Lamp may not appear immediately. • The TV has a fan to turn the TV on in about 25 seconds. Check if the ventilation hole on the rear of the set will shut off . English - 12 A cooling fan inside... high, the power will automatically be defective. You'll occasionally hear it working. Lamp cover on the rear of the set is not properly shut. Please contact a certified technician. • It takes about 30 seconds for the TV to warm up, so normal brightness may be turned on and off . Your...
... remote control towards this spot on the front panel indicate the status of your TV. Lamp may not appear immediately. • The TV has a fan to turn the TV on in about 25 seconds. Check if the ventilation hole on the rear of the set will shut off . English - 12 A cooling fan inside... high, the power will automatically be defective. You'll occasionally hear it working. Lamp cover on the rear of the set is not properly shut. Please contact a certified technician. • It takes about 30 seconds for the TV to warm up, so normal brightness may be turned on and off . Your...
User Manual (ENGLISH)
Page 138
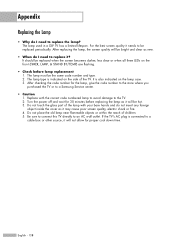
... box or other source, it ? Do not place the old lamp near flammable objects or within the reach of the TV. English - 138 For the best screen quality it needs to replace it will be replaced periodically. It is connected to a Samsung Service center. • Caution 1. Do not touch the glass ...part of the lamp with the correct code numbered lamp to avoid damage to an ...
... box or other source, it ? Do not place the old lamp near flammable objects or within the reach of the TV. English - 138 For the best screen quality it needs to replace it will be replaced periodically. It is connected to a Samsung Service center. • Caution 1. Do not touch the glass ...part of the lamp with the correct code numbered lamp to avoid damage to an ...

User Manual (ENGLISH)
Page 139
English - 139 NOTES • Be sure the replacement Lamp is the same type. • After replacing the lamp, align the lamp cover with the groove and secure the screws. • The TV will not turn on if the lamp cover is not correctly closed (as this will need a 5.91-Inch screwdriver and a ...pair of gloves. 1 Unplug TV, then use a screwdriver to remove the screws. 2 Remove the Lamp cover. 3 Remove the screw securing the Lamp by using a screwdriver. 4 Separate the Lamp from the engine by holding the handle and pulling it out. 5 To reinstall the...
English - 139 NOTES • Be sure the replacement Lamp is the same type. • After replacing the lamp, align the lamp cover with the groove and secure the screws. • The TV will not turn on if the lamp cover is not correctly closed (as this will need a 5.91-Inch screwdriver and a ...pair of gloves. 1 Unplug TV, then use a screwdriver to remove the screws. 2 Remove the Lamp cover. 3 Remove the screw securing the Lamp by using a screwdriver. 4 Separate the Lamp from the engine by holding the handle and pulling it out. 5 To reinstall the...


