
User Manual (ENGLISH)
Page 5
...and audio data is it to receive DTV signals indoors? DTV receivers do not worry about this since the sound comes from inside your TV while it was originally encoded for DTV broadcasts. The Federal Communications Commission's OTARD Rule (part of the Telecommunications Act of 1996) allows ...I connect my DTV set both VHF and UHF channels are no noise, ghosting, static, or scratchy audio. 3. All you won't have set -top receiver to receive DTV broadcasts. Cable TV systems use indoor antennas to my cable TV service? So you will still need is currently incompatible with many ...
...and audio data is it to receive DTV signals indoors? DTV receivers do not worry about this since the sound comes from inside your TV while it was originally encoded for DTV broadcasts. The Federal Communications Commission's OTARD Rule (part of the Telecommunications Act of 1996) allows ...I connect my DTV set both VHF and UHF channels are no noise, ghosting, static, or scratchy audio. 3. All you won't have set -top receiver to receive DTV broadcasts. Cable TV systems use indoor antennas to my cable TV service? So you will still need is currently incompatible with many ...
User Manual (ENGLISH)
Page 6
... ...11 Right side buttons 12 Side Panel Jacks 12 Front Panel LED Indicators 13 Rear Panel Jacks ...14 Remote Control...15 Connections 18 Connecting VHF and UHF Antennas 18 Antennas with 75-ohm Round Leads 18 Connecting Cable TV 19 Cable without a Cable Box 19 Cable with a Cable Box that Descrambles All... Names to External Input Mode 43 Channel Control 46 Selecting Your Favorite Channels 46 Viewing the Channel Lists 47 Labeling the Channels 49 LNA (Low Noise Amplifier 50 Fine Tuning Analog Channels Analog 51 Checking the Digital-Signal Strength Digital 52 English - 6
... ...11 Right side buttons 12 Side Panel Jacks 12 Front Panel LED Indicators 13 Rear Panel Jacks ...14 Remote Control...15 Connections 18 Connecting VHF and UHF Antennas 18 Antennas with 75-ohm Round Leads 18 Connecting Cable TV 19 Cable without a Cable Box 19 Cable with a Cable Box that Descrambles All... Names to External Input Mode 43 Channel Control 46 Selecting Your Favorite Channels 46 Viewing the Channel Lists 47 Labeling the Channels 49 LNA (Low Noise Amplifier 50 Fine Tuning Analog Channels Analog 51 Checking the Digital-Signal Strength Digital 52 English - 6
User Manual (ENGLISH)
Page 7
... 54 Picture Control...54 Changing the Picture Size 57 Digital Noise Reduction 58 Viewing the DNIe Demonstration 59 Setting the My... 98 Setting the Remote Control Mode 100 Using the CableCARD 101 Using the CableCARD Setup Function 102 Using TV Guide On ScreenTM 104 Using the D-Net 106 How to connect compatible IEEE1394 Devices 106 Connection Options 108... ...114 Recording Tips...115 Tips on stopping recording 115 Troubleshooting (D-Net 116 PC Display 122 Using Your TV as a Computer (PC) Display 122 Adjusting the Picture Quality 125 Changing the Picture Position 126 Adjusting ...
... 54 Picture Control...54 Changing the Picture Size 57 Digital Noise Reduction 58 Viewing the DNIe Demonstration 59 Setting the My... 98 Setting the Remote Control Mode 100 Using the CableCARD 101 Using the CableCARD Setup Function 102 Using TV Guide On ScreenTM 104 Using the D-Net 106 How to connect compatible IEEE1394 Devices 106 Connection Options 108... ...114 Recording Tips...115 Tips on stopping recording 115 Troubleshooting (D-Net 116 PC Display 122 Using Your TV as a Computer (PC) Display 122 Adjusting the Picture Quality 125 Changing the Picture Position 126 Adjusting ...
User Manual (ENGLISH)
Page 21
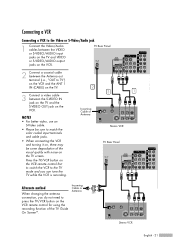
...quality with noise on the VCR. Incoming Cable or Antenna Stereo VCR English - 21 Press the TV/VCR button on the VCR remote control first to switch the VCR to the TV mode and you can tune the TV while the VCR is recording. 2 3 1 Incoming Cable or Antenna Stereo VCR TV Rear Panel Alternate...the antenna connection, you do not need to TV") on the VCR and the ANT 1 IN (CABLE) on the TV. 3 Connect a video cable between the VIDEO or S-VIDEO/AUDIO input jacks on the TV and VIDEO or S-VIDEO/AUDIO output jacks on the TV screen. TV Rear Panel 2 Connect a coaxial cable between the ...
...quality with noise on the VCR. Incoming Cable or Antenna Stereo VCR English - 21 Press the TV/VCR button on the VCR remote control first to switch the VCR to the TV mode and you can tune the TV while the VCR is recording. 2 3 1 Incoming Cable or Antenna Stereo VCR TV Rear Panel Alternate...the antenna connection, you do not need to TV") on the VCR and the ANT 1 IN (CABLE) on the TV. 3 Connect a video cable between the VIDEO or S-VIDEO/AUDIO input jacks on the TV and VIDEO or S-VIDEO/AUDIO output jacks on the TV screen. TV Rear Panel 2 Connect a coaxial cable between the ...

User Manual (ENGLISH)
Page 50
Channel Control LNA (Low Noise Amplifier) If the TV is operating in each channel. Press the ... Channel Input Picture Sound Channel Setup ...The LNA setting must be stored separately in a weak-signal area, sometimes the LNA function can improve the reception (a low-noise preamplifier boosts the incoming signal). 1 Press the MENU button. NOTES • LNA functions only when antenna is noisy with ...or † button to select "LNA", then press the ENTER button. 3 Press the ... English - 50 or † button to select "Channel", then press the ENTER button. 2 Press the ...
Channel Control LNA (Low Noise Amplifier) If the TV is operating in each channel. Press the ... Channel Input Picture Sound Channel Setup ...The LNA setting must be stored separately in a weak-signal area, sometimes the LNA function can improve the reception (a low-noise preamplifier boosts the incoming signal). 1 Press the MENU button. NOTES • LNA functions only when antenna is noisy with ...or † button to select "LNA", then press the ENTER button. 3 Press the ... English - 50 or † button to select "Channel", then press the ENTER button. 2 Press the ...
User Manual (ENGLISH)
Page 58
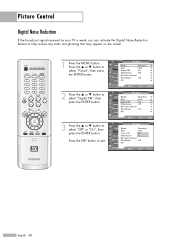
... reduce any static and ghosting that may appear on the screen. 1 Press the MENU button. Picture Control Digital Noise Reduction If the broadcast signal received by your TV is weak, you can activate the Digital Noise Reduction feature to select "Picture", then press the ENTER button. 2 Press the ... or † button to select...
... reduce any static and ghosting that may appear on the screen. 1 Press the MENU button. Picture Control Digital Noise Reduction If the broadcast signal received by your TV is weak, you can activate the Digital Noise Reduction feature to select "Picture", then press the ENTER button. 2 Press the ... or † button to select...
User Manual (ENGLISH)
Page 59
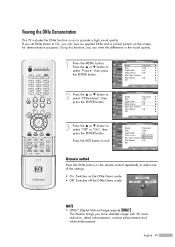
... remote control repeatedly to select one of the settings. • On: Switches on the screen, for demonstration purposes. English - 59 Viewing the DNIe Demonstration This TV includes the DNIe function so as to select "DNIe Demo", then press the ENTER button. 3 Press the ... If you can view the difference in the... to On, you set DNIe Demo to select "Off" or "On", then press the ENTER button. Using this function, you more detailed image with 3D noise reduction, detail enhancement, contrast enhancement and white enhancement.
... remote control repeatedly to select one of the settings. • On: Switches on the screen, for demonstration purposes. English - 59 Viewing the DNIe Demonstration This TV includes the DNIe function so as to select "DNIe Demo", then press the ENTER button. 3 Press the ... If you can view the difference in the... to On, you set DNIe Demo to select "Off" or "On", then press the ENTER button. Using this function, you more detailed image with 3D noise reduction, detail enhancement, contrast enhancement and white enhancement.
User Manual (ENGLISH)
Page 125
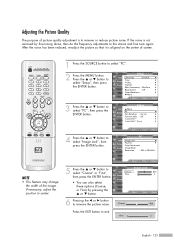
...select Channel these options (Coarse, Setup or Fine) by fine tuning alone, then do the frequency adjustments to remove or reduce picture noise. Adjusting the Picture Quality The purpose of picture quality adjustment is aligned on the center of the image. Press the ... PC Input ... √ Menu Transparency : Medium √ Blue Screen : Off √ Color Weakness √ ▼ More Move Enter Return 3 Press the ... After the noise has been reduced, re-adjust the picture so that it is to the utmost and fine tune again. or † button to exit. ▲ Fine...
...select Channel these options (Coarse, Setup or Fine) by fine tuning alone, then do the frequency adjustments to remove or reduce picture noise. Adjusting the Picture Quality The purpose of picture quality adjustment is aligned on the center of the image. Press the ... PC Input ... √ Menu Transparency : Medium √ Blue Screen : Off √ Color Weakness √ ▼ More Move Enter Return 3 Press the ... After the noise has been reduced, re-adjust the picture so that it is to the utmost and fine tune again. or † button to exit. ▲ Fine...

