
Quick Guide (ENGLISH)
Page 5
... have a mono Camcorder, connect L(mono) to the Camcorder audio out using a VCR. 1 Locate the A/V output jacks on the camcorder. Connecting a Camcorder The side panel jacks on your TV make it easy to connect a Camcorder to Y, PB, PR 1 Connect a set of two cables. 1 Camcorder Output Jacks TV Rear of audio cables between the AUDIO IN jacks on the TV and the AUDIO OUT jacks on the DVD player. The audio-video cables shown here are usually...
... have a mono Camcorder, connect L(mono) to the Camcorder audio out using a VCR. 1 Locate the A/V output jacks on the camcorder. Connecting a Camcorder The side panel jacks on your TV make it easy to connect a Camcorder to Y, PB, PR 1 Connect a set of two cables. 1 Camcorder Output Jacks TV Rear of audio cables between the AUDIO IN jacks on the TV and the AUDIO OUT jacks on the DVD player. The audio-video cables shown here are usually...

Quick Guide (ENGLISH)
Page 6
... DVD player. 2 Connect a video cable between the VIDEO IN (1 or 2) jack on the TV and Incoming Cable or Antenna TV Rear Panel the VIDEO OUT jack on the DVD player. 2 1 DVD Player Connecting a DTV Set-Top Box Connecting to Y, PB, PR 1 Connect a set of Component video, see your Set-Top Box owner's manual. Note: For an explanation of video cables between the COMPONENT (1 or 2) AUDIO (L, R) IN jacks on the TV and the AUDIO OUT jacks on the Set-Top Box. TV Rear Panel 2 Connect a set of audio cables between the COMPONENT (1 or 2) VIDEO...
... DVD player. 2 Connect a video cable between the VIDEO IN (1 or 2) jack on the TV and Incoming Cable or Antenna TV Rear Panel the VIDEO OUT jack on the DVD player. 2 1 DVD Player Connecting a DTV Set-Top Box Connecting to Y, PB, PR 1 Connect a set of Component video, see your Set-Top Box owner's manual. Note: For an explanation of video cables between the COMPONENT (1 or 2) AUDIO (L, R) IN jacks on the TV and the AUDIO OUT jacks on the Set-Top Box. TV Rear Panel 2 Connect a set of audio cables between the COMPONENT (1 or 2) VIDEO...

Quick Guide (ENGLISH)
Page 8
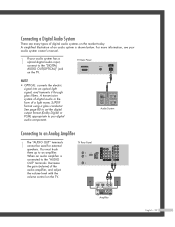
... system of digital audio in the form of the audio amplifier, and adjust the volume level with the volume control on the market today. Audio System Connecting to an amplifier. TV Rear Panel Amplifier English-8 For more information, see your audio system owner's manual. 1 If your audio system has a optical digital audio input, connect to the "DIGITAL AUDIO OUT(OPTICAL)" jack on the instruction manual to set the digital output format (Dolby Digital or PCM) appropriate to you digital audio component. Connecting a Digital Audio System...
... system of digital audio in the form of the audio amplifier, and adjust the volume level with the volume control on the market today. Audio System Connecting to an amplifier. TV Rear Panel Amplifier English-8 For more information, see your audio system owner's manual. 1 If your audio system has a optical digital audio input, connect to the "DIGITAL AUDIO OUT(OPTICAL)" jack on the instruction manual to set the digital output format (Dolby Digital or PCM) appropriate to you digital audio component. Connecting a Digital Audio System...

Quick Guide (ENGLISH)
Page 9
... preset factory settings (or select your remote control is not functioning properly, take out the batteries and press the reset button for automatic shut off . ´ P.MODE Adjust the TV picture by the same station. " ANYNET Runs the Anynet view functions and sets up Anynet devices. ' MENU Displays the main on and off . - ENTER Press to select highlight up to change channels. While using the on the TV screen. ˜...
... preset factory settings (or select your remote control is not functioning properly, take out the batteries and press the reset button for automatic shut off . ´ P.MODE Adjust the TV picture by the same station. " ANYNET Runs the Anynet view functions and sets up Anynet devices. ' MENU Displays the main on and off . - ENTER Press to select highlight up to change channels. While using the on the TV screen. ˜...

Quick Guide (ENGLISH)
Page 10
... source. The TV displays the current channel, the status of your remote control to select menu items and make some adjustments using the TV's side panel buttons. Viewing the Menus 1 Press the MENU button. The main menu is displayed. Viewing the Display Press the INFO button on -screen menu system allows you want in the menu. There are six menu groups: "Input", "Picture", "Sound", "Channel", "Setup", and "Guide". 2 Press the ... Cable 3 Picture Mode Standard Sound Mode Custom MTS Stereo Caption Off V-Chip Off No Time Information English...
... source. The TV displays the current channel, the status of your remote control to select menu items and make some adjustments using the TV's side panel buttons. Viewing the Menus 1 Press the MENU button. The main menu is displayed. Viewing the Display Press the INFO button on -screen menu system allows you want in the menu. There are six menu groups: "Input", "Picture", "Sound", "Channel", "Setup", and "Guide". 2 Press the ... Cable 3 Picture Mode Standard Sound Mode Custom MTS Stereo Caption Off V-Chip Off No Time Information English...

Quick Guide (ENGLISH)
Page 15
.... Picture rolls vertically. Adjust the antenna. operate your nearest Samsung authorized service center. remote control into TV mode. Make sure the TV is plugged in about 30 seconds for the TV to warm up, so normal brightness may not appear immediately. ● The TV has a fan to keep the inside the set is blocked, because if the inner temperature is working . English-15 Adjust the antenna. Please check the digital signal strength and input antenna. ● The display panel used...
.... Picture rolls vertically. Adjust the antenna. operate your nearest Samsung authorized service center. remote control into TV mode. Make sure the TV is plugged in about 30 seconds for the TV to warm up, so normal brightness may not appear immediately. ● The TV has a fan to keep the inside the set is blocked, because if the inner temperature is working . English-15 Adjust the antenna. Please check the digital signal strength and input antenna. ● The display panel used...
User Manual (ENGLISH)
Page 3
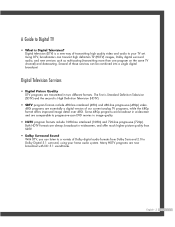
... services can listen to progressive-scan DVD movies in widescreen and are now broadcast with DD 5.1 soundtracks. The first is Standard Definition Television (SDTV) and the second is High Definition Television (HDTV). • SDTV program formats include 480-line interlaced (480i) and 480-line progressive (480p) video. 480i programs are essentially a digital version of transmitting high quality video and audio to Dolby Digital 5.1 surround, using your TV set. Some 480p programs...
... services can listen to progressive-scan DVD movies in widescreen and are now broadcast with DD 5.1 soundtracks. The first is Standard Definition Television (SDTV) and the second is High Definition Television (HDTV). • SDTV program formats include 480-line interlaced (480i) and 480-line progressive (480p) video. 480i programs are essentially a digital version of transmitting high quality video and audio to Dolby Digital 5.1 surround, using your TV set. Some 480p programs...

User Manual (ENGLISH)
Page 5
... to my cable TV service? Cable TV systems use indoor antennas to produce high-quality images and sound. How can provide broadcast DTV signals via a master TV antenna system to the transmission tower. You can find out whether your local DTV stations are no noise, ghosting, static, or scratchy audio. 3. Once the DTV signal level exceeds a certain threshold at the receiver, the digital video and audio data is a big advantage for...
... to my cable TV service? Cable TV systems use indoor antennas to produce high-quality images and sound. How can provide broadcast DTV signals via a master TV antenna system to the transmission tower. You can find out whether your local DTV stations are no noise, ghosting, static, or scratchy audio. 3. Once the DTV signal level exceeds a certain threshold at the receiver, the digital video and audio data is a big advantage for...

User Manual (ENGLISH)
Page 6
... 28 Connecting a Digital Audio System 29 Connecting to an Analog Amplifier 29 Operation ...32 Turning the TV On and Off 32 Viewing the Menus and On-Screen Displays 32 Selecting a Menu Language 33 Memorizing the Channels 34 Adding and Erasing Channels 36 Changing Channels 37 Customizing Your Remote Control 38 Remote Control Codes 39 Setting the Clock 40 Setting the On/Off Timer 42 Setting the Sleep Timer 43 Viewing an External Signal Source 44 Assigning Names to External Input Mode...
... 28 Connecting a Digital Audio System 29 Connecting to an Analog Amplifier 29 Operation ...32 Turning the TV On and Off 32 Viewing the Menus and On-Screen Displays 32 Selecting a Menu Language 33 Memorizing the Channels 34 Adding and Erasing Channels 36 Changing Channels 37 Customizing Your Remote Control 38 Remote Control Codes 39 Setting the Clock 40 Setting the On/Off Timer 42 Setting the Sleep Timer 43 Viewing an External Signal Source 44 Assigning Names to External Input Mode...

User Manual (ENGLISH)
Page 7
... Digital-Signal Strength Digital 51 LNA (Low Noise Amplifier 52 Picture Control 54 Picture Control ...54 Selecting the Color Tone 56 Changing the Picture Size 57 Digital Noise Reduction 58 DNIeTM (Digital Natural Image engine) 59 Setting the My Color Control Mode 60 Using the Color Weakness Enhancement Feature 62 Setting the Film Mode 63 Viewing Picture-In-Picture 64 Selecting the Sound Source 70 Freezing the Picture 71 Setting the Blue Screen Mode 72 Sound Control 74 Sound Control ...74 Setting the SRS TSXT 76 Auto Volume ...77 Choosing a Multi-Channel Sound...
... Digital-Signal Strength Digital 51 LNA (Low Noise Amplifier 52 Picture Control 54 Picture Control ...54 Selecting the Color Tone 56 Changing the Picture Size 57 Digital Noise Reduction 58 DNIeTM (Digital Natural Image engine) 59 Setting the My Color Control Mode 60 Using the Color Weakness Enhancement Feature 62 Setting the Film Mode 63 Viewing Picture-In-Picture 64 Selecting the Sound Source 70 Freezing the Picture 71 Setting the Blue Screen Mode 72 Sound Control 74 Sound Control ...74 Setting the SRS TSXT 76 Auto Volume ...77 Choosing a Multi-Channel Sound...

User Manual (ENGLISH)
Page 10
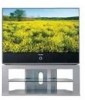
... the TV. For the best screen quality it needs to replace the lamp? Be sure to connect this TV directly to a Samsung Service center. • Caution 1. The lamp must be replaced periodically. Your New Wide TV Viewing Position To optimize your bare hands nor insert any foreign object inside the cover as it may cause an increase in the internal temperature of the lamp with the correct code numbered lamp...
... the TV. For the best screen quality it needs to replace the lamp? Be sure to connect this TV directly to a Samsung Service center. • Caution 1. The lamp must be replaced periodically. Your New Wide TV Viewing Position To optimize your bare hands nor insert any foreign object inside the cover as it may cause an increase in the internal temperature of the lamp with the correct code numbered lamp...

User Manual (ENGLISH)
Page 12
...-to-operate remote control • Easy-to-use on-screen menu system you can access from the side panel or remote control • Automatic timer to turn the TV on and off at any piece is a full-featured, high-performance unit that you have all the parts shown here. Remote Control (BP59-00076A)/ AAA Batteries English - 12 Warranty Cards (2)/ Registration Card (1) Instruction Manual/ Safety Guide/ Quick Guide/ Anynet Manual/ Manual Guide Anynet Cable Your New Wide TV List of...
...-to-operate remote control • Easy-to-use on-screen menu system you can access from the side panel or remote control • Automatic timer to turn the TV on and off at any piece is a full-featured, high-performance unit that you have all the parts shown here. Remote Control (BP59-00076A)/ AAA Batteries English - 12 Warranty Cards (2)/ Registration Card (1) Instruction Manual/ Safety Guide/ Quick Guide/ Anynet Manual/ Manual Guide Anynet Cable Your New Wide TV List of...
User Manual (ENGLISH)
Page 16
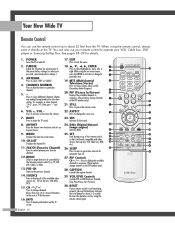
... ENTER Press to select "AIR" or "CABLE". 4. PIP (Picture In Picture) Displays the available channels in sequence. (These buttons change the screen size. 23. DNIe (Digital Natural Image engine) Activates DNIe. 25. SET Used during set of the preset factory settings (or select your personal, customized picture settings.) 3. English - 16 CH / Press to change channels in TV Guide menu. 16. POWER Turns the TV on -screen menus, press the ENTER to select additional channels (digital and analog) being broadcast by selecting...
... ENTER Press to select "AIR" or "CABLE". 4. PIP (Picture In Picture) Displays the available channels in sequence. (These buttons change the screen size. 23. DNIe (Digital Natural Image engine) Activates DNIe. 25. SET Used during set of the preset factory settings (or select your personal, customized picture settings.) 3. English - 16 CH / Press to change channels in TV Guide menu. 16. POWER Turns the TV on -screen menus, press the ENTER to select additional channels (digital and analog) being broadcast by selecting...
User Manual (ENGLISH)
Page 29
... audio system owner's manual. 1 If your audio system has a optical digital audio input, connect to the "DIGITAL AUDIO OUT(OPTICAL)" jack on the market today. TV Rear Panel NOTE • OPTICAL: converts the electric signal into an optical light signal, and transmits it through glass fibers. A transmission system of digital audio in the form of an audio system is connected to an Analog Amplifier 1 The "AUDIO OUT" terminals cannot be used for external speakers. See page 80 to set the digital output...
... audio system owner's manual. 1 If your audio system has a optical digital audio input, connect to the "DIGITAL AUDIO OUT(OPTICAL)" jack on the market today. TV Rear Panel NOTE • OPTICAL: converts the electric signal into an optical light signal, and transmits it through glass fibers. A transmission system of digital audio in the form of an audio system is connected to an Analog Amplifier 1 The "AUDIO OUT" terminals cannot be used for external speakers. See page 80 to set the digital output...

User Manual (ENGLISH)
Page 40
... Sound Channel Setup Guide Clock Set Set current date and time. Setup Input Picture Sound Channel Setup Guide Language : English √ Time √ V-Chip √ Caption √ Menu Transparency : Medium √ Blue Screen : Off √ ▼ More Move Enter Return 2 Press the ... Move Adjust Return • You can check the time while watching the TV. (Just press the INFO button.) Option 1: Setting the Clock Manually 1 Press the MENU button. Clock Input Picture Sound Channel Setup Clock Mode Clock Set Time Zone DST : MAauntoual Auto : No Guide...
... Sound Channel Setup Guide Clock Set Set current date and time. Setup Input Picture Sound Channel Setup Guide Language : English √ Time √ V-Chip √ Caption √ Menu Transparency : Medium √ Blue Screen : Off √ ▼ More Move Enter Return 2 Press the ... Move Adjust Return • You can check the time while watching the TV. (Just press the INFO button.) Option 1: Setting the Clock Manually 1 Press the MENU button. Clock Input Picture Sound Channel Setup Clock Mode Clock Set Time Zone DST : MAauntoual Auto : No Guide...

User Manual (ENGLISH)
Page 41
Time Input Picture Sound Channel Setup Clock Sleep Timer On Timer Off Timer : Off : Inactivated : Inactivated Guide Move Enter Return 3 Press the ENTER button to select "Clock". Atlantic Eastern Central Mountain Pacific Alaska Hawaii Move Enter Return • When you are receiving a digital signal. 1 Press the MENU button. Press the ENTER button to select "Clock Mode". or † button to select "DST"(Daylight Saving Time), then press the ENTER button. or †...
Time Input Picture Sound Channel Setup Clock Sleep Timer On Timer Off Timer : Off : Inactivated : Inactivated Guide Move Enter Return 3 Press the ENTER button to select "Clock". Atlantic Eastern Central Mountain Pacific Alaska Hawaii Move Enter Return • When you are receiving a digital signal. 1 Press the MENU button. Press the ENTER button to select "Clock Mode". or † button to select "DST"(Daylight Saving Time), then press the ENTER button. or †...

User Manual (ENGLISH)
Page 54
... picture settings. 4 Press the MENU button to display the "Mode" menu. Press the ... Picture Input Picture Sound Channel Setup Guide Mode : Standard √ Color Tone : Warm1 √ Size : 16:9 √ Digital NR : On √ DNIe : On √ My Color Control √ ▼ More Move Enter Return Mode Input Picture Sound Channel Setup Guide Mode : Standard Contrast Brightness Sharpness Color Tint G 50 Reset Move Enter √ 90 50 65 55 R 50 Return 3 Press the ... or † button to the factory defaults. The previously adjusted picture settings...
... picture settings. 4 Press the MENU button to display the "Mode" menu. Press the ... Picture Input Picture Sound Channel Setup Guide Mode : Standard √ Color Tone : Warm1 √ Size : 16:9 √ Digital NR : On √ DNIe : On √ My Color Control √ ▼ More Move Enter Return Mode Input Picture Sound Channel Setup Guide Mode : Standard Contrast Brightness Sharpness Color Tint G 50 Reset Move Enter √ 90 50 65 55 R 50 Return 3 Press the ... or † button to the factory defaults. The previously adjusted picture settings...
User Manual (ENGLISH)
Page 60
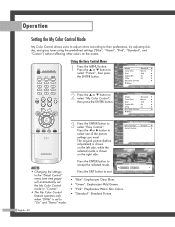
... Operation Setting the My Color Control Mode My Color Control allows users to adjust colors according to select "Picture", then press the ENTER button. or † button to their preferences, by adjusting skin, sky, and grass tones using the predefined settings ("Blue", "Green", "Pink", "Standard", and "Custom") without affecting other colors on the screen. Press the EXIT button to select "My Color Control", then press the ENTER button. Press the ... or † button to exit. Picture Input Picture Sound Channel Setup Guide Mode...
... Operation Setting the My Color Control Mode My Color Control allows users to adjust colors according to select "Picture", then press the ENTER button. or † button to their preferences, by adjusting skin, sky, and grass tones using the predefined settings ("Blue", "Green", "Pink", "Standard", and "Custom") without affecting other colors on the screen. Press the EXIT button to select "My Color Control", then press the ENTER button. Press the ... or † button to exit. Picture Input Picture Sound Channel Setup Guide Mode...

User Manual (ENGLISH)
Page 86
Input Enter PIN Picture * V-Chip (The default pin number for Sound a new TV set is "0000".) Channel The "V-Chip" menu is defined by a password (i.e., a 4-digit secret code that is Setup displayed. The on-screen menu will instruct you to select "V-Chip", then press the ENTER button. Press the ... or † button to assign a password (you forget the pin number, press the remote control buttons in RF, AV mode and S-Video mode. V-Chip Input Picture Sound Channel V-Chip Lock : Off TV Parental Guidelines MPAA Rating Change PIN Setup Guide Move Enter Return...
Input Enter PIN Picture * V-Chip (The default pin number for Sound a new TV set is "0000".) Channel The "V-Chip" menu is defined by a password (i.e., a 4-digit secret code that is Setup displayed. The on-screen menu will instruct you to select "V-Chip", then press the ENTER button. Press the ... or † button to assign a password (you forget the pin number, press the remote control buttons in RF, AV mode and S-Video mode. V-Chip Input Picture Sound Channel V-Chip Lock : Off TV Parental Guidelines MPAA Rating Change PIN Setup Guide Move Enter Return...

User Manual (ENGLISH)
Page 102
... picture or sound. The TV operates erratically. Possible Solution Try another channel. Adjust the antenna. Adjust the antenna. Make sure the MUTE button is working. Press the SOURCE button. Make sure the program is plugged in. Check all wire connections. Press the MODE button to have a problem, first try operating it again. Make sure the remote has batteries. Make sure the TV is broadcasted in . Please check the digital signal strength and input antenna. • The display panel used...
... picture or sound. The TV operates erratically. Possible Solution Try another channel. Adjust the antenna. Adjust the antenna. Make sure the MUTE button is working. Press the SOURCE button. Make sure the program is plugged in. Check all wire connections. Press the MODE button to have a problem, first try operating it again. Make sure the remote has batteries. Make sure the TV is broadcasted in . Please check the digital signal strength and input antenna. • The display panel used...


