Owner Instructions
Page 3
... image quality. • HDTV program formats include 1080-line interlaced (1080i) and 720-line progressive (720p). Many HDTV programs are comparable to progressive-scan DVD movies in widescreen and are now broadcast with DD 5.1 soundtracks. English - 3 Digital television (DTV) is a new way of transmitting high quality video and audio to your home audio system. The first is Standard Definition Television (SDTV) and the second is Digital Television? A Guide to Digital TV...
... image quality. • HDTV program formats include 1080-line interlaced (1080i) and 720-line progressive (720p). Many HDTV programs are comparable to progressive-scan DVD movies in widescreen and are now broadcast with DD 5.1 soundtracks. English - 3 Digital television (DTV) is a new way of transmitting high quality video and audio to your home audio system. The first is Standard Definition Television (SDTV) and the second is Digital Television? A Guide to Digital TV...
Owner Instructions
Page 5
... pay a monthly or per-program charge to receive OTA broadcast DTV programs. The good news is currently incompatible with many existing TV antennas. Once the DTV signal level exceeds a certain threshold at the receiver, the digital video and audio data is it to produce high-quality images and sound. So you will hear the sound if you need a different antenna. I connect an antenna in standby mode. Note that is that...
... pay a monthly or per-program charge to receive OTA broadcast DTV programs. The good news is currently incompatible with many existing TV antennas. Once the DTV signal level exceeds a certain threshold at the receiver, the digital video and audio data is it to produce high-quality images and sound. So you will hear the sound if you need a different antenna. I connect an antenna in standby mode. Note that is that...
Owner Instructions
Page 6
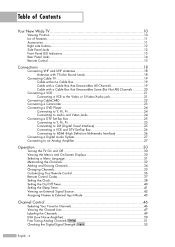
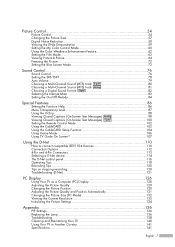
... Connecting a Digital Audio System 27 Connecting to an Analog Amplifier 27 Operation 30 Turning the TV On and Off 30 Viewing the Menus and On-Screen Displays 30 Selecting a Menu Language 31 Memorizing the Channels 32 Adding and Erasing Channels 34 Changing Channels 35 Customizing Your Remote Control 36 Remote Control Codes 37 Setting the Clock...38 Setting the On/Off Timer 40 Setting the Sleep Timer 41 Viewing an External Signal Source 42 Assigning Names to External Input Mode 43 Channel Control...
... Connecting a Digital Audio System 27 Connecting to an Analog Amplifier 27 Operation 30 Turning the TV On and Off 30 Viewing the Menus and On-Screen Displays 30 Selecting a Menu Language 31 Memorizing the Channels 32 Adding and Erasing Channels 34 Changing Channels 35 Customizing Your Remote Control 36 Remote Control Codes 37 Setting the Clock...38 Setting the On/Off Timer 40 Setting the Sleep Timer 41 Viewing an External Signal Source 42 Assigning Names to External Input Mode 43 Channel Control...
Owner Instructions
Page 7
... control panel 116 Operating Tips ...118 Recording Tips...120 Tips on stopping recording 120 Troubleshooting (D-Net 121 PC Display 126 Using Your TV as a Computer (PC) Display 126 Adjusting the Picture Quality 129 Changing the Picture Position 130 Adjusting the Picture Quality and Position Automatically 131 Changing the Picture Size (PC Mode 132 Viewing the Current Resolution 133 Initializing the Picture Settings 134 Appendix 136 PIP Settings ...136 Replacing the Lamp 136 Troubleshooting 138 Cleaning and Maintaining Your TV...
... control panel 116 Operating Tips ...118 Recording Tips...120 Tips on stopping recording 120 Troubleshooting (D-Net 121 PC Display 126 Using Your TV as a Computer (PC) Display 126 Adjusting the Picture Quality 129 Changing the Picture Position 130 Adjusting the Picture Quality and Position Automatically 131 Changing the Picture Size (PC Mode 132 Viewing the Current Resolution 133 Initializing the Picture Settings 134 Appendix 136 PIP Settings ...136 Replacing the Lamp 136 Troubleshooting 138 Cleaning and Maintaining Your TV...
Owner Instructions
Page 11
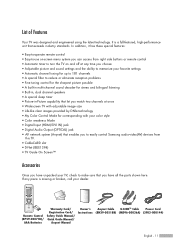
... timer • Picture-in-Picture capability that let you watch two channels at once • Widescreen TV with adjustable image size • Life-like clear images provided by DNle technology • My Color Control Mode for corresponding with your color style • Color weakness Mode • Digital Input (HDMI/DVI IN) jack • Digital Audio Output (OPTICAL) jack • AV network system (Anynet) that you to easily control Samsung audio-video(AV) devices from right side buttons or remote control...
... timer • Picture-in-Picture capability that let you watch two channels at once • Widescreen TV with adjustable image size • Life-like clear images provided by DNle technology • My Color Control Mode for corresponding with your color style • Color weakness Mode • Digital Input (HDMI/DVI IN) jack • Digital Audio Output (OPTICAL) jack • AV network system (Anynet) that you to easily control Samsung audio-video(AV) devices from right side buttons or remote control...
Owner Instructions
Page 13
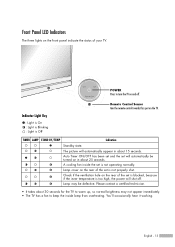
... Light Key : Light is On : Light is Blinking : Light is Off Remote Control Sensor Aim the remote control towards this spot on the rear of the set is not properly shut. Lamp may not appear immediately. • The TV has a fan to turn the TV on in about 25 seconds. You'll occasionally hear it working. Check if the ventilation hole on the front panel indicate the status of your TV. Auto Timer...
... Light Key : Light is On : Light is Blinking : Light is Off Remote Control Sensor Aim the remote control towards this spot on the rear of the set is not properly shut. Lamp may not appear immediately. • The TV has a fan to turn the TV on in about 25 seconds. You'll occasionally hear it working. Check if the ventilation hole on the front panel indicate the status of your TV. Auto Timer...
Owner Instructions
Page 14
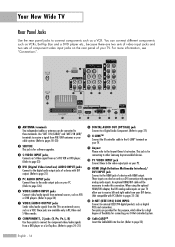
... for software upgrades. ˇ S-VIDEO INPUT jacks Connects an S-Video signal from an S-VHS VCR or DVD player. (Refer to page 23) ¨ DVI (Digital Video Interface) AUDIO INPUT jacks Connect to the digital audio output jacks of component video input jacks on your TV. Ô Anynet Please refer to the Anynet Owner's Instruction. These inputs can be necessary to make this purpose, which allow you to receive left and right audio from a DVD player or a Set-Top Box. (Refer...
... for software upgrades. ˇ S-VIDEO INPUT jacks Connects an S-Video signal from an S-VHS VCR or DVD player. (Refer to page 23) ¨ DVI (Digital Video Interface) AUDIO INPUT jacks Connect to the digital audio output jacks of component video input jacks on your TV. Ô Anynet Please refer to the Anynet Owner's Instruction. These inputs can be necessary to make this purpose, which allow you to receive left and right audio from a DVD player or a Set-Top Box. (Refer...
Owner Instructions
Page 15
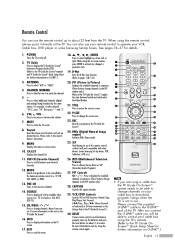
.... POWER Turns the TV on the TV screen. 17. PIP (Picture In Picture) Displays the available channels in sequence. (These buttons change channels on your cable box to download program listings when the TV is not functioning properly, take out the batteries and press the reset button for further information on -screen menu. 10. DNIe (Digital Natural Image engine) Activates DNIe Demo mode. 25. Re-insert the batteries and try using the TV's remote. (Refer to the TV Guide On ScreenTM Quick Setup...
.... POWER Turns the TV on the TV screen. 17. PIP (Picture In Picture) Displays the available channels in sequence. (These buttons change channels on your cable box to download program listings when the TV is not functioning properly, take out the batteries and press the reset button for further information on -screen menu. 10. DNIe (Digital Natural Image engine) Activates DNIe Demo mode. 25. Re-insert the batteries and try using the TV's remote. (Refer to the TV Guide On ScreenTM Quick Setup...
Owner Instructions
Page 24
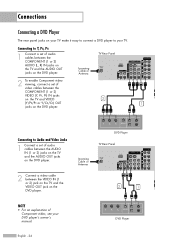
... jacks on the DVD player. 2 Connect a video cable between the COMPONENT (1 or 2) AUDIO (L, R) IN jacks on the TV and the AUDIO OUT jacks on the DVD player. DVD Player TV Rear Panel Incoming Cable or Antenna 2 1 NOTE • For an explanation of audio cables between the VIDEO IN (1 or 2) jack on the TV and the VIDEO OUT jack on the DVD player. English - 24 DVD Player Connections Connecting a DVD Player The rear panel jacks on your TV make it easy to connect a DVD player to your DVD player's owner's manual.
... jacks on the DVD player. 2 Connect a video cable between the COMPONENT (1 or 2) AUDIO (L, R) IN jacks on the TV and the AUDIO OUT jacks on the DVD player. DVD Player TV Rear Panel Incoming Cable or Antenna 2 1 NOTE • For an explanation of audio cables between the VIDEO IN (1 or 2) jack on the TV and the VIDEO OUT jack on the DVD player. English - 24 DVD Player Connections Connecting a DVD Player The rear panel jacks on your TV make it easy to connect a DVD player to your DVD player's owner's manual.
Owner Instructions
Page 25
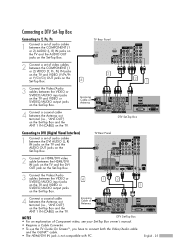
... Box owner's manual. • Requires a Cable Converter. • To use the TV Guide On ScreenTM, you have to DVI (Digital Visual Interface) 1 Connect a set of video cables between the COMPONENT (1 or 2) VIDEO (Y, PB, PR) IN jacks on the TV and VIDEO (Y/PB/PR 3 or Y/CB/CR) OUT jacks on the Set-Top Box. 4 2 1 3 Connect the Video/Audio cables between the COMPONENT (1 or 2) AUDIO (L, R) IN jacks on the TV and the AUDIO OUT jacks on the TV. TV Rear Panel 2 Connect an HDMI/DVI video cable...
... Box owner's manual. • Requires a Cable Converter. • To use the TV Guide On ScreenTM, you have to DVI (Digital Visual Interface) 1 Connect a set of video cables between the COMPONENT (1 or 2) VIDEO (Y, PB, PR) IN jacks on the TV and VIDEO (Y/PB/PR 3 or Y/CB/CR) OUT jacks on the Set-Top Box. 4 2 1 3 Connect the Video/Audio cables between the COMPONENT (1 or 2) AUDIO (L, R) IN jacks on the TV and the AUDIO OUT jacks on the TV. TV Rear Panel 2 Connect an HDMI/DVI video cable...
Owner Instructions
Page 27
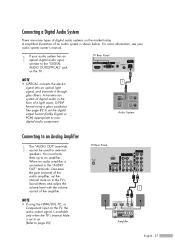
... TV's Sound Menu and adjust the volume level with the volume control of the audio amplifier, set the digital output format (Dolby Digital or PCM) appropriate to your audio system has an optical digital audio input, connect to an amplifier. NOTE • If using a glass conductor. A simplified illustration of digital audio systems on . (Refer to page 83) TV Rear Panel 1 Amplifier English - 27 You must hook them up to the "DIGITAL AUDIO OUT(OPTICAL)" jack on the TV, the audio output signal...
... TV's Sound Menu and adjust the volume level with the volume control of the audio amplifier, set the digital output format (Dolby Digital or PCM) appropriate to your audio system has an optical digital audio input, connect to an amplifier. NOTE • If using a glass conductor. A simplified illustration of digital audio systems on . (Refer to page 83) TV Rear Panel 1 Amplifier English - 27 You must hook them up to the "DIGITAL AUDIO OUT(OPTICAL)" jack on the TV, the audio output signal...
Owner Instructions
Page 30
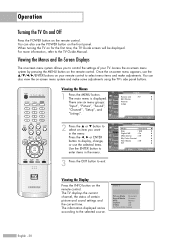
... displayed. Picture Input Mode : Standard √ Picture Size Digital NR : 16:9 : On √ √ Sound DNIe Demo : Off √ My Color Control √ Channel Film Mode : Off √ Setup PIP √ Listings Move Enter Return 3 Press the EXIT button to the TV Guide Manual. Operation Turning the TV On and Off Press the POWER button on the remote control. Viewing the Display Press the INFO button on the remote control. You can also view the on -screen menu system allows you want in the menu. Viewing...
... displayed. Picture Input Mode : Standard √ Picture Size Digital NR : 16:9 : On √ √ Sound DNIe Demo : Off √ My Color Control √ Channel Film Mode : Off √ Setup PIP √ Listings Move Enter Return 3 Press the EXIT button to the TV Guide Manual. Operation Turning the TV On and Off Press the POWER button on the remote control. Viewing the Display Press the INFO button on the remote control. You can also view the on -screen menu system allows you want in the menu. Viewing...
Owner Instructions
Page 33
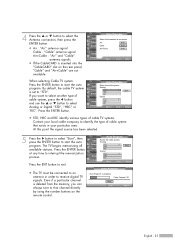
... rear panel, "Cable" and "Air+Cable" are not available. Even if a particular channel is deleted from the memory, you want to start the auto program. If you can always tune to that exists in your local cable company to "STD". Input Picture Sound Channel Setup Listings Auto Program Select the antennas to receive digital TV signals. or † button to select the Antenna connection, then press the ENTER button. • Air : "Air" antenna signal Cable : "Cable" antenna signal Air+Cable : "Air" and "Cable" antenna signals...
... rear panel, "Cable" and "Air+Cable" are not available. Even if a particular channel is deleted from the memory, you want to start the auto program. If you can always tune to that exists in your local cable company to "STD". Input Picture Sound Channel Setup Listings Auto Program Select the antennas to receive digital TV signals. or † button to select the Antenna connection, then press the ENTER button. • Air : "Air" antenna signal Cable : "Cable" antenna signal Air+Cable : "Air" and "Cable" antenna signals...
Owner Instructions
Page 38
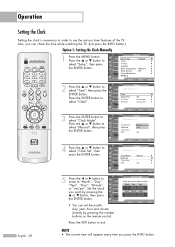
... -Minute Year ---am /pm". Move Adjust Return Press the EXIT button to select "Setup", then press the ENTER button. Setup Input Picture Sound Channel Setup Listings Language : English √ Time √ V-Chip √ Caption √ Menu Transparency : Medium √ Blue Screen : Off √ Color Weakness √ ▼ More Move Enter Return 2 Press the ... or † button to use the various timer features of the TV. Operation Setting the Clock Setting the clock is necessary in...
... -Minute Year ---am /pm". Move Adjust Return Press the EXIT button to select "Setup", then press the ENTER button. Setup Input Picture Sound Channel Setup Listings Language : English √ Time √ V-Chip √ Caption √ Menu Transparency : Medium √ Blue Screen : Off √ Color Weakness √ ▼ More Move Enter Return 2 Press the ... or † button to use the various timer features of the TV. Operation Setting the Clock Setting the clock is necessary in...
Owner Instructions
Page 40
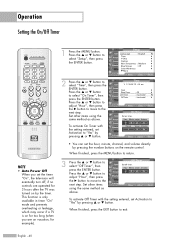
...; Setup Listings Move Enter Return Input Picture Sound Channel Setup Listings On Timer Set on timer. or † button to return. 3 Press the ... Set other items using the same method as above . or † button. Setup Input Picture Sound Channel Setup Listings Language : English √ Time √ V-Chip √ Caption √ Menu Transparency : Medium √ Blue Screen : Off √ Color Weakness √ ▼ More Move Enter Return Time Input 1/ 1/ 2005/ 12 : 00 am No ▼ Move Adjust Return To activate Off Timer with...
...; Setup Listings Move Enter Return Input Picture Sound Channel Setup Listings On Timer Set on timer. or † button to return. 3 Press the ... Set other items using the same method as above . or † button. Setup Input Picture Sound Channel Setup Listings Language : English √ Time √ V-Chip √ Caption √ Menu Transparency : Medium √ Blue Screen : Off √ Color Weakness √ ▼ More Move Enter Return Time Input 1/ 1/ 2005/ 12 : 00 am No ▼ Move Adjust Return To activate Off Timer with...
Owner Instructions
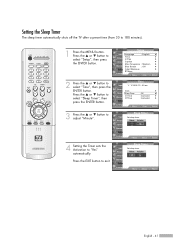
Page 41
...Picture Sound Channel Setup Listings Language : English √ Time √ V-Chip √ Caption √ Menu Transparency : Medium √ Blue Screen : Off √ Color Weakness √ ▼ More Move Enter Return Time Input 1/ 1/ 2005/ 12 : 00 am Picture Clock √ Sound Sleep Timer : Off √ Channel On Timer Off Timer : Inactivated √ : Inactivated √ Setup Listings Move Enter Return Input Picture Sound Channel Setup Listings Sleep Timer Set sleep timer. Setting the Sleep Timer The sleep timer automatically shuts off the TV...
...Picture Sound Channel Setup Listings Language : English √ Time √ V-Chip √ Caption √ Menu Transparency : Medium √ Blue Screen : Off √ Color Weakness √ ▼ More Move Enter Return Time Input 1/ 1/ 2005/ 12 : 00 am Picture Clock √ Sound Sleep Timer : Off √ Channel On Timer Off Timer : Inactivated √ : Inactivated √ Setup Listings Move Enter Return Input Picture Sound Channel Setup Listings Sleep Timer Set sleep timer. Setting the Sleep Timer The sleep timer automatically shuts off the TV...
Owner Instructions
Page 60
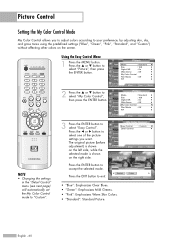
... √ Return • "Blue": Emphasizes Clear Blues. • "Green": Emphasizes Mild Greens. • "Pink": Emphasizes Warm Skin Colors. • "Standard": Standard Picture. NOTE • Changing the settings in the "Detail Control" menu (see next page) will automatically set the My Color Control mode to select "My Color Control", then press the ENTER button. or † button to "Custom". My Color Control Input Easy Control : Custom √ Picture Detail Control √ Sound Channel Setup Listings Move Enter Return Original...
... √ Return • "Blue": Emphasizes Clear Blues. • "Green": Emphasizes Mild Greens. • "Pink": Emphasizes Warm Skin Colors. • "Standard": Standard Picture. NOTE • Changing the settings in the "Detail Control" menu (see next page) will automatically set the My Color Control mode to select "My Color Control", then press the ENTER button. or † button to "Custom". My Color Control Input Easy Control : Custom √ Picture Detail Control √ Sound Channel Setup Listings Move Enter Return Original...
Owner Instructions
Page 88
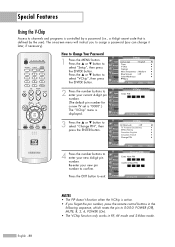
... ENTER button. English - 88 Picture * (The default pin number for Sound a new TV set is "0000".) Channel The "V-Chip" menu is defined by a password (i.e., a 4-digit secret code that is Setup displayed. or † button to select "Change PIN", then press the ENTER button. 4 Press the number buttons to assign a password (you can change it later, if necessary). The on-screen menu will instruct you forget the pin number, press the remote control buttons in the following sequence, which resets...
... ENTER button. English - 88 Picture * (The default pin number for Sound a new TV set is "0000".) Channel The "V-Chip" menu is defined by a password (i.e., a 4-digit secret code that is Setup displayed. or † button to select "Change PIN", then press the ENTER button. 4 Press the number buttons to assign a password (you can change it later, if necessary). The on-screen menu will instruct you forget the pin number, press the remote control buttons in the following sequence, which resets...
Owner Instructions
Page 136
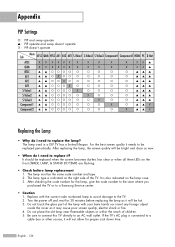
... a cable box or other source, it will be replaced periodically. If the TV's AC plug is indicated on the lamp case. 3. The lamp must be replaced when the screen becomes darker, less clear or when all three LEDs on the front (TIMER, LAMP, & STAND BY/TEMP) are flashing. • Check before replacing the lamp as it will be bright and clear as it needs to be hot. 3. For the best screen...
... a cable box or other source, it will be replaced periodically. If the TV's AC plug is indicated on the lamp case. 3. The lamp must be replaced when the screen becomes darker, less clear or when all three LEDs on the front (TIMER, LAMP, & STAND BY/TEMP) are flashing. • Check before replacing the lamp as it will be bright and clear as it needs to be hot. 3. For the best screen...
Owner Instructions
Page 138
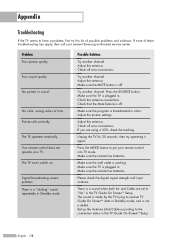
... sound. Your remote control does not operate your TV. Adjust the antenna. Adjust the picture settings. Digital broadcasting screen problem. Set up the Antenna (Air)/Cable according to "Yes" in the TV Guide On ScreenTM Setup. Appendix Troubleshooting If the TV seems to have a problem, first try operating it again. Problem Poor picture quality. Poor sound quality. Picture rolls vertically. There is a sound when both Air and Cable are using a VCR, check the tracking. Try another channel. Check the antenna connections. If you are set to the connection...
... sound. Your remote control does not operate your TV. Adjust the antenna. Adjust the picture settings. Digital broadcasting screen problem. Set up the Antenna (Air)/Cable according to "Yes" in the TV Guide On ScreenTM Setup. Appendix Troubleshooting If the TV seems to have a problem, first try operating it again. Problem Poor picture quality. Poor sound quality. Picture rolls vertically. There is a sound when both Air and Cable are using a VCR, check the tracking. Try another channel. Check the antenna connections. If you are set to the connection...


