
User Manual (user Manual) (ver.1.0) (English)
Page 2
... National Electrical Code (Section 54 of Canadian Electrical Code, Part I), that provides guidelines for proper grounding and, in particular, specifies that unauthorized recording of copyrighted TV programs is present inside part of plug to operate it.
... National Electrical Code (Section 54 of Canadian Electrical Code, Part I), that provides guidelines for proper grounding and, in particular, specifies that unauthorized recording of copyrighted TV programs is present inside part of plug to operate it.

User Manual (user Manual) (ver.1.0) (English)
Page 3
Your new Samsung Projection TV represents the latest in water is a possibility, such as near a radiator or heat register. do not place the TV receiver on a bed, sofa, rug, or other . Follow the manufacturer's instructions when mounting the unit, and use liquid or aerosol ...fit, contact your outlet. 1 SAFETY Use a damp cloth; For your TV. • Keep the safety and operating instructions for mounting. • Operate your TV receiver. Thank You for Choosing Samsung Thank you for the TV receiver. We designed it one of the manufacturer. Important Safety Information Always be...
Your new Samsung Projection TV represents the latest in water is a possibility, such as near a radiator or heat register. do not place the TV receiver on a bed, sofa, rug, or other . Follow the manufacturer's instructions when mounting the unit, and use liquid or aerosol ...fit, contact your outlet. 1 SAFETY Use a damp cloth; For your TV. • Keep the safety and operating instructions for mounting. • Operate your TV receiver. Thank You for Choosing Samsung Thank you for the TV receiver. We designed it one of the manufacturer. Important Safety Information Always be...
User Manual (user Manual) (ver.1.0) (English)
Page 4
...is grounded so as the original part. An outside antenna or cable system is connected to the following the operating instructions - if the TV has been exposed to determine that may cause undesired operation. Unauthorized substitutions may result in additional damage to the unit. • Upon...provide some protection against them. This device complies with such lines can be walked on or pinched by a qualified technician to restore the TV to normal. • When replacement parts are covered by the manufacturer or those that they can fall into the unit - This ...
...is grounded so as the original part. An outside antenna or cable system is connected to the following the operating instructions - if the TV has been exposed to determine that may cause undesired operation. Unauthorized substitutions may result in additional damage to the unit. • Upon...provide some protection against them. This device complies with such lines can be walked on or pinched by a qualified technician to restore the TV to normal. • When replacement parts are covered by the manufacturer or those that they can fall into the unit - This ...

User Manual (user Manual) (ver.1.0) (English)
Page 6
... Antennas 2.1 Antennas with 300-ohm Flat Twin Leads 2.1 Antennas with 75-ohm Round Leads 2.2 Separate VHF and UHF Antennas 2.2 Connecting Cable TV 2.2 Cable without a Cable Box 2.2 Connecting to a Cable Box that Descrambles All Channels 2.3 Connecting to a Cable Box that Descrambles some ...Channels 2.3 Connecting a VCR 2.5 Connecting a Second VCR to Record from the TV 2.6 Connecting a Camcorder 2.6 Connecting a DVD Player, DTV Set-Top Box (480i, 480p, 1080i) . . .2.7 Connecting a DTV Set-Top Box (...
... Antennas 2.1 Antennas with 300-ohm Flat Twin Leads 2.1 Antennas with 75-ohm Round Leads 2.2 Separate VHF and UHF Antennas 2.2 Connecting Cable TV 2.2 Cable without a Cable Box 2.2 Connecting to a Cable Box that Descrambles All Channels 2.3 Connecting to a Cable Box that Descrambles some ...Channels 2.3 Connecting a VCR 2.5 Connecting a Second VCR to Record from the TV 2.6 Connecting a Camcorder 2.6 Connecting a DVD Player, DTV Set-Top Box (480i, 480p, 1080i) . . .2.7 Connecting a DTV Set-Top Box (...
User Manual (user Manual) (ver.1.0) (English)
Page 7
... Using Automatic Sound Settings 3.18 Setting the Clock 3.19 Option 1: Setting the Clock Manually 3.19 Option 2: Using the Local PBS Channel to Automatically Set the TV Clock 3.20 Chapter 4: Special Features 4.1 Fine Tuning Channels 4.1 Digital Noise Reduction 4.2 Changing the Screen Size 4.3 Using the R.surf Feature 4.4 Setting the On/...14 Setting Up Your Personal ID Number (PIN 4.14 How to Enable/Disable the V-Chip 4.15 How to Set up Restrictions Using the "TV guidelines" . . . .4.15 How to Set up Restrictions using the MPAA Ratings: G, PG, PG-13, R, NC-17, X 4.17 How to Reset the...
... Using Automatic Sound Settings 3.18 Setting the Clock 3.19 Option 1: Setting the Clock Manually 3.19 Option 2: Using the Local PBS Channel to Automatically Set the TV Clock 3.20 Chapter 4: Special Features 4.1 Fine Tuning Channels 4.1 Digital Noise Reduction 4.2 Changing the Screen Size 4.3 Using the R.surf Feature 4.4 Setting the On/...14 Setting Up Your Personal ID Number (PIN 4.14 How to Enable/Disable the V-Chip 4.15 How to Set up Restrictions Using the "TV guidelines" . . . .4.15 How to Set up Restrictions using the MPAA Ratings: G, PG, PG-13, R, NC-17, X 4.17 How to Reset the...
User Manual (user Manual) (ver.1.0) (English)
Page 8
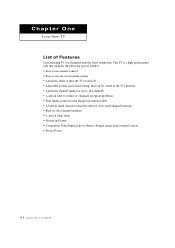
Chapter One YOUR NEW TV List of Features Your Samsung TV was designed with the latest technology. This TV is a high-performance unit that includes the following special features: • Easy-to-use remote control • Easy-to-use on-screen menu system • Automatic timer to turn the TV on and off •...; Adjustable picture and sound settings that can be stored in the TV's memory • Automatic channel tuning for up to 181 channels • A special filter to reduce ...
Chapter One YOUR NEW TV List of Features Your Samsung TV was designed with the latest technology. This TV is a high-performance unit that includes the following special features: • Easy-to-use remote control • Easy-to-use on-screen menu system • Automatic timer to turn the TV on and off •...; Adjustable picture and sound settings that can be stored in the TV's memory • Automatic channel tuning for up to 181 channels • A special filter to reduce ...
User Manual (user Manual) (ver.1.0) (English)
Page 9
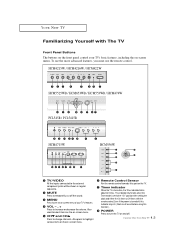
... if the power is set before using this spot on the TV. ∏ Timer indicator When the TV is turned on -screen menu. Also used to increase or decrease the volume. HCM4215W / HCM4216W / HCM422W HCM5525WB / HCM653WB / HCM553WB / HCM474W PCL545R / PCL5415R HCM4715W HCM556W Œ TV/VIDEO All the inputs connected to the external component jacks...
... if the power is set before using this spot on the TV. ∏ Timer indicator When the TV is turned on -screen menu. Also used to increase or decrease the volume. HCM4215W / HCM4216W / HCM422W HCM5525WB / HCM653WB / HCM553WB / HCM474W PCL545R / PCL5415R HCM4715W HCM556W Œ TV/VIDEO All the inputs connected to the external component jacks...

User Manual (user Manual) (ver.1.0) (English)
Page 10
... 1 Press the symbol " " in the center of the door and pull it up in the direction arrow as shown in figure. 1.3 CHAPTER ONE: YOUR NEW TV HCM556W 1 Hold the center of the door and lift it down as shown in the Factory. ´ VIDEO INPUT jack Use to connect a video signal... more than 5 inches tall and leave one inch of door and lift it down as shown in figure. 2 After placing a TV (or VCR, DVD, etc.) on the Component Shelf. YOUR NEW TV Front or Side Panel Jacks You can place a VCR, a DVD player, etc. Using the Component Shelf (HCM5525WB/HCM653WB/HCM553WB/HCM474W...
... 1 Press the symbol " " in the center of the door and pull it up in the direction arrow as shown in figure. 1.3 CHAPTER ONE: YOUR NEW TV HCM556W 1 Hold the center of the door and lift it down as shown in the Factory. ´ VIDEO INPUT jack Use to connect a video signal... more than 5 inches tall and leave one inch of door and lift it down as shown in figure. 2 After placing a TV (or VCR, DVD, etc.) on the Component Shelf. YOUR NEW TV Front or Side Panel Jacks You can place a VCR, a DVD player, etc. Using the Component Shelf (HCM5525WB/HCM653WB/HCM553WB/HCM474W...
User Manual (user Manual) (ver.1.0) (English)
Page 11
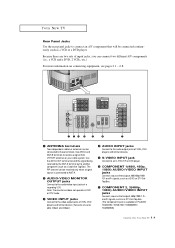
...terminal to send the signal being received by the ANT-A terminal out to receive a signal from VHF/UHF antennas or your cable system. YOUR NEW TV Rear Panel Jacks Use the rear panel jacks to connect an A/V component that outputs 480p/1080i Y, PB and PR signals, such as a DTV ... can connect two different A/V components (i.e., a VCR and a DVD, 2 VCRs, etc.) For more information on PCL545R/ HCM422W / HCM474W / HCM553WB / HCM653WB) 1.4 CHAPTER ONE: YOUR NEW TV Note: The monitor out does not operate in DVD or DTV mode. ˇ VIDEO INPUT jacks Connect to the video output jacks of VCRs, DVD...
...terminal to send the signal being received by the ANT-A terminal out to receive a signal from VHF/UHF antennas or your cable system. YOUR NEW TV Rear Panel Jacks Use the rear panel jacks to connect an A/V component that outputs 480p/1080i Y, PB and PR signals, such as a DTV ... can connect two different A/V components (i.e., a VCR and a DVD, 2 VCRs, etc.) For more information on PCL545R/ HCM422W / HCM474W / HCM553WB / HCM653WB) 1.4 CHAPTER ONE: YOUR NEW TV Note: The monitor out does not operate in DVD or DTV mode. ˇ VIDEO INPUT jacks Connect to the video output jacks of VCRs, DVD...
User Manual (user Manual) (ver.1.0) (English)
Page 12
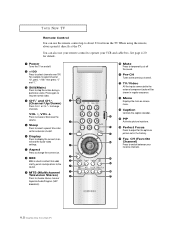
... picture. ı Perfect Focus Press to adjust for details. Œ Power Turns the TV on and off. ´ +100 Press to select channels over 100. When using the remote, always point it... directly at the TV. " BBE BBE is a built-in effect that adds clarity, punch and dynamics to the sound. '...733; Mute Press to temporarily cut off the sound. Ô Pre-CH Tunes to the previous channel. TV/Video All the inputs connected to the external component jacks will be shown in regular sequence. Ò Menu Displays ...
... picture. ı Perfect Focus Press to adjust for details. Œ Power Turns the TV on and off. ´ +100 Press to select channels over 100. When using the remote, always point it... directly at the TV. " BBE BBE is a built-in effect that adds clarity, punch and dynamics to the sound. '...733; Mute Press to temporarily cut off the sound. Ô Pre-CH Tunes to the previous channel. TV/Video All the inputs connected to the external component jacks will be shown in regular sequence. Ò Menu Displays ...
User Manual (user Manual) (ver.1.0) (English)
Page 13
Locate Press to move the PIP window to any of the four corners of this Samsung remote control, so that is currently displayed on models HCM5525WB/ HCM4715W/HCM4215W/ HCM4216W/PCL5415R. Scan Press to set up and activate the parental locks. - Size Press to make the PIP window ... ANT A or ANT B. ˘ R.surf Press to automatically return to a preferred channel after a userpreset time delay. ¿ S.Mode Adjust the TV sound by selecting one of the preset factory settings (or select your personal, customized picture settings). ˛ VCR controls Controls VCR tape functions: Rewind, ...
Locate Press to move the PIP window to any of the four corners of this Samsung remote control, so that is currently displayed on models HCM5525WB/ HCM4715W/HCM4215W/ HCM4216W/PCL5415R. Scan Press to set up and activate the parental locks. - Size Press to make the PIP window ... ANT A or ANT B. ˘ R.surf Press to automatically return to a preferred channel after a userpreset time delay. ¿ S.Mode Adjust the TV sound by selecting one of the preset factory settings (or select your personal, customized picture settings). ˛ VCR controls Controls VCR tape functions: Rewind, ...
User Manual (user Manual) (ver.1.0) (English)
Page 15
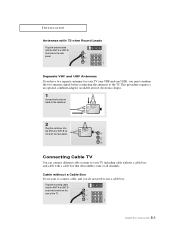
...at most electronics shops). 1 Connect both antenna leads to the combiner. 2 Plug the combiner into the ANT-A or ANT-B terminal on the rear of the TV. 2.2 CHAPTER TWO: INSTALLATION Cable without a cable box, and cable with 75-ohm Round Leads Plug the antenna lead into the ANT-A or ANT-B antenna ... Antennas with a cable box that descrambles some or all channels. Separate VHF and UHF Antennas If you have two separate antennas for your TV, including cable without a Cable Box If you want to connect cable, and you must combine the two antenna signals before connecting the antennas to use ...
...at most electronics shops). 1 Connect both antenna leads to the combiner. 2 Plug the combiner into the ANT-A or ANT-B terminal on the rear of the TV. 2.2 CHAPTER TWO: INSTALLATION Cable without a cable box, and cable with 75-ohm Round Leads Plug the antenna lead into the ANT-A or ANT-B antenna ... Antennas with a cable box that descrambles some or all channels. Separate VHF and UHF Antennas If you have two separate antennas for your TV, including cable without a Cable Box If you want to connect cable, and you must combine the two antenna signals before connecting the antennas to use ...
User Manual (user Manual) (ver.1.0) (English)
Page 16
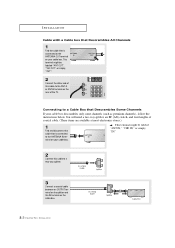
... is connected to the ANTENNA IN terminal on your cable box. You will need a two-way splitter, an RF (A/B) switch, and four lengths of the TV.
... is connected to the ANTENNA IN terminal on your cable box. You will need a two-way splitter, an RF (A/B) switch, and four lengths of the TV.
User Manual (user Manual) (ver.1.0) (English)
Page 17
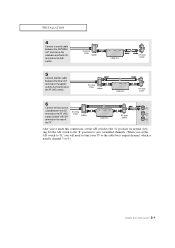
... RF (A/B) switch. 6 Connect the last coaxial cable between the OUT terminal on the RF (A/B) switch and the VHF/UHF terminal on the rear of the TV. After you've made this connection, set the A/B switch to "B," you set the A/B switch to the cable box's output channel, which is usually channel 3 or... 4.) 2.4 CHAPTER TWO: INSTALLATION Set the A/B switch to the "B" position to view scrambled channels. (When you will need to tune your TV to the "A" position for normal viewing.
... RF (A/B) switch. 6 Connect the last coaxial cable between the OUT terminal on the RF (A/B) switch and the VHF/UHF terminal on the rear of the TV. After you've made this connection, set the A/B switch to "B," you set the A/B switch to the cable box's output channel, which is usually channel 3 or... 4.) 2.4 CHAPTER TWO: INSTALLATION Set the A/B switch to the "B" position to view scrambled channels. (When you will need to tune your TV to the "A" position for normal viewing.
User Manual (user Manual) (ver.1.0) (English)
Page 18
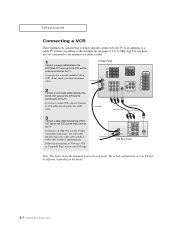
... out using only one audio cable. 3 Connect a video cable between the ANTENNA OUT terminal on the VCR and the antenna terminal on the TV. If you have not yet connected to view your local electronics store). 2 Connect a set of audio cables between the AUDIO OUT jacks on... the VCR and the VIDEO jack on pages 2.1-2.3). Note: This figure shows the Standard Connector-jack panel. The actual configuration on your TV to an antenna or a cable TV system (according to video 1 simultaneously. INSTALLATION Connecting a VCR These instructions assume that you have a S-VHS VCR, use the S-Video...
... out using only one audio cable. 3 Connect a video cable between the ANTENNA OUT terminal on the VCR and the antenna terminal on the TV. If you have not yet connected to view your local electronics store). 2 Connect a set of audio cables between the AUDIO OUT jacks on... the VCR and the VIDEO jack on pages 2.1-2.3). Note: This figure shows the Standard Connector-jack panel. The actual configuration on your TV to an antenna or a cable TV system (according to video 1 simultaneously. INSTALLATION Connecting a VCR These instructions assume that you have a S-VHS VCR, use the S-Video...

User Manual (user Manual) (ver.1.0) (English)
Page 19
... AUDIO OUTPUT jack on the camcorder and the AUDIO terminals on the VCR. The actual configuration on your TV may be different, depending on your TV make it easy to connect a camcorder to your TV. They allow you to view the camcorder tapes without using only one audio cable. 3 Connect a video cable ... your second VCR as follows: 1 Connect a set of two cables. To do this kind of connection. INSTALLATION Connecting a Second VCR to Record from the TV Your TV can send out signals of its picture and sound to be either on the front or rear of the VCR.) 2 Connect a video cable between the...
... AUDIO OUTPUT jack on the camcorder and the AUDIO terminals on the VCR. The actual configuration on your TV may be different, depending on your TV make it easy to connect a camcorder to your TV. They allow you to view the camcorder tapes without using only one audio cable. 3 Connect a video cable ... your second VCR as follows: 1 Connect a set of two cables. To do this kind of connection. INSTALLATION Connecting a Second VCR to Record from the TV Your TV can send out signals of its picture and sound to be either on the front or rear of the VCR.) 2 Connect a video cable between the...
User Manual (user Manual) (ver.1.0) (English)
Page 20
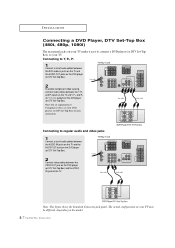
...video jacks 1 Connect a set of audio cables between the DVD audio in jacks on the TV and the AUDIO OUT jacks on the DVD player (or DTV Set-Top Box). 2 To...Connecting to your DVD player's (or DTV Set-Top Box) owner's instruction. The actual configuration on your TV may be different, depending on your TV make it easy to connect a DVD player (or DTV Set-Top Box) to Y, PB, PR ...Set-Top Box). 2 Connect video cables between the Y, PB, and PR inputs on the TV and Y, PB, and PR (or Y, CB, CR) outputs on the TV. INSTALLATION Connecting a DVD Player, DTV Set-Top Box (480i, 480p, 1080i) The rear...
...video jacks 1 Connect a set of audio cables between the DVD audio in jacks on the TV and the AUDIO OUT jacks on the DVD player (or DTV Set-Top Box). 2 To...Connecting to your DVD player's (or DTV Set-Top Box) owner's instruction. The actual configuration on your TV may be different, depending on your TV make it easy to connect a DVD player (or DTV Set-Top Box) to Y, PB, PR ...Set-Top Box). 2 Connect video cables between the Y, PB, and PR inputs on the TV and Y, PB, and PR (or Y, CB, CR) outputs on the TV. INSTALLATION Connecting a DVD Player, DTV Set-Top Box (480i, 480p, 1080i) The rear...

User Manual (user Manual) (ver.1.0) (English)
Page 21
... Settop box's owner's instruction. 2.8 CHAPTER TWO: INSTALLATION Note: For an explanation of audio cables between the DTV Set-Top Box audio in jacks on the TV and the AUDIO OUT jacks on the DTV Set-Top box. 2 To enable Component video viewing, connect video cables between the Y, PB, and PR inputs... on the TV and Y, PB, and PR (or Y, CB, CR) outputs on the DTV Set-Top box. INSTALLATION Connecting a DTV Set-Top Box (480p, 1080i) When switching to...
... Settop box's owner's instruction. 2.8 CHAPTER TWO: INSTALLATION Note: For an explanation of audio cables between the DTV Set-Top Box audio in jacks on the TV and the AUDIO OUT jacks on the DTV Set-Top box. 2 To enable Component video viewing, connect video cables between the Y, PB, and PR inputs... on the TV and Y, PB, and PR (or Y, CB, CR) outputs on the DTV Set-Top box. INSTALLATION Connecting a DTV Set-Top Box (480p, 1080i) When switching to...
User Manual (user Manual) (ver.1.0) (English)
Page 22
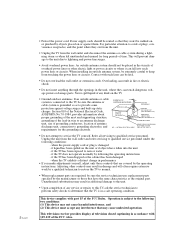
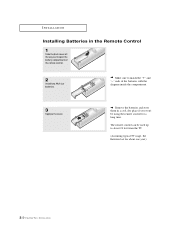
... inside the compartment. 3 Replace the cover. INSTALLATION Installing Batteries in a cool, dry place if you won't be used up to about 23 feet from the TV. (Assuming typical TV usage, the Batteries last for a long time.
... inside the compartment. 3 Replace the cover. INSTALLATION Installing Batteries in a cool, dry place if you won't be used up to about 23 feet from the TV. (Assuming typical TV usage, the Batteries last for a long time.
User Manual (user Manual) (ver.1.0) (English)
Page 23
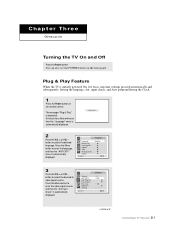
..." menu is initially powered On, five basic customer settings proceed automatically and subsequently: Setting the language, Ant. Chapter Three OPERATION Turning the TV On and Off Press the Power button. input check, and Auto program/Setting the Clock. 1 Press the Power button on the front...Antenna ANT/CATV Auto Program Fav. You can also use the POWER button on the remote control. continued... 3.1 CHAPTER THREE: TV OPERATION Plug & Play Feature When the TV is automatically displayed. Language Plug & Play Convergence Caption Time Auto Clock Set V-Chip Function : English 3 Press the VOL +...
..." menu is initially powered On, five basic customer settings proceed automatically and subsequently: Setting the language, Ant. Chapter Three OPERATION Turning the TV On and Off Press the Power button. input check, and Auto program/Setting the Clock. 1 Press the Power button on the front...Antenna ANT/CATV Auto Program Fav. You can also use the POWER button on the remote control. continued... 3.1 CHAPTER THREE: TV OPERATION Plug & Play Feature When the TV is automatically displayed. Language Plug & Play Convergence Caption Time Auto Clock Set V-Chip Function : English 3 Press the VOL +...


