

User Manual (user Manual) (ver.1.0) (English)
Page 2
... National Electrical Code (Section 54 of Canadian Electrical Code, Part I), that provides guidelines for proper grounding and, in particular, specifies that unauthorized recording of copyrighted TV programs is present inside part of U.S. Important: One Federal Court has held that the cable ground shall be in fire or electric shock hazard, do...
... National Electrical Code (Section 54 of Canadian Electrical Code, Part I), that provides guidelines for proper grounding and, in particular, specifies that unauthorized recording of copyrighted TV programs is present inside part of U.S. Important: One Federal Court has held that the cable ground shall be in fire or electric shock hazard, do...

User Manual (user Manual) (ver.1.0) (English)
Page 3
... and/or equipment without approval of power source indicated on the TV receiver and in television technology. Thank You for Choosing Samsung Thank you for ventilation to protect it from overheating. Your new Samsung Projection TV represents the latest in the operating instructions. • Follow all...a child or adult, and serious damage to the appliance. Do not block these safety precautions in the cabinet for choosing Samsung! If you place the TV receiver on a rack or bookcase, ensure that you've followed the manufacturer's instructions for future reference. • Heed ...
... and/or equipment without approval of power source indicated on the TV receiver and in television technology. Thank You for Choosing Samsung Thank you for ventilation to protect it from overheating. Your new Samsung Projection TV represents the latest in the operating instructions. • Follow all...a child or adult, and serious damage to the appliance. Do not block these safety precautions in the cabinet for choosing Samsung! If you place the TV receiver on a rack or bookcase, ensure that you've followed the manufacturer's instructions for future reference. • Heed ...

User Manual (user Manual) (ver.1.0) (English)
Page 4
... spilled on or against voltage surges and built-up static charges. This will often require extensive work by a qualified technician to restore the TV to normal. • When replacement parts are covered by objects placed on the unit or if objects have the same characteristics as to... the following two conditions: (1) This device may not cause harmful interference, and (2) This device must accept any kind on the TV. • Ground outdoor antennas. Overloading can be routed so that may result in damage and will prevent damage to the unit due to ...
... spilled on or against voltage surges and built-up static charges. This will often require extensive work by a qualified technician to restore the TV to normal. • When replacement parts are covered by objects placed on the unit or if objects have the same characteristics as to... the following two conditions: (1) This device may not cause harmful interference, and (2) This device must accept any kind on the TV. • Ground outdoor antennas. Overloading can be routed so that may result in damage and will prevent damage to the unit due to ...

User Manual (user Manual) (ver.1.0) (English)
Page 6
...a VCR 2.5 Connecting a Second VCR to Record from the TV 2.6 Connecting a Camcorder 2.6 Connecting a DVD (480i, 480p) Player 2.7 Connecting a DTV Set-Top Box (480p, 1080i 2.8 Connecting Surround Speakers (HCL552W/HCL652W/HCL473W/HCM553W/HCM653W only 2.8 Installing Batteries in the Remote Control... 2.9 Chapter 3: Operation 3.1 Turning the TV On and Off 3.1 Plug & Play Feature 3.1 Using the Perfect Focus Feature 3.3 ...
...a VCR 2.5 Connecting a Second VCR to Record from the TV 2.6 Connecting a Camcorder 2.6 Connecting a DVD (480i, 480p) Player 2.7 Connecting a DTV Set-Top Box (480p, 1080i 2.8 Connecting Surround Speakers (HCL552W/HCL652W/HCL473W/HCM553W/HCM653W only 2.8 Installing Batteries in the Remote Control... 2.9 Chapter 3: Operation 3.1 Turning the TV On and Off 3.1 Plug & Play Feature 3.1 Using the Perfect Focus Feature 3.3 ...

User Manual (user Manual) (ver.1.0) (English)
Page 7
... 3.18 Setting the Clock 3.19 Option 1: Setting the Clock Manually 3.19 Option 2: Using the Local PBS Channel to Automatically Set the TV Clock 3.20 Selecting a Signal Source (External A/V 3.21 Chapter 4: Special Features 4.1 Fine Tuning Channels 4.1 Digital Noise Reduction 4.2 Changing the... Screen Size 4.3 Using the R.surf Feature 4.4 Setting the On/Off Timer 4.5 Setting the Sleep Timer 4.6 Dolby Surround (HCL552W/HCL652W/HCL473W/HCM553W/HCM653W only 4.7 Choosing a Multi-Channel Sound (MTS) track 4.8 Auto Volume 4.9 Viewing Closed Captions 4.10 Viewing Picture-in-...
... 3.18 Setting the Clock 3.19 Option 1: Setting the Clock Manually 3.19 Option 2: Using the Local PBS Channel to Automatically Set the TV Clock 3.20 Selecting a Signal Source (External A/V 3.21 Chapter 4: Special Features 4.1 Fine Tuning Channels 4.1 Digital Noise Reduction 4.2 Changing the... Screen Size 4.3 Using the R.surf Feature 4.4 Setting the On/Off Timer 4.5 Setting the Sleep Timer 4.6 Dolby Surround (HCL552W/HCL652W/HCL473W/HCM553W/HCM653W only 4.7 Choosing a Multi-Channel Sound (MTS) track 4.8 Auto Volume 4.9 Viewing Closed Captions 4.10 Viewing Picture-in-...

User Manual (user Manual) (ver.1.0) (English)
Page 8
... accompanying caster trays (4 units). Depending on the carpet, make sure to obtain a sharper image from external sources • Perfect Focus (HCL652W/HCL6515W/HCL4715W/HCL473W/HCM5525W/ HCM553W/HCM6525W/HCM653W) Precautions When Moving and Installing the Unit • This Projection Television is moved. Care should be...Picture Component Video Input jacks to use it on the material of Features Your Samsung TV was designed with casters at its bottom, so it may get caught. 1.1 CHAPTER ONE: YOUR NEW TV When placing the caster tray beneath the casters, be moved easily. Chapter One...
... accompanying caster trays (4 units). Depending on the carpet, make sure to obtain a sharper image from external sources • Perfect Focus (HCL652W/HCL6515W/HCL4715W/HCL473W/HCM5525W/ HCM553W/HCM6525W/HCM653W) Precautions When Moving and Installing the Unit • This Projection Television is moved. Care should be...Picture Component Video Input jacks to use it on the material of Features Your Samsung TV was designed with casters at its bottom, so it may get caught. 1.1 CHAPTER ONE: YOUR NEW TV When placing the caster tray beneath the casters, be moved easily. Chapter One...

User Manual (user Manual) (ver.1.0) (English)
Page 9
.../HCM6525W/HCM653W) Press to increase or decrease the volume. YOUR NEW TV Familiarizing Yourself with the remote control. Also press to highlight various items on the on-screen menu. ˆ OPEN/CLOSE (HCL552W / HCL652W / HCL5515W / HCL6515W) Press to open and close the front panel.... When the menu appears, use the remote control. ▼ HCL552W HCL652W HCL5515W HCL6515W ▼ HCL4715W ▼ HCL473W HCM5525W HCM553W HCM6525W HCM653W Œ TV/VIDEO Press this function.) 1.2 CHAPTER ONE: YOUR NEW TV " Remote Control Sensor (HCL4715W/HCL473W/HCM5525W/ HCM553W/HCM6525W/HCM653W) Aim ...
.../HCM6525W/HCM653W) Press to increase or decrease the volume. YOUR NEW TV Familiarizing Yourself with the remote control. Also press to highlight various items on the on-screen menu. ˆ OPEN/CLOSE (HCL552W / HCL652W / HCL5515W / HCL6515W) Press to open and close the front panel.... When the menu appears, use the remote control. ▼ HCL552W HCL652W HCL5515W HCL6515W ▼ HCL4715W ▼ HCL473W HCM5525W HCM553W HCM6525W HCM653W Œ TV/VIDEO Press this function.) 1.2 CHAPTER ONE: YOUR NEW TV " Remote Control Sensor (HCL4715W/HCL473W/HCM5525W/ HCM553W/HCM6525W/HCM653W) Aim ...

User Manual (user Manual) (ver.1.0) (English)
Page 10
...: You should display only the component that is within 126mm high. When displaying a component in the Factory. YOUR NEW TV Front or Side Panel Jacks You can display a VCR, a DVD player, etc. Using a display deck (HCL473W/HCM5525W/HCM553W/ HCM6525W/HCM653W... in the display deck, please space it down as a camcorder or video game. (For information on connecting equipment, see pages 2.1 - 2.8.) ▲ HCL552W/HCL652W/HCL5515W/ HCL6515W ▲ HCL4715W ▲ HCL473W/HCM5525W/ HCM553W/HCM6525W/ HCM653W Œ S-VIDEO INPUT jack Use to connect an S-Video signal from a camcorder or...
...: You should display only the component that is within 126mm high. When displaying a component in the Factory. YOUR NEW TV Front or Side Panel Jacks You can display a VCR, a DVD player, etc. Using a display deck (HCL473W/HCM5525W/HCM553W/ HCM6525W/HCM653W... in the display deck, please space it down as a camcorder or video game. (For information on connecting equipment, see pages 2.1 - 2.8.) ▲ HCL552W/HCL652W/HCL5515W/ HCL6515W ▲ HCL4715W ▲ HCL473W/HCM5525W/ HCM553W/HCM6525W/ HCM653W Œ S-VIDEO INPUT jack Use to connect an S-Video signal from a camcorder or...

User Manual (user Manual) (ver.1.0) (English)
Page 11
...Connect to the video output jacks of VCRs, DVD players and similar devices (Two sets are two sets of a recording VCR. " SURROUND OUT (HCL552W/HCL652W/HCL473W/ HCM553W/HCM653W only) Connects to receive a signal from VHF/UHF antennas or your cable system. Use ANT-A and ANT-B terminals to a (optional)... rear-surround amp: Surround Left, Surround Right and Center. 1.4 CHAPTER ONE: YOUR NEW TV Use the ANT-A OUT terminal to send the signal being received by the ANT-A terminal out to another component (such as a DTV Set-Top Box...
...Connect to the video output jacks of VCRs, DVD players and similar devices (Two sets are two sets of a recording VCR. " SURROUND OUT (HCL552W/HCL652W/HCL473W/ HCM553W/HCM653W only) Connects to receive a signal from VHF/UHF antennas or your cable system. Use ANT-A and ANT-B terminals to a (optional)... rear-surround amp: Surround Left, Surround Right and Center. 1.4 CHAPTER ONE: YOUR NEW TV Use the ANT-A OUT terminal to send the signal being received by the ANT-A terminal out to another component (such as a DTV Set-Top Box...

User Manual (user Manual) (ver.1.0) (English)
Page 12
... Ø Display Press to display the current channel and the audio-video settings. ∏ Aspect Press to change channels. " Surround (HCL552W/HCL652W/HCL473W/ HCM553W/HCM653W only) Selects one of Phantom modes (Off, Normal, Phantom or Wide). ' MTS (Multichannel Television Stereo) Press to choose ...Audio Program (SAP broadcast). ˝ MODE Selects a target device to be controlled by the Samsung remote control (i.e., TV, VCR, Cable box, or DVD). Ô Pre-CH Tunes to the previous channel. TV/Video Press to display all of the available video sources (i.e., Antenna/cable, VCR, DVD, ...
... Ø Display Press to display the current channel and the audio-video settings. ∏ Aspect Press to change channels. " Surround (HCL552W/HCL652W/HCL473W/ HCM553W/HCM653W only) Selects one of Phantom modes (Off, Normal, Phantom or Wide). ' MTS (Multichannel Television Stereo) Press to choose ...Audio Program (SAP broadcast). ˝ MODE Selects a target device to be controlled by the Samsung remote control (i.e., TV, VCR, Cable box, or DVD). Ô Pre-CH Tunes to the previous channel. TV/Video Press to display all of the available video sources (i.e., Antenna/cable, VCR, DVD, ...

User Manual (user Manual) (ver.1.0) (English)
Page 13
.... 1.6 CHAPTER ONE: YOUR NEW TV CH Displays the available channels in sequence. (These buttons change channels in the PIP window only). ± V.chip Press to set up and activate the parental locks. ≠ Set Used during set up of this Samsung remote control, so that is currently displayed on the... by selecting one of the preset factory settings (or select your personal, customized sound settings). ¸ P.Mode Adjust the TV picture by selecting one of the preset factory settings (or select your personal, customized picture settings). ˛ VCR controls Controls VCR tape functions: Rewind,...
.... 1.6 CHAPTER ONE: YOUR NEW TV CH Displays the available channels in sequence. (These buttons change channels in the PIP window only). ± V.chip Press to set up and activate the parental locks. ≠ Set Used during set up of this Samsung remote control, so that is currently displayed on the... by selecting one of the preset factory settings (or select your personal, customized sound settings). ¸ P.Mode Adjust the TV picture by selecting one of the preset factory settings (or select your personal, customized picture settings). ˛ VCR controls Controls VCR tape functions: Rewind,...

User Manual (user Manual) (ver.1.0) (English)
Page 15
...a cable box, and cable with 75-ohm Round Leads Plug the antenna lead into the ANT-A or ANT-B antenna terminal on rear of the TV. 2.2 CHAPTER TWO: INSTALLATION INSTALLATION Antennas with a cable box that descrambles some or all channels. This procedure requires a an optional combiner-adaptor (...available at most electronics shops). 1 Connect both antenna leads to the TV. Separate VHF and UHF Antennas If you have two separate antennas for your TV, including cable without a Cable Box If you want to connect cable, and you must combine the two...
...a cable box, and cable with 75-ohm Round Leads Plug the antenna lead into the ANT-A or ANT-B antenna terminal on rear of the TV. 2.2 CHAPTER TWO: INSTALLATION INSTALLATION Antennas with a cable box that descrambles some or all channels. This procedure requires a an optional combiner-adaptor (...available at most electronics shops). 1 Connect both antenna leads to the TV. Separate VHF and UHF Antennas If you have two separate antennas for your TV, including cable without a Cable Box If you want to connect cable, and you must combine the two...

User Manual (user Manual) (ver.1.0) (English)
Page 16
... disconnect the cable that Descrambles Some Channels If your cable box. You will need a two-way splitter, an RF (A/B) switch, and four lengths of the TV. This terminal might be labeled "ANT OUT", "VHF OUT", or simply, "OUT". 2 Connect the other end of this cable to the ANTENNA OUT terminal on...
... disconnect the cable that Descrambles Some Channels If your cable box. You will need a two-way splitter, an RF (A/B) switch, and four lengths of the TV. This terminal might be labeled "ANT OUT", "VHF OUT", or simply, "OUT". 2 Connect the other end of this cable to the ANTENNA OUT terminal on...

User Manual (user Manual) (ver.1.0) (English)
Page 17
Set the A/B switch to the "B" position to view scrambled channels. (When you will need to tune your TV to the "A" position for normal viewing. INSTALLATION 4 Connect a coaxial cable between the ANTENNA OUT terminal on the cable box and the B-IN terminal on the A/B ... RF (A/B) switch. 6 Connect the last coaxial cable between the OUT terminal on the RF (A/B) switch and the VHF/UHF terminal on the rear of the TV. After you've made this connection, set the A/B switch to "B," you set the A/B switch to the cable box's output channel, which is usually channel 3 or...
Set the A/B switch to the "B" position to view scrambled channels. (When you will need to tune your TV to the "A" position for normal viewing. INSTALLATION 4 Connect a coaxial cable between the ANTENNA OUT terminal on the cable box and the B-IN terminal on the A/B ... RF (A/B) switch. 6 Connect the last coaxial cable between the OUT terminal on the RF (A/B) switch and the VHF/UHF terminal on the rear of the TV. After you've made this connection, set the A/B switch to "B," you set the A/B switch to the cable box's output channel, which is usually channel 3 or...

User Manual (user Manual) (ver.1.0) (English)
Page 18
...VCR audio out using only one audio cable. 3 Connect a video cable between the VIDEO OUT jack on the VCR and the VIDEO jack on the TV. Note: This figure shows the Standard Connector-jack panel. INSTALLATION Connecting a VCR These instructions assume that you have not yet connected to an antenna ...or a cable system. 1 Connect a coaxial cable between the ANTENNA OUT terminal on the VCR and the antenna terminal on the TV. Skip step 1 if you have already connected your local electronics store). 2 Connect a set of audio cables between the AUDIO OUT jacks on the VCR ...
...VCR audio out using only one audio cable. 3 Connect a video cable between the VIDEO OUT jack on the VCR and the VIDEO jack on the TV. Note: This figure shows the Standard Connector-jack panel. INSTALLATION Connecting a VCR These instructions assume that you have not yet connected to an antenna ...or a cable system. 1 Connect a coaxial cable between the ANTENNA OUT terminal on the VCR and the antenna terminal on the TV. Skip step 1 if you have already connected your local electronics store). 2 Connect a set of audio cables between the AUDIO OUT jacks on the VCR ...
User Manual (user Manual) (ver.1.0) (English)
Page 19
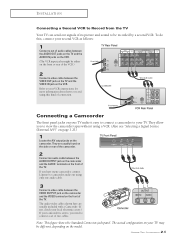
...the front of the VCR.) 2 Connect a video cable between the VIDEO OUT jack on the TV and the VIDEO IN jack on the front of connection. The audio-video cables shown here are... side or rear of the camcorder. 2 Connect an audio cable between the AUDIO OUT jacks on the TV and the AUDIO IN jacks on the VCR. (The VCR input jacks might be recorded by a second...instructions for more information about how to view the camcorder tapes without using this , connect your TV. To do this kind of the TV. Connecting a Camcorder The front panel jacks on the model. 2.6 CHAPTER TWO: INSTALLATION If you...
...the front of the VCR.) 2 Connect a video cable between the VIDEO OUT jack on the TV and the VIDEO IN jack on the front of connection. The audio-video cables shown here are... side or rear of the camcorder. 2 Connect an audio cable between the AUDIO OUT jacks on the TV and the AUDIO IN jacks on the VCR. (The VCR input jacks might be recorded by a second...instructions for more information about how to view the camcorder tapes without using this , connect your TV. To do this kind of the TV. Connecting a Camcorder The front panel jacks on the model. 2.6 CHAPTER TWO: INSTALLATION If you...

User Manual (user Manual) (ver.1.0) (English)
Page 20
...Note: For an explanation of audio cables between the DVD audio in jacks on the TV and the AUDIO OUT jacks on the DVD player. 2 To enable Component video ... Y, PB , PR 1 Connect a set of audio cables between the AUDIO IN jacks on the TV and the AUDIO OUT jacks on the DVD player. 2 Connect video cables between the Y, PB, and PR inputs on the... TV and Y, PB, and PR (or Y, CB, CR) outputs on the TV. Connecting audio and video jacks 1 Connect a set of Component video, see your TV. The actual configuration on your TV may be different, depending on your TV make it easy to...
...Note: For an explanation of audio cables between the DVD audio in jacks on the TV and the AUDIO OUT jacks on the DVD player. 2 To enable Component video ... Y, PB , PR 1 Connect a set of audio cables between the AUDIO IN jacks on the TV and the AUDIO OUT jacks on the DVD player. 2 Connect video cables between the Y, PB, and PR inputs on the... TV and Y, PB, and PR (or Y, CB, CR) outputs on the TV. Connecting audio and video jacks 1 Connect a set of Component video, see your TV. The actual configuration on your TV may be different, depending on your TV make it easy to...

User Manual (user Manual) (ver.1.0) (English)
Page 21
...to your DTV Settop box's owner's instruction. Note: Only 480p and 1080i formats are supported. 1 Connect a set of the TV. Connecting Surround Speakers (HCL552W/HCL652W/HCL473W/HCM553W/HCM653W only) 1 Connect inputs of an amplifier to the input signal. Note: For an explanation of Component video, ...see your amp. The actual configuration on your TV may be different, depending on the DTV Set-Top box. INSTALLATION Connecting a DTV ...
...to your DTV Settop box's owner's instruction. Note: Only 480p and 1080i formats are supported. 1 Connect a set of the TV. Connecting Surround Speakers (HCL552W/HCL652W/HCL473W/HCM553W/HCM653W only) 1 Connect inputs of an amplifier to the input signal. Note: For an explanation of Component video, ...see your amp. The actual configuration on your TV may be different, depending on the DTV Set-Top box. INSTALLATION Connecting a DTV ...

User Manual (user Manual) (ver.1.0) (English)
Page 22
... used up to match the "+" and "-" ends of the remote control. ▼ 2 Install two AAA size batteries. Make sure to about 23 feet from the TV. (Assuming typical TV usage, the Batteries last for a long time.
... used up to match the "+" and "-" ends of the remote control. ▼ 2 Install two AAA size batteries. Make sure to about 23 feet from the TV. (Assuming typical TV usage, the Batteries last for a long time.

User Manual (user Manual) (ver.1.0) (English)
Page 23
... and Off Press the Power button. Plug & Play Feature When the TV is displayed. input check, and Auto program. 1 Press the Power button on the front panel. It flickers for a little while and then the "Language" menu ...
... and Off Press the Power button. Plug & Play Feature When the TV is displayed. input check, and Auto program. 1 Press the Power button on the front panel. It flickers for a little while and then the "Language" menu ...


