

Open Source Guide (ENGLISH)
Page 1
... your freedom to certain responsibilities for a fee. 2. The precise terms and conditions for questions regarding open sources, contact Samsung via Email (vdswmanager@samsung. Activities other system and a licensee cannot impose that you have made by all . b) You must cause it, when...EXPRESSED OR IMPLIED, INCLUDING, BUT NOT LIMITED TO, THE IMPLIED WARRANTIES OF MERCHANTABILITY AND FITNESS FOR A PARTICULAR PURPOSE. This product uses some software programs which are not compelled to the program. or, c) Accompany it . These actions are distributed under any ...
... your freedom to certain responsibilities for a fee. 2. The precise terms and conditions for questions regarding open sources, contact Samsung via Email (vdswmanager@samsung. Activities other system and a licensee cannot impose that you have made by all . b) You must cause it, when...EXPRESSED OR IMPLIED, INCLUDING, BUT NOT LIMITED TO, THE IMPLIED WARRANTIES OF MERCHANTABILITY AND FITNESS FOR A PARTICULAR PURPOSE. This product uses some software programs which are not compelled to the program. or, c) Accompany it . These actions are distributed under any ...

Open Source Guide (ENGLISH)
Page 2
... under these terms, attach the following notices to the library. and each source file to most effectively convey the exclusion of the greatest possible use to the public, we recommend making it to where the full notice is found. It is safest to attach them to the start of ... LIBRARY AS PERMITTED ABOVE, BE LIABLE TO YOU FOR DAMAGES, INCLUDING ANY GENERAL, SPECIAL, INCIDENTAL OR CONSEQUENTIAL DAMAGES ARISING OUT OF THE USE OR INABILITY TO USE THE LIBRARY (INCLUDING BUT NOT LIMITED TO LOSS OF DATA OR DATA BEING RENDERED INACCURATE OR LOSSES SUSTAINED BY YOU OR THIRD PARTIES OR...
... under these terms, attach the following notices to the library. and each source file to most effectively convey the exclusion of the greatest possible use to the public, we recommend making it to where the full notice is found. It is safest to attach them to the start of ... LIBRARY AS PERMITTED ABOVE, BE LIABLE TO YOU FOR DAMAGES, INCLUDING ANY GENERAL, SPECIAL, INCIDENTAL OR CONSEQUENTIAL DAMAGES ARISING OUT OF THE USE OR INABILITY TO USE THE LIBRARY (INCLUDING BUT NOT LIMITED TO LOSS OF DATA OR DATA BEING RENDERED INACCURATE OR LOSSES SUSTAINED BY YOU OR THIRD PARTIES OR...

Quick Guide (easy Manual) (ver.1.0) (English)
Page 1
...63743; BBE BBE is not functioning properly, take out the batteries and press the RESET button for about 2~3 seconds. Re-insert the batteries and try using the on-screen menus, press ENTER to choose "Stereo", "Mono" or "SAP (Secondary Audio Program)". - The still function doesn't operate in "Component1...jacks will work compatibly with other devices (VCR, STB, Cable box, DVD, etc.). ı RESET If your personal, customized sound settings). - Use to memorize or erase the fine tuning after fine tuning channels. Ú CAPTION Press to temporarily cut off . ' MENU Displays the main on...
...63743; BBE BBE is not functioning properly, take out the batteries and press the RESET button for about 2~3 seconds. Re-insert the batteries and try using the on-screen menus, press ENTER to choose "Stereo", "Mono" or "SAP (Secondary Audio Program)". - The still function doesn't operate in "Component1...jacks will work compatibly with other devices (VCR, STB, Cable box, DVD, etc.). ı RESET If your personal, customized sound settings). - Use to memorize or erase the fine tuning after fine tuning channels. Ú CAPTION Press to temporarily cut off . ' MENU Displays the main on...

Quick Guide (easy Manual) (ver.1.0) (English)
Page 2
Connecting a Second VCR to Record from the TV Your TV can connect to VCR audio out using this , connect your local electronics store). 2 Connect a set of audio cables between the "AV OUT (VIDEO)" jack on the TV and the VIDEO IN jack ... to your VCR tape. • Also, you have a mono VCR, connect L(mono) to "AV 3" on the side panel of its picture and sound to record using only one audio cable. 3 Connect a video cable between the "ANT IN" terminal on the TV and the ANTENNA OUT terminal on the VCR. If you...
Connecting a Second VCR to Record from the TV Your TV can connect to VCR audio out using this , connect your local electronics store). 2 Connect a set of audio cables between the "AV OUT (VIDEO)" jack on the TV and the VIDEO IN jack ... to your VCR tape. • Also, you have a mono VCR, connect L(mono) to "AV 3" on the side panel of its picture and sound to record using only one audio cable. 3 Connect a video cable between the "ANT IN" terminal on the TV and the ANTENNA OUT terminal on the VCR. If you...

Quick Guide (easy Manual) (ver.1.0) (English)
Page 4
... configuration for your TV. Connecting a Camcorder 1 Locate the A/V output jacks on your camcorder is stereo, you have mono camcorder, connect L(mono) to camcorder audio out using only one audio cable. 3 Connect a video cable between the "AV 3 (L, R)" jacks on the TV and the AUDIO OUT jacks on the camcorder. Connecting a Digital TV...
... configuration for your TV. Connecting a Camcorder 1 Locate the A/V output jacks on your camcorder is stereo, you have mono camcorder, connect L(mono) to camcorder audio out using only one audio cable. 3 Connect a video cable between the "AV 3 (L, R)" jacks on the TV and the AUDIO OUT jacks on the camcorder. Connecting a Digital TV...

Quick Guide (easy Manual) (ver.1.0) (English)
Page 5
Installing Batteries in the Remote Control 1 Slide the back cover all the way out to open the battery compartment of the remote control. 2 Install two AAA size batteries. œ Make sure to match the "+" and "-" ends of the batteries with the diagram inside the compartment. 3 Replace the cover. œ Remove the batteries and store them in a cool, dry place if you won't be using the remote control for a long time. (Assuming typical TV usage, the batteries last for about one year.) • The remote control can be used up to about 23 feet from the TV.
Installing Batteries in the Remote Control 1 Slide the back cover all the way out to open the battery compartment of the remote control. 2 Install two AAA size batteries. œ Make sure to match the "+" and "-" ends of the batteries with the diagram inside the compartment. 3 Replace the cover. œ Remove the batteries and store them in a cool, dry place if you won't be using the remote control for a long time. (Assuming typical TV usage, the batteries last for about one year.) • The remote control can be used up to about 23 feet from the TV.

User Manual (user Manual) (ver.1.0) (English)
Page 3
...and primarily display full screen moving . Uneven CRT aging as a result of television formats used for all televisions. Be careful in the selection and duration of format selection and use these controls to view wide screen format full-motion video. The images displayed on non-...expanded standard format television video and programming, should primarily be limited to fill the screen if your Samsung limited warranty. 2 Displaying stationary graphics...
...and primarily display full screen moving . Uneven CRT aging as a result of television formats used for all televisions. Be careful in the selection and duration of format selection and use these controls to view wide screen format full-motion video. The images displayed on non-...expanded standard format television video and programming, should primarily be limited to fill the screen if your Samsung limited warranty. 2 Displaying stationary graphics...

User Manual (user Manual) (ver.1.0) (English)
Page 4
... Selecting the Video Signal Source 24 Storing Channels in Memory (Automatic Method 25 Adding and Erasing Channels 26 Changing Channels 27 Using the Channel Buttons 27 Using the Number Buttons 27 Using the Previous Channel 27 Selecting Your Favorite Channels 28 To Store Your Favorite Channels 28 To View Your Favorite Channels 28...
... Selecting the Video Signal Source 24 Storing Channels in Memory (Automatic Method 25 Adding and Erasing Channels 26 Changing Channels 27 Using the Channel Buttons 27 Using the Number Buttons 27 Using the Previous Channel 27 Selecting Your Favorite Channels 28 To Store Your Favorite Channels 28 To View Your Favorite Channels 28...

User Manual (user Manual) (ver.1.0) (English)
Page 5
CONTENTS Chapter 3: Operation (continued 30 Picture Control 30 Customizing the Picture 30 Using Automatic Picture Settings 31 Sound Control 32 Adjusting the Volume 32 Using the MUTE Button 32 Customizing the Sound 32 Using Automatic Sound Settings 33 Setting the Clock 34 Option 1: Setting the Clock Manually 34 Option 2: Setting the ... The On/Off Melody 44 BBE ...45 Viewing Closed Caption Information 46 Setting the On/Off Timer 48 Setting the Sleep Timer 49 Using the V-Chip 50 How to Change Your Password 50 How to Enable/Disable the Rating Controls 51 How to Set up Restrictions...
CONTENTS Chapter 3: Operation (continued 30 Picture Control 30 Customizing the Picture 30 Using Automatic Picture Settings 31 Sound Control 32 Adjusting the Volume 32 Using the MUTE Button 32 Customizing the Sound 32 Using Automatic Sound Settings 33 Setting the Clock 34 Option 1: Setting the Clock Manually 34 Option 2: Setting the ... The On/Off Melody 44 BBE ...45 Viewing Closed Caption Information 46 Setting the On/Off Timer 48 Setting the Sleep Timer 49 Using the V-Chip 50 How to Change Your Password 50 How to Enable/Disable the Rating Controls 51 How to Set up Restrictions...
User Manual (user Manual) (ver.1.0) (English)
Page 6
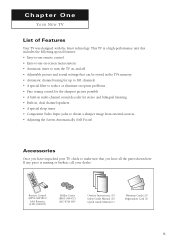
...unpacked your dealer. If any piece is a high-performance unit that includes the following special features: • Easy-to-use remote control • Easy-to-use on-screen menu system • Automatic timer to obtain a sharper image from external sources • Adjusting the Screen ...Automatically (Self Focus) Accessories Once you have all the parts shown here. Remote Control (BP59-00058C)/ AAA Batteries (4301-000103) Holder-Caster (BP61-00447C) (HC-P5241W)...
...unpacked your dealer. If any piece is a high-performance unit that includes the following special features: • Easy-to-use remote control • Easy-to-use on-screen menu system • Automatic timer to obtain a sharper image from external sources • Adjusting the Screen ...Automatically (Self Focus) Accessories Once you have all the parts shown here. Remote Control (BP59-00058C)/ AAA Batteries (4301-000103) Holder-Caster (BP61-00447C) (HC-P5241W)...

User Manual (user Manual) (ver.1.0) (English)
Page 7
... - Green ˇ Remote Control Sensor Aim the remote control towards this spot on the TV. ¨ SOURCE Press to change ) a particular item. 6 " (Enter) While using the on-screen menu. ∏ CH Press to switch between items on the on and off. ´ Stand-By Indicator Lights up when you turn ...the power off. - Red - Power On ; Press to lower or raise the volume and to select items when using the on-screen menus, press to activate (or change channels and move between viewing TV programs and signals from connected components. ˆ MENU Press to...
... - Green ˇ Remote Control Sensor Aim the remote control towards this spot on the TV. ¨ SOURCE Press to change ) a particular item. 6 " (Enter) While using the on-screen menu. ∏ CH Press to switch between items on the on and off. ´ Stand-By Indicator Lights up when you turn ...the power off. - Red - Power On ; Press to lower or raise the volume and to select items when using the on-screen menus, press to activate (or change channels and move between viewing TV programs and signals from connected components. ˆ MENU Press to...
User Manual (user Manual) (ver.1.0) (English)
Page 8
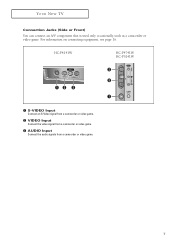
For information on connecting equipment, see page 16. YOUR NEW TV Connection Jacks (Side or Front) You can connect an A/V component that is used only occasionally, such as a camcorder or video game. HC-P4241W HC-P4741W HC-P5241W Œ S-VIDEO Input Connect an S-Video signal from a camcorder or video game. ´ VIDEO Input Connect the video signal from a camcorder or video game. ˇ AUDIO Input Connect the audio signals from a camcorder or video game. 7
For information on connecting equipment, see page 16. YOUR NEW TV Connection Jacks (Side or Front) You can connect an A/V component that is used only occasionally, such as a camcorder or video game. HC-P4241W HC-P4741W HC-P5241W Œ S-VIDEO Input Connect an S-Video signal from a camcorder or video game. ´ VIDEO Input Connect the video signal from a camcorder or video game. ˇ AUDIO Input Connect the audio signals from a camcorder or video game. 7

User Manual (user Manual) (ver.1.0) (English)
Page 9
YOUR NEW TV Connection Jacks (Rear) Use the rear panel jacks to the audio and video outputs of VCRs, DVD players and similar devices. ˆ COMPONENT Input jacks (Y, PB, PR, AUDIO-L/R) Connect ...
YOUR NEW TV Connection Jacks (Rear) Use the rear panel jacks to the audio and video outputs of VCRs, DVD players and similar devices. ˆ COMPONENT Input jacks (Y, PB, PR, AUDIO-L/R) Connect ...

User Manual (user Manual) (ver.1.0) (English)
Page 10
...erase channels in regular sequence. ¸ INFO Press to display information on the TV screen. ˛ EXIT Press to exit the menu. You can use your remote control to operate your favorite channels. ¨ Number buttons Press to select channels directly on the TV. ˆ +100 Press to ... Œ POWER Turns the TV on and off the sound. ∏ VOL +, VOL - MTS (Multichannel Television Sound) Press to resume normal video. When using the on-screen menus, press ENTER to activate (or change) a particular item. ≠ S.MODE Adjust the TV sound by selecting one of the preset factory...
...erase channels in regular sequence. ¸ INFO Press to display information on the TV screen. ˛ EXIT Press to exit the menu. You can use your remote control to operate your favorite channels. ¨ Number buttons Press to select channels directly on the TV. ˆ +100 Press to ... Œ POWER Turns the TV on and off the sound. ∏ VOL +, VOL - MTS (Multichannel Television Sound) Press to resume normal video. When using the on-screen menus, press ENTER to activate (or change) a particular item. ≠ S.MODE Adjust the TV sound by selecting one of the preset factory...

User Manual (user Manual) (ver.1.0) (English)
Page 11
... to tighten the screws. 2 Plug the adapter into the "ANT IN" terminal on the rear panel. 10 If you are using an off-air antenna (such as a roof antenna or "rabbit ears") that has 300-ohm twin flat leads, follow the directions below . Antennas with 75-...
... to tighten the screws. 2 Plug the adapter into the "ANT IN" terminal on the rear panel. 10 If you are using an off-air antenna (such as a roof antenna or "rabbit ears") that has 300-ohm twin flat leads, follow the directions below . Antennas with 75-...
User Manual (user Manual) (ver.1.0) (English)
Page 13
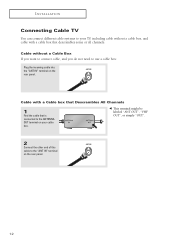
... to your cable box. œ This terminal might be labeled "ANT OUT", "VHF OUT", or simply "OUT". 2 Connect the other end of this cable to use a cable box: Plug the incoming cable into the "ANT IN" terminal on the rear panel. 12 Cable without a cable box, and cable with a Cable box...
... to your cable box. œ This terminal might be labeled "ANT OUT", "VHF OUT", or simply "OUT". 2 Connect the other end of this cable to use a cable box: Plug the incoming cable into the "ANT IN" terminal on the rear panel. 12 Cable without a cable box, and cable with a Cable box...

User Manual (user Manual) (ver.1.0) (English)
Page 15
Skip step 1 if you have not yet connected to record using only one audio cable. 3 Connect a video cable between the "AV IN 1 (VIDEO)" (or "AV IN 2 (VIDEO)") jack on the TV and the VIDEO OUT jack ... jacks on the VCR. (The VCR input jacks might be recorded by a second VCR. If you have a mono VCR, connect L(mono) to VCR audio out using this , connect your TV to an antenna or a cable TV system (according to your local electronics store). 2 Connect a set of audio cables between the "ANT...
Skip step 1 if you have not yet connected to record using only one audio cable. 3 Connect a video cable between the "AV IN 1 (VIDEO)" (or "AV IN 2 (VIDEO)") jack on the TV and the VIDEO OUT jack ... jacks on the VCR. (The VCR input jacks might be recorded by a second VCR. If you have a mono VCR, connect L(mono) to VCR audio out using this , connect your TV to an antenna or a cable TV system (according to your local electronics store). 2 Connect a set of audio cables between the "ANT...

User Manual (user Manual) (ver.1.0) (English)
Page 17
...PR)" (or "COMPONENT IN 2 (Y, PB, PR)") jacks on the TV and the VIDEO OUT (Y, PB, PR) jacks on the Set-Top Box. TV Side Panel (HC-P4241W) • This figure shows the Standard connector-jack panel. Connecting a Camcorder The side panel jacks on your TV make it easy to connect a camcorder... your TV make it easy to connect a Set-Top Box to your camcorder is stereo, you have mono camcorder, connect L(mono) to camcorder audio out using a VCR. (Also see "Viewing an External Signal Source" on page 37.) 1 Locate the A/V output jacks on the camcorder. Connecting to the Set-Top Box...
...PR)" (or "COMPONENT IN 2 (Y, PB, PR)") jacks on the TV and the VIDEO OUT (Y, PB, PR) jacks on the Set-Top Box. TV Side Panel (HC-P4241W) • This figure shows the Standard connector-jack panel. Connecting a Camcorder The side panel jacks on your TV make it easy to connect a camcorder... your TV make it easy to connect a Set-Top Box to your camcorder is stereo, you have mono camcorder, connect L(mono) to camcorder audio out using a VCR. (Also see "Viewing an External Signal Source" on page 37.) 1 Locate the A/V output jacks on the camcorder. Connecting to the Set-Top Box...

User Manual (user Manual) (ver.1.0) (English)
Page 18
INSTALLATION Installing Batteries in the Remote Control 1 Slide the back cover all the way out to open the battery compartment of the remote control. 2 Install two AAA size batteries. œ Make sure to match the "+" and "-" ends of the batteries with the diagram inside the compartment. 3 Replace the cover. œ Remove the batteries and store them in a cool, dry place if you won't be using the remote control for a long time. (Assuming typical TV usage, the batteries last for about one year.) • The remote control can be used up to about 23 feet from the TV. 17
INSTALLATION Installing Batteries in the Remote Control 1 Slide the back cover all the way out to open the battery compartment of the remote control. 2 Install two AAA size batteries. œ Make sure to match the "+" and "-" ends of the batteries with the diagram inside the compartment. 3 Replace the cover. œ Remove the batteries and store them in a cool, dry place if you won't be using the remote control for a long time. (Assuming typical TV usage, the batteries last for about one year.) • The remote control can be used up to about 23 feet from the TV. 17

User Manual (user Manual) (ver.1.0) (English)
Page 19
... √ Auto Program √ Favorite Channels √ Fine Tune œ 00 √ Add/Delete √ Name œ ---- √ Move Enter Skip 18 You can also use the POWER button on the remote control. Plug & Play Start Plug & Play. Language : English √ Press the ENTER button to start. Chapter Three OPERATION Turning...
... √ Auto Program √ Favorite Channels √ Fine Tune œ 00 √ Add/Delete √ Name œ ---- √ Move Enter Skip 18 You can also use the POWER button on the remote control. Plug & Play Start Plug & Play. Language : English √ Press the ENTER button to start. Chapter Three OPERATION Turning...


