
Quick Guide (ENGLISH)
Page 1
... Appears when AE is not centered. The camera will display. Focus indicator Setting the focus Selecting the Focusing Area (AF Point) Choose the part of the eleven points in order each time ... to one of the viewfinder to set . Both pictures are using a DSLR (Digital Single Lens reflex) camera for those who are taken while focusing on . : Move : Exit 2 You can take...The following images for up to 20 registered lenses. Number of recordable images / EV compensation Shows the number of recordable images (including the number of the camera. In the SAF mode, the ...
... Appears when AE is not centered. The camera will display. Focus indicator Setting the focus Selecting the Focusing Area (AF Point) Choose the part of the eleven points in order each time ... to one of the viewfinder to set . Both pictures are using a DSLR (Digital Single Lens reflex) camera for those who are taken while focusing on . : Move : Exit 2 You can take...The following images for up to 20 registered lenses. Number of recordable images / EV compensation Shows the number of recordable images (including the number of the camera. In the SAF mode, the ...

User Manual (ENGLISH)
Page 2
... strong light. This may result from the camera's moving parts. ■ Batteries and camera may be carried out by your dealer or Samsung Camera Service centre. ■ Please do not use it . This could result in camera malfunction. Important Safety Information Thank you for buying a Samsung Digital Camera. ■ Prior to using this camera, please read this product and accessories...
... strong light. This may result from the camera's moving parts. ■ Batteries and camera may be carried out by your dealer or Samsung Camera Service centre. ■ Please do not use it . This could result in camera malfunction. Important Safety Information Thank you for buying a Samsung Digital Camera. ■ Prior to using this camera, please read this product and accessories...
User Manual (ENGLISH)
Page 4
...the Contents of the Package 012 What are included in the package 013 Names of Working Parts 013 Front & Top 014 Rear 015 Quick reference guide 016 Charging and Inserting the Battery...battery) 019 Inserting the Memory Card 020 Precautions When Using the Memory Card 021 Turning the Camera On and Off 021 Using the Vertical Battery Grip (SBG-D1V) (Sold Separately) 022 ...the Drive Mode 038 Checking the Composition, Exposure, and Focus Before Shooting 038 Displaying the Digital Preview 038 Using the Liveview function 039 Manual White Balance (Manual W.B.) 040 Checking the ...
...the Contents of the Package 012 What are included in the package 013 Names of Working Parts 013 Front & Top 014 Rear 015 Quick reference guide 016 Charging and Inserting the Battery...battery) 019 Inserting the Memory Card 020 Precautions When Using the Memory Card 021 Turning the Camera On and Off 021 Using the Vertical Battery Grip (SBG-D1V) (Sold Separately) 022 ...the Drive Mode 038 Checking the Composition, Exposure, and Focus Before Shooting 038 Displaying the Digital Preview 038 Using the Liveview function 039 Manual White Balance (Manual W.B.) 040 Checking the ...
User Manual (ENGLISH)
Page 10
... Functions This chapter helps users achieve a better picture by learning how to get a camera's angle of various parts. 2. Before Starting to take a picture using the flash. 6. Starting Basic Shooting (Auto mode) This chapter gives a quick guidelines for your SAMSUNG digital camera. 8. Appendix Explains troubleshooting and introduces the special terms used in a dark place using...
... Functions This chapter helps users achieve a better picture by learning how to get a camera's angle of various parts. 2. Before Starting to take a picture using the flash. 6. Starting Basic Shooting (Auto mode) This chapter gives a quick guidelines for your SAMSUNG digital camera. 8. Appendix Explains troubleshooting and introduces the special terms used in a dark place using...

User Manual (ENGLISH)
Page 12
Before Starting to Take a Picture Explains camera characteristics, accessories and the names of various parts. 012 Checking the Contents of the Package 012 What are included in the package 013 Names of Working Parts 013 Front & Top 014 Rear 015 Quick reference guide 016 Charging and Inserting the Battery 016 Charging the Battery 017...
Before Starting to Take a Picture Explains camera characteristics, accessories and the names of various parts. 012 Checking the Contents of the Package 012 What are included in the package 013 Names of Working Parts 013 Front & Top 014 Rear 015 Quick reference guide 016 Charging and Inserting the Battery 016 Charging the Battery 017...

User Manual (ENGLISH)
Page 14
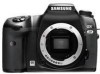
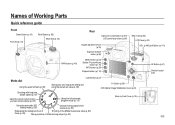
Names of Working Parts Front & Top Shutter Button Main Switch Front dial Self-Timer lamp / Remote control receiver Lens mount index Lens unlock button Lens information contacts Mirror AF coupler Green Button Flash Button Built-in Flash Mode dial Focus mode lever Terminal Cover Strap holder External flash sync terminal RAW Button Remote control port USB / Video terminal DC input terminal Do not attempt to malfunction. 013 Failure to follow this instruction may cause the product to adjust the aperture lever or the mirror in the camera body.
Names of Working Parts Front & Top Shutter Button Main Switch Front dial Self-Timer lamp / Remote control receiver Lens mount index Lens unlock button Lens information contacts Mirror AF coupler Green Button Flash Button Built-in Flash Mode dial Focus mode lever Terminal Cover Strap holder External flash sync terminal RAW Button Remote control port USB / Video terminal DC input terminal Do not attempt to malfunction. 013 Failure to follow this instruction may cause the product to adjust the aperture lever or the mirror in the camera body.

User Manual (ENGLISH)
Page 15
Names of Working Parts Rear Self-Timer lamp / Remote control receiver Hot shoe Diopter adjustment lever Metering mode lever Exposure bracket button Exposure Compensation / LCD panel lamp button Rear e-dial LCD Panel AE-L/Lock Button Strap Holder Memory Card Slot Memory Card Cover Viewfinder MENU button Delete / Picture Wizard INFO button Playback button LCD Monitor 014 Focus point selection dial AF Button OK Button Direction button Card access lamp Card cover lock OIS (Optical Image Stabilization) lever Fn Button
Names of Working Parts Rear Self-Timer lamp / Remote control receiver Hot shoe Diopter adjustment lever Metering mode lever Exposure bracket button Exposure Compensation / LCD panel lamp button Rear e-dial LCD Panel AE-L/Lock Button Strap Holder Memory Card Slot Memory Card Cover Viewfinder MENU button Delete / Picture Wizard INFO button Playback button LCD Monitor 014 Focus point selection dial AF Button OK Button Direction button Card access lamp Card cover lock OIS (Optical Image Stabilization) lever Fn Button
User Manual (ENGLISH)
Page 16
Names of Working Parts Quick reference guide Front Green Button (p. 66) Front dial (p. 53) Flash Button (p. 99) Mode dial (p. 33) Rear Exposure Compensation (p.47)/ LCD panel lamp button (p.69) ... (p. 89) Fn Button (p.36) OIS (Optical Image Stabilization) lever (p.26) Shooting with long time shutter speed (p. 87) Using the manual mode to choose your own camera settings (p. 86) Using the full automatic program mode (p. 33) Memory Card Cover (p.19) Using the automatic ISO setting mode (p. 85) Using the best programmed exposure...
Names of Working Parts Quick reference guide Front Green Button (p. 66) Front dial (p. 53) Flash Button (p. 99) Mode dial (p. 33) Rear Exposure Compensation (p.47)/ LCD panel lamp button (p.69) ... (p. 89) Fn Button (p.36) OIS (Optical Image Stabilization) lever (p.26) Shooting with long time shutter speed (p. 87) Using the manual mode to choose your own camera settings (p. 86) Using the full automatic program mode (p. 33) Memory Card Cover (p.19) Using the automatic ISO setting mode (p. 85) Using the best programmed exposure...

User Manual (ENGLISH)
Page 42
... selection dial. Select Sets the AF point to the centre of the viewfinder. Select SEL with the Focus point selection dial. - Auto The camera selects the optimum AF point even if the subject is selected for [Superimpose AF Area] in the centre as soon as you want to . Setting... AF point where you set the AF point. Set the desired program mode using the direction buttons ( ) on your camera. - Checking the focus Selecting the Focusing Area (AF Point) Choose the part of the viewfinder to set focus to focus. 2. The AF point appears red in the AF area. Look...
... selection dial. Select Sets the AF point to the centre of the viewfinder. Select SEL with the Focus point selection dial. - Auto The camera selects the optimum AF point even if the subject is selected for [Superimpose AF Area] in the centre as soon as you want to . Setting... AF point where you set the AF point. Set the desired program mode using the direction buttons ( ) on your camera. - Checking the focus Selecting the Focusing Area (AF Point) Choose the part of the viewfinder to set focus to focus. 2. The AF point appears red in the AF area. Look...

User Manual (ENGLISH)
Page 48
... while the button is set to (Auto mode), M (Manual), B (Bulb), and X (Flash synchro) mode. ● The exposure compensation is not cancelled by turning the camera off if you to +3 (EV) in the [Memory of Settings] of 1/2 EV or 1/3 EV. Confirm the compensation value in 16...allows you select the [EV Compensation] in increments of [CAPTURE MENU]. ● The is pressed. Setting the Exposure Selecting the Metering Method Choose the part of the screen and determine exposure. Measure only the centre of the screen to 0 when button and green button ( ) are pressed at the same...
... while the button is set to (Auto mode), M (Manual), B (Bulb), and X (Flash synchro) mode. ● The exposure compensation is not cancelled by turning the camera off if you to +3 (EV) in the [Memory of Settings] of 1/2 EV or 1/3 EV. Confirm the compensation value in 16...allows you select the [EV Compensation] in increments of [CAPTURE MENU]. ● The is pressed. Setting the Exposure Selecting the Metering Method Choose the part of the screen and determine exposure. Measure only the centre of the screen to 0 when button and green button ( ) are pressed at the same...

User Manual (ENGLISH)
Page 75
... is locked in the sensor if you can change the file name of "SG20" if the [Colour Space] is a precision part. 1 . Select [Sensor Cleaning] on your camera. - Capture image appears first to show dust in the up to [sRGB]. Press the OK button. - Attach the lens... dust from the Sensor. Use the direction buttons (▲▼) to end sensor cleaning : Set : Back Clean the Sensor. - Please contact Samsung Camera service centre for white backgrounds and other shooting conditions if the Sensor becomes dirty or dusty. Using a blower with a cloth. 8. Turn the...
... is locked in the sensor if you can change the file name of "SG20" if the [Colour Space] is a precision part. 1 . Select [Sensor Cleaning] on your camera. - Capture image appears first to show dust in the up to [sRGB]. Press the OK button. - Attach the lens... dust from the Sensor. Use the direction buttons (▲▼) to end sensor cleaning : Set : Back Clean the Sensor. - Please contact Samsung Camera service centre for white backgrounds and other shooting conditions if the Sensor becomes dirty or dusty. Using a blower with a cloth. 8. Turn the...

User Manual (ENGLISH)
Page 122
Using the Software Explains camera characteristics, accessories and the names of various parts. 122 Software Notes 122 System Requirements 124 Setting up the application software 125 Starting PC mode 126 Removable Disk 126 Downloading stored images 127 Removing .../Vista 127 Setting up the USB Driver for MAC 127 Using the USB Driver for MAC 128 Samsung Master 128 Downloading images 130 Image viewer 131 Image edit 132 Movie edit 133 Using the Samsung RAW Converter 2.0 133 Developing the RAW files 134 Correcting the exposure 135 Handling the JPEG/TIFF...
Using the Software Explains camera characteristics, accessories and the names of various parts. 122 Software Notes 122 System Requirements 124 Setting up the application software 125 Starting PC mode 126 Removable Disk 126 Downloading stored images 127 Removing .../Vista 127 Setting up the USB Driver for MAC 127 Using the USB Driver for MAC 128 Samsung Master 128 Downloading images 130 Image viewer 131 Image edit 132 Movie edit 133 Using the Samsung RAW Converter 2.0 133 Developing the RAW files 134 Correcting the exposure 135 Handling the JPEG/TIFF...

User Manual (ENGLISH)
Page 123
... part of either the software or the user manual be held responsible in any way for damage caused by inappropriate use. ● Using a Hand-made PC or a PC and OS that you read this section of the instruction manual carefully before use. ● The included software is a camera...; In the unlikely event of a manufacturing fault, we will repair or exchange your camera. Software Notes Please ensure that has not been guaranteed by the manufacturer is not covered by the Samsung warranty. ● Before reading this manual is based on English Edition of Windows. We cannot, however, be ...
... part of either the software or the user manual be held responsible in any way for damage caused by inappropriate use. ● Using a Hand-made PC or a PC and OS that you read this section of the instruction manual carefully before use. ● The included software is a camera...; In the unlikely event of a manufacturing fault, we will repair or exchange your camera. Software Notes Please ensure that has not been guaranteed by the manufacturer is not covered by the Samsung warranty. ● Before reading this manual is based on English Edition of Windows. We cannot, however, be ...

User Manual (ENGLISH)
Page 154
...types), Color Selection (18 types), Color (6 types), Soft (3 steps), Illustration, HDR (3 steps), Slim (±8 steps), Brightness (±8 steps) Digital Output : USB 2.0 (HI-SPEED) Video Output : NTSC, PAL (user selectable) Interface DC Power Input Connector : DC 8.3V, 2A (100...142mm×101mm×71.5mm (excluding the projecting parts of the camera) Weight 727g (Body only) , 806g (Memory card & Battery included) Operating Temperature 0 ~ 40°C Operating Humidity 5 ~ 85% Software Application Samsung Master, Samsung RAW Converter 2.0, Adobe Reader • Specifications...
...types), Color Selection (18 types), Color (6 types), Soft (3 steps), Illustration, HDR (3 steps), Slim (±8 steps), Brightness (±8 steps) Digital Output : USB 2.0 (HI-SPEED) Video Output : NTSC, PAL (user selectable) Interface DC Power Input Connector : DC 8.3V, 2A (100...142mm×101mm×71.5mm (excluding the projecting parts of the camera) Weight 727g (Body only) , 806g (Memory card & Battery included) Operating Temperature 0 ~ 40°C Operating Humidity 5 ~ 85% Software Application Samsung Master, Samsung RAW Converter 2.0, Adobe Reader • Specifications...

User Manual (ENGLISH)
Page 160
...No : Samsung GX-20 Responsible Party : SAMSUNG ELECTRONICS AMERICA, INC. Reorient or relocate the receiving antenna. - These limits are designed to part 15 of the FCC Rules. FCC notice ■ NOTE: This equipment has been tested and found to comply with the limits for a Class B digital device, ...responsible for help. ■ CAUTION: Changes or modifications not expressly approved by one or more of Conformity Trade Name : SAMSUNG DIGITAL IMAGING CO., LTD. However, there is subject to the following two conditions: (1) This device may not cause harmful interference, and...
...No : Samsung GX-20 Responsible Party : SAMSUNG ELECTRONICS AMERICA, INC. Reorient or relocate the receiving antenna. - These limits are designed to part 15 of the FCC Rules. FCC notice ■ NOTE: This equipment has been tested and found to comply with the limits for a Class B digital device, ...responsible for help. ■ CAUTION: Changes or modifications not expressly approved by one or more of Conformity Trade Name : SAMSUNG DIGITAL IMAGING CO., LTD. However, there is subject to the following two conditions: (1) This device may not cause harmful interference, and...
