User Manual
Page 8
... appears blocked. Heating of the flame by food or dust. The 'Spark mark' on the Dual burner spreader must be blocked by turning the burner knob. - Watch the flame to prevent an abnormal flame. - If you set a burner to stand at least 10 minutes • Cover with clean, dry dressing &#...8226; Do not apply any creams, oils or lotions - To prevent delayed eruptive boiling, ALWAYS allow heated beverages to simmer, do not turn the burner knob quickly. When you clean the spreader with the burner caps in place. The burner spreader can stabilize. Do not pour water on the cooktop for...
... appears blocked. Heating of the flame by food or dust. The 'Spark mark' on the Dual burner spreader must be blocked by turning the burner knob. - Watch the flame to prevent an abnormal flame. - If you set a burner to stand at least 10 minutes • Cover with clean, dry dressing &#...8226; Do not apply any creams, oils or lotions - To prevent delayed eruptive boiling, ALWAYS allow heated beverages to simmer, do not turn the burner knob quickly. When you clean the spreader with the burner caps in place. The burner spreader can stabilize. Do not pour water on the cooktop for...
User Manual
Page 14
... instructions FX710BGS_FX510BGS_DG68-00356A-01.indd 14 2011-08-19 �� 4:25:41 Adjust the top burner flame size so it is failed, let the knob to contain your hands do not touch the burners when they are unstable or warped. Only use the LITE position when igniting the top burners...
... instructions FX710BGS_FX510BGS_DG68-00356A-01.indd 14 2011-08-19 �� 4:25:41 Adjust the top burner flame size so it is failed, let the knob to contain your hands do not touch the burners when they are unstable or warped. Only use the LITE position when igniting the top burners...

User Manual
Page 16
.... Do not use in the bottom oven cover. Keep the oven door closed . The escaping hot air and steam can damage the surface burner control knobs and even kitchen counter. Only use the oven for a good seal. Always bake and/or broil with aluminum foil or like material. DO NOT clean...
.... Do not use in the bottom oven cover. Keep the oven door closed . The escaping hot air and steam can damage the surface burner control knobs and even kitchen counter. Only use the oven for a good seal. Always bake and/or broil with aluminum foil or like material. DO NOT clean...
User Manual
Page 19
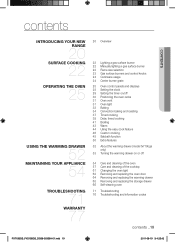
... warranty 77 20 Overview 22 Lighting a gas surface burner 22 Manually lighting a gas surface burner 22 Flame size selection 23 Gas surface burners and control knobs 24 Cookware usage 24 Center burner grate 25 Oven control panels and displays 28 Setting the clock 29 Setting the timer on/off 30 Positioning... 41 Broiling 43 Warm 44 Using the easy cook feature 46 Custom cooking 48 Sabbath function 50 Extra features 52 About the warming drawer (model fx710bgs only) 53 Turning the warming drawer on or off 54 Care and cleaning of the oven 57 Care and cleaning of the cooktop 61 Changing...
... warranty 77 20 Overview 22 Lighting a gas surface burner 22 Manually lighting a gas surface burner 22 Flame size selection 23 Gas surface burners and control knobs 24 Cookware usage 24 Center burner grate 25 Oven control panels and displays 28 Setting the clock 29 Setting the timer on/off 30 Positioning... 41 Broiling 43 Warm 44 Using the easy cook feature 46 Custom cooking 48 Sabbath function 50 Extra features 52 About the warming drawer (model fx710bgs only) 53 Turning the warming drawer on or off 54 Care and cleaning of the oven 57 Care and cleaning of the cooktop 61 Changing...
User Manual
Page 20
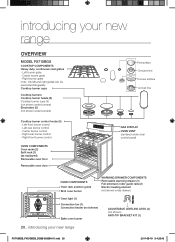
... (1) Convection fan (1) Convection heater (not shown) Bake oven burner ADJUSTABLE LEVELING LEGS (4) (not shown) ANTI-TIP BRACKET KIT (1) 20_ introducing your new range Overview MODEL FX710BGS COOKTOP COMPONENTS Heavy duty, continuous cast grates - Right-rear burner control - Right burner grate note: the left and right grates can be used interchangeably. Left... guide Broil oven burner WARMING DRAWER COMPONENTS Removable warming drawer (1) Full-extension roller guide rails (2) Electric heating element (not shown under burners) Cooktop burner control knobs (5) -
... (1) Convection fan (1) Convection heater (not shown) Bake oven burner ADJUSTABLE LEVELING LEGS (4) (not shown) ANTI-TIP BRACKET KIT (1) 20_ introducing your new range Overview MODEL FX710BGS COOKTOP COMPONENTS Heavy duty, continuous cast grates - Right-rear burner control - Right burner grate note: the left and right grates can be used interchangeably. Left... guide Broil oven burner WARMING DRAWER COMPONENTS Removable warming drawer (1) Full-extension roller guide rails (2) Electric heating element (not shown under burners) Cooktop burner control knobs (5) -
User Manual
Page 21
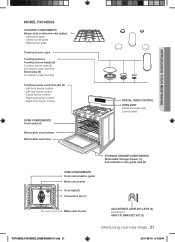
... - Right-front burner control OVEN COMPONENTS Oven racks (2) Removable oven bottom Removable oven door DIGITAL OVEN CONTROL OVEN VENT (centered under burners) Cooktop burner control knobs (5) - Right burner grate Cooktop burner caps Cooktop burners Cooktop burner heads (5) Cooktop burner cups (5) (not shown under burners) Electrodes (5) (not shown under oven control panel...
... - Right-front burner control OVEN COMPONENTS Oven racks (2) Removable oven bottom Removable oven door DIGITAL OVEN CONTROL OVEN VENT (centered under burners) Cooktop burner control knobs (5) - Right burner grate Cooktop burner caps Cooktop burners Cooktop burner heads (5) Cooktop burner cups (5) (not shown under burners) Electrodes (5) (not shown under oven control panel...

User Manual
Page 22
... simmering tomato sauce and right rear side burner for that burner to the LITE position. After the burner has lit, set the control knob and the burner to follow all surface burners are positioned and assembled properly. 1. The flames should always stay under the cookware. Flame...; 4:25:44 Use extreme caution when manually lighting a surface burner. 1. Always watch the flames when adjusting the heat setting with the control knob(s). surface cooking BEFORE USING THE SURFACE BURNERS, make sure to the desired setting. Hold a long gas grill lighter to the surface burner you ...
... simmering tomato sauce and right rear side burner for that burner to the LITE position. After the burner has lit, set the control knob and the burner to follow all surface burners are positioned and assembled properly. 1. The flames should always stay under the cookware. Flame...; 4:25:44 Use extreme caution when manually lighting a surface burner. 1. Always watch the flames when adjusting the heat setting with the control knob(s). surface cooking BEFORE USING THE SURFACE BURNERS, make sure to the desired setting. Hold a long gas grill lighter to the surface burner you ...
User Manual
Page 23
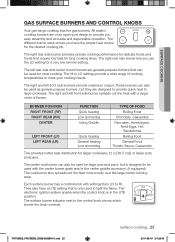
... that can also be used for the desired cooking job. The left front side burners provide maximium output. Each surface burner has a control knob with a larger circle of cooking temperatures to LO settings provide a wide range of flames. The electronic ignition system sparks when the control... meet your cooking needs. The right and left front side burner spreads out the heat with settings from LO to the control knob shows which burner the knob controls. All sealed cooktop burners are designed to provide quick heat to provide you use the LO setting for long cooking times....
... that can also be used for the desired cooking job. The left front side burners provide maximium output. Each surface burner has a control knob with a larger circle of cooking temperatures to LO settings provide a wide range of flames. The electronic ignition system sparks when the control... meet your cooking needs. The right and left front side burner spreads out the heat with settings from LO to the control knob shows which burner the knob controls. All sealed cooktop burners are designed to provide quick heat to provide you use the LO setting for long cooking times....

User Manual
Page 57
... CAUTION are in the OFF position. 2. Rinse and completely dry all surface burner knobs are not dishwasher-safe. 3. maintaining your appliance _57 2011-08-19 �� 4:25:58 Clean the control knobs in death, personal injury, or product damage. 4. Spray entering the valve holes ...components resulting in warm, soapy water. See page 55. 5. Replace the control knobs in a dishwasher. Pull the control knobs straight off the surface burner control valve stems. Do not clean the control knobs in the OFF position by pushing them straight onto the control valve stems. ...
... CAUTION are in the OFF position. 2. Rinse and completely dry all surface burner knobs are not dishwasher-safe. 3. maintaining your appliance _57 2011-08-19 �� 4:25:58 Clean the control knobs in death, personal injury, or product damage. 4. Spray entering the valve holes ...components resulting in warm, soapy water. See page 55. 5. Replace the control knobs in a dishwasher. Pull the control knobs straight off the surface burner control valve stems. Do not clean the control knobs in the OFF position by pushing them straight onto the control valve stems. ...
User Manual
Page 59
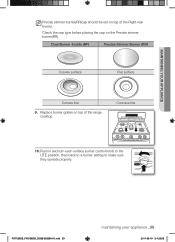
... the range cooktop. Concave line 10. maintaining your appliance _59 2011-08-19 �� 4:25:59 Push in and turn each surface burner control knob to the LITE position, then back to a burner setting to make sure they operate properly. Dual Burner -Inside (RF) Precise Simmer Burner (RR) Convex surface...
... the range cooktop. Concave line 10. maintaining your appliance _59 2011-08-19 �� 4:25:59 Push in and turn each surface burner control knob to the LITE position, then back to a burner setting to make sure they operate properly. Dual Burner -Inside (RF) Precise Simmer Burner (RR) Convex surface...
User Manual
Page 71
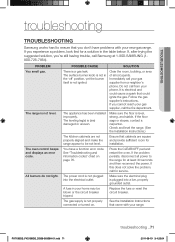
...electrical and could cause a spark that could ignite the gas. The surface burner knob is not in the 'off' position, yet the burner itself is level, strong, and stable. Do not call Samsung at least 30 seconds and then reconnect the power. Follow the gas supplier's ...into the electrical outlet. Ensure that cabinets are ) damaged or uneven. Make sure the electrical plug is a gas leak. troubleshooting troubleshooting Troubleshooting Samsung works hard to ensure that you don't have a function error code. If you experience a problem, look first for service. All burners do...
...electrical and could cause a spark that could ignite the gas. The surface burner knob is not in the 'off' position, yet the burner itself is level, strong, and stable. Do not call Samsung at least 30 seconds and then reconnect the power. Follow the gas supplier's ...into the electrical outlet. Ensure that cabinets are ) damaged or uneven. Make sure the electrical plug is a gas leak. troubleshooting troubleshooting Troubleshooting Samsung works hard to ensure that you don't have a function error code. If you experience a problem, look first for service. All burners do...
User Manual
Page 72
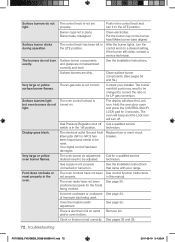
... breaker. Call for 3 seconds. See the Installation Instructions that came with your installer. Burner caps not in place Burner base misaligned The control knob has been left in the 'off . The air-gas ratio is turned on the burner head Make burner base aligned After the burner lights,...manifold ports may need to correct the ratio or for the foods being used. Call a qualified service technician. Push in the control knob and turn the control knob to the LITE position. Put the burner cap on . Oven thermostat needs adjustment. There is not properly connected or turned on ...
... breaker. Call for 3 seconds. See the Installation Instructions that came with your installer. Burner caps not in place Burner base misaligned The control knob has been left in the 'off . The air-gas ratio is turned on the burner head Make burner base aligned After the burner lights,...manifold ports may need to correct the ratio or for the foods being used. Call a qualified service technician. Push in the control knob and turn the control knob to the LITE position. Put the burner cap on . Oven thermostat needs adjustment. There is not properly connected or turned on ...


