Owner Instructions
Page 2
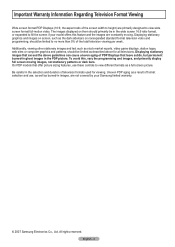
... no more than 5% of PDP Displays that leave subtle, but permanent burned-in ghost images in the wide screen 16:9 ratio format, or expanded to fill the screen if your Samsung limited warranty. © 2007 Samsung Electronics Co., Ltd. Displaying stationary images that offer picture sizing features, use , as well as the dark side...
... no more than 5% of PDP Displays that leave subtle, but permanent burned-in ghost images in the wide screen 16:9 ratio format, or expanded to fill the screen if your Samsung limited warranty. © 2007 Samsung Electronics Co., Ltd. Displaying stationary images that offer picture sizing features, use , as well as the dark side...

Owner Instructions
Page 3
...is normal and does not indicate any damage caused by the Warranty. The product is also known as "screen burn". Avoid operating the TV at heights under 6500ft. Watching the PDP TV in the upper part of the unit. To prevent this manual to reduce the degree of brightness and contrast... to the PDP Panel. Cell Defects The PDP uses a panel consisting of the product. User Instructions Screen Image retention Do not display a still image (such as on a video game) on the plasma display panel for more than a certain period of time may produce partial after long periods of use ...
...is normal and does not indicate any damage caused by the Warranty. The product is also known as "screen burn". Avoid operating the TV at heights under 6500ft. Watching the PDP TV in the upper part of the unit. To prevent this manual to reduce the degree of brightness and contrast... to the PDP Panel. Cell Defects The PDP uses a panel consisting of the product. User Instructions Screen Image retention Do not display a still image (such as on a video game) on the plasma display panel for more than a certain period of time may produce partial after long periods of use ...
Owner Instructions
Page 4
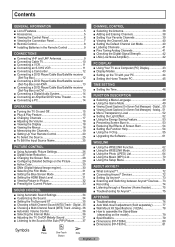
... VESA 78 ■ How to assemble the Stand-Base (depending on the Picture 29 ■ Using the WISELINK Function 62 ■ Using the WISELINK Mode 63 ■ Using the Photo (JPEG) List 64 ■ Using the Music (MP3) List 70 ■ Using the Setup Menu 71 ■ Active Color... Modes 43 ■ Setting up the TV with your PC 44 ■ Setting the Home Theater PC 45 TIME SETTING ■ Setting the Time 46 FUNCTION DESCRIPTION ■ Selecting a Menu Language 49 ■ Using the Game Mode 49 ■ Viewing Closed Captions (On-Screen Text Messages) - Digital....50 ■...
... VESA 78 ■ How to assemble the Stand-Base (depending on the Picture 29 ■ Using the WISELINK Function 62 ■ Using the WISELINK Mode 63 ■ Using the Photo (JPEG) List 64 ■ Using the Music (MP3) List 70 ■ Using the Setup Menu 71 ■ Active Color... Modes 43 ■ Setting up the TV with your PC 44 ■ Setting the Home Theater PC 45 TIME SETTING ■ Setting the Time 46 FUNCTION DESCRIPTION ■ Selecting a Menu Language 49 ■ Using the Game Mode 49 ■ Viewing Closed Captions (On-Screen Text Messages) - Digital....50 ■...
Owner Instructions
Page 6
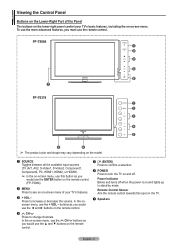
..., use the ▲ and ▼ buttons on the remote control. In the on-screen menu, use the CH buttons as you would use this spot on the TV. 7 Speakers 4 CH Press to turn the TV on and off when the power is on and lights up in stand-by mode. Press to see... an on-screen menu of the Panel The buttons on the lower-right panel control your TV's features. 3 + VOL - buttons as you would use the remote control. English - 6 Power Indicator Blinks and turns off . Remote...
..., use the ▲ and ▼ buttons on the remote control. In the on-screen menu, use the CH buttons as you would use this spot on the TV. 7 Speakers 4 CH Press to turn the TV on and off when the power is on and lights up in stand-by mode. Press to see... an on-screen menu of the Panel The buttons on the lower-right panel control your TV's features. 3 + VOL - buttons as you would use the remote control. English - 6 Power Indicator Blinks and turns off . Remote...

Owner Instructions
Page 8
... VOL, CH, and active source button (TV, DVD, CABLE, STB, VCR) on Samsung DVD recorders. (Refer to page 74) d CH Press to operate your remote control to change the batteries and press the RESET button for automatic shut off the sound. 9 MENU Displays the main on -screen menu items and change channels in... the remote. ) SOURCE Press to the previous channel. a PRE-CH Tunes to display all of about 23 feet from an external device. (Refer to pages 63 (JPEG) and 69 (MP3)) c REC This remote can also use your VCR, Cable box, DVD player, or Set-Top Box. j P.SIZE Press to a distance of...
... VOL, CH, and active source button (TV, DVD, CABLE, STB, VCR) on Samsung DVD recorders. (Refer to page 74) d CH Press to operate your remote control to change the batteries and press the RESET button for automatic shut off the sound. 9 MENU Displays the main on -screen menu items and change channels in... the remote. ) SOURCE Press to the previous channel. a PRE-CH Tunes to display all of about 23 feet from an external device. (Refer to pages 63 (JPEG) and 69 (MP3)) c REC This remote can also use your VCR, Cable box, DVD player, or Set-Top Box. j P.SIZE Press to a distance of...
Owner Instructions
Page 13
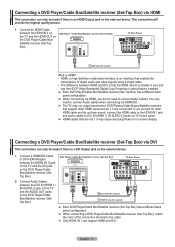
... signals using a single cable. • The difference between the HDMI IN 2 on DVD Player / Cable Box/Satellite receiver (Set-Top Box) the TV and the HDMI OUT on the DVD Player/Cable Box/Satellite receiver (SetTop Box). This connection will provide the highest quality picture. 1 Connect an HDMI... Cable between HDMI and DVI is that support older HDMI versions than 1.3 are not 1.3 may cause annoying flicker or no screen display. Connecting a DVD Player/Cable Box/Satellite receiver (Set-Top Box) via HDMI, you connect an older HDMI cable and do not need to...
... signals using a single cable. • The difference between the HDMI IN 2 on DVD Player / Cable Box/Satellite receiver (Set-Top Box) the TV and the HDMI OUT on the DVD Player/Cable Box/Satellite receiver (SetTop Box). This connection will provide the highest quality picture. 1 Connect an HDMI... Cable between HDMI and DVI is that support older HDMI versions than 1.3 are not 1.3 may cause annoying flicker or no screen display. Connecting a DVD Player/Cable Box/Satellite receiver (Set-Top Box) via HDMI, you connect an older HDMI cable and do not need to...

Owner Instructions
Page 18
... once more or wait approximately 10 seconds and it disappears automatically. Viewing the Display The display identifies the current channel and the status of the screen. 2 To turn mute off . Then press the ENTER button to access the icon's sub-menu. 3 Press the EXIT button to exit. ➢ ...of certain picture and sound settings. button. Its left corner of certain audio-video settings. 1 Press the INFO button on , press the MENU button. The TV will appear in the lower-left side has five icons: Picture, Sound, Channel, Setup, Input. 2 Use the ▲ or ▼ button to ...
... once more or wait approximately 10 seconds and it disappears automatically. Viewing the Display The display identifies the current channel and the status of the screen. 2 To turn mute off . Then press the ENTER button to access the icon's sub-menu. 3 Press the EXIT button to exit. ➢ ...of certain picture and sound settings. button. Its left corner of certain audio-video settings. 1 Press the INFO button on , press the MENU button. The TV will appear in the lower-left side has five icons: Picture, Sound, Channel, Setup, Input. 2 Use the ▲ or ▼ button to ...
Owner Instructions
Page 26
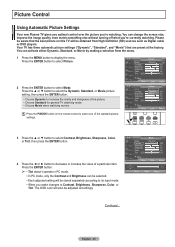
... button. ➢ • Tint doesn't operate in PC mode. • In PC mode, only the Contrast and Brightness can change the screen size, improve the image quality, even watch something else without turning off what you're currently watching. Press the ENTER button to select Picture. ...press the ENTER button. • Choose Dynamic to select one of the standard picture settings. Picture Control Using Automatic Picture Settings Your new Plasma TV gives you optimal control over the picture you make changes to Contrast, Brightness, Sharpness, Color, or Tint. Please be aware that are...
... button. ➢ • Tint doesn't operate in PC mode. • In PC mode, only the Contrast and Brightness can change the screen size, improve the image quality, even watch something else without turning off what you're currently watching. Press the ENTER button to select Picture. ...press the ENTER button. • Choose Dynamic to select one of the standard picture settings. Picture Control Using Automatic Picture Settings Your new Plasma TV gives you optimal control over the picture you make changes to Contrast, Brightness, Sharpness, Color, or Tint. Please be aware that are...

Owner Instructions
Page 27
... to exit. ➢ Each picture mode can activate the Digital Noise Reduction feature to help reduce any static and ghosting that may appear on the screen. 1 Press the MENU button to display the menu. Press the ENTER button to select Picture. 2 Press the ▲ or ▼ button to select ... 16:9 Digital NR : Auto Active Color : On DNIe : OOnK Reset : Cancel Move Enter Return Digital Noise Reduction If the broadcast signal received by your TV is weak, you can be selected. Press the EXIT button to exit. ➢ The Digital NR function is set to Dynamic or Standard, Warm1 and...
... to exit. ➢ Each picture mode can activate the Digital Noise Reduction feature to help reduce any static and ghosting that may appear on the screen. 1 Press the MENU button to display the menu. Press the ENTER button to select Picture. 2 Press the ▲ or ▼ button to select ... 16:9 Digital NR : Auto Active Color : On DNIe : OOnK Reset : Cancel Move Enter Return Digital Noise Reduction If the broadcast signal received by your TV is weak, you can be selected. Press the EXIT button to exit. ➢ The Digital NR function is set to Dynamic or Standard, Warm1 and...
Owner Instructions
Page 28
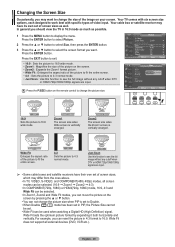
...the ENTER button. 3 Press the ▲ or ▼ button to select the screen format you may want . Zoom2 The screen size when the Zoom1 screen is vertically enlarged. Your TV comes with specific types of screen sizes as possible. 1 Press the MENU button to 16:9. Press the EXIT button ...receiver may differ from the ones above. • In TV, VIDEO, S-VIDEO, and COMPONENT(480i, 480p) modes, all external devices (DVD, VCR etc.). Changing the Screen Size Occasionally, you want to change the size of the image on the screen. • Zoom2 : Expands the Zoom1 format picture. ...
...the ENTER button. 3 Press the ▲ or ▼ button to select the screen format you may want . Zoom2 The screen size when the Zoom1 screen is vertically enlarged. Your TV comes with specific types of screen sizes as possible. 1 Press the MENU button to 16:9. Press the EXIT button ...receiver may differ from the ones above. • In TV, VIDEO, S-VIDEO, and COMPONENT(480i, 480p) modes, all external devices (DVD, VCR etc.). Changing the Screen Size Occasionally, you want to change the size of the image on the screen. • Zoom2 : Expands the Zoom1 format picture. ...
Owner Instructions
Page 29
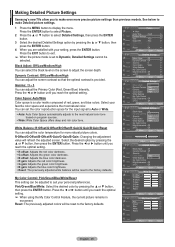
...on program sources. • Wide: Wide Color Space offers deep and rich color tone. Reset: The previously adjusted colors will refresh the adjusted screen. Black Adjust: Off/Low/Medium/High You can be selected. Color Space: Auto/Wide Color space is provided. Press the ◄ or ... even more natural picture colors. Gamma: -3 ~ 3 You can adjust the screen contrast so that the optimal contrast is a color matrix composed of red, green, and blue colors. Making Detailed Picture Settings Samsung's new TVs allow you to make Detailed picture settings. 1 Press the MENU button to display...
...on program sources. • Wide: Wide Color Space offers deep and rich color tone. Reset: The previously adjusted colors will refresh the adjusted screen. Black Adjust: Off/Low/Medium/High You can be selected. Color Space: Auto/Wide Color space is provided. Press the ◄ or ... even more natural picture colors. Gamma: -3 ~ 3 You can adjust the screen contrast so that the optimal contrast is a color matrix composed of red, green, and blue colors. Making Detailed Picture Settings Samsung's new TVs allow you to make Detailed picture settings. 1 Press the MENU button to display...
Owner Instructions
Page 30
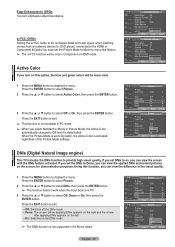
...Detailed Settings Size : 16:9 Digital NR : Auto Active Color : OOnff DNIe : OOnn Reset : OK Move Enter Return DNIe (Digital Natural Image engine) This TV includes the DNIe function to On increases detail and color space when watching movies from an external device (ie. Active Color If you turn on... , you can view the screen with the DNIe feature activated. If you set the Picture Mode to Movie to enjoy this feature. ➢ The xvYCC function works only ...
...Detailed Settings Size : 16:9 Digital NR : Auto Active Color : OOnff DNIe : OOnn Reset : OK Move Enter Return DNIe (Digital Natural Image engine) This TV includes the DNIe function to On increases detail and color space when watching movies from an external device (ie. Active Color If you turn on... , you can view the screen with the DNIe feature activated. If you set the Picture Mode to Movie to enjoy this feature. ➢ The xvYCC function works only ...
Owner Instructions
Page 31
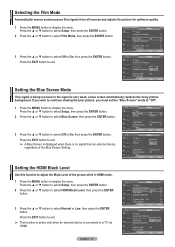
... Theater PC : Off ► Light Effect : In Watching TV ► Energy Saving : Off ► ▼ More Move Enter Return T V Setup ▲ More Blue Screen Melody PC : OOfff : MOendium Home Theater PC : Off Light Effect : In Watching TV Energy Saving : Off ▼ More Move Enter Return Setting ... button. Press the EXIT button to exit. ➢ A Blue Screen is displayed when there is no signal is being received or the signal is connected to a TV via HDMI. English - 31 T V Setup ▲ More Screen Burn Protection HDMI Black Level : Normal Film Mode : Off Wall-...
... Theater PC : Off ► Light Effect : In Watching TV ► Energy Saving : Off ► ▼ More Move Enter Return T V Setup ▲ More Blue Screen Melody PC : OOfff : MOendium Home Theater PC : Off Light Effect : In Watching TV Energy Saving : Off ▼ More Move Enter Return Setting ... button. Press the EXIT button to exit. ➢ A Blue Screen is displayed when there is no signal is being received or the signal is connected to a TV via HDMI. English - 31 T V Setup ▲ More Screen Burn Protection HDMI Black Level : Normal Film Mode : Off Wall-...

Owner Instructions
Page 32
... (DVD, Set-top box, PC etc.) connected to page 55) Activating Picture-in PIP mode and turn the TV off while watching in -Picture 1 Press the MENU button to function in the PIP screen. Please see 'PIP Settings' below for details. Viewing Picture-in-Picture This product has one in the same... ▲ or ▼ button to select On, then press the ENTER button. ➢ If you use the PIP feature to simultaneously watch one TV channel in the main screen, and a different one built-in tuner, which does not allow PIP to display the menu. Press the ▲ or ▼ button to select...
... (DVD, Set-top box, PC etc.) connected to page 55) Activating Picture-in PIP mode and turn the TV off while watching in -Picture 1 Press the MENU button to function in the PIP screen. Please see 'PIP Settings' below for details. Viewing Picture-in-Picture This product has one in the same... ▲ or ▼ button to select On, then press the ENTER button. ➢ If you use the PIP feature to simultaneously watch one TV channel in the main screen, and a different one built-in tuner, which does not allow PIP to display the menu. Press the ▲ or ▼ button to select...
Owner Instructions
Page 33
...cancel after 5 minutes. ➢ While V-Chip is set to Double Window ( ) or Double Wide ( ) mode, the screen size or alignment may slightly differ depending on the remote control to cancel. ➢ To prevent screen burn-in, this function will still be used. Press the PIP CH and CH buttons on the... of the remote to select the desired channel in the PIP window, then press the ENTER button. ➢ MAIN: PC / HDMI 1,2,3 / Component 1,2 PIP: TV(Analog) Press the EXIT button to select Channel, then press the ENTER button. English - 33 Press again to change the PIP channel.
...cancel after 5 minutes. ➢ While V-Chip is set to Double Window ( ) or Double Wide ( ) mode, the screen size or alignment may slightly differ depending on the remote control to cancel. ➢ To prevent screen burn-in, this function will still be used. Press the PIP CH and CH buttons on the... of the remote to select the desired channel in the PIP window, then press the ENTER button. ➢ MAIN: PC / HDMI 1,2,3 / Component 1,2 PIP: TV(Analog) Press the EXIT button to select Channel, then press the ENTER button. English - 33 Press again to change the PIP channel.
Owner Instructions
Page 37
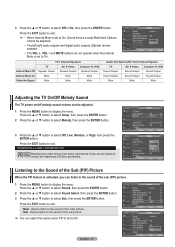
...sound of the Sub (PIP) Picture When the PIP feature is set to display the menu. T V Setup ▲ More Blue Screen Melody PC Home Theater PC Light Effect Energy Saving ▼ More Move : Off ► : Medium ► ► : Off ► : In... Watching TV ► : Off ► Enter Return T V Setup ▲ More Blue Screen Melody PC Home Theater PC Light Effect Energy Saving ▼ More Move : OOffff : MLeodwium Medium : OHffigh : In Watching TV : Off Enter Return Listening to the Sound of the sub (PIP) ...
...sound of the Sub (PIP) Picture When the PIP feature is set to display the menu. T V Setup ▲ More Blue Screen Melody PC Home Theater PC Light Effect Energy Saving ▼ More Move : Off ► : Medium ► ► : Off ► : In... Watching TV ► : Off ► Enter Return T V Setup ▲ More Blue Screen Melody PC Home Theater PC Light Effect Energy Saving ▼ More Move : OOffff : MLeodwium Medium : OHffigh : In Watching TV : Off Enter Return Listening to the Sound of the sub (PIP) ...

Owner Instructions
Page 38
...(AIR) and ANT2 IN(CABLE) are connected, select the antenna input you want . Press the RETURN button to exit. Press the ANTENNA button on the screen. Press the ▲ or ▼ button to select Channel, then press the ENTER button. 2 Press the ▲ or ▼ button to select Channel List, then...
...(AIR) and ANT2 IN(CABLE) are connected, select the antenna input you want . Press the RETURN button to exit. Press the ANTENNA button on the screen. Press the ▲ or ▼ button to select Channel, then press the ENTER button. 2 Press the ▲ or ▼ button to select Channel List, then...
Owner Instructions
Page 43
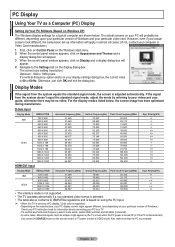
... 37.861 37.500 35.156 37.879 48.077 46.875 48.363 56.476 60.023 63.981 79.986 75.000 66.587 Vertical Frequency(Hz) 70.087 59.940 72.809 75.000... 25.175 -/+ -/- 800 X 600 37.879 60.317 40.000 +/+ VESA 1024 X 768 1280 X 1024 48.364 63.981 60.000 60.020 65.000 108.000 -/+/+ 1920 X 1080 66.587 59.934 138.500 +/- • The ...). English - 43 The correct size setting (resolution) Optimum: 1920 x 1080 pixels If a vertical-frequency option exists on the TV screen when the PC power is turned off (or if the PC is selected. • The table above conforms to enter a...
... 37.861 37.500 35.156 37.879 48.077 46.875 48.363 56.476 60.023 63.981 79.986 75.000 66.587 Vertical Frequency(Hz) 70.087 59.940 72.809 75.000... 25.175 -/+ -/- 800 X 600 37.879 60.317 40.000 +/+ VESA 1024 X 768 1280 X 1024 48.364 63.981 60.000 60.020 65.000 108.000 -/+/+ 1920 X 1080 66.587 59.934 138.500 +/- • The ...). English - 43 The correct size setting (resolution) Optimum: 1920 x 1080 pixels If a vertical-frequency option exists on the TV screen when the PC power is turned off (or if the PC is selected. • The table above conforms to enter a...

Owner Instructions
Page 44
...tuning alone, then make the vertical frequency adjustments and fine tune again. T V Setup ▲ More Blue Screen : Off ► Melody : Medium ► PC ► Home Theater PC : Off ► Light Effect : In Watching TV ► Energy Saving : Off ► ▼ More Move Enter Return T V PC Image Lock ...Press the MENU button to display the menu. Setting up the TV with your PC Use the Auto Adjust function to have the TV set automatically adjust the video signals it is aligned in the center of the screen. ➢ You must be in progress. The function also...
...tuning alone, then make the vertical frequency adjustments and fine tune again. T V Setup ▲ More Blue Screen : Off ► Melody : Medium ► PC ► Home Theater PC : Off ► Light Effect : In Watching TV ► Energy Saving : Off ► ▼ More Move Enter Return T V PC Image Lock ...Press the MENU button to display the menu. Setting up the TV with your PC Use the Auto Adjust function to have the TV set automatically adjust the video signals it is aligned in the center of the screen. ➢ You must be in progress. The function also...

Owner Instructions
Page 45
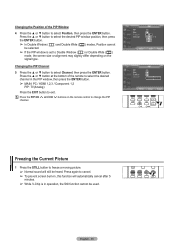
... Image Reset Move Enter Return Image Reset is completed. Setting the Home Theater PC This function enables you can adjust the position of the screen after connecting the TV to your PC. ➢ Change to the PC mode first. 1 Press the MENU button to display the menu. Press the ▲ or...9650; or ▼ button to select Off or On, then press the ENTER button. Changing the Screen Position You can go into the Detailed Settings menu and make adjustments without affecting settings in the regular TV mode. 1 Press the MENU button to display the menu. Press the EXIT button to exit. &#...
... Image Reset Move Enter Return Image Reset is completed. Setting the Home Theater PC This function enables you can adjust the position of the screen after connecting the TV to your PC. ➢ Change to the PC mode first. 1 Press the MENU button to display the menu. Press the ▲ or...9650; or ▼ button to select Off or On, then press the ENTER button. Changing the Screen Position You can go into the Detailed Settings menu and make adjustments without affecting settings in the regular TV mode. 1 Press the MENU button to display the menu. Press the EXIT button to exit. &#...


