
Quick Guide (ENGLISH)
Page 5
... fix the stand by fastening the screw. 1-3 Installing the Product A. Place a soft cloth or cushion on a flat surface to protect the panel and place the product down on the point "A". Stand Mount B. Align the groove of the part of the product faces downwards. 3. Stand (Optional) 1. Lift up the monitor stand to the maximum angle with your left hand, and remove the back decoration cover...
... fix the stand by fastening the screw. 1-3 Installing the Product A. Place a soft cloth or cushion on a flat surface to protect the panel and place the product down on the point "A". Stand Mount B. Align the groove of the part of the product faces downwards. 3. Stand (Optional) 1. Lift up the monitor stand to the maximum angle with your left hand, and remove the back decoration cover...
Quick Guide (ENGLISH)
Page 6
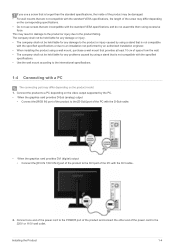
... or injury caused by using a stand that is not compatible with the specified specifications. • Use the wall mount according to the international specifications. 1-4 Connecting with a PC The connecting part may differ depending on the corresponding specifications. • Do not use screws that are incompatible with the standard VESA specifications and do not assemble them using excessive force. Connect one end of the power cord to the POWER port of the product and...
... or injury caused by using a stand that is not compatible with the specified specifications. • Use the wall mount according to the international specifications. 1-4 Connecting with a PC The connecting part may differ depending on the corresponding specifications. • Do not use screws that are incompatible with the standard VESA specifications and do not assemble them using excessive force. Connect one end of the power cord to the POWER port of the product and...
Quick Guide (ENGLISH)
Page 7
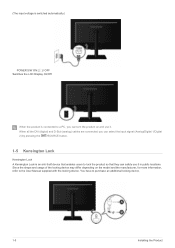
... the User Manual supplied with the locking device. Since the shape and usage of the locking device may differ depending on and use it . You have to purchase an additional locking device. 1-5 Installing the Product When the product is connected to a PC, you can select the input signal (Analog/Digital 1/Digital 2) by pressing the /SOURCE button. 1-5 Kensington Lock Kensington Lock A Kensington Lock is switched automatically.) POWER S/W ON [ │ ] / OFF Switches the LCD Display On...
... the User Manual supplied with the locking device. Since the shape and usage of the locking device may differ depending on and use it . You have to purchase an additional locking device. 1-5 Installing the Product When the product is connected to a PC, you can select the input signal (Analog/Digital 1/Digital 2) by pressing the /SOURCE button. 1-5 Kensington Lock Kensington Lock A Kensington Lock is switched automatically.) POWER S/W ON [ │ ] / OFF Switches the LCD Display On...

Quick Guide (ENGLISH)
Page 8
... input signal (Analog/Digital 1/Digital 2) is turned on the screen, push the button to one of the product and turn it , the configured function will be performed - - - You can set the Customized Key to adjust brightness. Even if the OSD Adjustment Lock function is activated, users can adjust the brightness and contrast and can purchase the locking device from being changed by pressing [ /SOURCE] button or the product is switched. When OSD is disabled. When the input signal...
... input signal (Analog/Digital 1/Digital 2) is turned on the screen, push the button to one of the product and turn it , the configured function will be performed - - - You can set the Customized Key to adjust brightness. Even if the OSD Adjustment Lock function is activated, users can adjust the brightness and contrast and can purchase the locking device from being changed by pressing [ /SOURCE] button or the product is switched. When OSD is disabled. When the input signal...

Quick Guide (ENGLISH)
Page 9
... this button to the power saving function in More Information. Icon AUTO Description Press [AUTO] button to minimize power consumption. 1-6 Installing the Product When not using the product for a long time, unplugging the power cord is recommended to adjust the screen settings automatically This function is only available in the Display Properties, the AUTO adjustment function is turned on the right of the product are changed in analog mode. Power LED This LED is...
... this button to the power saving function in More Information. Icon AUTO Description Press [AUTO] button to minimize power consumption. 1-6 Installing the Product When not using the product for a long time, unplugging the power cord is recommended to adjust the screen settings automatically This function is only available in the Display Properties, the AUTO adjustment function is turned on the right of the product are changed in analog mode. Power LED This LED is...
Quick Guide (ENGLISH)
Page 10
... you reconnect the DVI cable after disconnecting the cable while using the Self-Diagnosis function. • If a blank screen is displayed and the Power LED blinks even if the product and the PC are properly connected, perform the self-diagnosis function according to the user manual. If the product is properly connected, recheck the input signal by pressing the /SOURCE button of the product. Check the cable connecting the PC...
... you reconnect the DVI cable after disconnecting the cable while using the Self-Diagnosis function. • If a blank screen is displayed and the Power LED blinks even if the product and the PC are properly connected, perform the self-diagnosis function according to the user manual. If the product is properly connected, recheck the input signal by pressing the /SOURCE button of the product. Check the cable connecting the PC...
Quick Guide (ENGLISH)
Page 11
... [AUTO] button to the (Standard Signal Mode Table) The color is designed so that the color has a soft appearance by selecting Con- The pictures are supported referring to the User Manual of the video signal? Set the resolution and the frequency to the appropriate values in 16 bit (16 colors). The color has been changed after changing the graphics card. Windows ME/XP/2000 : Set the color again by coating it . Install the device driver...
... [AUTO] button to the (Standard Signal Mode Table) The color is designed so that the color has a soft appearance by selecting Con- The pictures are supported referring to the User Manual of the video signal? Set the resolution and the frequency to the appropriate values in 16 bit (16 colors). The color has been changed after changing the graphics card. Windows ME/XP/2000 : Set the color again by coating it . Install the device driver...
User Manual (ENGLISH)
Page 3
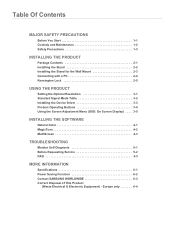
... 2-1 Installing the Stand 2-2 Installing the Stand for the Wall Mount 2-3 Connecting with a PC 2-4 Kensington Lock 2-5 USING THE PRODUCT Setting the Optimal Resolution 3-1 Standard Signal Mode Table 3-2 Installing the Device Driver 3-3 Product Operating Buttons 3-4 Using the Screen Adjustment Menu (OSD: On Screen Display) . . . . 3-5 INSTALLING THE SOFTWARE Natural Color 4-1 MagicTune 4-2 MultiScreen 4-3 TROUBLESHOOTING Monitor Self-Diagnosis 5-1 Before Requesting Service 5-2 FAQ 5-3 MORE INFORMATION Specifications 6-1 Power Saving Function 6-2 Contact SAMSUNG WORLDWIDE...
... 2-1 Installing the Stand 2-2 Installing the Stand for the Wall Mount 2-3 Connecting with a PC 2-4 Kensington Lock 2-5 USING THE PRODUCT Setting the Optimal Resolution 3-1 Standard Signal Mode Table 3-2 Installing the Device Driver 3-3 Product Operating Buttons 3-4 Using the Screen Adjustment Menu (OSD: On Screen Display) . . . . 3-5 INSTALLING THE SOFTWARE Natural Color 4-1 MagicTune 4-2 MultiScreen 4-3 TROUBLESHOOTING Monitor Self-Diagnosis 5-1 Before Requesting Service 5-2 FAQ 5-3 MORE INFORMATION Specifications 6-1 Power Saving Function 6-2 Contact SAMSUNG WORLDWIDE...

User Manual (ENGLISH)
Page 6
... not touch. Must be unplugged from the wall outlet. The number of sub-pixels of an LCD panel by size: The number of the material, if a supersonic humidifier is used for a long time may create a persistent image or stain on the model. Vertical Resolution x 3 Example) If the maximum resolution is 1600 x 900(1920 x 1080) x 3 = 4,320,000(6,220,800). 1-3 Safety Precautions Icons used . Do not disassemble. If...
... not touch. Must be unplugged from the wall outlet. The number of sub-pixels of an LCD panel by size: The number of the material, if a supersonic humidifier is used for a long time may create a persistent image or stain on the model. Vertical Resolution x 3 Example) If the maximum resolution is 1600 x 900(1920 x 1080) x 3 = 4,320,000(6,220,800). 1-3 Safety Precautions Icons used . Do not disassemble. If...
User Manual (ENGLISH)
Page 11
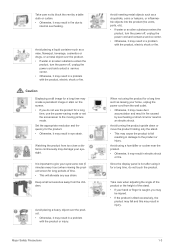
... an alien substance enters the product, turn the power off , unplug the power cord and contact a service center. • Otherwise, it may fall resulting in damage to give your hand or finger is caught, you do not touch the product. Since the display panel is important to the product or injury. When not using a humidifier or cooker near the...
... an alien substance enters the product, turn the power off , unplug the power cord and contact a service center. • Otherwise, it may fall resulting in damage to give your hand or finger is caught, you do not touch the product. Since the display panel is important to the product or injury. When not using a humidifier or cooker near the...

User Manual (ENGLISH)
Page 18
... User Manual supplied with the locking device. When all the DVI (digital) and D-Sub (analog) cables are connected, you can safely use it in public locations. When the product is connected to a PC, you can select the input signal (Analog/Digital 1/Digital 2) by pressing the /SOURCE button. 2-5 Kensington Lock Kensington Lock A Kensington Lock is switched automatically.) POWER S/W ON [ │ ] / OFF Switches the LCD Display On/Off. (The input voltage is an anti-theft device that enables users to lock...
... User Manual supplied with the locking device. When all the DVI (digital) and D-Sub (analog) cables are connected, you can safely use it in public locations. When the product is connected to a PC, you can select the input signal (Analog/Digital 1/Digital 2) by pressing the /SOURCE button. 2-5 Kensington Lock Kensington Lock A Kensington Lock is switched automatically.) POWER S/W ON [ │ ] / OFF Switches the LCD Display On/Off. (The input voltage is an anti-theft device that enables users to lock...
User Manual (ENGLISH)
Page 20
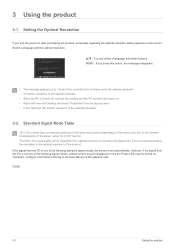
... inherent characteristics of the panel, unlike for the panel size. If the signal from the pop-up to 3 times if the resolution has not been set to the optimal resolution. • To set the resolution to the User Manual of the following signal modes, a blank screen may be displayed or only the Power LED may be degraded if the optimal resolution is set automatically. MENU : If you turn the power on. • Right-click...
... inherent characteristics of the panel, unlike for the panel size. If the signal from the pop-up to 3 times if the resolution has not been set to the optimal resolution. • To set the resolution to the User Manual of the following signal modes, a blank screen may be displayed or only the Power LED may be degraded if the optimal resolution is set automatically. MENU : If you turn the power on. • Right-click...
User Manual (ENGLISH)
Page 22
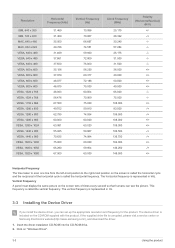
... resolution and frequency for the product. The horizontal frequency is represented in kHz. The vertical frequency is represented in Hz. 3-3 Installing the Device Driver If you install the device driver, you can see the picture. The device driver is called the horizontal frequency. Insert the driver installation CD-ROM into the CD-ROM drive. 2. Vertical Frequency A panel must display the same picture on the screen tens of the horizontal cycle is included on "Windows Driver". 3-3 Using...
... resolution and frequency for the product. The horizontal frequency is represented in kHz. The vertical frequency is represented in Hz. 3-3 Installing the Device Driver If you install the device driver, you can see the picture. The device driver is called the horizontal frequency. Insert the driver installation CD-ROM into the CD-ROM drive. 2. Vertical Frequency A panel must display the same picture on the screen tens of the horizontal cycle is included on "Windows Driver". 3-3 Using...

User Manual (ENGLISH)
Page 23
Even if the OSD Adjustment Lock function is disabled. Use these buttons to navigate the menu or to adjust a value in the Control Panel settings. Complete the remaining installation steps according to the [ ]. Off: If you press and hold the MENU button down for 5 seconds again, the OSD Adjustment Lock function is activated, users can adjust the brightness and contrast and can set up the adjustment function assigned to the instructions displayed on the screen. 5. Using the product...
Even if the OSD Adjustment Lock function is disabled. Use these buttons to navigate the menu or to adjust a value in the Control Panel settings. Complete the remaining installation steps according to the [ ]. Off: If you press and hold the MENU button down for 5 seconds again, the OSD Adjustment Lock function is activated, users can adjust the brightness and contrast and can set up the adjustment function assigned to the instructions displayed on the screen. 5. Using the product...

User Manual (ENGLISH)
Page 24
... is switched. H-Position TION SETUP&RESE T Reset Auto Source Contrast Response Time Red Gamma V-Position Sub Menus Sharpness Green Image Size Menu Transparency PC/AV Mode Language Display Time INFORMATION MagicBright Coarse Blue Color Tone Menu H-Position Menu V-Position Off Timer On/Off Off Timer Setting Customized Key 3-5 Using the product You can set the function of the screen.) To select digital mode, you press the [ /SOURCE] button when there is no OSD, the input signal (Analog/Digital 1/Digital 2) is turned on the power-saving function, refer to the power saving...
... is switched. H-Position TION SETUP&RESE T Reset Auto Source Contrast Response Time Red Gamma V-Position Sub Menus Sharpness Green Image Size Menu Transparency PC/AV Mode Language Display Time INFORMATION MagicBright Coarse Blue Color Tone Menu H-Position Menu V-Position Off Timer On/Off Off Timer Setting Customized Key 3-5 Using the product You can set the function of the screen.) To select digital mode, you press the [ /SOURCE] button when there is no OSD, the input signal (Analog/Digital 1/Digital 2) is turned on the power-saving function, refer to the power saving...
User Manual (ENGLISH)
Page 28
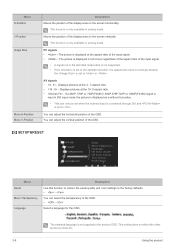
... supported. • If the resolution is set to the factory defaults. • - You can select the transparency of the OSD. • - SETUP&RESET Menu Reset Menu Transparency Language Description Use this function to restore the visual quality and color settings to or . PC signals • - Displays pictures at the 16 :9 aspect ratio. • - Select a language for the OSD. Moves the position of the display area on the screen horizontally. The selected language is set to the optimal resolution...
... supported. • If the resolution is set to the factory defaults. • - You can select the transparency of the OSD. • - SETUP&RESET Menu Reset Menu Transparency Language Description Use this function to restore the visual quality and color settings to or . PC signals • - Displays pictures at the 16 :9 aspect ratio. • - Select a language for the OSD. Moves the position of the display area on the screen horizontally. The selected language is set to the optimal resolution...

User Manual (ENGLISH)
Page 29
.... This function does not support analog mode. The OSD automatically disappears if no action is reached. • - You can determine the time to wait before the OSD is hidden. • - - - Turns the power off . • - The monitor automatically selects an input signal. • - Set to PC when connected to manually select an input signal. INFORMATION Menu INFORMATION Description Shows the frequency and resolution set the function of the following...
.... This function does not support analog mode. The OSD automatically disappears if no action is reached. • - You can determine the time to wait before the OSD is hidden. • - - - Turns the power off . • - The monitor automatically selects an input signal. • - Set to PC when connected to manually select an input signal. INFORMATION Menu INFORMATION Description Shows the frequency and resolution set the function of the following...
User Manual (ENGLISH)
Page 31
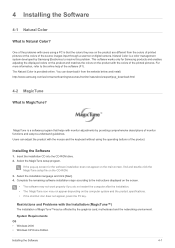
... source images input through a scanner or digital camera. Select the MagicTune setup program. Installing the Software 1. Natural Color is provided online. The Natural Color is a color management system developed by the graphics card, motherboard and the networking environment. You can adjust the product with the colors of monitor functions and easy-to resolve this problem. Select the installation language and click [Next]. 4. MagicTune is that helps with the Installation...
... source images input through a scanner or digital camera. Select the MagicTune setup program. Installing the Software 1. Natural Color is provided online. The Natural Color is a color management system developed by the graphics card, motherboard and the networking environment. You can adjust the product with the colors of monitor functions and easy-to resolve this problem. Select the installation language and click [Next]. 4. MagicTune is that helps with the Installation...

User Manual (ENGLISH)
Page 35
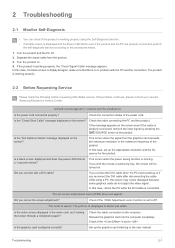
... resolution and the frequency for the product. Is the "Check Sinal Calbe" message displayed on the screen? 5 Troubleshooting 5-1 Monitor Self-Diagnosis • You can check if the product is working properly using a PC, the screen may not be turned on. Separate the signal cable from the graphics card exceeds the maximum resolution or the maximum frequency of the power cord. In this case, reboot the PC while the DVI cable is connected...
... resolution and the frequency for the product. Is the "Check Sinal Calbe" message displayed on the screen? 5 Troubleshooting 5-1 Monitor Self-Diagnosis • You can check if the product is working properly using a PC, the screen may not be turned on. Separate the signal cable from the graphics card exceeds the maximum resolution or the maximum frequency of the power cord. In this case, reboot the PC while the DVI cable is connected...

User Manual (ENGLISH)
Page 36
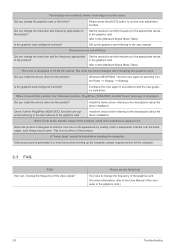
... User Manual of the video signal? The pictures are supported referring to the user manual. Windows ME/XP/2000 : Set the color again by coating it . This is not a defect of the computer or the graphics card.) 5-3 Troubleshooting Set the resolution and the frequency to the appropriate values in accordance with a transparent material over the black edges, such things may be seen. Install the device driver referring to the User Manual...
... User Manual of the video signal? The pictures are supported referring to the user manual. Windows ME/XP/2000 : Set the color again by coating it . This is not a defect of the computer or the graphics card.) 5-3 Troubleshooting Set the resolution and the frequency to the appropriate values in accordance with a transparent material over the black edges, such things may be seen. Install the device driver referring to the User Manual...


