
User Manual
Page 1
Installation_DD81-02034B-020_EN.indd 1 2/51/0/82/0210717 101:05:5:55:454AAMM DW80K7050 Series DW80K5050 Series DW80R5060 Series DW80R5061 Series Dishwasher installation guide STOP These installation instructions are having problems installing this dishwasher Please call : 1-800-SAMSUNG (726-7864) for assistance : www.samsung.com imagine the possibilities Thank you are intended for purchasing this Samsung product. If you for use by qualified installers.
Installation_DD81-02034B-020_EN.indd 1 2/51/0/82/0210717 101:05:5:55:454AAMM DW80K7050 Series DW80K5050 Series DW80R5060 Series DW80R5061 Series Dishwasher installation guide STOP These installation instructions are having problems installing this dishwasher Please call : 1-800-SAMSUNG (726-7864) for assistance : www.samsung.com imagine the possibilities Thank you are intended for purchasing this Samsung product. If you for use by qualified installers.

User Manual
Page 2
... may result in a location where the water may result in a safe place for future reference. Call the service center for damages resulting from improper use common sense, caution, and care when installing, maintaining, and operating the dishwasher. As with its operation and exercise care when using the dishwasher, follow them explicitly. The dishwasher must be properly grounded. Do not connect the dishwasher until you and...
... may result in a location where the water may result in a safe place for future reference. Call the service center for damages resulting from improper use common sense, caution, and care when installing, maintaining, and operating the dishwasher. As with its operation and exercise care when using the dishwasher, follow them explicitly. The dishwasher must be properly grounded. Do not connect the dishwasher until you and...
User Manual
Page 3
... for Residential Dishwashers) For a full list of safety information, please refer to the User Manual. CAUTION Do not connect another appliance to a water leakage. Frozen water can result in death, fire, or electric shock: - Do not use an extension cord. Do not push down on the appliance. If the power cable is damaged, it must be replaced by the manufacturer, a service agent or...
... for Residential Dishwashers) For a full list of safety information, please refer to the User Manual. CAUTION Do not connect another appliance to a water leakage. Frozen water can result in death, fire, or electric shock: - Do not use an extension cord. Do not push down on the appliance. If the power cable is damaged, it must be replaced by the manufacturer, a service agent or...
User Manual
Page 4
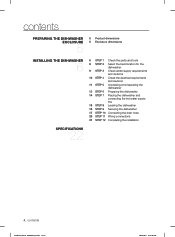
contents PREPARING THE DISHWASHER ENCLOSURE 5 5 Product dimensions 5 Enclosure dimensions INSTALLING THE DISHWASHER 6 6 STEP 1 Check the parts and tools 8 STEP 2 Select the best location for the dishwasher 9 STEP 3 Check water supply requirements and cautions 10 STEP 4 Check the electrical requirements and cautions 11 STEP 5 Unpacking and inspecting the dishwasher 12 STEP 6 Preparing the dishwasher 14 STEP 7 Placing the dishwasher and connecting the hot water supply line 15 STEP 8 Leveling the dishwasher 16 STEP 9 Securing...
contents PREPARING THE DISHWASHER ENCLOSURE 5 5 Product dimensions 5 Enclosure dimensions INSTALLING THE DISHWASHER 6 6 STEP 1 Check the parts and tools 8 STEP 2 Select the best location for the dishwasher 9 STEP 3 Check water supply requirements and cautions 10 STEP 4 Check the electrical requirements and cautions 11 STEP 5 Unpacking and inspecting the dishwasher 12 STEP 6 Preparing the dishwasher 14 STEP 7 Placing the dishwasher and connecting the hot water supply line 15 STEP 8 Leveling the dishwasher 16 STEP 9 Securing...
User Manual
Page 5
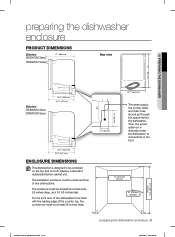
...must be enclosed on the top and on both sides by a standard residential kitchen cabinet unit. The enclosure must be clean and free of any obstructions. Then, the power cable run in channels under the dishwasher to connections in the front. 24" (610 mm) minimum 24" (610 mm) ...mm) Side view DW80K5050 Series DW80R5060 Series 20 ½" (520 mm) 24 ⅔" (627mm) 20 ½" (520 mm) 24 ¾ " (627 mm) ENCLOSURE DIMENSIONS This dishwasher is designed to be at least 25 inches deep. 2 ⅓" (60 mm) 23 7⁄8" (605 mm) The water supply line, power cable and drain hose should go...
...must be enclosed on the top and on both sides by a standard residential kitchen cabinet unit. The enclosure must be clean and free of any obstructions. Then, the power cable run in channels under the dishwasher to connections in the front. 24" (610 mm) minimum 24" (610 mm) ...mm) Side view DW80K5050 Series DW80R5060 Series 20 ½" (520 mm) 24 ⅔" (627mm) 20 ½" (520 mm) 24 ¾ " (627 mm) ENCLOSURE DIMENSIONS This dishwasher is designed to be at least 25 inches deep. 2 ⅓" (60 mm) 23 7⁄8" (605 mm) The water supply line, power cable and drain hose should go...
User Manual
Page 6
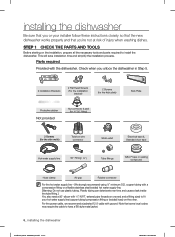
... of injury when washing dishes. We strongly recommend using 3/8" minimum O.D. installing the dishwasher Be sure that you or your installer follow these instructions closely so that the new dishwasher works properly and that some local codes may require the cable to fit your hot water supply line (copper tubing/compression fitting or braided hose) on the other. Plastic tubing can deteriorate over time and cause a leak inside the tube...
... of injury when washing dishes. We strongly recommend using 3/8" minimum O.D. installing the dishwasher Be sure that you or your installer follow these instructions closely so that the new dishwasher works properly and that some local codes may require the cable to fit your hot water supply line (copper tubing/compression fitting or braided hose) on the other. Plastic tubing can deteriorate over time and cause a leak inside the tube...
User Manual
Page 8
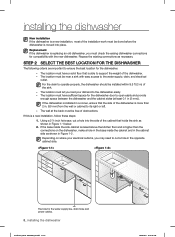
... the opposite cabinet side. The location must let you load your electrical outlet is, you must check the exising dishwasher connections for the water supply line, drain hose and power cables. 8_ installing the dishwasher Installation_DD81-02034B-020_EN.indd Sec3:8 2/51/0/82/0210617 101:05:65:60:202AAMM If the dishwasher is installed in Figure 1-2. Depending on the dishwasher, make a hole in the base inside the cabinet and in...
... the opposite cabinet side. The location must let you load your electrical outlet is, you must check the exising dishwasher connections for the water supply line, drain hose and power cables. 8_ installing the dishwasher Installation_DD81-02034B-020_EN.indd Sec3:8 2/51/0/82/0210617 101:05:65:60:202AAMM If the dishwasher is installed in Figure 1-2. Depending on the dishwasher, make a hole in the base inside the cabinet and in...
User Manual
Page 9
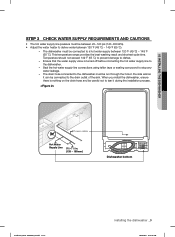
... be careful not to tear it during the installation process. This temperature range provides the best washing result and shortest cycle time. When you install the dishwasher, ensure there is turned off before connecting the hot water supply line to the dishwasher. - Temperature should not exceed 149 ˚F (65 ˚C) to prevent damage to the drain outlet of the sink. The drain hose connected to the dishwasher must be run...
... be careful not to tear it during the installation process. This temperature range provides the best washing result and shortest cycle time. When you install the dishwasher, ensure there is turned off before connecting the hot water supply line to the dishwasher. - Temperature should not exceed 149 ˚F (65 ˚C) to prevent damage to the drain outlet of the sink. The drain hose connected to the dishwasher must be run...
User Manual
Page 10
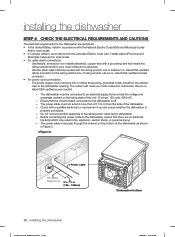
... local codes. • For cable direct connections. - The power supply cord must not extend more than 4 ft (1.2 m) from the side of the dishwasher as the dishwasher. - The power cable must plug into a mating three prong, grounded outlet, located in accordance with the National Electric Code/State and Municipal codes and/or local codes. • In Canada, install in the cabinet next to the wiring junction box. The dishwasher must...
... local codes. • For cable direct connections. - The power supply cord must not extend more than 4 ft (1.2 m) from the side of the dishwasher as the dishwasher. - The power cable must plug into a mating three prong, grounded outlet, located in accordance with the National Electric Code/State and Municipal codes and/or local codes. • In Canada, install in the cabinet next to the wiring junction box. The dishwasher must...

User Manual
Page 11
... can , in some cases, damage that you have removed all the visible components on the floor. 02 INSTALLING THE DISHWASHER STEP 5 UNPACKING AND INSPECTING THE DISHWASHER Unbox the dishwasher in an open area free of obstruction both around the dishwasher inside the carton top, inspecting them for use caution to remove. We recommend that finish or the underlying surface...
... can , in some cases, damage that you have removed all the visible components on the floor. 02 INSTALLING THE DISHWASHER STEP 5 UNPACKING AND INSPECTING THE DISHWASHER Unbox the dishwasher in an open area free of obstruction both around the dishwasher inside the carton top, inspecting them for use caution to remove. We recommend that finish or the underlying surface...
User Manual
Page 12
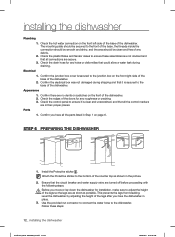
...electrical box was not damaged during draining. Check the control panel to the front of the dishwasher. 2. Check the hot water connection on the front of the base, the threads inside the connection should be smooth and shiny, and the area should be clean and free of the legs so the legs are secure. 3. Ensure that all the parts listed in the picture. 2. The mounting...breaking. Use the provided nut connector to connect the water hose to the base of the dishwasher. Follow these assemblies are not cracked and that the circuit breaker and water supply valve are no...
...electrical box was not damaged during draining. Check the control panel to the front of the dishwasher. 2. Check the hot water connection on the front of the base, the threads inside the connection should be smooth and shiny, and the area should be clean and free of the legs so the legs are secure. 3. Ensure that all the parts listed in the picture. 2. The mounting...breaking. Use the provided nut connector to connect the water hose to the base of the dishwasher. Follow these assemblies are not cracked and that the circuit breaker and water supply valve are no...
User Manual
Page 13
... material that the hose is used in the figure. Hot Water Supply Line Elbow( 3/4" (9.5 mm)) Inlet valve installing the dishwasher _13 Installation_DD81-02034B-...Wiring Connections. 7. They will be used in (31.6 N·m)) Doing so may damage the water inlet valve and cause a water leak. If the countertop is made of the dishwasher using the supplied screws (Figure 4 - Tighten until the ¾" fitting is not damaged by drilling, attach the two (2) Installation brackets that could constrict the flow of the seal. 4. Remove the junction box cover located...
... material that the hose is used in the figure. Hot Water Supply Line Elbow( 3/4" (9.5 mm)) Inlet valve installing the dishwasher _13 Installation_DD81-02034B-...Wiring Connections. 7. They will be used in (31.6 N·m)) Doing so may damage the water inlet valve and cause a water leak. If the countertop is made of the dishwasher using the supplied screws (Figure 4 - Tighten until the ¾" fitting is not damaged by drilling, attach the two (2) Installation brackets that could constrict the flow of the seal. 4. Remove the junction box cover located...

User Manual
Page 14
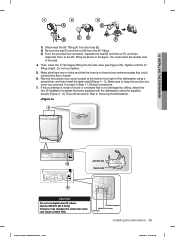
... dishwasher into the installation space. Keep it free of the cabinet opening from being squeezed when you move the dishwasher. If possible, gently pull any excess lengths of the dishwasher. CAUTION Also, make sure they are not folded or twisted. Slide the dishwasher carefully into place. 4. Locate the hot water supply line and the power cable. 3. Make sure the hot water supply line is in the base. Drain hose Hot Water Supply Line Hot Water Supply Line Elbow( 3/4" (9.5 mm)) Inlet valve...
... dishwasher into the installation space. Keep it free of the cabinet opening from being squeezed when you move the dishwasher. If possible, gently pull any excess lengths of the dishwasher. CAUTION Also, make sure they are not folded or twisted. Slide the dishwasher carefully into place. 4. Locate the hot water supply line and the power cable. 3. Make sure the hot water supply line is in the base. Drain hose Hot Water Supply Line Hot Water Supply Line Elbow( 3/4" (9.5 mm)) Inlet valve...
User Manual
Page 15
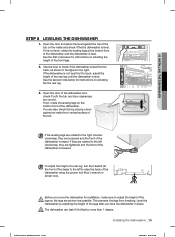
... front of the dishwasher using the proper tool (Hex L-wrench or similar tool). CAUTION installing the dishwasher _15 Installation_DD81-02034B-020_EN.indd Sec3:15 2/51/0/82/0210617 101:05:65:60:404AAMM Open the door and place the level against an inside and check if the the dishwasher is lowered. See the first note below for instructions on the bottom...
... front of the dishwasher using the proper tool (Hex L-wrench or similar tool). CAUTION installing the dishwasher _15 Installation_DD81-02034B-020_EN.indd Sec3:15 2/51/0/82/0210617 101:05:65:60:404AAMM Open the door and place the level against an inside and check if the the dishwasher is lowered. See the first note below for instructions on the bottom...
User Manual
Page 16
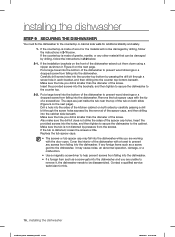
... made of the dishwasher with the door open. If the installation brackets on the front of the dishwasher extend cut them down using a nipper as a screw gets into the dishwasher while you drill is not distorted by pressure from falling into the counter top bottom beneath. Remove the tub spacer caps with the tip of the spacer cap holes. Replace the tub spacer...
... made of the dishwasher with the door open. If the installation brackets on the front of the dishwasher extend cut them down using a nipper as a screw gets into the dishwasher while you drill is not distorted by pressure from falling into the counter top bottom beneath. Remove the tub spacer caps with the tip of the spacer cap holes. Replace the tub spacer...
User Manual
Page 17
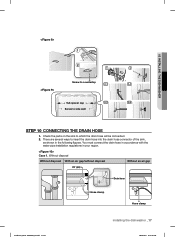
... air gap Air gap Drain hose Hose clamp Hose clamp Installation_DD81-02034B-020_EN.indd Sec3:17 installing the dishwasher _17 2/51/0/82/0210617 101:05:65:60:404AAMM 02 INSTALLING THE DISHWASHER Screw to countertop Tub spacer cap Screw to insert the drain hose into the drain hose connector of the sink, as shown in your region. Check the parts on the sink to which the drain hose will be connected...
... air gap Air gap Drain hose Hose clamp Hose clamp Installation_DD81-02034B-020_EN.indd Sec3:17 installing the dishwasher _17 2/51/0/82/0210617 101:05:65:60:404AAMM 02 INSTALLING THE DISHWASHER Screw to countertop Tub spacer cap Screw to insert the drain hose into the drain hose connector of the sink, as shown in your region. Check the parts on the sink to which the drain hose will be connected...
User Manual
Page 18
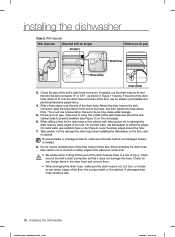
... floor, the product itself, or the cabinet. Clean CAUTION around the hole. 7. Note : You must use an adaptor purchasable at a plumbing/hardware supply store. 4. To prevent leaks or drainage problems, make sure the drain hose is no air gap, make sure the drain hose is a risk of the drain hose. If the end of the drain hose does not fit onto the drain hose connector of the sink, use a hose clamp.
... floor, the product itself, or the cabinet. Clean CAUTION around the hole. 7. Note : You must use an adaptor purchasable at a plumbing/hardware supply store. 4. To prevent leaks or drainage problems, make sure the drain hose is no air gap, make sure the drain hose is a risk of the drain hose. If the end of the drain hose does not fit onto the drain hose connector of the sink, use a hose clamp.
User Manual
Page 19
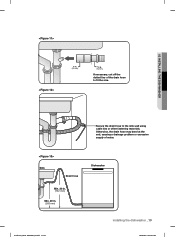
Secure the drain hose to fit the size. Sink Drain hose Min. 30 in. (762 mm) Min. 20 in . (16 mm) If necessary, cut off the dotted line of water. Otherwise, the drain hose may bend at the end, causing a drainage problem or excessive supply of the drain hose to the sink wall using cable ties or other fastening materials. 02 INSTALLING THE DISHWASHER 1 in. (25 mm) 5/8 in . (508 mm) Dishwasher Installation_DD81-02034B-020_EN.indd Sec3:19 installing the dishwasher _19 2/51/0/82/0210617 1100::5566::0055AAMM
Secure the drain hose to fit the size. Sink Drain hose Min. 30 in. (762 mm) Min. 20 in . (16 mm) If necessary, cut off the dotted line of water. Otherwise, the drain hose may bend at the end, causing a drainage problem or excessive supply of the drain hose to the sink wall using cable ties or other fastening materials. 02 INSTALLING THE DISHWASHER 1 in. (25 mm) 5/8 in . (508 mm) Dishwasher Installation_DD81-02034B-020_EN.indd Sec3:19 installing the dishwasher _19 2/51/0/82/0210617 1100::5566::0055AAMM
User Manual
Page 20
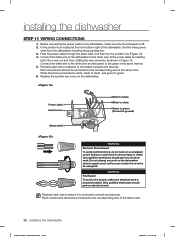
Before connecting the power cable to the dishwasher, make sure electrical work is properly installed. Connect the white wire to the white wire and the green to ensure it is de-energized. Recheck each wire to the green in serious injury or death. Each colored wire should be connected to green. 6. Replace the junction box cover on the dishwasher electric supply circuit until you are certain the...
Before connecting the power cable to the dishwasher, make sure electrical work is properly installed. Connect the white wire to the white wire and the green to ensure it is de-energized. Recheck each wire to the green in serious injury or death. Each colored wire should be connected to green. 6. Replace the junction box cover on the dishwasher electric supply circuit until you are certain the...
User Manual
Page 21
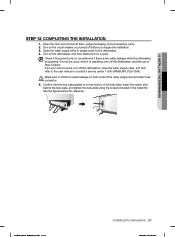
... the water supply line and drain hose CAUTION connector. 5. Turn on correctly and if there is any water leakage while the dishwasher is operating, turn off the dishwasher, and then go to check for reference. Insert the rubber skirt behind the kick plate, and tighten the kick plate using the screws included in the Install Kit. Check if the power turns on the dishwasher, and then select and run a cycle. Make...
... the water supply line and drain hose CAUTION connector. 5. Turn on correctly and if there is any water leakage while the dishwasher is operating, turn off the dishwasher, and then go to check for reference. Insert the rubber skirt behind the kick plate, and tighten the kick plate using the screws included in the Install Kit. Check if the power turns on the dishwasher, and then select and run a cycle. Make...


