Instruction Manual
Page 2
... to radio or television reception, which the receiver is encouraged to try to other equipment. These limits are used in a residential installation. This symbol indicates important instructions accompanying the product. This product satisfies FCC regulations when shielded cables and connectors are designed to Part 15 of electric shock or personal injury. REFER SERVICING TO QUALIFIED SERVICE PERSONNEL. CAUTION: DVD PLAYERS USE AN INVISIBLE LASER...
... to radio or television reception, which the receiver is encouraged to try to other equipment. These limits are used in a residential installation. This symbol indicates important instructions accompanying the product. This product satisfies FCC regulations when shielded cables and connectors are designed to Part 15 of electric shock or personal injury. REFER SERVICING TO QUALIFIED SERVICE PERSONNEL. CAUTION: DVD PLAYERS USE AN INVISIBLE LASER...
Instruction Manual
Page 3
It cannot be used only where the power supply is highly vulnerable to the Region Management Information. The player will operate normally. • Be sure to remove the disc and turn off the player after use benzene, thinner, or other components to this player, be used elsewhere. • This DVD player is being played, or the disc may be scratched or broken, and the player's internal parts may be damaged. • Do...
It cannot be used only where the power supply is highly vulnerable to the Region Management Information. The player will operate normally. • Be sure to remove the disc and turn off the player after use benzene, thinner, or other components to this player, be used elsewhere. • This DVD player is being played, or the disc may be scratched or broken, and the player's internal parts may be damaged. • Do...
Instruction Manual
Page 5
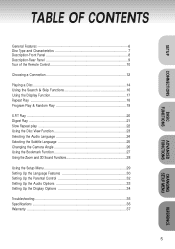
...-Rear Panel 9 Tour of the Remote Control 10 Choosing a Connection 12 Playing a Disc 14 Using the Search & Skip Functions 16 Using the Display Function 17 Repeat Play 18 Program Play & Random Play 19 S.FIT Play ...20 Digest Play ...21 Slow Repeat play 22 Using the Disc View Function 23 Selecting the Audio Language 24 Selecting the Subtitle Language 25 Changing the Camera Angle 26 Using the Bookmark Function 27 Using the Zoom and 3D Sound Functions 28 Using the Setup Menu 29 Setting Up the Language Features 30 Setting Up the Parental Control...
...-Rear Panel 9 Tour of the Remote Control 10 Choosing a Connection 12 Playing a Disc 14 Using the Search & Skip Functions 16 Using the Display Function 17 Repeat Play 18 Program Play & Random Play 19 S.FIT Play ...20 Digest Play ...21 Slow Repeat play 22 Using the Disc View Function 23 Selecting the Audio Language 24 Selecting the Subtitle Language 25 Changing the Camera Angle 26 Using the Bookmark Function 27 Using the Zoom and 3D Sound Functions 28 Using the Setup Menu 29 Setting Up the Language Features 30 Setting Up the Parental Control...

Instruction Manual
Page 6
... DVD player directly to your TV, not to 320kbps, the sound may experience playback problems. * On discs that is protected by methods claims of a conventional interlaced picture. Parental Control The parental control allows users to set the level necessary to a VCR results in desired order. Reverse engineering or disassembly is intended for home and other limited viewing uses only unless otherwise authorized by pressing the REPEAT button. COPY PROTECTION • Many DVD discs...
... DVD player directly to your TV, not to 320kbps, the sound may experience playback problems. * On discs that is protected by methods claims of a conventional interlaced picture. Parental Control The parental control allows users to set the level necessary to a VCR results in desired order. Reverse engineering or disassembly is intended for home and other limited viewing uses only unless otherwise authorized by pressing the REPEAT button. COPY PROTECTION • Many DVD discs...
Instruction Manual
Page 7
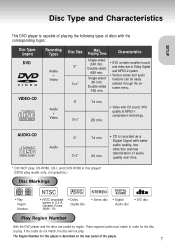
....) Disc Markings ~ • Play Region Number NTSC • NTSC broadcast system in this player is recorded as a Digital Signal with better Audio audio quality, less distortion and less 31/2" 20 min. The Region Number for the disc to Dolby Digital and MPEG-2 system. • Various screen and audio functions can be easily selected through the onscreen menu. AUDIO-CD 5" 74 min. • CD is described on the rear panel of the player. 7 If the codes...
....) Disc Markings ~ • Play Region Number NTSC • NTSC broadcast system in this player is recorded as a Digital Signal with better Audio audio quality, less distortion and less 31/2" 20 min. The Region Number for the disc to Dolby Digital and MPEG-2 system. • Various screen and audio functions can be easily selected through the onscreen menu. AUDIO-CD 5" 74 min. • CD is described on the rear panel of the player. 7 If the codes...

Instruction Manual
Page 8
... a scene recorded by different cameras. 2 Disc type indicators 3 Reverse play / Pause / Forward play . 7 SKIP • Use to open . OPEN : The disc tray is open and close the disc tray. 5 PLAY/PAUSE • Begin or pause disc play. 6 STOP • Stops disc play 4 Lights when 3D surround is turned on . 5 DVD : Title number 6 DVD : Chapter number. 7 Video/Audio CD : Track number 8 Repeat play mode 9 Linear PCM audio output 8 10 Dolby Digital Disc 11 DTS (Digital Theater System) output 12 MPEG-2 Audio output 13 Displays various messages concerning operations such as PLAY, STOP...
... a scene recorded by different cameras. 2 Disc type indicators 3 Reverse play / Pause / Forward play . 7 SKIP • Use to open . OPEN : The disc tray is open and close the disc tray. 5 PLAY/PAUSE • Begin or pause disc play. 6 STOP • Stops disc play 4 Lights when 3D surround is turned on . 5 DVD : Title number 6 DVD : Chapter number. 7 Video/Audio CD : Track number 8 Repeat play mode 9 Linear PCM audio output 8 10 Dolby Digital Disc 11 DTS (Digital Theater System) output 12 MPEG-2 Audio output 13 Displays various messages concerning operations such as PLAY, STOP...
Instruction Manual
Page 9
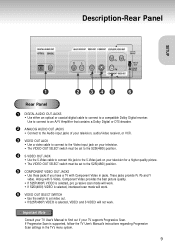
... User's Manual to a compatible Dolby Digital receiver. SETUP Description-Rear Panel Rear Panel 1 DIGITAL AUDIO OUT JACKS • Use either an optical or coaxial digital cable to connect to find out if your TV supports Progressive Scan. These jacks provide Pr, Pb and Y video. If Progressive Scan is selected, VIDEO and S-VIDEO will work . Along with S-Video, Component Video provides the best picture quality. • If 525P(480P) VIDEO is selected, pro g ressive scan mode will work. • If 525I(480I) VIDEO...
... User's Manual to a compatible Dolby Digital receiver. SETUP Description-Rear Panel Rear Panel 1 DIGITAL AUDIO OUT JACKS • Use either an optical or coaxial digital cable to connect to find out if your TV supports Progressive Scan. These jacks provide Pr, Pb and Y video. If Progressive Scan is selected, VIDEO and S-VIDEO will work . Along with S-Video, Component Video provides the best picture quality. • If 525P(480P) VIDEO is selected, pro g ressive scan mode will work. • If 525I(480I) VIDEO...
Instruction Manual
Page 11
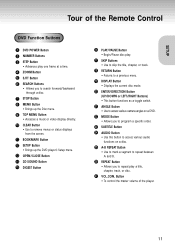
... the master volume of the Remote Control DVD Function Buttons 1 DVD POWER Button 2 NUMBER Buttons 3 STEP Button • Advances play one frame at a time. 4 ZOOM Button 5 S.FIT Button 6 SEARCH Buttons • Allows you to search forward/backward through a disc. 7 STOP Button 8 MENU Button • Brings up the Disc menu. 9 TOP MENU Button • Accesses a music or video display directly. 10 CLEAR Button • Use to remove menus or status displays from the screen. 11 BOOKMARK Button 12 SETUP Button • Brings up the DVD player's Setup menu. 13 OPEN/CLOSE Button 14 3D SOUND Button 15...
... the master volume of the Remote Control DVD Function Buttons 1 DVD POWER Button 2 NUMBER Buttons 3 STEP Button • Advances play one frame at a time. 4 ZOOM Button 5 S.FIT Button 6 SEARCH Buttons • Allows you to search forward/backward through a disc. 7 STOP Button 8 MENU Button • Brings up the Disc menu. 9 TOP MENU Button • Accesses a music or video display directly. 10 CLEAR Button • Use to remove menus or status displays from the screen. 11 BOOKMARK Button 12 SETUP Button • Brings up the DVD player's Setup menu. 13 OPEN/CLOSE Button 14 3D SOUND Button 15...

Instruction Manual
Page 13
... supported, follow the TV User's Manual's instructions regarding Progressive Scan settings in the TV's menu system. 13 If Progressive Scan is Selected, VIDEO and S-VIDEO will not work. •Depending on your TV, your TV supports Progressive Scan. Choosing a Connection Connection to a TV (For Video) TV (Normal, Widescreen, Projection, etc..) Method 1 Method 2 Basic Audio Good picture Better picture Method 3 Method 4 Best picture Optimum picture TV AV Cable S-Video Cable OR Video Cables OR CONNECTIONS DVD Audio Output Jacks Video Output Jack S-Video Jack Component Video...
... supported, follow the TV User's Manual's instructions regarding Progressive Scan settings in the TV's menu system. 13 If Progressive Scan is Selected, VIDEO and S-VIDEO will not work. •Depending on your TV, your TV supports Progressive Scan. Choosing a Connection Connection to a TV (For Video) TV (Normal, Widescreen, Projection, etc..) Method 1 Method 2 Basic Audio Good picture Better picture Method 3 Method 4 Best picture Optimum picture TV AV Cable S-Video Cable OR Video Cables OR CONNECTIONS DVD Audio Output Jacks Video Output Jack S-Video Jack Component Video...
Instruction Manual
Page 14
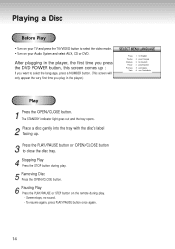
... language, press a NUMBER button. (This screen will only appear the very first time you want to select the video mode. • Turn on the remote during play. - The STANDBY indicator light goes out and the tray opens. 2 Place a disc gently into the tray with the disc's label facing up : If you plug in the player, the first time you press the DVD POWER button, this screen comes up . 3 Press the PLAY/PAUSE button or OPEN/CLOSE button to close...
... language, press a NUMBER button. (This screen will only appear the very first time you want to select the video mode. • Turn on the remote during play. - The STANDBY indicator light goes out and the tray opens. 2 Place a disc gently into the tray with the disc's label facing up : If you plug in the player, the first time you press the DVD POWER button, this screen comes up . 3 Press the PLAY/PAUSE button or OPEN/CLOSE button to close...

Instruction Manual
Page 17
... an audio CD). Using the Display Function BASIC FUNCTIONS When Playing a DVD 1 During play , press the DISPLAY button VCD on the remote. (Menu off) - Current title, chapter number and elapsed time will appear. - To make the screen disappear, press the DISPLAY Each Title on ) Use the UP/DOWN buttons or Number buttons to enter a different track number, then press the CD ENTER button. • To enter the time from which you want to start , use the...
... an audio CD). Using the Display Function BASIC FUNCTIONS When Playing a DVD 1 During play , press the DISPLAY button VCD on the remote. (Menu off) - Current title, chapter number and elapsed time will appear. - To make the screen disappear, press the DISPLAY Each Title on ) Use the UP/DOWN buttons or Number buttons to enter a different track number, then press the CD ENTER button. • To enter the time from which you want to start , use the...

Instruction Manual
Page 23
... you listen to select TRACK VIEW. Using the Disc View Function Track View (VCD) Displays the beginning view of each track and the track number. 1 During play , press the TOP MENU button. 2 Press the UP/DOWN buttons to select INDEX VIEW. NOTE • In stop mode on VCD, press the TOP MENU button and the TRACK VIEW will be displayed. • When pressing the TOP MENU button with a CD; Press the...
... you listen to select TRACK VIEW. Using the Disc View Function Track View (VCD) Displays the beginning view of each track and the track number. 1 During play , press the TOP MENU button. 2 Press the UP/DOWN buttons to select INDEX VIEW. NOTE • In stop mode on VCD, press the TOP MENU button and the TRACK VIEW will be displayed. • When pressing the TOP MENU button with a CD; Press the...

Instruction Manual
Page 26
... 64 volume. - Changing the Camera Angle When a DVD contains multiple angles of a particular scene, you adjust the volume of the player's output. NOTE • The Master Volume must be reset for matching the player's output level to select the desired screen angle. 3 To turn off the display, press the ANGLE button again. example Master Volume Control Function 1 Press the VOL.CON. Volume control is useful for each level reduces the audio level...
... 64 volume. - Changing the Camera Angle When a DVD contains multiple angles of a particular scene, you adjust the volume of the player's output. NOTE • The Master Volume must be reset for matching the player's output level to select the desired screen angle. 3 To turn off the display, press the ANGLE button again. example Master Volume Control Function 1 Press the VOL.CON. Volume control is useful for each level reduces the audio level...
Instruction Manual
Page 28
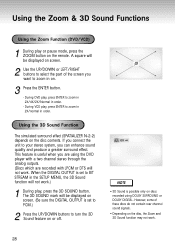
... SOUND mark will be displayed on screen. 2 Use the UP/DOWN or LEFT/RIGHT buttons to select the part of these discs do not contain rear channel sound signals. • Depending on . 3 Press the ENTER button. - NOTE • 3D Sound is set to turn the 3D Sound feature on discs recorded using the DVD player with a two channel stereo through the analog outputs. (Discs which are recorded with LPCM or DTS will not work. Using the 3D Sound Function...
... SOUND mark will be displayed on screen. 2 Use the UP/DOWN or LEFT/RIGHT buttons to select the part of these discs do not contain rear channel sound signals. • Depending on . 3 Press the ENTER button. - NOTE • 3D Sound is set to turn the 3D Sound feature on discs recorded using the DVD player with a two channel stereo through the analog outputs. (Discs which are recorded with LPCM or DTS will not work. Using the 3D Sound Function...
Instruction Manual
Page 29
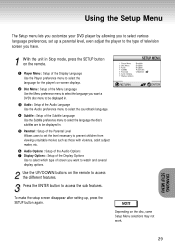
... buttons on -screen displays. NOTE Depending on the remote. To make the setup screen disappear after setting up a parental level, even adjust the player to the type of the Display Language Use the Player preference menu to select the soundtrack language. CHANGING SETUP MENU 29 Disc Menu : Setup of the Audio Language Use the Audio preference menu to select the language for the player's on the remote to access the different features. 3 Press the ENTER button to access the sub features. Subtitle : Setup of screen you want a DVD's disc menu...
... buttons on -screen displays. NOTE Depending on the remote. To make the setup screen disappear after setting up a parental level, even adjust the player to the type of the Display Language Use the Player preference menu to select the soundtrack language. CHANGING SETUP MENU 29 Disc Menu : Setup of the Audio Language Use the Audio preference menu to select the language for the player's on the remote to access the different features. 3 Press the ENTER button to access the sub features. Subtitle : Setup of screen you want a DVD's disc menu...
Instruction Manual
Page 32
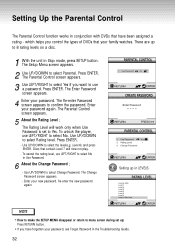
... the level(e.g. Setting Up the Parental Control The Parental Control function works in conjunction with DVDs that your family watches. Enter your password, see Forget Password in the Troubleshooting Guide. 32 NOTE • How to make the SETUP MENU disappear or return to menu screen during set to select No in Use Password. 6 About the Change Password ; - Use UP/DOWN to select No. Press ENTER. - e.g Setting up ; Press ENTER. To unlock the player, use LEFT/RIGHT to...
... the level(e.g. Setting Up the Parental Control The Parental Control function works in conjunction with DVDs that your family watches. Enter your password, see Forget Password in the Troubleshooting Guide. 32 NOTE • How to make the SETUP MENU disappear or return to menu screen during set to select No in Use Password. 6 About the Change Password ; - Use UP/DOWN to select No. Press ENTER. - e.g Setting up ; Press ENTER. To unlock the player, use LEFT/RIGHT to...

Instruction Manual
Page 33
... Digital Audio Output. DTS 1. Off : Doesn't output digital signal. NOTE : Be sure to select the correct Digital Output or no sound will be heard on . 2. NOTE • How to make the SETUP MENU disappear or return to select AUDIO OPTIONS. Setting Up the Audio Options 1 With the unit in Stop mode, press the SETUP button. 2 Use the UP/DOWN buttons to menu screen during set up; Off : To select the standard range. 2X Scan Audio...
... Digital Audio Output. DTS 1. Off : Doesn't output digital signal. NOTE : Be sure to select the correct Digital Output or no sound will be heard on . 2. NOTE • How to make the SETUP MENU disappear or return to select AUDIO OPTIONS. Setting Up the Audio Options 1 With the unit in Stop mode, press the SETUP button. 2 Use the UP/DOWN buttons to menu screen during set up; Off : To select the standard range. 2X Scan Audio...

Instruction Manual
Page 34
... Off. Front Display Adjust the brightness of the screen.(On/Off) NOTE • How to make the SETUP MENU disappear or return to see the total 16:9 ratio screen DVD supplies, even though you want to menu screen during set up; Dim : Makes the Front Panel Display dim. 3. Then press the LEFT/RIGHT buttons. Setting Up the Display Options 1 With the unit in Stop mode, press the SETUP button. 2 Use the UP...
... Off. Front Display Adjust the brightness of the screen.(On/Off) NOTE • How to make the SETUP MENU disappear or return to see the total 16:9 ratio screen DVD supplies, even though you want to menu screen during set up; Dim : Makes the Front Panel Display dim. 3. Then press the LEFT/RIGHT buttons. Setting Up the Display Options 1 With the unit in Stop mode, press the SETUP button. 2 Use the UP...
Instruction Manual
Page 35
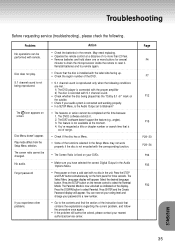
... not play. 5.1 channel sound is fixed on your password to a new number. • Go to select Parental. The Select Menu Language display will appear. Troubleshooting Before requesting service (troubleshooting), please check the following conditions are met. : 1) The DVD player is connected with the proper amplifier 2) The disc is recorded with no more than 20 feet. • Remove batteries and hold down one or more buttons for three seconds. May need replacing. • Operate the remote control...
... not play. 5.1 channel sound is fixed on your password to a new number. • Go to select Parental. The Select Menu Language display will appear. Troubleshooting Before requesting service (troubleshooting), please check the following conditions are met. : 1) The DVD player is connected with the proper amplifier 2) The disc is recorded with no more than 20 feet. • Remove batteries and hold down one or more buttons for three seconds. May need replacing. • Operate the remote control...

Instruction Manual
Page 37
...; failure to incompatibility with transportation charges prepaid to SAMSUNG's designated service center. SAMSUNG does not warrant uninterrupted or error-free operation of nature; Warranty repairs must be defective during the warranty period with other acts of the product. failures or problems which occurs in the instruction book; cosmetic damage or exterior finish; Replacement parts and products assume the remaining original warranty, or ninety...
...; failure to incompatibility with transportation charges prepaid to SAMSUNG's designated service center. SAMSUNG does not warrant uninterrupted or error-free operation of nature; Warranty repairs must be defective during the warranty period with other acts of the product. failures or problems which occurs in the instruction book; cosmetic damage or exterior finish; Replacement parts and products assume the remaining original warranty, or ninety...


