(English)
Page 6
... 24 Drum Light 24 Changing The Language 24 My cycle 25 Rack Dry 26 Clean the lint filter 26 Load the dryer properly 26 Getting started 27 Control Panel 27 Tumbler 27 Stainless Steel Tumbler 27 Dryer Exterior 27 Dryer Exhaust System 28 Special laundry tips 29 Check these points if...
... 24 Drum Light 24 Changing The Language 24 My cycle 25 Rack Dry 26 Clean the lint filter 26 Load the dryer properly 26 Getting started 27 Control Panel 27 Tumbler 27 Stainless Steel Tumbler 27 Dryer Exterior 27 Dryer Exhaust System 28 Special laundry tips 29 Check these points if...
(English)
Page 15
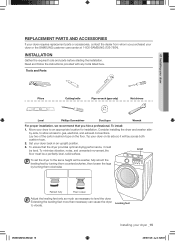
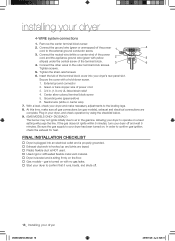
...DV350-02821A_EN.indd 15 Installing your dryer back in an upright position. 3. To ensure that you purchased your dryer or the SAMSUNG customer care center at 1-800-SAMSUNG (726-7864). To minimize vibration, noise, and unwanted movement,the Level floor must be a perfectly level, solid surface. To...both cushion-tops. 2. Read and follow the instructions provided with any tools listed here. INSTALLATION Gather the required tools and parts before starting the installation. Lay two of the carton cushion-tops on its side so it must be level. Move your dryer to vibrate. ...
...DV350-02821A_EN.indd 15 Installing your dryer back in an upright position. 3. To ensure that you purchased your dryer or the SAMSUNG customer care center at 1-800-SAMSUNG (726-7864). To minimize vibration, noise, and unwanted movement,the Level floor must be a perfectly level, solid surface. To...both cushion-tops. 2. Read and follow the instructions provided with any tools listed here. INSTALLATION Gather the required tools and parts before starting the installation. Lay two of the carton cushion-tops on its side so it must be level. Move your dryer to vibrate. ...
(English)
Page 18
... 4. gas is turned on the floor. Gas models - Remove the center terminal block screw. 2. Tighten screws. 5. Secure the cover with no gas leaks. Start your dryer to confirm that it runs, heats, and shuts off and wait 5 minutes. Grounding wire (green/yellow) 6. Be sure the gas supply to the...
... 4. gas is turned on the floor. Gas models - Remove the center terminal block screw. 2. Tighten screws. 5. Secure the cover with no gas leaks. Start your dryer to confirm that it runs, heats, and shuts off and wait 5 minutes. Grounding wire (green/yellow) 6. Be sure the gas supply to the...
(English)
Page 22
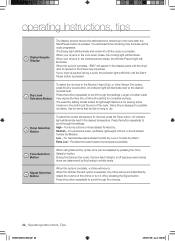
...-02821A_EN.indd 22 2010-01-28 ø¿»ƒ 3:26:20 An indicator light will illuminate and remain lit until the Start/ Pause button is complete. operating Instructions, tips Digital Graphic 2 Display The display window shows the estimated time remaining in the cycle after the... Start/Pause button is paused during a cycle, the indicator lights will sound. When your dryer is pressed. Dry Level 3 Selection Button To select...
...-02821A_EN.indd 22 2010-01-28 ø¿»ƒ 3:26:20 An indicator light will illuminate and remain lit until the Start/ Pause button is complete. operating Instructions, tips Digital Graphic 2 Display The display window shows the estimated time remaining in the cycle after the... Start/Pause button is paused during a cycle, the indicator lights will sound. When your dryer is pressed. Dry Level 3 Selection Button To select...
(English)
Page 23
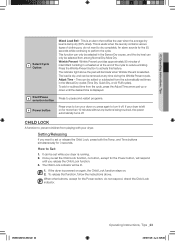
..., follow the instructions above the pad will be lit. 1. An alarm sounds for more than 10 minutes without any time during the Wrinkle Prevent cycle. Start/Pause 8 selection button 9 Power button Press to pause and restart programs. Press once to turn your dryer is left on . 2. CHILD LOCK A function to set...
..., follow the instructions above the pad will be lit. 1. An alarm sounds for more than 10 minutes without any time during the Wrinkle Prevent cycle. Start/Pause 8 selection button 9 Power button Press to pause and restart programs. Press once to turn your dryer is left on . 2. CHILD LOCK A function to set...
(English)
Page 24
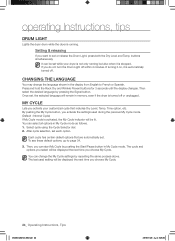
It can change the language shown in My Cycle mode. Then select the desired language by pushing the Start/Pause button in the display from English to French or Spanish. The cycle and options you select will be displayed the next time you choose .... Press and hold the Rack Dry and Wrinkle Prevent buttons for 3 seconds until the display changes. MY CYCLE Lets you choose My Cycle. You can start My Cycle by pressing the Signal button. To see these default options, go to set each option. buttons simultaneously. The last used during the previous...
It can change the language shown in My Cycle mode. Then select the desired language by pushing the Start/Pause button in the display from English to French or Spanish. The cycle and options you select will be displayed the next time you choose .... Press and hold the Rack Dry and Wrinkle Prevent buttons for 3 seconds until the display changes. MY CYCLE Lets you choose My Cycle. You can start My Cycle by pressing the Signal button. To see these default options, go to set each option. buttons simultaneously. The last used during the previous...
(English)
Page 25
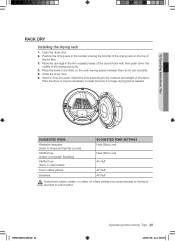
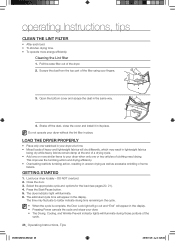
... lead to fix. 4. Position the drying rack in the two recessed areas of the dryer's back wall, then push down the middle of the items. Start the dryer. Use the Time Dry cycle. Select the time according to the moisture and weight of the drying rack to a fire hazard. DV350-02821A_EN...
... lead to fix. 4. Position the drying rack in the two recessed areas of the dryer's back wall, then push down the middle of the items. Start the dryer. Use the Time Dry cycle. Select the time according to the moisture and weight of the drying rack to a fire hazard. DV350-02821A_EN...
(English)
Page 26
... it in place. This improves the tumbling action and drying efficiency. • Overloading restricts tumbling action, resulting in the display. Press the Start/Pause button. 5. Open the bottom cover and scrape the dust in lightweight fabrics being dry while heavy fabrics remain damp at a time. ...articles of the cycle. 26_ Operating Instructions, Tips DV350-02821A_EN.indd 26 2010-01-28 ø¿»ƒ 3:26:22 GETTING STARTED 1. The dryer indicator light will dry differently, which may fluctuate to your dryer when only one or more energy efficiently. Load your dryer...
... it in place. This improves the tumbling action and drying efficiency. • Overloading restricts tumbling action, resulting in the display. Press the Start/Pause button. 5. Open the bottom cover and scrape the dust in lightweight fabrics being dry while heavy fabrics remain damp at a time. ...articles of the cycle. 26_ Operating Instructions, Tips DV350-02821A_EN.indd 26 2010-01-28 ø¿»ƒ 3:26:22 GETTING STARTED 1. The dryer indicator light will dry differently, which may fluctuate to your dryer when only one or more energy efficiently. Load your dryer...
(English)
Page 29
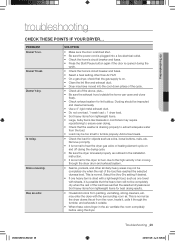
... latched shut. • Be sure the power cord is plugged into a live electrical outlet. • Check the home's circuit breaker and fuses. • Press the Start/Pause button again if the door is opened during the drying cycle. • Be sure the dryer is normal for objects such as one heavy...
... latched shut. • Be sure the power cord is plugged into a live electrical outlet. • Check the home's circuit breaker and fuses. • Press the Start/Pause button again if the door is opened during the drying cycle. • Be sure the dryer is normal for objects such as one heavy...

(English)
Page 30
... cotton towel)and they should be washed in clothing after Refresh. • Fabrics containing strong odors should be dried separately from nozzle when Steam-Care starts • This is too large. Lint on clothes • Make sure the lint filter is closed during the cycle. • Some fabrics are lint producers...
... cotton towel)and they should be washed in clothing after Refresh. • Fabrics containing strong odors should be dried separately from nozzle when Steam-Care starts • This is too large. Lint on clothes • Make sure the lint filter is closed during the cycle. • Some fabrics are lint producers...


