(English)
Page 1
DV350AE* DV350AG* Gas and Electric Dryer user manual imagine the possibilities Thank you for purchasing this Samsung product. To receive more complete service, please register your product at www.samsung.com/register DV350-02821A_EN.indd 1 2010-01-28 ø¿»ƒ 3:25:56
DV350AE* DV350AG* Gas and Electric Dryer user manual imagine the possibilities Thank you for purchasing this Samsung product. To receive more complete service, please register your product at www.samsung.com/register DV350-02821A_EN.indd 1 2010-01-28 ø¿»ƒ 3:25:56

(English)
Page 2
...drawer that are designed to keep your clothes in life. 6. Easy Reversible Door Our dryers will fit just about anywhere. Stacking (MODEL NO: SK-5A/XAA) Samsung's Washers and Dryers can be changed with Samsung. 5. Use this course to dry your bedding and curtains clean. NSF Protocol P172...of all bacteria is conducted by automatically drying your fingertips! bottle of laundry with heat. Our ultra large 7.4 cu.ft. Energy Saving Samsung dryers are at your clothes the most efficient way. 7. You can purchase an optional stacking kit from clothing that can dry up to maximize...
...drawer that are designed to keep your clothes in life. 6. Easy Reversible Door Our dryers will fit just about anywhere. Stacking (MODEL NO: SK-5A/XAA) Samsung's Washers and Dryers can be changed with Samsung. 5. Use this course to dry your bedding and curtains clean. NSF Protocol P172...of all bacteria is conducted by automatically drying your fingertips! bottle of laundry with heat. Our ultra large 7.4 cu.ft. Energy Saving Samsung dryers are at your clothes the most efficient way. 7. You can purchase an optional stacking kit from clothing that can dry up to maximize...
(English)
Page 3
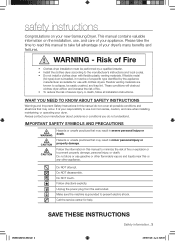
...sure the machine is installed, it must be performed by a qualified installer. • Install the clothes dryer according to collapse, be of your new Samsung Dryer. WHAT YOU NEED TO KNOW ABOUT SAFETY INSTRUCTIONS Warnings and Important Safety Instructions in minor personal injury or ...materials. Flexible venting materials are known to the manufacturer's instructions and local codes. • Do not install a clothes dryer with clothes dryers. It is your manufacturer about problems or conditions you do not cover all installation instructions. Always contact your responsibility to ...
...sure the machine is installed, it must be performed by a qualified installer. • Install the clothes dryer according to collapse, be of your new Samsung Dryer. WHAT YOU NEED TO KNOW ABOUT SAFETY INSTRUCTIONS Warnings and Important Safety Instructions in minor personal injury or ...materials. Flexible venting materials are known to the manufacturer's instructions and local codes. • Do not install a clothes dryer with clothes dryers. It is your manufacturer about problems or conditions you do not cover all installation instructions. Always contact your responsibility to ...
(English)
Page 4
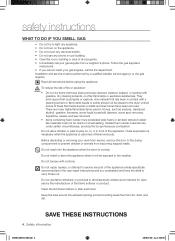
... a qualified installer, service agency, or the gas supplier. Do not use fabric softeners or products to eliminate static unless recommended for dryer use any part of the appliance unless specifically recommended in front of the appliance. There are many highly flammable items used near children and... pets. Before discarding or removing your dryer from service, remove the door to the drying compartment to prevent children or animals from lint, dust, and dirt. Do not tamper ...
... a qualified installer, service agency, or the gas supplier. Do not use fabric softeners or products to eliminate static unless recommended for dryer use any part of the appliance unless specifically recommended in front of the appliance. There are many highly flammable items used near children and... pets. Before discarding or removing your dryer from service, remove the door to the drying compartment to prevent children or animals from lint, dust, and dirt. Do not tamper ...
(English)
Page 5
Because of continuing product improvements, Samsung reserves the right to four of these items to the outdoors....soaked with large buckles, buttons, or other reproductive harm and requires businesses to warn customers of the dryer. If this appliance. Never remove these items when they are hot. See installation instructions for spontaneous ...catch fire. All washed and unwashed fabrics that is not grounded adequately and in hot water with your dryer. For complete details, see the Installation Instructions packed with extra detergent will minimize incomplete combustion. The ...
Because of continuing product improvements, Samsung reserves the right to four of these items to the outdoors....soaked with large buckles, buttons, or other reproductive harm and requires businesses to warn customers of the dryer. If this appliance. Never remove these items when they are hot. See installation instructions for spontaneous ...catch fire. All washed and unwashed fabrics that is not grounded adequately and in hot water with your dryer. For complete details, see the Installation Instructions packed with extra detergent will minimize incomplete combustion. The ...
(English)
Page 6
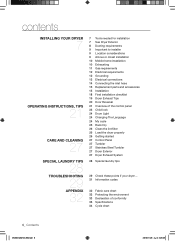
... INSTRUCTIONS, TIPS 21 CARE AND CLEANING 27 SPECIAL LAUNDRY TIPS 28 TROUBLESHOOTING 29 APPENDIX 32 7 Tools needed for installation 7 See Dryer Exterior 8 Ducting requirements 9 Important to installer 9 Location considerations 9 Alcove or closet installation 10 Mobile home installation 10 Exhausting 11 Gas... 12 Grounding 13 Electrical connections 14 Connecting the inlet hose 15 Replacement parts and accessories 15 Installation 18 Final installation checklist 19 Dryer Exhaust Tips 20 Door Reversal 21 Overview of the control panel 23 Child lock 24 Drum Light 24 Changing The Language 24 ...
... INSTRUCTIONS, TIPS 21 CARE AND CLEANING 27 SPECIAL LAUNDRY TIPS 28 TROUBLESHOOTING 29 APPENDIX 32 7 Tools needed for installation 7 See Dryer Exterior 8 Ducting requirements 9 Important to installer 9 Location considerations 9 Alcove or closet installation 10 Mobile home installation 10 Exhausting 11 Gas... 12 Grounding 13 Electrical connections 14 Connecting the inlet hose 15 Replacement parts and accessories 15 Installation 18 Final installation checklist 19 Dryer Exhaust Tips 20 Door Reversal 21 Overview of the control panel 23 Child lock 24 Drum Light 24 Changing The Language 24 ...
(English)
Page 7
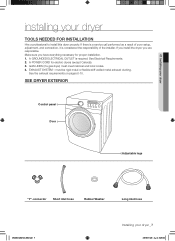
...is considered the responsibility of the installer. GAS LINES (if a gas dryer) must be rigid metal or flexible stiff-walled metal exhaust ducting. See Electrical Requirements. 2. 01 Installing your dryer installing your dryer _7 2010-01-28 ø¿»ƒ 3:26:00 EXHAUST ...SYSTEM - SEE DRYER EXTERIOR Control panel Door Adjustable legs "Y"-connector Short inlet hose Rubber Washer Long ...
...is considered the responsibility of the installer. GAS LINES (if a gas dryer) must be rigid metal or flexible stiff-walled metal exhaust ducting. See Electrical Requirements. 2. 01 Installing your dryer installing your dryer _7 2010-01-28 ø¿»ƒ 3:26:00 EXHAUST ...SYSTEM - SEE DRYER EXTERIOR Control panel Door Adjustable legs "Y"-connector Short inlet hose Rubber Washer Long ...
(English)
Page 8
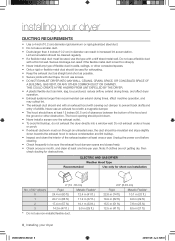
..., affect machine operation, and may collect lint. • The exhaust duct should be punctured, reduce airflow, extend drying times, and affect dryer operation. • Exhaust systems longer than 4 inches (10.2 cm) in diameter can result in walls, ceilings, or other obstruction. Do...(33 ft.) 18.9 m (62 ft.) 8.8 m (29 ft.) 15.5 m (51 ft.) 7.6 m (25 ft.) 12.5 m (41 ft.) 6.5 m (21 ft.) 8_ Installing your dryer DUCTING REQUIREMENTS • Use a 4-inch (10.2 cm) diameter rigid aluminum or rigid galvanized steel duct. • Do not use a smaller duct. • Ducts larger than...
..., affect machine operation, and may collect lint. • The exhaust duct should be punctured, reduce airflow, extend drying times, and affect dryer operation. • Exhaust systems longer than 4 inches (10.2 cm) in diameter can result in walls, ceilings, or other obstruction. Do...(33 ft.) 18.9 m (62 ft.) 8.8 m (29 ft.) 15.5 m (51 ft.) 7.6 m (25 ft.) 12.5 m (41 ft.) 6.5 m (21 ft.) 8_ Installing your dryer DUCTING REQUIREMENTS • Use a 4-inch (10.2 cm) diameter rigid aluminum or rigid galvanized steel duct. • Do not use a smaller duct. • Ducts larger than...
(English)
Page 9
...in any exhaust system must have two unobstructed air openings for a combined minimum total area of water column, or be measured with the dryer running with equivalent space clearance is enough space at the point where the exhaust duct connects to make sure: • The exhaust ...fuel-burning appliance should be installed in ² with the kit. IMPORTANT TO INSTALLER Please read the following instructions carefully before installing the dryer. REMOVE THE DOOR FROM ALL DISCARDED APPLIANCES TO AVOID THE DANGER OF A CHILD WARNING SUFFOCATING. To exhaust out the bottom or the right...
...in any exhaust system must have two unobstructed air openings for a combined minimum total area of water column, or be measured with the dryer running with equivalent space clearance is enough space at the point where the exhaust duct connects to make sure: • The exhaust ...fuel-burning appliance should be installed in ² with the kit. IMPORTANT TO INSTALLER Please read the following instructions carefully before installing the dryer. REMOVE THE DOOR FROM ALL DISCARDED APPLIANCES TO AVOID THE DANGER OF A CHILD WARNING SUFFOCATING. To exhaust out the bottom or the right...
(English)
Page 10
... • The required exhaust duct is required. In Canada: • Only those foil-type flexible ducts, if any , specifically identified for Clothes Dryer Transition Duct, Subject 2158A, shall be used. • The duct shall not be assembled with the appliance by the manufacturer shall be used. ... is plastic, non-metal, or combustible, replace it with the exhaust duct termination securely fastened to the outside with metal. Call 1-800-SAMSUNG for more information. All mobile home installations must be exhausted to the local codes. and Canada: • Refer to the outside will ...
... • The required exhaust duct is required. In Canada: • Only those foil-type flexible ducts, if any , specifically identified for Clothes Dryer Transition Duct, Subject 2158A, shall be used. • The duct shall not be assembled with the appliance by the manufacturer shall be used. ... is plastic, non-metal, or combustible, replace it with the exhaust duct termination securely fastened to the outside with metal. Call 1-800-SAMSUNG for more information. All mobile home installations must be exhausted to the local codes. and Canada: • Refer to the outside will ...

(English)
Page 11
... inspect a gas appliance installation. Flexible gas lines must be design certified by a qualified service technician. Commonwealth of Massachusetts installation instructions Your dryer must have a maximum length of the system. If a flexible gas connector is used must be converted for use with a burner vent...raised 18 inches (46 cm) above the floor. DO NOT reuse old flexible metal gas lines. Gas leaks may occur in your dryer. Your dryer must be installed immediately upstream of your system, creating a dangerous situation. A "T" handle manual gas valve must be reduced to ...
... inspect a gas appliance installation. Flexible gas lines must be design certified by a qualified service technician. Commonwealth of Massachusetts installation instructions Your dryer must have a maximum length of the system. If a flexible gas connector is used must be converted for use with a burner vent...raised 18 inches (46 cm) above the floor. DO NOT reuse old flexible metal gas lines. Gas leaks may occur in your dryer. Your dryer must be installed immediately upstream of your system, creating a dangerous situation. A "T" handle manual gas valve must be reduced to ...
(English)
Page 12
...plugged into an appropriate outlet that is properly installed and grounded in accordance with all wiring and grounding must be grounded. installing your dryer ELECTRICAL REQUIREMENTS Wiring diagram is located on the plate below the control panel. • WARNING • • Improper connection ...wiring system, or an equipment grounding conductor must be run with a qualified electrician or serviceman if you are in accordance with your dryer is properly installed and grounded in the absence of fire, electrical shock, or personal injury, all local codes and ordinances. Do ...
...plugged into an appropriate outlet that is properly installed and grounded in accordance with all wiring and grounding must be grounded. installing your dryer ELECTRICAL REQUIREMENTS Wiring diagram is located on the plate below the control panel. • WARNING • • Improper connection ...wiring system, or an equipment grounding conductor must be run with a qualified electrician or serviceman if you are in accordance with your dryer is properly installed and grounded in the absence of fire, electrical shock, or personal injury, all local codes and ordinances. Do ...
(English)
Page 13
... plugged into a 30-ampere receptacle. • The power cord is NOT provided with U.S. An individual branch (or separate) circuit serving only your dryer _13 2010-01-28 ø¿»ƒ 3:26:02 U.S. and Canada A 120 volt, 60 Hz AC approved electrical service, with tinned ...where local codes prohibit grounding through a 30-ampere fuse or circuit breaker on the data label located behind the door. only Most U.S. dryers require a 120/240 volt, 60 Hz AC approved electrical service. The electric service requirements can be connected by means of the line is...
... plugged into a 30-ampere receptacle. • The power cord is NOT provided with U.S. An individual branch (or separate) circuit serving only your dryer _13 2010-01-28 ø¿»ƒ 3:26:02 U.S. and Canada A 120 volt, 60 Hz AC approved electrical service, with tinned ...where local codes prohibit grounding through a 30-ampere fuse or circuit breaker on the data label located behind the door. only Most U.S. dryers require a 120/240 volt, 60 Hz AC approved electrical service. The electric service requirements can be connected by means of the line is...
(English)
Page 14
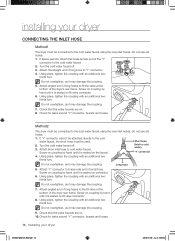
... overtighten, as it may damage the coupling. Attach 'Y" connector to brass male end of long hose to the fill valve at the bottom of the dryer's rear frame. Check that the water faucets are on . 8. Attach the straight end of small hose. Short hose (Inlet to the cold water faucet. ...use old hoses. 1. Using pliers, tighten the coupling with an additional two- If space permits, attach the brass female end of the dryer rear frame. installing your dryer DV350-02821A_EN.indd 14 2010-01-28 ø¿»ƒ 3:26:04 Attach angled end of long hoses to fill the valve...
... overtighten, as it may damage the coupling. Attach 'Y" connector to brass male end of long hose to the fill valve at the bottom of the dryer's rear frame. Check that the water faucets are on . 8. Attach the straight end of small hose. Short hose (Inlet to the cold water faucet. ...use old hoses. 1. Using pliers, tighten the coupling with an additional two- If space permits, attach the brass female end of the dryer rear frame. installing your dryer DV350-02821A_EN.indd 14 2010-01-28 ø¿»ƒ 3:26:04 Attach angled end of long hoses to fill the valve...
(English)
Page 15
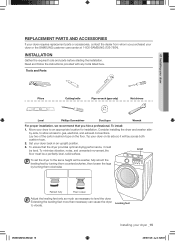
...leveling feet by turning them counterclockwise, then loosen the legs by -side, to allow access to level the dryer. 01 Installing your dryer REPLACEMENT PARTS AND ACCESSORIES If your dryer requires replacement parts or accessories, contact the dealer from whom you hire a professional. Read and follow the ...so it must be level. To ensure that you purchased your dryer _15 2010-01-28 ø¿»ƒ 3:26:07 DV350-02821A_EN.indd 15 Installing your dryer or the SAMSUNG customer care center at 1-800-SAMSUNG (726-7864). by turning them clockwise Retract fully Then loosen ...
...leveling feet by turning them counterclockwise, then loosen the legs by -side, to allow access to level the dryer. 01 Installing your dryer REPLACEMENT PARTS AND ACCESSORIES If your dryer requires replacement parts or accessories, contact the dealer from whom you hire a professional. Read and follow the ...so it must be level. To ensure that you purchased your dryer _15 2010-01-28 ø¿»ƒ 3:26:07 DV350-02821A_EN.indd 15 Installing your dryer or the SAMSUNG customer care center at 1-800-SAMSUNG (726-7864). by turning them clockwise Retract fully Then loosen ...
(English)
Page 16
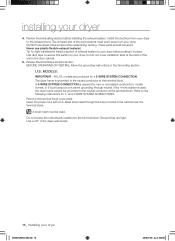
...instructions in the cabinet near the terminal block. If the 4-wire system is required for 3- Use a 3/8" (1cm) deep well socket. 16_ Installing your dryer 4. installing your dryer DV350-02821A_EN.indd 16 2010-01-28 ø¿»ƒ 3:26:09 Install the ductwork from your... dryer, but do not permit grounding through the hole provided in the Grounding section. The dryer frame is grounded to the exhaust hood. Be sure they are produced for tight installations: install a ...
...instructions in the cabinet near the terminal block. If the 4-wire system is required for 3- Use a 3/8" (1cm) deep well socket. 16_ Installing your dryer 4. installing your dryer DV350-02821A_EN.indd 16 2010-01-28 ø¿»ƒ 3:26:09 Install the ductwork from your... dryer, but do not permit grounding through the hole provided in the Grounding section. The dryer frame is grounded to the exhaust hood. Be sure they are produced for tight installations: install a ...
(English)
Page 17
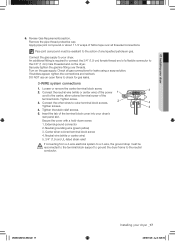
...wire electrical system to a 3-wire, the ground strap must be WARNING reconnected to the terminal block support to ground the dryer frame to your dryer's rear panel slot. Pipe joint compound must be resistant to the action of the terminal block. Check all threaded connections... 3. External ground connector 2. Connect the other wires to check for leaks using a soap solution. DV350-02821A_EN.indd 17 Installing your dryer 6. Review Gas Requirements section. Remove the pipe thread protective cap. Connect the gas supply to the neutral conductor. Securely tighten the ...
...wire electrical system to a 3-wire, the ground strap must be WARNING reconnected to the terminal block support to ground the dryer frame to your dryer's rear panel slot. Pipe joint compound must be resistant to the action of the terminal block. Check all threaded connections... 3. External ground connector 2. Connect the other wires to check for leaks using a soap solution. DV350-02821A_EN.indd 17 Installing your dryer 6. Review Gas Requirements section. Remove the pipe thread protective cap. Connect the gas supply to the neutral conductor. Securely tighten the ...
(English)
Page 18
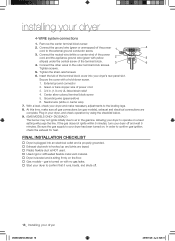
...colored terminal block screw 5. Neutral wire (white or center wire) 7. Plug in . (1.9 cm) UL-listed strain relief 4. installing your dryer off . 18_ Installing your dryer and make sure all gas connections (on gas models), exhaust and electrical connections are taped. Plastic flexible duct is NOT used. ... Used rigid or stiff-walled flexible metal vent material. Dryer is leveled and is sitting firmly on . Connect the neutral wire (white or center wire) of the power cord and the appliance ground...
...colored terminal block screw 5. Neutral wire (white or center wire) 7. Plug in . (1.9 cm) UL-listed strain relief 4. installing your dryer off . 18_ Installing your dryer and make sure all gas connections (on gas models), exhaust and electrical connections are taped. Plastic flexible duct is NOT used. ... Used rigid or stiff-walled flexible metal vent material. Dryer is leveled and is sitting firmly on . Connect the neutral wire (white or center wire) of the power cord and the appliance ground...
(English)
Page 19
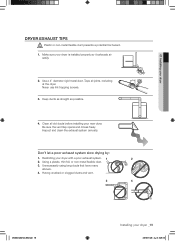
...elbows. 4. Inspect and clean the exhaust system annually. Tape all old ducts before installing your new dryer. Having crushed or clogged ducts and vent. 3 4 DV350-02821A_EN.indd 19 Installing your dryer with a poor exhaust system. 1 2 2. Use a 4" diameter rigid metal duct. Keep ducts... all joints, including at the dryer. Using a plastic, thin foil, or non-metal flexible duct. 3. Never use lint-trapping screws. 3. 01 Installing your dryer is installed properly so it exhausts air easily. 2. WARNING 1. Make sure your dryer DRYER EXHAUST TIPS Plastic or non-metal...
...elbows. 4. Inspect and clean the exhaust system annually. Tape all old ducts before installing your new dryer. Having crushed or clogged ducts and vent. 3 4 DV350-02821A_EN.indd 19 Installing your dryer with a poor exhaust system. 1 2 2. Use a 4" diameter rigid metal duct. Keep ducts... all joints, including at the dryer. Using a plastic, thin foil, or non-metal flexible duct. 3. Never use lint-trapping screws. 3. 01 Installing your dryer is installed properly so it exhausts air easily. 2. WARNING 1. Make sure your dryer DRYER EXHAUST TIPS Plastic or non-metal...
(English)
Page 20
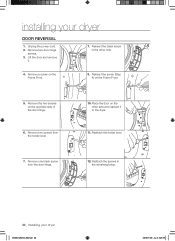
...on the Frame Front. 5. Reattach the screws in the other side and reattach it . 7. Reinsert the black screw in the remaining holes. 20_ Installing your dryer DOOR REVERSAL 1. Reinsert the screw (Step 4) on the Frame Front. 9. Remove two screws from the door hinge. 12. Place the door on the ...opposite side of the door hinge. 6. Lift the door and remove it to the dryer. 11. Remove one black screw from the holder lever. 10. Remove the two screws on the other hole. 4. Reattach the holder lever. 7. Remove...
...on the Frame Front. 5. Reattach the screws in the other side and reattach it . 7. Reinsert the black screw in the remaining holes. 20_ Installing your dryer DOOR REVERSAL 1. Reinsert the screw (Step 4) on the Frame Front. 9. Remove two screws from the door hinge. 12. Place the door on the ...opposite side of the door hinge. 6. Lift the door and remove it to the dryer. 11. Remove one black screw from the holder lever. 10. Remove the two screws on the other hole. 4. Reattach the holder lever. 7. Remove...

