User Manual
Page 2
... information What you need to know about the safety instructions Important safety symbols Important safety precautions Warnings Cautions Before installation Key installation requirements Location considerations Ducting requirements Exhausting requirements Electrical requirements Installation What's included Step-by-step installation Exhaust ducting guide Changing the direction of the exhaust duct (optional) Switching the door position Before you start Sort and load Functional prerequisite Operations Feature panel Simple steps to start Cycle overview Cycle guide Special features 2 English...
... information What you need to know about the safety instructions Important safety symbols Important safety precautions Warnings Cautions Before installation Key installation requirements Location considerations Ducting requirements Exhausting requirements Electrical requirements Installation What's included Step-by-step installation Exhaust ducting guide Changing the direction of the exhaust duct (optional) Switching the door position Before you start Sort and load Functional prerequisite Operations Feature panel Simple steps to start Cycle overview Cycle guide Special features 2 English...
User Manual
Page 4
... in a safe location close to take some time to use and care of personal injury or material damage exists. Please store the manual in personal injury and/or property damage. Use this appliance only for future reference. Because the following operating instructions cover various models, the characteristics of your responsibility to read this instruction manual. NOTE Indicates that uses electricity and moving parts, potential hazards...
... in a safe location close to take some time to use and care of personal injury or material damage exists. Please store the manual in personal injury and/or property damage. Use this appliance only for future reference. Because the following operating instructions cover various models, the characteristics of your responsibility to read this instruction manual. NOTE Indicates that uses electricity and moving parts, potential hazards...

User Manual
Page 6
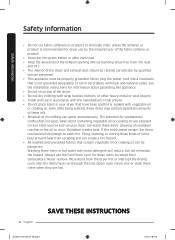
... the drum is energized. 6 English SAVE THESE INSTRUCTIONS DV22K6800-03650A-00_EN (US)_151211.indd 6 2015-12-11 7:15:41 Clean the lint screen before or after each load. 13. Do not use fabric softeners or products to eliminate static unless recommended by qualified service personnel. 16. Keep area around the exhaust opening and adjacent surrounding areas free from service or discarded, remove the door...
... the drum is energized. 6 English SAVE THESE INSTRUCTIONS DV22K6800-03650A-00_EN (US)_151211.indd 6 2015-12-11 7:15:41 Clean the lint screen before or after each load. 13. Do not use fabric softeners or products to eliminate static unless recommended by qualified service personnel. 16. Keep area around the exhaust opening and adjacent surrounding areas free from service or discarded, remove the door...
User Manual
Page 7
...used in front of the appliance. To reduce the risk of fire or explosion: • Do not dry items that have been previously cleaned, washed, soaked, or spotted with the controls. • Do not repair, replace, or attempt to service any part of the appliance unless specifically instructed to carry out the procedure. Heated... that could damage your dryer from service, remove the door to the drying compartment to prevent children or animals from becoming trapped inside. • Do not reach into the appliance when the drum is moving. • Do not install or store this appliance where...
...used in front of the appliance. To reduce the risk of fire or explosion: • Do not dry items that have been previously cleaned, washed, soaked, or spotted with the controls. • Do not repair, replace, or attempt to service any part of the appliance unless specifically instructed to carry out the procedure. Heated... that could damage your dryer from service, remove the door to the drying compartment to prevent children or animals from becoming trapped inside. • Do not reach into the appliance when the drum is moving. • Do not install or store this appliance where...
User Manual
Page 8
...codes. Even after each load. • Keep the area around the exhaust opening and surrounding areas free from lint, dust, and dirt. • The interior of the dryer and exhaust duct should be cleaned periodically by the manufacturer of the dryer. • Do not dry clothing with large buckles, buttons, or other heavy metal or solid objects. • Install and use in accordance with the manufacturer's instructions...or product. • Clean the lint screen before or after being washed, these items may prevent heat from the dryer hot or interrupt the drying cycle until the items have ...
...codes. Even after each load. • Keep the area around the exhaust opening and surrounding areas free from lint, dust, and dirt. • The interior of the dryer and exhaust duct should be cleaned periodically by the manufacturer of the dryer. • Do not dry clothing with large buckles, buttons, or other heavy metal or solid objects. • Install and use in accordance with the manufacturer's instructions...or product. • Clean the lint screen before or after being washed, these items may prevent heat from the dryer hot or interrupt the drying cycle until the items have ...
User Manual
Page 9
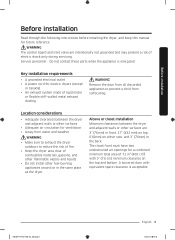
... energized. Key installation requirements • A grounded electrical outlet. • A power cord for future reference. The closet front must have two unobstructed air openings for ventilation. • Away from suffocating. DV22K6800-03650A-00_EN (US)_151211.indd 9 English 9 2015-12-11 7:15:42 WARNING Remove the door from all discarded appliances to reduce the risk of fire. • Keep the dryer area clear...
... energized. Key installation requirements • A grounded electrical outlet. • A power cord for future reference. The closet front must have two unobstructed air openings for ventilation. • Away from suffocating. DV22K6800-03650A-00_EN (US)_151211.indd 9 English 9 2015-12-11 7:15:42 WARNING Remove the door from all discarded appliances to reduce the risk of fire. • Keep the dryer area clear...
User Manual
Page 14
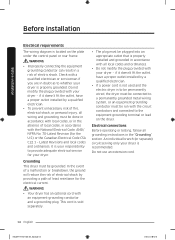
... with your dryer. This cord is sold separately. • The plug must be connected to provide adequate electrical service for your dryer - Check with a qualified electrician or serviceman if you are in doubt as to the equipment grounding terminal or lead on the plate under the control panel or rear frame. Latest Revisions and local codes and ordinances. Before installation Before installation Electrical requirements The wiring diagram is recommended...
... with your dryer. This cord is sold separately. • The plug must be connected to provide adequate electrical service for your dryer - Check with a qualified electrician or serviceman if you are in doubt as to the equipment grounding terminal or lead on the plate under the control panel or rear frame. Latest Revisions and local codes and ordinances. Before installation Before installation Electrical requirements The wiring diagram is recommended...
User Manual
Page 15
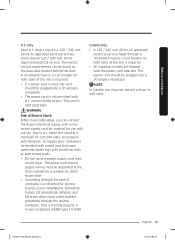
... loop terminals, open-end spade lugs with turned up ends, or with U.S. Before installation U.S. Some require 120 / 208 volt, 60 Hz approved electrical service. A 30-ampere fuse or circuit breaker on both sides of the line is not provided with tinned leads. • Do not reuse a power supply cord from an old dryer. The power cord electric supply wiring must be found on the data label located behind the door...
... loop terminals, open-end spade lugs with turned up ends, or with U.S. Before installation U.S. Some require 120 / 208 volt, 60 Hz approved electrical service. A 30-ampere fuse or circuit breaker on both sides of the line is not provided with tinned leads. • Do not reuse a power supply cord from an old dryer. The power cord electric supply wiring must be found on the data label located behind the door...
User Manual
Page 18
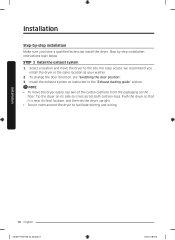
... the dryer to the site. Install the exhaust system as instructed in the same location as your washer. 2. Step by -step installation Make sure you install the dryer in the "Exhaust ducting guide" section. Push the dryer so that it lies across both cushion-tops. To change the door direction, see "Switching the door position". 3. Tip the dryer on the floor. NOTE • To move the dryer to facilitate ducting and wiring.
... the dryer to the site. Install the exhaust system as instructed in the same location as your washer. 2. Step by -step installation Make sure you install the dryer in the "Exhaust ducting guide" section. Push the dryer so that it lies across both cushion-tops. To change the door direction, see "Switching the door position". 3. Tip the dryer on the floor. NOTE • To move the dryer to facilitate ducting and wiring.

User Manual
Page 20
... a technician. Loosen or remove the screws from the center terminal block. 3. CAUTION D B E C F A. Connect the other wires to the screw. models are tightened. 2. Insert the tab of the terminal block cover into the rear panel of A the power cable to the outer terminal block screws. Center silver-colored terminal block screw B. Remove the external ground connector's screw, and connect the ground wire (green or unwrapped) of the dryer. Neutral wire (white or center...
... a technician. Loosen or remove the screws from the center terminal block. 3. CAUTION D B E C F A. Connect the other wires to the screw. models are tightened. 2. Insert the tab of the terminal block cover into the rear panel of A the power cable to the outer terminal block screws. Center silver-colored terminal block screw B. Remove the external ground connector's screw, and connect the ground wire (green or unwrapped) of the dryer. Neutral wire (white or center...
User Manual
Page 22
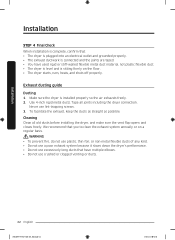
... not use excessively long ducts that you to clean the exhaust system annually or on the floor. • The dryer starts, runs, heats, and shuts off properly. Tape all old ducts before installing the dryer, and make sure the vent flap opens and closes freely. Installation Installation STEP 4 Final Check When installation is complete, confirm that: • The dryer is plugged into an electrical outlet and grounded properly. • The exhaust ductwork is connected and...
... not use excessively long ducts that you to clean the exhaust system annually or on the floor. • The dryer starts, runs, heats, and shuts off properly. Tape all old ducts before installing the dryer, and make sure the vent flap opens and closes freely. Installation Installation STEP 4 Final Check When installation is complete, confirm that: • The dryer is plugged into an electrical outlet and grounded properly. • The exhaust ductwork is connected and...
User Manual
Page 36
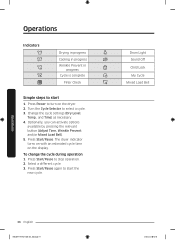
... dryer. 2. To change the cycle during operation 1. Press Start/Pause again to start the new cycle. Operations Indicators Drying in progress Cooling in progress Wrinkle Prevent in progress Cycle is complete Filter Check Simple steps to start 1. Press Power to turn on the display. Optionally, you can activate options available by pressing the relevant button (Adjust Time, Wrinkle Prevent and/or Mixed Load Bell). 5. Press Start/Pause. Select a different cycle. 3. Drum Light Sound Off Child Lock My Cycle...
... dryer. 2. To change the cycle during operation 1. Press Start/Pause again to start the new cycle. Operations Indicators Drying in progress Cooling in progress Wrinkle Prevent in progress Cycle is complete Filter Check Simple steps to start 1. Press Power to turn on the display. Optionally, you can activate options available by pressing the relevant button (Adjust Time, Wrinkle Prevent and/or Mixed Load Bell). 5. Press Start/Pause. Select a different cycle. 3. Drum Light Sound Off Child Lock My Cycle...
User Manual
Page 39
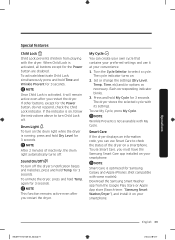
... models). Download the Samsung Smart Washer app from playing with My Cycle. To unmute the dryer, press and hold Time and Wrinkle Prevent for 3 seconds. The cycle indicator turns on the drum light while the dryer is activated, all buttons except for 3 seconds. NOTE Smart Care is on your convenience. 1. To activate/deactivate Child Lock, simultaneously press and hold Temp. Drum Light To turn off . When Child Lock is running, press and hold Dry...
... models). Download the Samsung Smart Washer app from playing with My Cycle. To unmute the dryer, press and hold Time and Wrinkle Prevent for 3 seconds. The cycle indicator turns on the drum light while the dryer is activated, all buttons except for 3 seconds. NOTE Smart Care is on your convenience. 1. To activate/deactivate Child Lock, simultaneously press and hold Temp. Drum Light To turn off . When Child Lock is running, press and hold Dry...
User Manual
Page 41
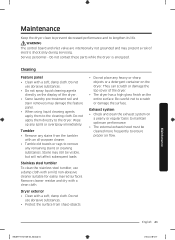
... subsequent loads. Remove cleaner residue and dry with a soft, damp cloth. They can scratch or damage the top cover of electric shock only during servicing. Maintenance DV22K6800-03650A-00_EN (US)_151211.indd 41 English 41 2015-12-11 7:15:50 WARNING The control board and inlet valve are intentionally not grounded and may damage the feature panel. • When using liquid cleaning agents...
... subsequent loads. Remove cleaner residue and dry with a soft, damp cloth. They can scratch or damage the top cover of electric shock only during servicing. Maintenance DV22K6800-03650A-00_EN (US)_151211.indd 41 English 41 2015-12-11 7:15:50 WARNING The control board and inlet valve are intentionally not grounded and may damage the feature panel. • When using liquid cleaning agents...

User Manual
Page 42
... a live electrical outlet. • Check your home's circuit breakers or fuses. • Press or tap Start/Pause again if the door is plugged into the cool-down phase of the cycle. • Check all of problems in the table below and try the suggested actions. Remove some items and restart the dryer. • Clean the lint filter. Problem Does not run. Check the selected cycle again. • Clean the lint filter and exhaust duct. • The dryer may...
... a live electrical outlet. • Check your home's circuit breakers or fuses. • Press or tap Start/Pause again if the door is plugged into the cool-down phase of the cycle. • Check all of problems in the table below and try the suggested actions. Remove some items and restart the dryer. • Clean the lint filter. Problem Does not run. Check the selected cycle again. • Clean the lint filter and exhaust duct. • The dryer may...
User Manual
Page 45
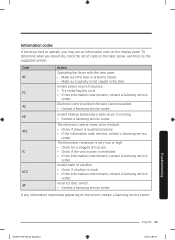
... checked. • Check if power is supplied properly. • If the information code remains, contact a Samsung service center. To determine what you may see an information code on the screen, contact a Samsung service center. The electronic control needs to operate, you should do, check the list of a button. • Check if a button is running. • Contact a Samsung service center. Code dC FC AC HC 9C1 tC bC2 dF Action Operating the dryer with the door open...
... checked. • Check if power is supplied properly. • If the information code remains, contact a Samsung service center. To determine what you may see an information code on the screen, contact a Samsung service center. The electronic control needs to operate, you should do, check the list of a button. • Check if a button is running. • Contact a Samsung service center. Code dC FC AC HC 9C1 tC bC2 dF Action Operating the dryer with the door open...
User Manual
Page 46
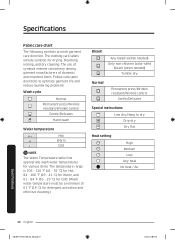
...;C) for drying, bleaching, ironing, and dry cleaning. Specifications Fabric care chart The following symbols provide garment care direction. The clothing care labels include symbols for detergent activation and effective cleaning.) Bleach Any bleach (when needed) Only non-chlorine (color-safe) bleach (when needed) Tumble dry Normal Permanent press/Wrinkle resistant/Wrinkle control Gentle/Delicates Special instructions Line dry/Hang to dry Drip dry Dry flat Heat setting High Medium Low Any heat No heat / Air Specification 46 English...
...;C) for drying, bleaching, ironing, and dry cleaning. Specifications Fabric care chart The following symbols provide garment care direction. The clothing care labels include symbols for detergent activation and effective cleaning.) Bleach Any bleach (when needed) Only non-chlorine (color-safe) bleach (when needed) Tumble dry Normal Permanent press/Wrinkle resistant/Wrinkle control Gentle/Delicates Special instructions Line dry/Hang to dry Drip dry Dry flat Heat setting High Medium Low Any heat No heat / Air Specification 46 English...
User Manual
Page 49
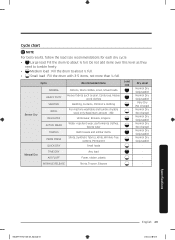
... results, follow the load size recommendations for each dry cycle. • Large load: Fill the drum to about ¾ full. Manual Dry AIR FLUFF Foam, rubber, plastic - Cycle NORMAL HEAVY DUTY SANITIZE Sensor Dry WOOL DELICATES ACTIVE WEAR TOWELS PERM PRESS QUICK DRY Recommended items Cottons, Work clothes, Linen, Mixed loads Heavy fabrics such as they need to tumble freely. • Medium load : Fill the drum to about ½...
... results, follow the load size recommendations for each dry cycle. • Large load: Fill the drum to about ¾ full. Manual Dry AIR FLUFF Foam, rubber, plastic - Cycle NORMAL HEAVY DUTY SANITIZE Sensor Dry WOOL DELICATES ACTIVE WEAR TOWELS PERM PRESS QUICK DRY Recommended items Cottons, Work clothes, Linen, Mixed loads Heavy fabrics such as they need to tumble freely. • Medium load : Fill the drum to about ½...
User Manual
Page 52
... PURCHASER'S PROPERTY AND TO OTHERS AND THEIR PROPERTY ARISING OUT OF THE USE, MISUSE, OR INABILITY TO USE THIS PRODUCT. This limited warranty does not cover problems resulting from incorrect electric current, voltage or supply, light bulbs, house fuses, house wiring, cost of nature or God; applications and uses for instructions, or fixing installation errors. SAMSUNG SHALL NOT BE LIABLE FOR LOSS OF REVENUE OR PROFITS, FAILURE...
... PURCHASER'S PROPERTY AND TO OTHERS AND THEIR PROPERTY ARISING OUT OF THE USE, MISUSE, OR INABILITY TO USE THIS PRODUCT. This limited warranty does not cover problems resulting from incorrect electric current, voltage or supply, light bulbs, house fuses, house wiring, cost of nature or God; applications and uses for instructions, or fixing installation errors. SAMSUNG SHALL NOT BE LIABLE FOR LOSS OF REVENUE OR PROFITS, FAILURE...
User Manual
Page 55
... in normal, noncommercial use of nature or God; altered product or serial numbers; customer adjustments and failure to the following: damage that occurs in shipment; This limited warranty does not cover problems resulting from incorrect electric current, voltage or supply, light bulbs, house fuses, house wiring, cost of this product and shall not apply to follow operating instructions, maintenance and environmental instructions that damage this product...
... in normal, noncommercial use of nature or God; altered product or serial numbers; customer adjustments and failure to the following: damage that occurs in shipment; This limited warranty does not cover problems resulting from incorrect electric current, voltage or supply, light bulbs, house fuses, house wiring, cost of this product and shall not apply to follow operating instructions, maintenance and environmental instructions that damage this product...


