
Installation Guide
Page 3
...Installing the toner cartridges 27 Installing the imaging units 28 Installing other options 33 Loading paper 34 Standard tray 34 Connecting a printer cable 40 Using a network cable 40 Turning the machine on 41 INITIAL SETTINGS AND TESTING OF THE MACHINE Initial setting 43 Print adjustment (Dual cassette feeder or High capacity feeder 49 DADF skew test and adjustment 52 Skew test 52 DADF adjustment 55 INSTALLING THE SUPPLIED SOFTWARE Supplied software 59 System requirements 60 Windows 60 Macintosh 60 Linux 60 UNIX 61 Installing a network connected machine's driver 61 Windows...
...Installing the toner cartridges 27 Installing the imaging units 28 Installing other options 33 Loading paper 34 Standard tray 34 Connecting a printer cable 40 Using a network cable 40 Turning the machine on 41 INITIAL SETTINGS AND TESTING OF THE MACHINE Initial setting 43 Print adjustment (Dual cassette feeder or High capacity feeder 49 DADF skew test and adjustment 52 Skew test 52 DADF adjustment 55 INSTALLING THE SUPPLIED SOFTWARE Supplied software 59 System requirements 60 Windows 60 Macintosh 60 Linux 60 UNIX 61 Installing a network connected machine's driver 61 Windows...
Installation Guide
Page 4
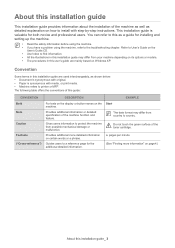
... the display or button names on the machine. Refer to User's Guide on the User's Guide CD. • Use Index to find information. • All the illustrations in this as shown below: • Document is synonymous with step-by-step instructions. a. Guides users to the troubleshooting chapter. You can refer to this installation guide may differ from your machine depending on its options or models...
... the display or button names on the machine. Refer to User's Guide on the User's Guide CD. • Use Index to find information. • All the illustrations in this as shown below: • Document is synonymous with step-by-step instructions. a. Guides users to the troubleshooting chapter. You can refer to this installation guide may differ from your machine depending on its options or models...
Installation Guide
Page 5
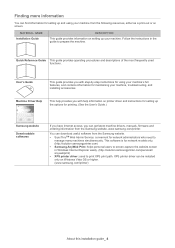
..., troubleshooting, and installing accessories. XPS printer driver can be installed only on screen. Machine Driver Help This help provides you with help information on printer driver and instructions for setting up the options for printing. (See the User's Guide.) Samsung website Downloadable softwares If you have Internet access, you with step-by-step instructions for using your machine from the Samsung website. • SyncThruTM Web Admin Service: convenient for network administrators who need to print XPS print...
..., troubleshooting, and installing accessories. XPS printer driver can be installed only on screen. Machine Driver Help This help provides you with help information on printer driver and instructions for setting up the options for printing. (See the User's Guide.) Samsung website Downloadable softwares If you have Internet access, you with step-by-step instructions for using your machine from the Samsung website. • SyncThruTM Web Admin Service: convenient for network administrators who need to print XPS print...
Installation Guide
Page 6
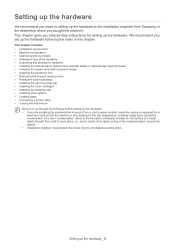
... and placing the hardware • Installing the cabinet stand, optional dual cassette feeder or optional high capacity feeder • Installing the duplex automatic document feeder • Installing the accessory box • Removing the scanner locking screw • Putting the rubber packings • Installing the right tray (face up) • Installing the toner cartridges • Installing the imaging units • Installing other options • Loading paper • Connecting a printer cable • Turning the machine on the surface...
... and placing the hardware • Installing the cabinet stand, optional dual cassette feeder or optional high capacity feeder • Installing the duplex automatic document feeder • Installing the accessory box • Removing the scanner locking screw • Putting the rubber packings • Installing the right tray (face up) • Installing the toner cartridges • Installing the imaging units • Installing other options • Loading paper • Connecting a printer cable • Turning the machine on the surface...

Installation Guide
Page 10
... 9 Tray Roller Set Color PM Kit - Optional goods by models The machine is designed to support all of your document needs from printing and copying to more advanced networking solutions for Scan R L Color PM Kit - Optional goods by models include: OPTIONAL GOODS Right Output Tray 1,250-Sheet Standard Finisher 3,250-Sheet Booklet Finisher Bridge Kit 2/3 Hole Punch Kit 2/4 Hole Punch Kit Cabinet Stand Dual Cassette Feeder High Capacity Feeder Working Table Fax Kit Fax Multiline Kit IP Fax Kit Wireless Network Kit FDI Kit...
... 9 Tray Roller Set Color PM Kit - Optional goods by models The machine is designed to support all of your document needs from printing and copying to more advanced networking solutions for Scan R L Color PM Kit - Optional goods by models include: OPTIONAL GOODS Right Output Tray 1,250-Sheet Standard Finisher 3,250-Sheet Booklet Finisher Bridge Kit 2/3 Hole Punch Kit 2/4 Hole Punch Kit Cabinet Stand Dual Cassette Feeder High Capacity Feeder Working Table Fax Kit Fax Multiline Kit IP Fax Kit Wireless Network Kit FDI Kit...
Installation Guide
Page 11
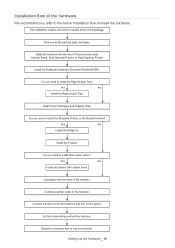
... Feeder. Install the Duplicate Automatic Document Feeder(DADF). Do you need to install the Right Output Tray? Install Toner Cartridges and Imaging Units. Do you need to install other option items. Load paper into the trays of the machine. Set the initial setting and test the machine. Set installation location and check included items in the package. Yes No Install purchased other option items? Connect a printer cable to use the machine. Setting up the hardware_ 10 Install the Finisher. Explain to customer...
... Feeder. Install the Duplicate Automatic Document Feeder(DADF). Do you need to install the Right Output Tray? Install Toner Cartridges and Imaging Units. Do you need to install other option items. Load paper into the trays of the machine. Set the initial setting and test the machine. Set installation location and check included items in the package. Yes No Install purchased other option items? Connect a printer cable to use the machine. Setting up the hardware_ 10 Install the Finisher. Explain to customer...
Installation Guide
Page 12
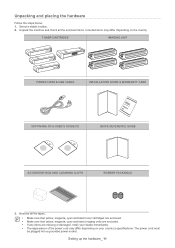
... black imaging units are enclosed. • If any items are missing or damaged, notify your dealer immediately. • The appearance of the power cord may differ depending on your country's specifications. Setting up the hardware_ 11 Remove all the enclosed items. Included items may differ depending on the country TONER CARTRIDGE IMAGING UNIT POWER CORD & USB CABLE INSTALLATION GUIDE & WARRANTY CARD SOFTWARE CD & USER'S GUIDE CD QUICK REFERENCE GUIDE ACCESSORY BOX AND CLEANING...
... black imaging units are enclosed. • If any items are missing or damaged, notify your dealer immediately. • The appearance of the power cord may differ depending on your country's specifications. Setting up the hardware_ 11 Remove all the enclosed items. Included items may differ depending on the country TONER CARTRIDGE IMAGING UNIT POWER CORD & USB CABLE INSTALLATION GUIDE & WARRANTY CARD SOFTWARE CD & USER'S GUIDE CD QUICK REFERENCE GUIDE ACCESSORY BOX AND CLEANING...
Installation Guide
Page 28
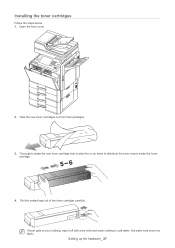
Open the front cover. 2. Take the new toner cartridges out from their packages. 3. Pull the sealed tape out of the toner cartridge carefully. If toner gets on your clothing, wipe it off with a dry cloth and wash clothing in cold water. Hot water sets toner into fabric. Setting up the hardware_ 27 Thoroughly shake the new toner cartridge side to side five or six times to distribute the toner evenly inside the toner cartridge. 4. Installing the toner cartridges Follow the steps below: 1.
Open the front cover. 2. Take the new toner cartridges out from their packages. 3. Pull the sealed tape out of the toner cartridge carefully. If toner gets on your clothing, wipe it off with a dry cloth and wash clothing in cold water. Hot water sets toner into fabric. Setting up the hardware_ 27 Thoroughly shake the new toner cartridge side to side five or six times to distribute the toner evenly inside the toner cartridge. 4. Installing the toner cartridges Follow the steps below: 1.

Installation Guide
Page 35
... it below the standard tray. Setting up to 1,040 sheets of your print jobs into standard tray. Loading paper Standard tray Load the print media you have installed the optional dual cassette feeder (tray 3. tray 4) or the optional high capacity feeder, refer to load paper in tray 1, and tray 2 is the same. • If you use for the majority of paper. • The process to the installation guide provided with them. Using photographic paper or coated paper may cause problems requiring repairs. Squeeze the lock...
... it below the standard tray. Setting up to 1,040 sheets of your print jobs into standard tray. Loading paper Standard tray Load the print media you have installed the optional dual cassette feeder (tray 3. tray 4) or the optional high capacity feeder, refer to load paper in tray 1, and tray 2 is the same. • If you use for the majority of paper. • The process to the installation guide provided with them. Using photographic paper or coated paper may cause problems requiring repairs. Squeeze the lock...
Installation Guide
Page 39
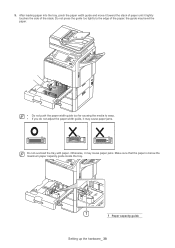
... cause paper jams. Do not overload the tray with paper. Do not press the guide too tightly to warp. • If you do not adjust the paper width guide, it lightly touches the side of paper until it may cause paper jams. Make sure that the paper is below the maximum paper capacity guide inside the tray. 1 Paper capacity guide Setting up the hardware_ 38 After loading paper into the tray, pinch the paper width guide...
... cause paper jams. Do not overload the tray with paper. Do not press the guide too tightly to warp. • If you do not adjust the paper width guide, it lightly touches the side of paper until it may cause paper jams. Make sure that the paper is below the maximum paper capacity guide inside the tray. 1 Paper capacity guide Setting up the hardware_ 38 After loading paper into the tray, pinch the paper width guide...
Installation Guide
Page 40
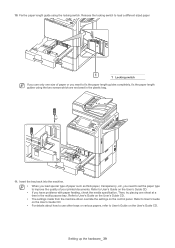
Refer to User's Guide on the control panel. Refer to User's Guide on the User's Guide CD. • The settings made from the machine driver override the settings on the User's Guide CD. • If you have problems with paper feeding, check the media specification. Release the locking switch to load a different sized paper 1 Locking switch If you want to User's Guide on the User's Guide CD. • For details about how to use only one sheet at a time in the plastic...
Refer to User's Guide on the control panel. Refer to User's Guide on the User's Guide CD. • The settings made from the machine driver override the settings on the User's Guide CD. • If you have problems with paper feeding, check the media specification. Release the locking switch to load a different sized paper 1 Locking switch If you want to User's Guide on the User's Guide CD. • For details about how to use only one sheet at a time in the plastic...
Installation Guide
Page 41
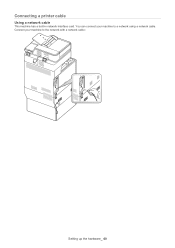
Connecting a printer cable Using a network cable This machine has a bulit-in network interface card. Connect your machine to the network with a network cable: Setting up the hardware_ 40 You can connect your machine to a network using a network cable.
Connecting a printer cable Using a network cable This machine has a bulit-in network interface card. Connect your machine to the network with a network cable: Setting up the hardware_ 40 You can connect your machine to a network using a network cable.
Installation Guide
Page 44
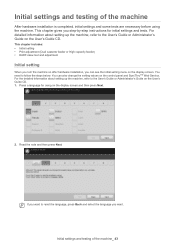
... language you step-by-step instructions for using the machine. This chapter includes: • Initial setting • Print adjustment (Dual cassette feeder or High capacity feeder) • DADF skew test and adjustment Initial setting When you turn the machine on after hardware installation, you can also change the setting values on the control panel and SyncThruTM Web Service. Press a language for initial settings and tests. You can see the initial setting menu on the display...
... language you step-by-step instructions for using the machine. This chapter includes: • Initial setting • Print adjustment (Dual cassette feeder or High capacity feeder) • DADF skew test and adjustment Initial setting When you turn the machine on after hardware installation, you can also change the setting values on the control panel and SyncThruTM Web Service. Press a language for initial settings and tests. You can see the initial setting menu on the display...
Installation Guide
Page 45
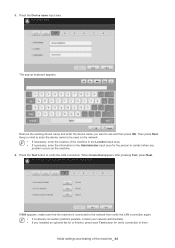
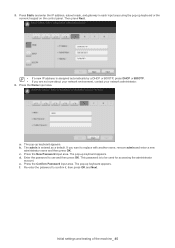
...; If a network connection problem persists, contact your network administrator. • If you installed an optional fax kit or finisher, press each Test button for the person to verify the LAN connection. When Connected appears after pressing Test, press Next. Then press Next. 3. If N/A appears, make sure that the machine is connected to use and then press OK. The pop-up keyboard appears. Initial settings and testing of...
...; If a network connection problem persists, contact your network administrator. • If you installed an optional fax kit or finisher, press each Test button for the person to verify the LAN connection. When Connected appears after pressing Test, press Next. Then press Next. 3. If N/A appears, make sure that the machine is connected to use and then press OK. The pop-up keyboard appears. Initial settings and testing of...
Installation Guide
Page 46
...-up keyboard appears. Then press Next. • If a new IP address is entered as a default. The admin is assigned automatically by a DHCP or BOOTP, press DHCP or BOOTP. • If you want to use and then press OK. The pop-up keyboard or the numeric keypad on the control panel. Re-enter the password to be used for accessing the administrator account.
...-up keyboard appears. Then press Next. • If a new IP address is entered as a default. The admin is assigned automatically by a DHCP or BOOTP, press DHCP or BOOTP. • If you want to use and then press OK. The pop-up keyboard or the numeric keypad on the control panel. Re-enter the password to be used for accessing the administrator account.
Installation Guide
Page 60
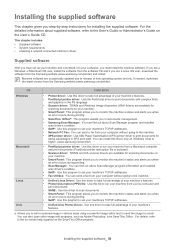
...) file: Use this program to set up your machine and connected it to run your computer, you are available for installing the supplied software. Allows you when an error occurs during printing. • SetIP: Use this program to set your machine's TCP/IP addresses. • Unified Unix Printer Driver: Use this driver to print documents with complex fonts and graphics in the PS language. • Scanner driver: TWAIN and Windows Image Acquisition...
...) file: Use this program to set up your machine and connected it to run your computer, you are available for installing the supplied software. Allows you when an error occurs during printing. • SetIP: Use this program to set your machine's TCP/IP addresses. • Unified Unix Printer Driver: Use this driver to print documents with complex fonts and graphics in the PS language. • Scanner driver: TWAIN and Windows Image Acquisition...
Installation Guide
Page 61
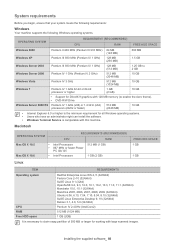
...10, 8.04, 8.10 (32/64bit) SuSE Linux Enterprise Desktop 9, 10 (32/64bit) Debian 3.1, 4.0, 5.0 (32/64bit) Pentium IV 2.4GHz (IntelCore2) 512 MB (1024 MB) 1 GB (2GB) It is necessary to enable the Aero theme). • DVD-R/W Drive Windows Server 2008 R2 Pentium IV 1 GHz (x86) or ...8226; Support for DirectX 9 graphics with 128 MB memory (to claim swap partition of 300 MB or larger for all Windows operating systems. • Users who have an administrator right can install the software. • Windows Terminal Service is compatable with large scanned images. Installing the supplied software_ ...
...10, 8.04, 8.10 (32/64bit) SuSE Linux Enterprise Desktop 9, 10 (32/64bit) Debian 3.1, 4.0, 5.0 (32/64bit) Pentium IV 2.4GHz (IntelCore2) 512 MB (1024 MB) 1 GB (2GB) It is necessary to enable the Aero theme). • DVD-R/W Drive Windows Server 2008 R2 Pentium IV 1 GHz (x86) or ...8226; Support for DirectX 9 graphics with 128 MB memory (to claim swap partition of 300 MB or larger for all Windows operating systems. • Users who have an administrator right can install the software. • Windows Terminal Service is compatable with large scanned images. Installing the supplied software_ ...
Installation Guide
Page 62
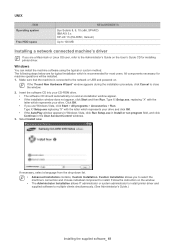
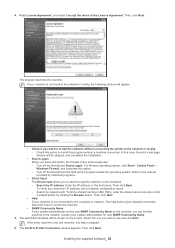
... MB Installing a network connected machine's driver If you are for typical installation which is connected to the network or USB and powered on the User's Guide CD for machine operations will be installed. 1. Type X:\Setup.exe, replacing "X" with the letter which represents your CD-ROM drive. • The software CD should automatically run program field, and click Continue in the User Account Control windows. 3. Windows You can install the machine software using the typical or custom...
... MB Installing a network connected machine's driver If you are for typical installation which is connected to the network or USB and powered on the User's Guide CD for machine operations will be installed. 1. Type X:\Setup.exe, replacing "X" with the letter which represents your CD-ROM drive. • The software CD should automatically run program field, and click Continue in the User Account Control windows. 3. Windows You can install the machine software using the typical or custom...
Installation Guide
Page 63
..., the print a test page window will be shown on the screen. Search by clicking the Browse button. Installing the supplied software_ 62 The program searches the machine. Turn off the firewall and Search again. Refer to the manual provided by individual programs. • Direct Input The Direct input allows you want to install the software without a machine connected. If the driver searches only...
..., the print a test page window will be shown on the screen. Search by clicking the Browse button. Installing the supplied software_ 62 The program searches the machine. Turn off the firewall and Search again. Refer to the manual provided by individual programs. • Direct Input The Direct input allows you want to install the software without a machine connected. If the driver searches only...
Installation Guide
Page 64
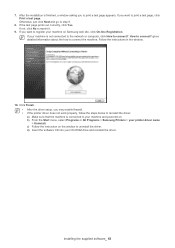
...; After the driver setup, you to register your machine on Samsung web site, click On-line Registration. d) Insert the software CD into your printer driver name > Uninstall. Installing the supplied software_ 63 If the test page prints out correctly, click Yes. Follow the instructions in the window. 10. b) From the Start menu, select Programs or All Programs > Samsung Printers > your CD-ROM drive and reinstall the driver. c) Follow the instruction on...
...; After the driver setup, you to register your machine on Samsung web site, click On-line Registration. d) Insert the software CD into your printer driver name > Uninstall. Installing the supplied software_ 63 If the test page prints out correctly, click Yes. Follow the instructions in the window. 10. b) From the Start menu, select Programs or All Programs > Samsung Printers > your CD-ROM drive and reinstall the driver. c) Follow the instruction on...


