
Installation Guide
Page 3
... Installing the accessory box 23 Removing the scanner locking screw 24 Putting the rubber packings 24 Installing the right tray (face up 25 Installing the toner cartridges 27 Installing the imaging units 28 Installing other options 33 Loading paper 34 Standard tray 34 Connecting a printer cable 40 Using a network cable 40...
... Installing the accessory box 23 Removing the scanner locking screw 24 Putting the rubber packings 24 Installing the right tray (face up 25 Installing the toner cartridges 27 Installing the imaging units 28 Installing other options 33 Loading paper 34 Standard tray 34 Connecting a printer cable 40 Using a network cable 40...

Installation Guide
Page 4
.... a. This installation guide is synonymous with step-by-step instructions. Convention Some terms in this installation guide_ 3 Provides additional information or detailed specification of the toner cartridge. Guides users to this installation guide are mainly based on Windows XP. Do not touch the green surface of the machine function and feature...
.... a. This installation guide is synonymous with step-by-step instructions. Convention Some terms in this installation guide_ 3 Provides additional information or detailed specification of the toner cartridge. Guides users to this installation guide are mainly based on Windows XP. Do not touch the green surface of the machine function and feature...
Installation Guide
Page 6
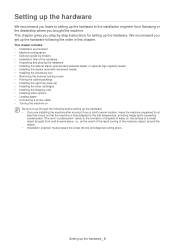
... cold to the installation engineer from cold to warm place, i.e., as the result of the rapid cooling of a metal object brought from Samsung or the dealership where you set up the hardware. Setting up the hardware 1. We recommend you leave to setting up the hardware to... box • Removing the scanner locking screw • Putting the rubber packings • Installing the right tray (face up) • Installing the toner cartridges • Installing the imaging units • Installing other options • Loading paper • Connecting a printer cable • Turning the machine on...
... cold to the installation engineer from cold to warm place, i.e., as the result of the rapid cooling of a metal object brought from Samsung or the dealership where you set up the hardware. Setting up the hardware 1. We recommend you leave to setting up the hardware to... box • Removing the scanner locking screw • Putting the rubber packings • Installing the right tray (face up) • Installing the toner cartridges • Installing the imaging units • Installing other options • Loading paper • Connecting a printer cable • Turning the machine on...
Installation Guide
Page 11
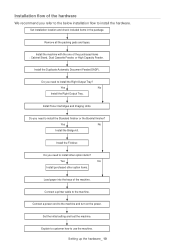
... kit. Setting up the hardware_ 10 Set installation location and check included items in the package. Set the initial setting and test the machine. Install Toner Cartridges and Imaging Units. Connect a printer cable to the machine and turn on the power. Connect a power cord to the machine. Do you need to...
... kit. Setting up the hardware_ 10 Set installation location and check included items in the package. Set the initial setting and test the machine. Install Toner Cartridges and Imaging Units. Connect a printer cable to the machine and turn on the power. Connect a power cord to the machine. Do you need to...
Installation Guide
Page 12
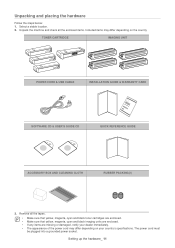
.... Unpacking and placing the hardware Follow the steps below: 1. Remove all the enclosed items. Included items may differ depending on the country TONER CARTRIDGE IMAGING UNIT POWER CORD & USB CABLE INSTALLATION GUIDE & WARRANTY CARD SOFTWARE CD & USER'S GUIDE CD QUICK REFERENCE GUIDE ACCESSORY BOX ... 3. Select a stable location. 2. Unpack the machine and check all the tapes. • Make sure that yellow, magenta, cyan and black toner cartridges are enclosed. • Make sure that yellow, magenta, cyan and black imaging units are enclosed. • If any items are missing or...
.... Unpacking and placing the hardware Follow the steps below: 1. Remove all the enclosed items. Included items may differ depending on the country TONER CARTRIDGE IMAGING UNIT POWER CORD & USB CABLE INSTALLATION GUIDE & WARRANTY CARD SOFTWARE CD & USER'S GUIDE CD QUICK REFERENCE GUIDE ACCESSORY BOX ... 3. Select a stable location. 2. Unpack the machine and check all the tapes. • Make sure that yellow, magenta, cyan and black toner cartridges are enclosed. • Make sure that yellow, magenta, cyan and black imaging units are enclosed. • If any items are missing or...
Installation Guide
Page 28
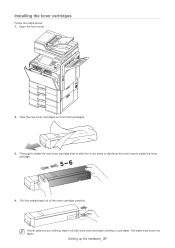
Pull the sealed tape out of the toner cartridge carefully. If toner gets on your clothing, wipe it off with a dry cloth and wash clothing in cold water. Hot water sets toner into fabric. Setting up the hardware_ 27 Take the new toner cartridges out from their packages. 3. Thoroughly shake the new toner cartridge side to side five or six times to distribute the toner evenly inside the toner cartridge. 4. Open the front cover. 2. Installing the toner cartridges Follow the steps below: 1.
Pull the sealed tape out of the toner cartridge carefully. If toner gets on your clothing, wipe it off with a dry cloth and wash clothing in cold water. Hot water sets toner into fabric. Setting up the hardware_ 27 Take the new toner cartridges out from their packages. 3. Thoroughly shake the new toner cartridge side to side five or six times to distribute the toner evenly inside the toner cartridge. 4. Open the front cover. 2. Installing the toner cartridges Follow the steps below: 1.

Installation Guide
Page 29
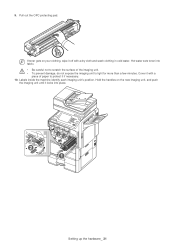
Squeeze the left/right locking levers and push outward at the same time. Installing the imaging units Follow the steps below: 1. Setting up the hardware_ 28 Then remove the waste toner container. Hold the new toner cartridge by the handle and slide it into its corresponding positions until it locks into place. Leave the front cover opened. 5.
Squeeze the left/right locking levers and push outward at the same time. Installing the imaging units Follow the steps below: 1. Setting up the hardware_ 28 Then remove the waste toner container. Hold the new toner cartridge by the handle and slide it into its corresponding positions until it locks into place. Leave the front cover opened. 5.
Installation Guide
Page 32
... on the new imaging unit, and push the imaging unit until it if necessary. 10. Setting up the hardware_ 31 Hot water sets toner into place. Cover it off with a piece of the imaging unit. • To prevent damage, do not expose the imaging unit to protect it locks ...
... on the new imaging unit, and push the imaging unit until it if necessary. 10. Setting up the hardware_ 31 Hot water sets toner into place. Cover it off with a piece of the imaging unit. • To prevent damage, do not expose the imaging unit to protect it locks ...
Installation Guide
Page 33
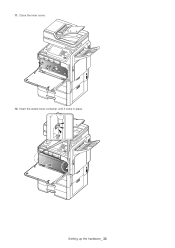
Insert the waste toner container until it locks in place. Setting up the hardware_ 32 Close the inner cover. 12. 11.
Insert the waste toner container until it locks in place. Setting up the hardware_ 32 Close the inner cover. 12. 11.


