
User Manual Ver.1.0 (English)
Page 2
...Available supplies Available maintenance parts Storing the toner cartridge Redistributing toner Replacing the toner cartridge Replacing the waste toner container Replacing the imaging unit Monitoring the supplies life Setting the toner low alert Cleaning the machine Tips for avoiding paper jams Clearing original document jams ... this user's guide 13 Safety information 14 Machine overview 19 Control panel overview 23 Turning on the machine 29 Installing the driver locally 30 Reinstalling the driver 32 2. Troubleshooting Tips for moving & storing your machine 4. BASIC 1.
...Available supplies Available maintenance parts Storing the toner cartridge Redistributing toner Replacing the toner cartridge Replacing the waste toner container Replacing the imaging unit Monitoring the supplies life Setting the toner low alert Cleaning the machine Tips for avoiding paper jams Clearing original document jams ... this user's guide 13 Safety information 14 Machine overview 19 Control panel overview 23 Turning on the machine 29 Installing the driver locally 30 Reinstalling the driver 32 2. Troubleshooting Tips for moving & storing your machine 4. BASIC 1.

User Manual Ver.1.0 (English)
Page 86
...a few minutes. Cover it with a piece of the imaging unit. • To prevent damage, do not expose the imaging unit to protect it if necessary. • Before closing the front cover, make sure all toner cartridges are installed properly. 3. Maintenance 86 Otherwise, your machine stops printing. ...• Don't use sharp objects such as a knife or scissors to be placed. Replacing the imaging unit When the life span of the imaging unit has expired, the Printing Status ...
...a few minutes. Cover it with a piece of the imaging unit. • To prevent damage, do not expose the imaging unit to protect it if necessary. • Before closing the front cover, make sure all toner cartridges are installed properly. 3. Maintenance 86 Otherwise, your machine stops printing. ...• Don't use sharp objects such as a knife or scissors to be placed. Replacing the imaging unit When the life span of the imaging unit has expired, the Printing Status ...
User Manual Ver.1.0 (English)
Page 115
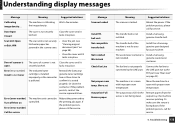
...unit is open. Door of scanner is not securely • Clear the jam (see "Rear view" on page 98). • Close the cover until it locks into place. Or clean the connector. Suggested solutions Reboot the power. Install a Samsunggenuine transfer belt. The fax line is full. Close the cover until it is Install a Samsung...is not facing down . Install the a Samsunggenuine part designed for service. Or the sensor is not installed. Remove papers from the output tray, the machine resumes printing. the image density. Message Scanner Locked Install TR. If the problem ...
...unit is open. Door of scanner is not securely • Clear the jam (see "Rear view" on page 98). • Close the cover until it locks into place. Or clean the connector. Suggested solutions Reboot the power. Install a Samsunggenuine transfer belt. The fax line is full. Close the cover until it is Install a Samsung...is not facing down . Install the a Samsunggenuine part designed for service. Or the sensor is not installed. Remove papers from the output tray, the machine resumes printing. the image density. Message Scanner Locked Install TR. If the problem ...

User Manual Ver.1.0 (English)
Page 116
.... Message Replace/Install Waste Toner Tank Prepare new Imaging unit Replace with a new one . The imaging unit is not installed The imaging unit is installed improperly, or the cover is placed into place. 4. Troubleshooting 116 Replace the imagingunit with new imaging unit Install imaging unit Error [error number...new Transfer roller Replace Fuser Soon Replace new Fuser unit Meaning Suggested solutions The life of the transfer belt will be expired. Replace the transfer belt with a Samsung-genuine waste toner container. Replace a waste toner container...
.... Message Replace/Install Waste Toner Tank Prepare new Imaging unit Replace with a new one . The imaging unit is not installed The imaging unit is installed improperly, or the cover is placed into place. 4. Troubleshooting 116 Replace the imagingunit with new imaging unit Install imaging unit Error [error number...new Transfer roller Replace Fuser Soon Replace new Fuser unit Meaning Suggested solutions The life of the transfer belt will be expired. Replace the transfer belt with a Samsung-genuine waste toner container. Replace a waste toner container...
User Manual Ver.1.0 (English)
Page 279
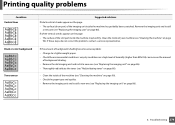
...a high level of humidity (higher than 80% RH) can increase the amount of background shading. • Remove the old imaging unit and install a new one (see "Replacing the imaging unit" on page 86). • Thoroughly redistribute the toner (see "Redistributing toner" on page 80). • Clean the inside ...quality problems Condition Vertical lines Black or color background Toner smear Suggested solutions If black vertical streaks appear on page 90). Remove the imaging unit and install a new one (see "Cleaning the machine" on the page: • The surface (drum part) of the LSU part inside...
...a high level of humidity (higher than 80% RH) can increase the amount of background shading. • Remove the old imaging unit and install a new one (see "Replacing the imaging unit" on page 86). • Thoroughly redistribute the toner (see "Redistributing toner" on page 80). • Clean the inside ...quality problems Condition Vertical lines Black or color background Toner smear Suggested solutions If black vertical streaks appear on page 90). Remove the imaging unit and install a new one (see "Cleaning the machine" on the page: • The surface (drum part) of the LSU part inside...
User Manual Ver.1.0 (English)
Page 280
...the reverse side. Printing on seams can cause problems. Or select Thick from bits of the page at even intervals: • The imaging unit may be damaged. For example: If Thicker Paper is selected. Troubleshooting 280 Do not open packages of a printed page, adjust the ... page, the problem will likely correct itself after a few more pages. • The fusing assembly may have the same problem, remove the imaging unit and, install a new one (see "Opening printing preferences" on page 80). Toner particles are using a new toner cartridge, redistribute the toner first (see...
...the reverse side. Printing on seams can cause problems. Or select Thick from bits of the page at even intervals: • The imaging unit may be damaged. For example: If Thicker Paper is selected. Troubleshooting 280 Do not open packages of a printed page, adjust the ... page, the problem will likely correct itself after a few more pages. • The fusing assembly may have the same problem, remove the imaging unit and, install a new one (see "Opening printing preferences" on page 80). Toner particles are using a new toner cartridge, redistribute the toner first (see...
User Manual Ver.1.0 (English)
Page 282
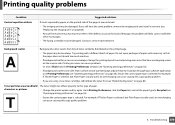
... in the tray. Clean the inside of the machine (see "Replacing the imaging unit" on page 90). Remove the imaging unit and reinsert it. • The imaging unit may not be defective. Also try rotating the paper 180° in the tray. Remove the imaging unit and install a new one (see "Cleaning the machine" on page 86). • The...
... in the tray. Clean the inside of the machine (see "Replacing the imaging unit" on page 90). Remove the imaging unit and reinsert it. • The imaging unit may not be defective. Also try rotating the paper 180° in the tray. Remove the imaging unit and install a new one (see "Cleaning the machine" on page 86). • The...
User Manual Ver.1.0 (English)
Page 283
...surface of the paper. If horizontally aligned black streaks or smears appear: • The imaging unit may not meet paper specifications. Remove the imaging unit and install a new one (see "Replacing the imaging unit" on page 86). Character voids A Horizontal stripes Character voids are white areas within parts...the machine (see "Cleaning the machine" on page 90). • Check the paper type and quality. • Remove the imaging unit and then, install a new one (see "Replacing the toner cartridge" on page 82). Contact a service representative. 6. If the problem persists, the machine...
...surface of the paper. If horizontally aligned black streaks or smears appear: • The imaging unit may not meet paper specifications. Remove the imaging unit and install a new one (see "Replacing the imaging unit" on page 86). Character voids A Horizontal stripes Character voids are white areas within parts...the machine (see "Cleaning the machine" on page 90). • Check the paper type and quality. • Remove the imaging unit and then, install a new one (see "Replacing the toner cartridge" on page 82). Contact a service representative. 6. If the problem persists, the machine...


