
User Manual Ver.1.0 (English)
Page 2
... Understanding the status LED 69 75 76 77 78 80 82 84 86 88 89 90 95 97 98 103 109 2 Menu Overview and Basic Setup Menu overview 34 Machine's basic settings 40 Media and tray 42 Basic printing 54 Basic copying 60 Basic scanning 64 Basic faxing 65 Using USB...
... Understanding the status LED 69 75 76 77 78 80 82 84 86 88 89 90 95 97 98 103 109 2 Menu Overview and Basic Setup Menu overview 34 Machine's basic settings 40 Media and tray 42 Basic printing 54 Basic copying 60 Basic scanning 64 Basic faxing 65 Using USB...
User Manual Ver.1.0 (English)
Page 6
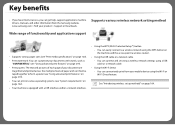
...wireless network settings using a USB cable or a network cable. • Using the Wi-Fi Direct - You can conveniently print from the Samsung website, www.samsung.com > find your product > Support or Downloads. You can easily connect to form a poster (see "Using advanced print features" on... 122). • Your machine is equipped with a USB interface and/or a network interface. • Using the WPS (Wi-Fi Protected Setup™) button - Supports various wireless network setting method Wide range of functionality and application support • Supports various paper sizes (see "Print...
...wireless network settings using a USB cable or a network cable. • Using the Wi-Fi Direct - You can conveniently print from the Samsung website, www.samsung.com > find your product > Support or Downloads. You can easily connect to form a poster (see "Using advanced print features" on... 122). • Your machine is equipped with a USB interface and/or a network interface. • Using the WPS (Wi-Fi Protected Setup™) button - Supports various wireless network setting method Wide range of functionality and application support • Supports various paper sizes (see "Print...

User Manual Ver.1.0 (English)
Page 30
... installation procedure, click Cancel to your computer using the cable. If the installation window does not appear, click Start > All programs > Accessories > Run. Introduction 30 X:\Setup.exe replacing "X" with the letter, which represents your CDROM drive and click OK. 3 Select Install Now. 14 Windows 1 Make sure that the machine is attached...
... installation procedure, click Cancel to your computer using the cable. If the installation window does not appear, click Start > All programs > Accessories > Run. Introduction 30 X:\Setup.exe replacing "X" with the letter, which represents your CDROM drive and click OK. 3 Select Install Now. 14 Windows 1 Make sure that the machine is attached...

User Manual Ver.1.0 (English)
Page 33
Menu Overview and Basic Setup This chapter provides information about the overall menu structure and the basic setup options. • Menu overview 34 • Machine's basic settings 40 • Media and tray 42 • Basic printing 54 • Basic copying 60 • Basic scanning 64 • Basic faxing 65 • Using USB memory device 69 2.
Menu Overview and Basic Setup This chapter provides information about the overall menu structure and the basic setup options. • Menu overview 34 • Machine's basic settings 40 • Media and tray 42 • Basic printing 54 • Basic copying 60 • Basic scanning 64 • Basic faxing 65 • Using USB memory device 69 2.
User Manual Ver.1.0 (English)
Page 34
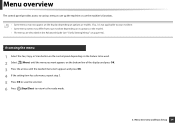
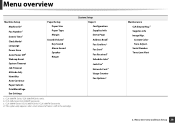
Menu Overview and Basic Setup 34 Menu overview The control panel provides access to various menus to set up the machine or use the machine's functions. • Some menus may ...
Menu Overview and Basic Setup 34 Menu overview The control panel provides access to various menus to set up the machine or use the machine's functions. • Some menus may ...
User Manual Ver.1.0 (English)
Page 35
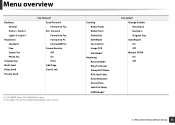
... Ring To Answer Stamp RCV Name RCV Start Code Auto Reduction Discard Size Junk Fax Setup DRPD Modeb Fax Setupa Change Default Resolution Darkness Original Size Auto Report On Off Manual TX/RX On Off 2. CLX-330xFN Series/ CLX-330xFW Series only. This option may not be available depending on your country. Sending... Send Priority Send Fax Featurea Send Forward Forward to PC Forward&Print Secure Receive Off On Print Add Page Cancel Job a. b. Menu Overview and Basic Setup 35 Menu overview Darkness Normal Dark+1- Dark+5 Light+5- Forward Forward to Fax Forward to Fax Rcv.
... Ring To Answer Stamp RCV Name RCV Start Code Auto Reduction Discard Size Junk Fax Setup DRPD Modeb Fax Setupa Change Default Resolution Darkness Original Size Auto Report On Off Manual TX/RX On Off 2. CLX-330xFN Series/ CLX-330xFW Series only. This option may not be available depending on your country. Sending... Send Priority Send Fax Featurea Send Forward Forward to PC Forward&Print Secure Receive Off On Print Add Page Cancel Job a. b. Menu Overview and Basic Setup 35 Menu overview Darkness Normal Dark+1- Dark+5 Light+5- Forward Forward to Fax Forward to Fax Rcv.

User Manual Ver.1.0 (English)
Page 36
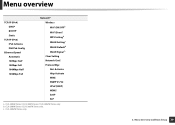
Off Auto Enhance Lev.1 Enhance Lev.2 Erase Lev.1- Light+1 Original Type Text/Photo Photo Magazine Text Layout Normal 2-Up 4-Up ID Copy Copy Feature Adjust Bkgd. Menu Overview and Basic Setup 36 Dark+5 Light+5- Erase Lev.4 Copy Setup Change Default Original Size Copies Copy Collation Reduce/Enlarge Darkness Original Type Adjust Bkgd. 2. Menu overview Original Size Reduce/Enlarge Darkness Normal Dark+1-
Off Auto Enhance Lev.1 Enhance Lev.2 Erase Lev.1- Light+1 Original Type Text/Photo Photo Magazine Text Layout Normal 2-Up 4-Up ID Copy Copy Feature Adjust Bkgd. Menu Overview and Basic Setup 36 Dark+5 Light+5- Erase Lev.4 Copy Setup Change Default Original Size Copies Copy Collation Reduce/Enlarge Darkness Original Type Adjust Bkgd. 2. Menu overview Original Size Reduce/Enlarge Darkness Normal Dark+1-

User Manual Ver.1.0 (English)
Page 37
Menu Overview and Basic Setup 37 Menu overview Scan Feature USB Feature Original Size Original Type Resolution Color Mode File Format Darkness Scan Setup Change Default USB Default Orientation Portrait Landscape Copies [1 - 999] Resolution Normal Best Trapping Off Normal Maximum Document Type Standard Photo Biz Graphic CAD Web Page Print Setup Screen Enhance Detailed Normal Clear Text Off Minimum Normal Maximum Auto CR LF LF+CR Emulation Emulation Type Setup 2.
Menu Overview and Basic Setup 37 Menu overview Scan Feature USB Feature Original Size Original Type Resolution Color Mode File Format Darkness Scan Setup Change Default USB Default Orientation Portrait Landscape Copies [1 - 999] Resolution Normal Best Trapping Off Normal Maximum Document Type Standard Photo Biz Graphic CAD Web Page Print Setup Screen Enhance Detailed Normal Clear Text Off Minimum Normal Maximum Auto CR LF LF+CR Emulation Emulation Type Setup 2.
User Manual Ver.1.0 (English)
Page 38
... Number TonerLow Alert 2. Menu Overview and Basic Setup 38 d. CLX-330x Series/CLX-330xW Seriesonly c. PrintBlankPage Eco Settings Paper Setup Paper Size Paper Type Margin Sound/Volumea Key Sound Alarm Sound Speaker Ringer a. CLX-330xFN Series/ CLX-330xFW Series only. b. CLX-330xW Series/ CLX-330xFN Series/ CLX-330xFW Seriesonly. Menu overview Machine Setup Machine IDa Fax Numbera Date & Timea Clock...
... Number TonerLow Alert 2. Menu Overview and Basic Setup 38 d. CLX-330x Series/CLX-330xW Seriesonly c. PrintBlankPage Eco Settings Paper Setup Paper Size Paper Type Margin Sound/Volumea Key Sound Alarm Sound Speaker Ringer a. CLX-330xFN Series/ CLX-330xFW Series only. b. CLX-330xW Series/ CLX-330xFN Series/ CLX-330xFW Seriesonly. Menu overview Machine Setup Machine IDa Fax Numbera Date & Timea Clock...
User Manual Ver.1.0 (English)
Page 39
CLX-330xW Series/ CLX-330xFW Series only. Menu Overview and Basic Setup 39 CLX-330xW Series/ CLX-330xFN Series/ CLX-330xFW Series only. c. Protocol Mgr. Menu overview TCP/IP (IPv4) DHCP BOOTP Static TCP/IP (IPv6) IPv6 Activate DHCPv6 Config Ethernet Speed Automatic 10Mbps Half 10Mbps Full 100Mbps Half 100Mbps Full Networka Wireless Wi-Fi ON/OFFb Wi-Fi Directc WPS Settingb WLAN Settingc WLAN Defaultb WLAN Signal b Clear Setting Network Conf. b. CLX-330xFW Series only. 2. Net. Activate Http Activate WINS SNMP V1/V2 UPnP(SSDP) MDNS SetIP SLP a.
CLX-330xW Series/ CLX-330xFW Series only. Menu Overview and Basic Setup 39 CLX-330xW Series/ CLX-330xFN Series/ CLX-330xFW Series only. c. Protocol Mgr. Menu overview TCP/IP (IPv4) DHCP BOOTP Static TCP/IP (IPv6) IPv6 Activate DHCPv6 Config Ethernet Speed Automatic 10Mbps Half 10Mbps Full 100Mbps Half 100Mbps Full Networka Wireless Wi-Fi ON/OFFb Wi-Fi Directc WPS Settingb WLAN Settingc WLAN Defaultb WLAN Signal b Clear Setting Network Conf. b. CLX-330xFW Series only. 2. Net. Activate Http Activate WINS SNMP V1/V2 UPnP(SSDP) MDNS SetIP SLP a.
User Manual Ver.1.0 (English)
Page 40
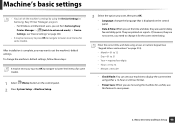
..., they are not correct, you need to change it for some models. Menu Overview and Basic Setup 40 To change the language that is complete, you set the time and date, they are used in Samsung Easy Printer Manager program. - After installation is displayed on the control panel. • Date ...; You can set your machine to display the current time using either a 12-hour or 24-hour format. • Power Save: When you set from Samsung Easy Printer Manager > (Switch to advanced mode) > Device Settings, see "Device Settings" on page 258. • It may want , then press OK. &#...
..., they are not correct, you need to change it for some models. Menu Overview and Basic Setup 40 To change the language that is complete, you set the time and date, they are used in Samsung Easy Printer Manager program. - After installation is displayed on the control panel. • Date ...; You can set your machine to display the current time using either a 12-hour or 24-hour format. • Power Save: When you set from Samsung Easy Printer Manager > (Switch to advanced mode) > Device Settings, see "Device Settings" on page 258. • It may want , then press OK. &#...

User Manual Ver.1.0 (English)
Page 41
..., which atmospheric pressure is received, the product will wake up from the power saving mode. • Press (Menu) > System Setup > Machine Setup > Wakeup Event > On on the control panel. Menu Overview and Basic Setup 41 Machine's basic settings • When you press the Power/Wakeup button, start printing, or a fax is determined by...
..., which atmospheric pressure is received, the product will wake up from the power saving mode. • Press (Menu) > System Setup > Machine Setup > Wakeup Event > On on the control panel. Menu Overview and Basic Setup 41 Machine's basic settings • When you press the Power/Wakeup button, start printing, or a fax is determined by...
User Manual Ver.1.0 (English)
Page 42
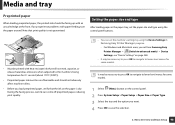
... cause a fire. Media and tray This chapter provides information on page 120). The use the inkjet photo paper with this machine. Menu Overview and Basic Setup 42 Such repairs are not covered by Samsung's warranty or service agreements. • Make sure not to overheating of the paper. 2.
... cause a fire. Media and tray This chapter provides information on page 120). The use the inkjet photo paper with this machine. Menu Overview and Basic Setup 42 Such repairs are not covered by Samsung's warranty or service agreements. • Make sure not to overheating of the paper. 2.
User Manual Ver.1.0 (English)
Page 43
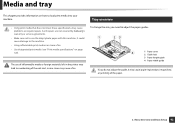
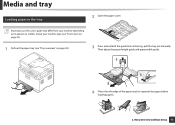
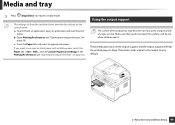
Illustrations on this user's guide may differ from your machine type (see "Front view" on page 20). 1 Pull out the paper tray (see "Tray overview" on its options or models. Check your machine depending on page 42). 3 Press and unlatch the guide lock in the tray 2 Open the paper cover. Then adjust the paper length guide and paper width guide. 1 32 2 4 Flex or fan the edge of the paper stack to separate the pages before loading papers. 2. Menu Overview and Basic Setup 43 Media and tray 3 Loading paper in the tray, pull the tray out manually.
Illustrations on this user's guide may differ from your machine type (see "Front view" on page 20). 1 Pull out the paper tray (see "Tray overview" on its options or models. Check your machine depending on page 42). 3 Press and unlatch the guide lock in the tray 2 Open the paper cover. Then adjust the paper length guide and paper width guide. 1 32 2 4 Flex or fan the edge of the paper stack to separate the pages before loading papers. 2. Menu Overview and Basic Setup 43 Media and tray 3 Loading paper in the tray, pull the tray out manually.
User Manual Ver.1.0 (English)
Page 44
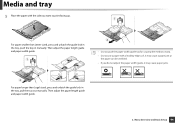
Menu Overview and Basic Setup 44 Then adjust the paper length guide and paper width guide. 2. Media and tray 5 Place the paper with a leading-edge curl, it may cause a paper ...
Menu Overview and Basic Setup 44 Then adjust the paper length guide and paper width guide. 2. Media and tray 5 Place the paper with a leading-edge curl, it may cause a paper ...

User Manual Ver.1.0 (English)
Page 45
Menu Overview and Basic Setup 45 c Press the Paper tab in application. 2. For example, if you print a document, set the paper type to use a label, set the paper type and ...
Menu Overview and Basic Setup 45 c Press the Paper tab in application. 2. For example, if you print a document, set the paper type to use a label, set the paper type and ...
User Manual Ver.1.0 (English)
Page 46
... proper media type from your machine type (see "Opening printing preferences" on page 56). Check your machine depending on page 120. Menu Overview and Basic Setup 46 To see for paper weights for each sheet, refer to print on labels, select Labels for Paper Type. • When using special media, we...
... proper media type from your machine type (see "Opening printing preferences" on page 56). Check your machine depending on page 120. Menu Overview and Basic Setup 46 To see for paper weights for each sheet, refer to print on labels, select Labels for Paper Type. • When using special media, we...
User Manual Ver.1.0 (English)
Page 47
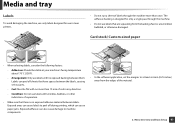
.... 2. Adhesives: Should be stable at least 6.4 mm (0.25 inches) away from the backing sheet or are wrinkled, bubbled, or otherwise damaged. Menu Overview and Basic Setup 47
.... 2. Adhesives: Should be stable at least 6.4 mm (0.25 inches) away from the backing sheet or are wrinkled, bubbled, or otherwise damaged. Menu Overview and Basic Setup 47
User Manual Ver.1.0 (English)
Page 48
During the fusing process, wet ink can come off preprinted paper, reducing print quality. • You can set from Samsung Easy Printer Manager > (Switch to advanced mode) > Device Settings, see "Device Settings" on page 258. • It may be necessary to press OK to ... the printed side should not adversely affect machine rollers. • Before you load preprinted paper, verify that the ink on the control panel. 2 Press System Setup > Paper Setup > Paper Size or Paper Type. 3 Select the tray and the option you want. 4 Press OK to save the selection. 2. If you set the machine...
During the fusing process, wet ink can come off preprinted paper, reducing print quality. • You can set from Samsung Easy Printer Manager > (Switch to advanced mode) > Device Settings, see "Device Settings" on page 258. • It may be necessary to press OK to ... the printed side should not adversely affect machine rollers. • Before you load preprinted paper, verify that the ink on the control panel. 2 Press System Setup > Paper Setup > Paper Size or Paper Type. 3 Select the tray and the option you want. 4 Press OK to save the selection. 2. If you set the machine...
User Manual Ver.1.0 (English)
Page 49
... use special-sized paper such as billing paper, select the Paper tab > Size > Edit... The printed pages stack on page 56). Menu Overview and Basic Setup 49 The printer sends output to the output tray by default. 2. and set from an application, open an application and start the print menu. a To...
... use special-sized paper such as billing paper, select the Paper tab > Size > Edit... The printed pages stack on page 56). Menu Overview and Basic Setup 49 The printer sends output to the output tray by default. 2. and set from an application, open an application and start the print menu. a To...


