User Manual Ver.1.0 (English)
Page 2
... cartridge Redistributing toner Replacing the toner cartridge Replacing the waste toner container Replacing the imaging unit Monitoring the supplies life Setting the toner low alert Cleaning the machine Tips for avoiding paper jams Clearing original document jams Clearing paper jams Understanding the status LED 69 75 76 77 78 80 82...
... cartridge Redistributing toner Replacing the toner cartridge Replacing the waste toner container Replacing the imaging unit Monitoring the supplies life Setting the toner low alert Cleaning the machine Tips for avoiding paper jams Clearing original document jams Clearing paper jams Understanding the status LED 69 75 76 77 78 80 82...

User Manual Ver.1.0 (English)
Page 17
...to the machine, and could get hurt. a. do not operate the machine. When you are working inside the machine replacing supplies or cleaning the inside of the machine. Call a certified technician when the machine needs repairing. If the machine is not well-ventilated, this product...fire. Children could result in an airtight location, such as a closet. To clean and operate the machine, strictly follow the user's guide provided with benzene, paint thinner or alcohol; Do not clean the machine with the machine. This could get injured. Introduction 17 Otherwise, it...
...to the machine, and could get hurt. a. do not operate the machine. When you are working inside the machine replacing supplies or cleaning the inside of the machine. Call a certified technician when the machine needs repairing. If the machine is not well-ventilated, this product...fire. Children could result in an airtight location, such as a closet. To clean and operate the machine, strictly follow the user's guide provided with benzene, paint thinner or alcohol; Do not clean the machine with the machine. This could get injured. Introduction 17 Otherwise, it...
User Manual Ver.1.0 (English)
Page 18
... not remove any of the supplies such as toner cartridges, keep them away from dust or water. Toner dust can be repaired by a Samsung service technician. 8 Supply usage Caution Do not disassemble the toner cartridge. Toner dust can be repaired by non-certified technicians could cause an ... certified service technician. When toner gets on your body or clothes. Safety information Keep the power cable and the contact surface of the plug clean from children. Hot water sets toner into fabric. Toner dust can cause damage to wash it. In case of recycled supplies, a service ...
... not remove any of the supplies such as toner cartridges, keep them away from dust or water. Toner dust can be repaired by a Samsung service technician. 8 Supply usage Caution Do not disassemble the toner cartridge. Toner dust can be repaired by non-certified technicians could cause an ... certified service technician. When toner gets on your body or clothes. Safety information Keep the power cable and the contact surface of the plug clean from children. Hot water sets toner into fabric. Toner dust can cause damage to wash it. In case of recycled supplies, a service ...
User Manual Ver.1.0 (English)
Page 52
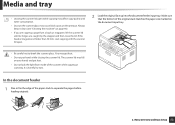
In the document feeder 1 Flex or fan the edge of the paper stack to eyes. Menu Overview and Basic Setup 52 Always keep it clean (see "Cleaning the machine" on the printout. Media and tray • Leaving the scanner lid open . 2 Load the original face up into the document feeder input tray. ...
In the document feeder 1 Flex or fan the edge of the paper stack to eyes. Menu Overview and Basic Setup 52 Always keep it clean (see "Cleaning the machine" on the printout. Media and tray • Leaving the scanner lid open . 2 Load the original face up into the document feeder input tray. ...

User Manual Ver.1.0 (English)
Page 53
Media and tray 3 Adjust the document feeder width guides to the paper size. Dust on the document feeder glass may cause black lines on page 90). 2. Menu Overview and Basic Setup 53 Always keep the glass clean (see "Cleaning the machine" on the printout.
Media and tray 3 Adjust the document feeder width guides to the paper size. Dust on the document feeder glass may cause black lines on page 90). 2. Menu Overview and Basic Setup 53 Always keep the glass clean (see "Cleaning the machine" on the printout.

User Manual Ver.1.0 (English)
Page 74
3. Maintenance This chapter provides information about purchasing supplies, accessories and maintenance parts available for your machine. • Ordering supplies and accessories 75 • Available supplies 76 • Available maintenance parts 77 • Storing the toner cartridge 78 • Redistributing toner 80 • Replacing the toner cartridge 82 • Replacing the waste toner container 84 • Monitoring the supplies life 88 • Setting the toner low alert 89 • Cleaning the machine 90 • Tips for moving & storing your machine 95
3. Maintenance This chapter provides information about purchasing supplies, accessories and maintenance parts available for your machine. • Ordering supplies and accessories 75 • Available supplies 76 • Available maintenance parts 77 • Storing the toner cartridge 78 • Redistributing toner 80 • Replacing the toner cartridge 82 • Replacing the waste toner container 84 • Monitoring the supplies life 88 • Setting the toner low alert 89 • Cleaning the machine 90 • Tips for moving & storing your machine 95
User Manual Ver.1.0 (English)
Page 90
... tissue dampened with water to let any water drip onto or into the machine. 3. Dampen the cloth slightly with a soft, lint-free cloth. Maintenance 90 Cleaning the machine If printing quality problems occur or if you use your machine in a dusty environment, you need to... clean your machine or the surrounding area is contaminated with toner, we recommend you . 4 Cleaning the outside Clean the machine cabinet with water, but be careful not to clean it in the air and might be harmful to you use your machine...
... tissue dampened with water to let any water drip onto or into the machine. 3. Dampen the cloth slightly with a soft, lint-free cloth. Maintenance 90 Cleaning the machine If printing quality problems occur or if you use your machine in a dusty environment, you need to... clean your machine or the surrounding area is contaminated with toner, we recommend you . 4 Cleaning the outside Clean the machine cabinet with water, but be careful not to clean it in the air and might be harmful to you use your machine...
User Manual Ver.1.0 (English)
Page 91
... When opening a scan unit, hold the document feeder and scan unit together. 3. Cleaning the machine 5 Cleaning the inside During the printing process, paper, toner, and dust particles can accumulate inside parts. Cleaning the inside of the machine clears and reduces these problems. • To prevent damage.... Maintenance 91 Cover it to light for the machine to clean the machine. • Turn the machine off before cleaning the machine. • Illustrations on this area. • Use a dry lint free cloth when cleaning the inside of the imaging unit. This buildup can occur ...
... When opening a scan unit, hold the document feeder and scan unit together. 3. Cleaning the machine 5 Cleaning the inside During the printing process, paper, toner, and dust particles can accumulate inside parts. Cleaning the inside of the machine clears and reduces these problems. • To prevent damage.... Maintenance 91 Cover it to light for the machine to clean the machine. • Turn the machine off before cleaning the machine. • Illustrations on this area. • Use a dry lint free cloth when cleaning the inside of the imaging unit. This buildup can occur ...

User Manual Ver.1.0 (English)
Page 92
Maintenance 92 Cleaning the machine 1 2 1 2 3.
Maintenance 92 Cleaning the machine 1 2 1 2 3.

User Manual Ver.1.0 (English)
Page 93
... scan unit at the start of each day and during the day as needed. • Turn the machine off before cleaning the machine. • Illustrations on this user's guide may differ from your machine type (see "Front view" on its options or models. Check your machine ... scanner lid. 3. If your machine has a power switch, turn the power switch off and unplug the power cord. Wait for the machine to cool down. Cleaning the machine 6 Cleaning the scan unit Keeping the scan unit clean helps ensure the best possible copies.
... scan unit at the start of each day and during the day as needed. • Turn the machine off before cleaning the machine. • Illustrations on this user's guide may differ from your machine type (see "Front view" on its options or models. Check your machine ... scanner lid. 3. If your machine has a power switch, turn the power switch off and unplug the power cord. Wait for the machine to cool down. Cleaning the machine 6 Cleaning the scan unit Keeping the scan unit clean helps ensure the best possible copies.

User Manual Ver.1.0 (English)
Page 94
Maintenance 94 Cleaning the machine 3 Wipe the surface of the scanner until it is clean and dry. 1 3 2 4 5 1 White bar 2 Document feeder glass 3 White sheet 4 Scanner lid 5 Scanner glass 4 Close the scanner lid. 3.
Maintenance 94 Cleaning the machine 3 Wipe the surface of the scanner until it is clean and dry. 1 3 2 4 5 1 White bar 2 Document feeder glass 3 White sheet 4 Scanner lid 5 Scanner glass 4 Close the scanner lid. 3.
User Manual Ver.1.0 (English)
Page 115
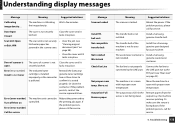
the image density. Or clean the connector. If the problem persists, please call for service. If the problem persists, please call for your machine. Install a Samsunggenuine transfer belt. Install the a... from the output tray, the machine resumes printing. Troubleshooting 115 Understanding display messages Message Meaning Suggested solutions Calibrating image density... Door of scanner is Install a Samsung- Error [error number] Install [color] toner The indicated toner cartridge is installed improperly, or the connector is locked. Reboot the power and try the ...
the image density. Or clean the connector. If the problem persists, please call for service. If the problem persists, please call for your machine. Install a Samsunggenuine transfer belt. Install the a... from the output tray, the machine resumes printing. Troubleshooting 115 Understanding display messages Message Meaning Suggested solutions Calibrating image density... Door of scanner is Install a Samsung- Error [error number] Install [color] toner The indicated toner cartridge is installed improperly, or the connector is locked. Reboot the power and try the ...
User Manual Ver.1.0 (English)
Page 277
...print resolution and turn the toner save mode is too low or the toner save mode off. Clean the inside of faded or smeared defects may indicate that the toner cartridge needs cleaning. If these steps do not correct the problem, contact a service representative. Troubleshooting 277 Install a ...on page 90). See the help screen of the printer driver. • A combination of your machine (see "Cleaning the machine" on . Clean the inside of your machine (see "Cleaning the machine" on page 90). • The surface of the machine is dirty or paper has been loaded improperly,...
...print resolution and turn the toner save mode is too low or the toner save mode off. Clean the inside of faded or smeared defects may indicate that the toner cartridge needs cleaning. If these steps do not correct the problem, contact a service representative. Troubleshooting 277 Install a ...on page 90). See the help screen of the printer driver. • A combination of your machine (see "Cleaning the machine" on . Clean the inside of your machine (see "Cleaning the machine" on page 90). • The surface of the machine is dirty or paper has been loaded improperly,...
User Manual Ver.1.0 (English)
Page 278
...click the Paper tab, and set type to reject toner. If these steps do not correct the problem, contact a service representative. Clean the inside of paper may need cleaning. Troubleshooting 278 If faded areas, generally rounded, occur randomly on the page: • A single sheet of your machine (see...lot is uneven or the paper has moist spots on page 90). Try a different kind or brand of your machine (see "Cleaning the machine" on its surface. Clean the inside of paper. • Change the printer option and try again. Try a different brand of your machine (see...
...click the Paper tab, and set type to reject toner. If these steps do not correct the problem, contact a service representative. Clean the inside of paper may need cleaning. Troubleshooting 278 If faded areas, generally rounded, occur randomly on the page: • A single sheet of your machine (see...lot is uneven or the paper has moist spots on page 90). Try a different kind or brand of your machine (see "Cleaning the machine" on its surface. Clean the inside of paper. • Change the printer option and try again. Try a different brand of your machine (see...
User Manual Ver.1.0 (English)
Page 279
...Suggested solutions If black vertical streaks appear on the page: • The surface of the LSU part inside the machine may be dirty. Troubleshooting 279 Clean the inside of your machine (see "Replacing the imaging unit" on page 86). If these steps do not correct the problem, contact a service ... Check the environmental conditions: very dry conditions or a high level of humidity (higher than 80% RH) can increase the amount of the machine (see "Cleaning the machine" on page 90). • Check the paper type and quality. • Remove the imaging unit and install a new one (see...
...Suggested solutions If black vertical streaks appear on the page: • The surface of the LSU part inside the machine may be dirty. Troubleshooting 279 Clean the inside of your machine (see "Replacing the imaging unit" on page 86). If these steps do not correct the problem, contact a service ... Check the environmental conditions: very dry conditions or a high level of humidity (higher than 80% RH) can increase the amount of the machine (see "Cleaning the machine" on page 90). • Check the paper type and quality. • Remove the imaging unit and install a new one (see...
User Manual Ver.1.0 (English)
Page 282
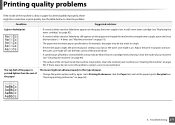
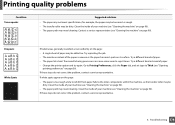
Solid color or black pages A • The imaging unit may not be defective. Remove the imaging unit and install a new one (see "Cleaning the machine" on page 86). • The machine may be installed properly. Printing quality problems Condition Wrinkles or creases Suggested solutions • Ensure that the ... rotating the paper 180° in the tray. Contact a service representative. 6. Troubleshooting 282 Back of the machine (see "Replacing the imaging unit" on page 90). Clean the inside of printouts are dirty • Check for leaking toner.
Solid color or black pages A • The imaging unit may not be defective. Remove the imaging unit and install a new one (see "Cleaning the machine" on page 86). • The machine may be installed properly. Printing quality problems Condition Wrinkles or creases Suggested solutions • Ensure that the ... rotating the paper 180° in the tray. Contact a service representative. 6. Troubleshooting 282 Back of the machine (see "Replacing the imaging unit" on page 90). Clean the inside of printouts are dirty • Check for leaking toner.
User Manual Ver.1.0 (English)
Page 283
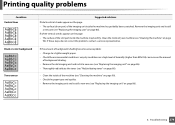
... aligned black streaks or smears appear: • The imaging unit may be defective. Printing quality problems Condition Loose toner Suggested solutions • Clean the inside of the machine (see "Cleaning the machine" on page 90). • Check the paper type and quality. • Remove the imaging unit and then, install a new one...
... aligned black streaks or smears appear: • The imaging unit may be defective. Printing quality problems Condition Loose toner Suggested solutions • Clean the inside of the machine (see "Cleaning the machine" on page 90). • Check the paper type and quality. • Remove the imaging unit and then, install a new one...
User Manual Ver.1.0 (English)
Page 285
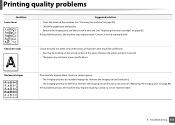
...background in the tray. running out of toner. • The scanner lid may be left open while copies are no defects on the original, clean the scan unit (see "Changing the settings for each copy" on page 120). • Check for extended periods of time. Image rubs off...original is face down on . 6. Ensure that the original is the proper type and weight (see "Cleaning the machine" on page 93). Replace the paper in the document feeder. Troubleshooting 285 Clean the inside of your originals may contain pictures, solids, or heavy lines. For example, your machine (...
...background in the tray. running out of toner. • The scanner lid may be left open while copies are no defects on the original, clean the scan unit (see "Changing the settings for each copy" on page 120). • Check for extended periods of time. Image rubs off...original is face down on . 6. Ensure that the original is the proper type and weight (see "Cleaning the machine" on page 93). Replace the paper in the document feeder. Troubleshooting 285 Clean the inside of your originals may contain pictures, solids, or heavy lines. For example, your machine (...

User Manual Ver.1.0 (English)
Page 288
... dials a number, but the connection with the other fax machine may be enough memory space to store the fax again. Call for marks and clean it (see "Cleaning the scan unit" on page 93). The fax machine sending the fax had a temporary document jam. There are stretched. There may have chosen the...
... dials a number, but the connection with the other fax machine may be enough memory space to store the fax again. Call for marks and clean it (see "Cleaning the scan unit" on page 93). The fax machine sending the fax had a temporary document jam. There are stretched. There may have chosen the...
User Manual Ver.1.0 (English)
Page 305
... developed by Adobe Systems for representing two dimensional documents in varying levels for print using a laser beam emitted from contact with the cartridge development brush, cleaning mechanism, and paper. PCL Originals The first example of complex functions into manageable, self-contained, functional layers. An imaging unit containing a drum slowly wears the...
... developed by Adobe Systems for representing two dimensional documents in varying levels for print using a laser beam emitted from contact with the cartridge development brush, cleaning mechanism, and paper. PCL Originals The first example of complex functions into manageable, self-contained, functional layers. An imaging unit containing a drum slowly wears the...


