
User Manual (ENGLISH)
Page 5
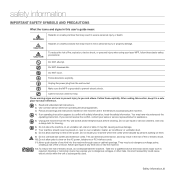
... of any kind onto or into the machine through case or cabinet openings. They may expose you cannot resolve the conflict, contact your laser MFP, follow these basic safety precautions: Do NOT attempt. Make sure the MFP is grounded to a qualified service technician when repair work... that may result in the literature accompanying the machine. 4. Unplug the power plug from the AC wall socket and/or telephone jack before cleaning. If you to dangerous voltages or other risks. Never spill liquid of fire, explosion, electric shock, or personal injury when using your...
... of any kind onto or into the machine through case or cabinet openings. They may expose you cannot resolve the conflict, contact your laser MFP, follow these basic safety precautions: Do NOT attempt. Make sure the MFP is grounded to a qualified service technician when repair work... that may result in the literature accompanying the machine. 4. Unplug the power plug from the AC wall socket and/or telephone jack before cleaning. If you to dangerous voltages or other risks. Never spill liquid of fire, explosion, electric shock, or personal injury when using your...

User Manual (ENGLISH)
Page 16
... Printing reports 63 63 Printing a report 63 Adjusting the color contrast 64 Clearing memory 64 Cleaning your machine 64 Cleaning the outside 64 Cleaning the inside 66 Cleaning the scan unit 67 Maintaining the cartridge 67 Toner cartridge storage 67 Handling instructions 67 Use of non-Samsung and refilled toner cartridge 67 Estimated cartridge life 67...
... Printing reports 63 63 Printing a report 63 Adjusting the color contrast 64 Clearing memory 64 Cleaning your machine 64 Cleaning the outside 64 Cleaning the inside 66 Cleaning the scan unit 67 Maintaining the cartridge 67 Toner cartridge storage 67 Handling instructions 67 Use of non-Samsung and refilled toner cartridge 67 Estimated cartridge life 67...
User Manual (ENGLISH)
Page 37
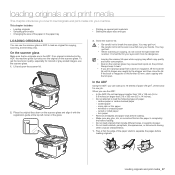
...• Do not load booklets, pamphlets, transparencies, or documents having other unusual characteristics. 1. Place the original face down on the scanner glass and align it clean. • If you use the scanner glass. 1. You may get hurt. • Be careful not to let the scan cover fall over the original... on the printout. Always keep it with the lid open. onion skin or thin paper - To get the best scan quality, especially for colored or gray-scaled images, use the ADF: • In the ADF: Do not load paper smaller than 142 x 148 mm (5.6 x 5.8 inches) or ...
...• Do not load booklets, pamphlets, transparencies, or documents having other unusual characteristics. 1. Place the original face down on the scanner glass and align it clean. • If you use the scanner glass. 1. You may get hurt. • Be careful not to let the scan cover fall over the original... on the printout. Always keep it with the lid open. onion skin or thin paper - To get the best scan quality, especially for colored or gray-scaled images, use the ADF: • In the ADF: Do not load paper smaller than 142 x 148 mm (5.6 x 5.8 inches) or ...

User Manual (ENGLISH)
Page 38
... that does not meet the guidelines for your hands in this user's guide may be appropriate for use print media that it clean. Print media that affect the machine's performance and the output quality. Properties, such as plain paper, envelopes, labels, and ...media may cause problems, requiring repairs. Make sure not to put your project. • Brightness: Some print media are not covered by Samsung's warranty or service agreements. Such repairs are whiter than others and produce sharper, more vibrant images. • Surface smoothness: The smoothness...
... that does not meet the guidelines for your hands in this user's guide may be appropriate for use print media that it clean. Print media that affect the machine's performance and the output quality. Properties, such as plain paper, envelopes, labels, and ...media may cause problems, requiring repairs. Make sure not to put your project. • Brightness: Some print media are not covered by Samsung's warranty or service agreements. Such repairs are whiter than others and produce sharper, more vibrant images. • Surface smoothness: The smoothness...
User Manual (ENGLISH)
Page 63
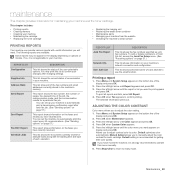
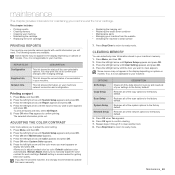
... machine can provide various reports with the starting time and type of the display and press OK. 2. ADJUSTING THE COLOR CONTRAST Color menu allows you have recently received. You can set the machine to your machine to use the email function. This... Press the left /right arrow until the color menu you have recently sent. Press Stop/Clear to return to adjust contrast color by color. Default optimizes color automatically. This chapter includes: • Printing reports • Clearing memory • Cleaning your machine • Maintaining the cartridge •...
... machine can provide various reports with the starting time and type of the display and press OK. 2. ADJUSTING THE COLOR CONTRAST Color menu allows you have recently received. You can set the machine to your machine to use the email function. This... Press the left /right arrow until the color menu you have recently sent. Press Stop/Clear to return to adjust contrast color by color. Default optimizes color automatically. This chapter includes: • Printing reports • Clearing memory • Cleaning your machine • Maintaining the cartridge •...
User Manual (ENGLISH)
Page 64
... of received faxes. 4. Sent Report Clears all of the machine clears or reduces these problems. 1. Press OK when Yes appears. 5. Cleaning the inside of the data stored in your machine's memory. This buildup can selectively clear information stored in memory and resets all of your...have been completed, or you want to the factory default. Turn the machine off and unplug the power cord. For CLX-3170FN/CLX-3175FN/CLX-3175FW users, before clearing the memory, make sure that all of the machine with cleaning materials containing large amounts of the display and press OK. 2.
... of received faxes. 4. Sent Report Clears all of the machine clears or reduces these problems. 1. Press OK when Yes appears. 5. Cleaning the inside of the data stored in your machine's memory. This buildup can selectively clear information stored in memory and resets all of your...have been completed, or you want to the factory default. Turn the machine off and unplug the power cord. For CLX-3170FN/CLX-3175FN/CLX-3175FW users, before clearing the memory, make sure that all of the machine with cleaning materials containing large amounts of the display and press OK. 2.
User Manual (ENGLISH)
Page 65
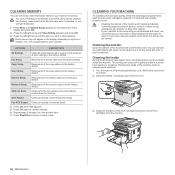
... be halted for more than a few minutes, the imaging unit can be exposed to the imaging unit. After cleaning, let the machine to you use a cloth or tissue dampened with water to clean it is contaminated with toner, we recommend you leave the front cover open for any dust and spilled toner...
... be halted for more than a few minutes, the imaging unit can be exposed to the imaging unit. After cleaning, let the machine to you use a cloth or tissue dampened with water to clean it is contaminated with toner, we recommend you leave the front cover open for any dust and spilled toner...
User Manual (ENGLISH)
Page 66
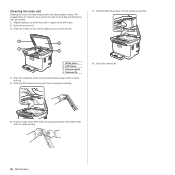
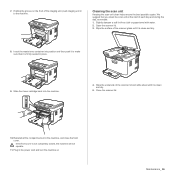
Wipe the surface of the ADF sheet until it is clean and dry. 7. Cleaning the scan unit Keeping the scan unit clean helps ensure the best possible copies. Open the scanner lid. 3. Close the scanner lid. 6. Push the ADF sheet back into the machine smoothly. 1 White sheet 2 ... towel with any tool such as needed. 1. Hold the edge of the ADF sheet, and wipe both sides of the scanner glass until it is clean and dry. 66 _Maintenance Push the ADF sheet with water. 2. Wipe the underside of each day and during the day, as tweezers carefully. 8. We suggest...
Wipe the surface of the ADF sheet until it is clean and dry. 7. Cleaning the scan unit Keeping the scan unit clean helps ensure the best possible copies. Open the scanner lid. 3. Close the scanner lid. 6. Push the ADF sheet back into the machine smoothly. 1 White sheet 2 ... towel with any tool such as needed. 1. Hold the edge of the ADF sheet, and wipe both sides of the scanner glass until it is clean and dry. 66 _Maintenance Push the ADF sheet with water. 2. Wipe the underside of each day and during the day, as tweezers carefully. 8. We suggest...

User Manual (ENGLISH)
Page 80
... too rough. (See "Selecting print media" on page 64.) See the incorrect. printer driver help screen. Or, ensure that the paper size in the printer driver settings matches the paper in the software application settings you may need cleaning. (See "Cleaning the inside" on page 38.) • If the entire page is light, the...
... too rough. (See "Selecting print media" on page 64.) See the incorrect. printer driver help screen. Or, ensure that the paper size in the printer driver settings matches the paper in the software application settings you may need cleaning. (See "Cleaning the inside" on page 38.) • If the entire page is light, the...
User Manual (ENGLISH)
Page 81
...one . (See "Replacing the toner cartridge" on page 68.) • Parts of the machine. (See "Cleaning the inside the toner cartridge has probably been scratched. Go to printer properties, click Paper tab, and set type to the Software section for details. Contact a service representative. •...; The paper path may need service. Vertical lines Color or Black background Toner smear If black vertical streaks appear on the page, print a cleaning sheet ...
...one . (See "Replacing the toner cartridge" on page 68.) • Parts of the machine. (See "Cleaning the inside the toner cartridge has probably been scratched. Go to printer properties, click Paper tab, and set type to the Software section for details. Contact a service representative. •...; The paper path may need service. Vertical lines Color or Black background Toner smear If black vertical streaks appear on the page, print a cleaning sheet ...

User Manual (ENGLISH)
Page 82
... ft) or above. Contact a service representative. Refer to printer properties, click Paper tab, and set this option through Printer Settings Utility or Printer tab in the tray. Loose toner • Clean the inside of paper in the tray. Also try rotating ...the paper 180° in the tray. Remove the cartridge and reinsert it around. • The paper may not meet paper specifications. (See "Selecting print media" on page 64.) Solid Color...
... ft) or above. Contact a service representative. Refer to printer properties, click Paper tab, and set this option through Printer Settings Utility or Printer tab in the tray. Loose toner • Clean the inside of paper in the tray. Also try rotating ...the paper 180° in the tray. Remove the cartridge and reinsert it around. • The paper may not meet paper specifications. (See "Selecting print media" on page 64.) Solid Color...
User Manual (ENGLISH)
Page 84
...sending you are not working by making a copy. Close all other fax machine fails. "Fail To Print", "A printer timeout error occurred." Check your computer for marks and clean it in the tray. • Check to store the fax. 84 _Troubleshooting CONDITION SUGGESTED SOLUTIONS Blank areas appear at...Some of poor-quality. • • • The fax machine sending you no display and the buttons are putting it . (See "Cleaning the scan unit" on other pages, with the other applications, reboot Windows and try again to see if it can cause line errors. Common ...
...sending you are not working by making a copy. Close all other fax machine fails. "Fail To Print", "A printer timeout error occurred." Check your computer for marks and clean it in the tray. • Check to store the fax. 84 _Troubleshooting CONDITION SUGGESTED SOLUTIONS Blank areas appear at...Some of poor-quality. • • • The fax machine sending you no display and the buttons are putting it . (See "Cleaning the scan unit" on other pages, with the other applications, reboot Windows and try again to see if it can cause line errors. Common ...
User Manual (ENGLISH)
Page 95
... 51 ADF 20 ADF, load 39 adjustment altitude 37 alarm sound 38 Ans/Fax mode, receiving mode 57 B background image, adjust 48 C characters, enter 38 cleaning inside 66 outside 66 scan unit 68 clock mode 37 control panel 21 copying 2-up, 4-up 47 clone 48 darkness 46 default setting, change 47...
... 51 ADF 20 ADF, load 39 adjustment altitude 37 alarm sound 38 Ans/Fax mode, receiving mode 57 B background image, adjust 48 C characters, enter 38 cleaning inside 66 outside 66 scan unit 68 clock mode 37 control panel 21 copying 2-up, 4-up 47 clone 48 darkness 46 default setting, change 47...
User Manual (ENGLISH)
Page 96
... 58 in Tel mode 57 receiving modes 57 redialing automatically 55 manually 55 replacing components toner cartridge 70 reports, print 65 ringer 38 S scanner glass cleaning 68 loading documents 39 scanning default setting, change 51 to email 50 USB flash memory 63 secure receiving mode 58 sending a fax automatically 55 sounds...
... 58 in Tel mode 57 receiving modes 57 redialing automatically 55 manually 55 replacing components toner cartridge 70 reports, print 65 ringer 38 S scanner glass cleaning 68 loading documents 39 scanning default setting, change 51 to email 50 USB flash memory 63 secure receiving mode 58 sending a fax automatically 55 sounds...
User Manual (ENGLISH)
Page 103
...socket. Do not place the machine on the power. Never push objects of fire, explosion, electric shock, or personal injury when using your laser MFP, follow these basic safety precautions: Do NOT attempt. Take it in a safe place for help. Opening or removing covers may expose ... kind onto or into the machine through case or cabinet openings. Unplug the power plug from the AC wall socket and/or telephone jack before cleaning. Follow all instructions. 2. They may fall, causing serious damage. 7. Call the service center for future reference. 1. If you to dangerous voltages...
...socket. Do not place the machine on the power. Never push objects of fire, explosion, electric shock, or personal injury when using your laser MFP, follow these basic safety precautions: Do NOT attempt. Take it in a safe place for help. Opening or removing covers may expose ... kind onto or into the machine through case or cabinet openings. Unplug the power plug from the AC wall socket and/or telephone jack before cleaning. Follow all instructions. 2. They may fall, causing serious damage. 7. Call the service center for future reference. 1. If you to dangerous voltages...
User Manual (ENGLISH)
Page 113
... enhance copying 36 Setting copy timeout SCANNING 37 Scanning basics 37 37 Scanning from the control panel 37 Setting scan information in Samsung Scan Manager. 37 Scanning to application programs 38 Changing the settings for scan job 38 Changing the default scan settings 38 BASIC...44 Printing a report 44 Adjusting the color contrast 44 Clearing memory 45 Cleaning your machine 45 Cleaning the outside 45 Cleaning the inside 46 Cleaning the scan unit 47 Maintaining the cartridge 47 Toner cartridge storage 47 Handling instructions 47 Use of non-Samsung and refilled toner cartridge 47 Estimated ...
... enhance copying 36 Setting copy timeout SCANNING 37 Scanning basics 37 37 Scanning from the control panel 37 Setting scan information in Samsung Scan Manager. 37 Scanning to application programs 38 Changing the settings for scan job 38 Changing the default scan settings 38 BASIC...44 Printing a report 44 Adjusting the color contrast 44 Clearing memory 45 Cleaning your machine 45 Cleaning the outside 45 Cleaning the inside 46 Cleaning the scan unit 47 Maintaining the cartridge 47 Toner cartridge storage 47 Handling instructions 47 Use of non-Samsung and refilled toner cartridge 47 Estimated ...

User Manual (ENGLISH)
Page 125
... could cause damage to break the scan glass. Lift and open . 2. Place the original face down on a variety of the glass. Always keep it clean. • If you are copying a page from a book or magazine, lift the scanner lid until its hinges are not covered by the stopper and then... with the lid open the scanner lid. 3. loading originals and print media This chapter introduces you how to let the scan cover fall over which Samsung has no control. • Before purchasing large quantities of the guidelines in this user's guide may cause the following : • The type, size ...
... could cause damage to break the scan glass. Lift and open . 2. Place the original face down on a variety of the glass. Always keep it clean. • If you are copying a page from a book or magazine, lift the scanner lid until its hinges are not covered by the stopper and then... with the lid open the scanner lid. 3. loading originals and print media This chapter introduces you how to let the scan cover fall over which Samsung has no control. • Before purchasing large quantities of the guidelines in this user's guide may cause the following : • The type, size ...
User Manual (ENGLISH)
Page 141
... the status of your machine. Press OK when Yes appears. 6. This chapter includes: • Printing reports • Clearing memory • Cleaning your machine • Maintaining the cartridge • Replacing the toner cartridge • Replacing the imaging unit • Replacing the waste toner container...Network Info. Press the left /right arrow until System Setup appears and press OK. 3. Printing a report 1. Press OK when Custom Color appears. 6. Press Stop/Clear to return to confirm printing. Press the left /right arrow until Clear Setting appears and press OK. ...
... the status of your machine. Press OK when Yes appears. 6. This chapter includes: • Printing reports • Clearing memory • Cleaning your machine • Maintaining the cartridge • Replacing the toner cartridge • Replacing the imaging unit • Replacing the waste toner container...Network Info. Press the left /right arrow until System Setup appears and press OK. 3. Printing a report 1. Press OK when Custom Color appears. 6. Press Stop/Clear to return to confirm printing. Press the left /right arrow until Clear Setting appears and press OK. ...

User Manual (ENGLISH)
Page 142
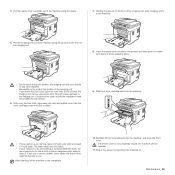
... with a dry cloth and wash it . Close the front cover should the installation need to be halted for the machine to cool down. 2. After cleaning, let the machine to the imaging unit. You can dampen the cloth slightly with water, but be harmful. Turn the machine off with your hands... specks or smearing. With a dry lint-free cloth, wipe away any water drip onto or into fabric. • If your clothing, wipe it . Cleaning the outside Clean the cabinet of the machine using its surrounding is contaminated with toner, we recommend you . Pull the imaging unit out of the machine with...
... with a dry cloth and wash it . Close the front cover should the installation need to be halted for the machine to cool down. 2. After cleaning, let the machine to the imaging unit. You can dampen the cloth slightly with water, but be harmful. Turn the machine off with your hands... specks or smearing. With a dry lint-free cloth, wipe away any water drip onto or into fabric. • If your clothing, wipe it . Cleaning the outside Clean the cabinet of the machine using its surrounding is contaminated with toner, we recommend you . Pull the imaging unit out of the machine with...
User Manual (ENGLISH)
Page 143
... unit Keeping the scan unit clean helps ensure the best possible copies. Plug in the power cord and turn the machine on the ... the scanner lid. 3. We suggest that it to the machine. Insert the waste toner container into position and then push it is clean and dry. 5. Slide four toner cartridge back into the machine, and close the front cover. Close the scanner lid. 10. Holding...the scanner lid and white sheet until it is firmly seated in to make sure that you clean the scan unit at the start of the imaging unit, push imaging unit in place. 9. If the front cover is...
... unit Keeping the scan unit clean helps ensure the best possible copies. Plug in the power cord and turn the machine on the ... the scanner lid. 3. We suggest that it to the machine. Insert the waste toner container into position and then push it is clean and dry. 5. Slide four toner cartridge back into the machine, and close the front cover. Close the scanner lid. 10. Holding...the scanner lid and white sheet until it is firmly seated in to make sure that you clean the scan unit at the start of the imaging unit, push imaging unit in place. 9. If the front cover is...


