
User Manual (ENGLISH)
Page 18
... proceed to the next step. For details, see the next section. 6 Press OK to Standby mode. Changing the default mode (CLX-3160FN only) Your machine is cut off, you need to reset the correct time and date once the power has been restored. 1 Press Menu until System Setup appears on the bottom line... clock mode You can switch this happens, simply reenter the correct number. 7 Press Stop/Clear to return to save the time and date. For the CLX-3160FN, all of your machine is not under the digit you want to correct and enter a new number. 5 To select AM or PM for 12-hour...
... proceed to the next step. For details, see the next section. 6 Press OK to Standby mode. Changing the default mode (CLX-3160FN only) Your machine is cut off, you need to reset the correct time and date once the power has been restored. 1 Press Menu until System Setup appears on the bottom line... clock mode You can switch this happens, simply reenter the correct number. 7 Press Stop/Clear to return to save the time and date. For the CLX-3160FN, all of your machine is not under the digit you want to correct and enter a new number. 5 To select AM or PM for 12-hour...
User Manual (ENGLISH)
Page 64
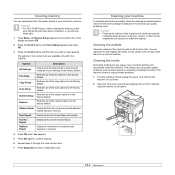
The options in the colored cells are available only with cleaning materials containing large amounts of your settings to the ...on its bottom. 13.2 Sent Report Clears all of the fax number and email address entries stored in memory and resets all of the network options to cool down. 2 Open the front cover and pull the imaging unit out of sent...on the bottom line of the machine with water, but be careful not to the factory default. Caution • For CLX-3160FN users, before clearing the memory, make sure that all of received faxes. Restores all records of the scan options to ...
The options in the colored cells are available only with cleaning materials containing large amounts of your settings to the ...on its bottom. 13.2 Sent Report Clears all of the fax number and email address entries stored in memory and resets all of the network options to cool down. 2 Open the front cover and pull the imaging unit out of sent...on the bottom line of the machine with water, but be careful not to the factory default. Caution • For CLX-3160FN users, before clearing the memory, make sure that all of received faxes. Restores all records of the scan options to ...

User Manual (ENGLISH)
Page 70
Wait for about 1.5 minutes for the imaging unit. • If the installation is completed properly, a guide report is not completely closed, the machine will automatically reset the counter for the machine to the dummy caps, it may cause problem. 13.8 Note • After rebooting, your machine will not operate. 11 Turn ...
Wait for about 1.5 minutes for the imaging unit. • If the installation is completed properly, a guide report is not completely closed, the machine will automatically reset the counter for the machine to the dummy caps, it may cause problem. 13.8 Note • After rebooting, your machine will not operate. 11 Turn ...
User Manual (ENGLISH)
Page 71
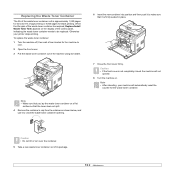
...it to close the waste toner container opening. 6 Insert the new container into position and then push it is approximately 1,250 pages for full color 5% image printing or 5,000 pages for the waste toner container. Note • After rebooting, your printer stops printing. To replace the waste ...toner container out of the machine using its package. 13.9 Caution • If the front cover is not completely closed, the machine will automatically reset the counter for black printing. Note • Make sure that it to be replaced. Caution • Do not tilt or turn over the...
...it to close the waste toner container opening. 6 Insert the new container into position and then push it is approximately 1,250 pages for full color 5% image printing or 5,000 pages for the waste toner container. Note • After rebooting, your printer stops printing. To replace the waste ...toner container out of the machine using its package. 13.9 Caution • If the front cover is not completely closed, the machine will automatically reset the counter for black printing. Note • Make sure that it to be replaced. Caution • Do not tilt or turn over the...


