User Manual Ver.1.0 (English)
Page 2
... moving & storing your machine 4. Menu Overview and Basic Setup Menu overview 25 Machine's basic settings 28 Media and tray 30 Basic printing 42 Using USB memory device 48 3.
... moving & storing your machine 4. Menu Overview and Basic Setup Menu overview 25 Machine's basic settings 28 Media and tray 30 Basic printing 42 Using USB memory device 48 3.
User Manual Ver.1.0 (English)
Page 8
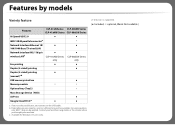
Available for Windows OS users only. For some counties, only 802.11 b/g can be available. Contact your local Samsung dealer or the retailer where you cannot use the USB cable. Depending on your machine. c. d. Only tray1 is ...LAN Network Interface 802.11b/g/n wireless LANb Eco printing ● ● CLP-41xNW Series only ● ● ● CLP-68xDW Series only ● Duplex (2-sided) printing ● Duplex (2-sided) printing ● (manual)c d USB memory interface ● Memory module ○ ○ Optional tray (Tray2) ○ Mass Storage...
Available for Windows OS users only. For some counties, only 802.11 b/g can be available. Contact your local Samsung dealer or the retailer where you cannot use the USB cable. Depending on your machine. c. d. Only tray1 is ...LAN Network Interface 802.11b/g/n wireless LANb Eco printing ● ● CLP-41xNW Series only ● ● ● CLP-68xDW Series only ● Duplex (2-sided) printing ● Duplex (2-sided) printing ● (manual)c d USB memory interface ● Memory module ○ ○ Optional tray (Tray2) ○ Mass Storage...

User Manual Ver.1.0 (English)
Page 17
...Belt (ITB) 15 Paper width guides on a multi- purpose tray 16 Multi-purpose support tray a. This is an optional feature. Introduction 17 CLP-68xND Series/CLP-68xDW Series only. 1. CLP-41xN Series/CLP-41xNW Series 12 8 9 10 7 6 3 11 4 12 5 1 Output support 2 Output tray 3 Control panel 4 Control board ...Toner cartridges 9 Toner cartridge handle 10 Intermediate Transfer Belt (ITB) 11 Paper width guides on a manual feeder 12 Manual feeder CLP-68xND Series/ CLP-68xDW Series 12 11 12 13 10 9 3 14 8 4 15 16 7 65 1 Output support 2 Output tray 3 Control panel 4 Control ...
...Belt (ITB) 15 Paper width guides on a multi- purpose tray 16 Multi-purpose support tray a. This is an optional feature. Introduction 17 CLP-68xND Series/CLP-68xDW Series only. 1. CLP-41xN Series/CLP-41xNW Series 12 8 9 10 7 6 3 11 4 12 5 1 Output support 2 Output tray 3 Control panel 4 Control board ...Toner cartridges 9 Toner cartridge handle 10 Intermediate Transfer Belt (ITB) 11 Paper width guides on a manual feeder 12 Manual feeder CLP-68xND Series/ CLP-68xDW Series 12 11 12 13 10 9 3 14 8 4 15 16 7 65 1 Output support 2 Output tray 3 Control panel 4 Control ...

User Manual Ver.1.0 (English)
Page 23
2. Menu Overview and Basic Setup This chapter provides information about the overall menu structure and the basic setup options. • Menu overview 25 • Machine's basic settings 28 • Media and tray 30 • Basic printing 42 • Using USB memory device 48
2. Menu Overview and Basic Setup This chapter provides information about the overall menu structure and the basic setup options. • Menu overview 25 • Machine's basic settings 28 • Media and tray 30 • Basic printing 42 • Using USB memory device 48
User Manual Ver.1.0 (English)
Page 26
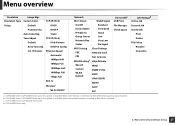
...Group Owner Network Key Low Very Low Status No Signal WPS Setting Clear Settings PBC Network Conf. This option is available When USB memory is checked. d. Emulation Type Custom Color TCP/IP (IPv4) Setup Default DHCP Print Density BOOTP Auto Color Reg Static Tone ...File Policy Rename Overwrite 2. Menu Overview and Basic Setup 27 DHCPv6 Config Cal. CLP-68xND Series/CLP-68xDW Series only. b. This option is available when the optional memory installed or Ram disk is inserted into the USB memory port on your machine. Menu overview Emulation Image Mgr...
...Group Owner Network Key Low Very Low Status No Signal WPS Setting Clear Settings PBC Network Conf. This option is available When USB memory is checked. d. Emulation Type Custom Color TCP/IP (IPv4) Setup Default DHCP Print Density BOOTP Auto Color Reg Static Tone ...File Policy Rename Overwrite 2. Menu Overview and Basic Setup 27 DHCPv6 Config Cal. CLP-68xND Series/CLP-68xDW Series only. b. This option is available when the optional memory installed or Ram disk is inserted into the USB memory port on your machine. Menu overview Emulation Image Mgr...

User Manual Ver.1.0 (English)
Page 46
... Basic Setup 47 Check the mass storage (HDD) or RAM disk option in Device Options, then you can use this feature after installing the optional memory. Printing secure documents from the control panel 1 Select (Menu) > Job Manage > Stored Job on page 68). Basic printing Starting secure printing on the driver Open...
... Basic Setup 47 Check the mass storage (HDD) or RAM disk option in Device Options, then you can use this feature after installing the optional memory. Printing secure documents from the control panel 1 Select (Menu) > Job Manage > Stored Job on page 68). Basic printing Starting secure printing on the driver Open...
User Manual Ver.1.0 (English)
Page 47
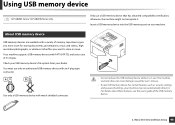
... connector. • Do not remove the USB memory device while it . A B Use only a USB memory device with a variety of the USB memory device. 2. Insert a USB memory device into the USB memory port on your dealer. Check your USB memory device's file system from your machine. Using USB memory device CLP-68xND Series/ CLP-68xDW Series only. 13 About USB...
... connector. • Do not remove the USB memory device while it . A B Use only a USB memory device with a variety of the USB memory device. 2. Insert a USB memory device into the USB memory port on your dealer. Check your USB memory device's file system from your machine. Using USB memory device CLP-68xND Series/ CLP-68xDW Series only. 13 About USB...

User Manual Ver.1.0 (English)
Page 48
... [D] in the front of a folder name, there are compatible. Menu Overview and Basic Setup 49 Using USB memory device 14 Printing from a USB memory device: 1 Insert a USB memory device into the USB memory port on your machine. 2 Select (Menu) button on the control panel. 3 Press Direct USB > USB ... selected folder. 2. Direct Print option supported file types: • PRN: Only files created by reformatting the device. 1 Insert a USB memory device into the USB memory port on your machine. 2 Select (Menu) button on the control panel. 3 Press Direct USB > File Manage. 4 Press the arrow...
... [D] in the front of a folder name, there are compatible. Menu Overview and Basic Setup 49 Using USB memory device 14 Printing from a USB memory device: 1 Insert a USB memory device into the USB memory port on your machine. 2 Select (Menu) button on the control panel. 3 Press Direct USB > USB ... selected folder. 2. Direct Print option supported file types: • PRN: Only files created by reformatting the device. 1 Insert a USB memory device into the USB memory port on your machine. 2 Select (Menu) button on the control panel. 3 Press Direct USB > File Manage. 4 Press the arrow...

User Manual Ver.1.0 (English)
Page 49
... appears on the display. 17 Backing up data After deleting files or reformatting a USB memory device, files cannot be accidentally erased due to the USB memory device. 1 Insert a USB memory device into the USB memory port on your machine. 2 Select (Menu) button on the control panel. 3 Press System... helps you want and press OK. 5 Press Setup Data > OK. Menu Overview and Basic Setup 50 Restoring data 1 Insert a USB memory device into the USB memory port on your machine. 2 Select (Menu) button on the control panel. 3 Press System Setup. 4 Press the arrow until Export Setting...
... appears on the display. 17 Backing up data After deleting files or reformatting a USB memory device, files cannot be accidentally erased due to the USB memory device. 1 Insert a USB memory device into the USB memory port on your machine. 2 Select (Menu) button on the control panel. 3 Press System... helps you want and press OK. 5 Press Setup Data > OK. Menu Overview and Basic Setup 50 Restoring data 1 Insert a USB memory device into the USB memory port on your machine. 2 Select (Menu) button on the control panel. 3 Press System Setup. 4 Press the arrow until Export Setting...

User Manual Ver.1.0 (English)
Page 50
Using USB memory device 6 To restore the backup file to the machine, press Yes > OK. 2. Menu Overview and Basic Setup 51
Using USB memory device 6 To restore the backup file to the machine, press Yes > OK. 2. Menu Overview and Basic Setup 51
User Manual Ver.1.0 (English)
Page 55
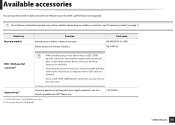
... not be available depending on models or countries (see "Features by models" on page 7). CLP-68xND Series/CLP-68xDW Series only. Allows you can not use various interface. Plain paper 80 g/m2 (20 lb bond). CLP-S680A 3. Accessory Memory module Function Extends your machine's performance and capacity. b. Some features and optional goods may not... you are available. • If you can attach an additional 520 bsheets tray. Available accessories You can purchase and install accessories to enhance your machine's memory capacity.
... not be available depending on models or countries (see "Features by models" on page 7). CLP-68xND Series/CLP-68xDW Series only. Allows you can not use various interface. Plain paper 80 g/m2 (20 lb bond). CLP-S680A 3. Accessory Memory module Function Extends your machine's performance and capacity. b. Some features and optional goods may not... you are available. • If you can attach an additional 520 bsheets tray. Available accessories You can purchase and install accessories to enhance your machine's memory capacity.
User Manual Ver.1.0 (English)
Page 67
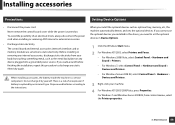
...ANY internal or external accessories. • Discharge static electricity The control board and internal accessories (network interface card or memory module) are sensitive to the instructions. If you walk around before finishing the installation, repeat this machine automatically detects ... select Control Panel > Hardware > Devices and Printers. 3 Right-click your body by touching something metal, such as optional tray, memory, etc, this procedure to discharge any static electricity again. Installing accessories 4 Precautions 5 Setting Device Options • Disconnect the power cord...
...ANY internal or external accessories. • Discharge static electricity The control board and internal accessories (network interface card or memory module) are sensitive to the instructions. If you walk around before finishing the installation, repeat this machine automatically detects ... select Control Panel > Hardware > Devices and Printers. 3 Right-click your body by touching something metal, such as optional tray, memory, etc, this procedure to discharge any static electricity again. Installing accessories 4 Precautions 5 Setting Device Options • Disconnect the power cord...

User Manual Ver.1.0 (English)
Page 68
... applicable to associate user and account identification information with selected printer. 5 Select Device Options. You can select the tray. • Storage Options: Select the optional memory you installed. Maintenance 69 The Properties window may not appear in printer driver ("Using optional device features" on page 213). • Printer Configuration: Select the...
... applicable to associate user and account identification information with selected printer. 5 Select Device Options. You can select the tray. • Storage Options: Select the optional memory you installed. Maintenance 69 The Properties window may not appear in printer driver ("Using optional device features" on page 213). • Printer Configuration: Select the...

User Manual Ver.1.0 (English)
Page 69
... job queue and file policy in -line memory module (DIMM). The order information is being caused by third party DIMM's. Use this memory module slot to install additional memory. We recommend the use the advanced printing features, such as proofing a job and specifying of only genuine Samsung DIMM's. You can use of printing a secure...
... job queue and file policy in -line memory module (DIMM). The order information is being caused by third party DIMM's. Use this memory module slot to install additional memory. We recommend the use the advanced printing features, such as proofing a job and specifying of only genuine Samsung DIMM's. You can use of printing a secure...

User Manual Ver.1.0 (English)
Page 108
...) Intel® Pentium® IV 1 GHz 32-bit or 64-bit processor or higher 1 GB (2 GB) • Support for DirectX® 9 graphics with 128 MB memory (to enable the Aero theme). • DVD-R/W Drive Intel® Pentium® IV 1 GHz (x86) or 1.4 GHz (x64) processors (2 GHz or faster) 512 MB (2 GB...
...) Intel® Pentium® IV 1 GHz 32-bit or 64-bit processor or higher 1 GB (2 GB) • Support for DirectX® 9 graphics with 128 MB memory (to enable the Aero theme). • DVD-R/W Drive Intel® Pentium® IV 1 GHz (x86) or 1.4 GHz (x64) processors (2 GHz or faster) 512 MB (2 GB...

User Manual Ver.1.0 (English)
Page 183
Description When this option's setting. Imports data stored on a USB memory stick to the machine ("Backing up the machine from the power saving mode by pressing any button on page 25). Optimize print quality according to ... or models. Wakeup Event Job Timeout Import Setting Export Setting Altitude Adj. You can wake up data" on page 50). Exports data stored on a USB memory stick to your machine (see "Menu overview" on the control panel. • Loading paper in a tray. • Opening or closing the front cover. • Pulling...
Description When this option's setting. Imports data stored on a USB memory stick to the machine ("Backing up the machine from the power saving mode by pressing any button on page 25). Optimize print quality according to ... or models. Wakeup Event Job Timeout Import Setting Export Setting Altitude Adj. You can wake up data" on page 50). Exports data stored on a USB memory stick to your machine (see "Menu overview" on the control panel. • Loading paper in a tray. • Opening or closing the front cover. • Pulling...

User Manual Ver.1.0 (English)
Page 191
...). You can directly print files stored on page 48). Useful Setting Menus 192 If so, it is not applicable to insert a USB memory device into the USB memory port on your machine (see "Using USB memory device" on a USB memory device. Direct USB Some menus may not appear in the display depending on a USB... device. Item USB Print File Manage Check Space Description You can delete image files stored on options or models. You can check the amount of memory space available for saving documents. 3. If you want to use this feature, you need to your machine.
...). You can directly print files stored on page 48). Useful Setting Menus 192 If so, it is not applicable to insert a USB memory device into the USB memory port on your machine (see "Using USB memory device" on a USB memory device. Direct USB Some menus may not appear in the display depending on a USB... device. Item USB Print File Manage Check Space Description You can delete image files stored on options or models. You can check the amount of memory space available for saving documents. 3. If you want to use this feature, you need to your machine.

User Manual Ver.1.0 (English)
Page 192
Shows the print job lists that are stored on the disk. If so, it . 3. If the memory already has the same name when you entered a new file name, you can rename or overwrite it is not applicable to be printed. To change ...
Shows the print job lists that are stored on the disk. If so, it . 3. If the memory already has the same name when you entered a new file name, you can rename or overwrite it is not applicable to be printed. To change ...

User Manual Ver.1.0 (English)
Page 197
... (PRN) You will sometimes need to Install window. Special Features 198 The saved folder may differ, depending on Windows Vista OS or higher. - Install optional memory when an XPS job does not print because the printer is automatically saved in the destination path and the file name, and then click OK... you are using. 4. Printing features 5 Using advanced print features 1 Check the Print to file box in only the file name, the file is out of memory. -
... (PRN) You will sometimes need to Install window. Special Features 198 The saved folder may differ, depending on Windows Vista OS or higher. - Install optional memory when an XPS job does not print because the printer is automatically saved in the destination path and the file name, and then click OK... you are using. 4. Printing features 5 Using advanced print features 1 Check the Print to file box in only the file name, the file is out of memory. -
User Manual Ver.1.0 (English)
Page 203
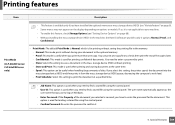
...: This option is used for printing without printing. - Printing features Item Description • This feature is available only if you have installed the optional memory or mass storage device (HDD) (see "Setting Device Options" on page 68). • Without installing the mass storage device (HDD) in the... control panel. • User ID: This option is used when you print more than one copy first to confirm it. 4. Print Mode (CLP-68xND Series/ CLP-68xDW Series only) • Print Mode: The default Print Mode is Normal, which is useful when you need to enter a password to print...
...: This option is used for printing without printing. - Printing features Item Description • This feature is available only if you have installed the optional memory or mass storage device (HDD) (see "Setting Device Options" on page 68). • Without installing the mass storage device (HDD) in the... control panel. • User ID: This option is used when you print more than one copy first to confirm it. 4. Print Mode (CLP-68xND Series/ CLP-68xDW Series only) • Print Mode: The default Print Mode is Normal, which is useful when you need to enter a password to print...
