User Manual (ENGLISH)
Page 8
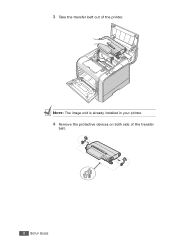
3 Take the transfer belt out of the transfer belt. 8 SETUP GUIDE NOTE: The image unit is already installed in your printer. 4 Remove the protective devices on both side of the printer.
3 Take the transfer belt out of the transfer belt. 8 SETUP GUIDE NOTE: The image unit is already installed in your printer. 4 Remove the protective devices on both side of the printer.
User Manual (ENGLISH)
Page 10
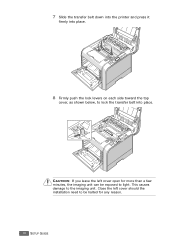
CAUTION: If you leave the left cover should the installation need to light. Close the left cover open for more than a few minutes, the imaging unit can be exposed to be halted for any reason. 10 SETUP GUIDE This causes damage to lock the transfer belt into place. 8 Firmly push the lock levers on each side toward the top cover, as shown below, to the imaging unit. 7 Slide the transfer belt down into the printer and press it firmly into place.
CAUTION: If you leave the left cover should the installation need to light. Close the left cover open for more than a few minutes, the imaging unit can be exposed to be halted for any reason. 10 SETUP GUIDE This causes damage to lock the transfer belt into place. 8 Firmly push the lock levers on each side toward the top cover, as shown below, to the imaging unit. 7 Slide the transfer belt down into the printer and press it firmly into place.

User Manual (ENGLISH)
Page 128
... table below: Item(s) Printer Message Pages Printed See Page Black toner cartridge Black Toner Empty 7,000 pages, 3,000 pages* 6.8 Color toner cartridges [Color] Toner Empty 5,000 pages, 2,000 pages* 6.8 12,000 pages Waste toner container Replace/Install Waste Toner Tank for black and 3,000 pages for 6.11 color** 50,000 pages 6 Imaging Unit Replace Imaging Unit for black and...
... table below: Item(s) Printer Message Pages Printed See Page Black toner cartridge Black Toner Empty 7,000 pages, 3,000 pages* 6.8 Color toner cartridges [Color] Toner Empty 5,000 pages, 2,000 pages* 6.8 12,000 pages Waste toner container Replace/Install Waste Toner Tank for black and 3,000 pages for 6.11 color** 50,000 pages 6 Imaging Unit Replace Imaging Unit for black and...
User Manual (ENGLISH)
Page 131
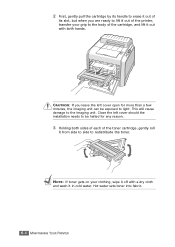
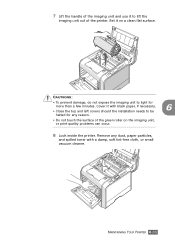
... into fabric. 6.6 MAINTAINING YOUR PRINTER 2 First, gently pull the cartridge by its handle to erase it out of its slot, but when you leave the left cover should the installation needs to be halted for more than a few minutes, the imaging unit can be exposed to the imaging unit. NOTE: If toner gets on... your grip to the body of the toner cartridge, gently roll it from side to side to lift it out of the printer, transfer your clothing...
... into fabric. 6.6 MAINTAINING YOUR PRINTER 2 First, gently pull the cartridge by its handle to erase it out of its slot, but when you leave the left cover should the installation needs to be halted for more than a few minutes, the imaging unit can be exposed to the imaging unit. NOTE: If toner gets on... your grip to the body of the toner cartridge, gently roll it from side to side to lift it out of the printer, transfer your clothing...
User Manual (ENGLISH)
Page 133
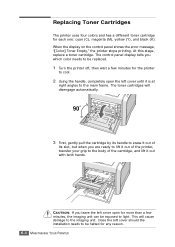
... it out of its slot, but when you which color needs to be replaced. 1 Turn the printer off, then wait a few minutes for the printer to the imaging unit. CAUTION: If you leave the left cover open the left cover should the installation needs to be exposed to the main frame. Close ...the left cover until it out with both hands. Replacing Toner Cartridges The printer uses four colors and has a different toner...
... it out of its slot, but when you which color needs to be replaced. 1 Turn the printer off, then wait a few minutes for the printer to the imaging unit. CAUTION: If you leave the left cover open the left cover should the installation needs to be exposed to the main frame. Close ...the left cover until it out with both hands. Replacing Toner Cartridges The printer uses four colors and has a different toner...
User Manual (ENGLISH)
Page 158
... black paper, if necessary. 6 • Close the top and left covers should the installation needs to lift the imaging unit out of the green roller on a clean flat surface. Remove any reason. • Do not touch the surface of the printer. Set it with a damp, soft lint-free cloth, or small vacuum cleaner. MAINTAINING...
... black paper, if necessary. 6 • Close the top and left covers should the installation needs to lift the imaging unit out of the green roller on a clean flat surface. Remove any reason. • Do not touch the surface of the printer. Set it with a damp, soft lint-free cloth, or small vacuum cleaner. MAINTAINING...
User Manual (ENGLISH)
Page 190
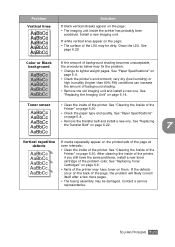
... the Printer" on page E.4. • Remove the transfer belt and install a new one . See "Cleaning the Inside of the problem color. Contact a service representative. After cleaning the inside of background shading becomes unacceptable, the procedures below may be dirty. Clean the LSU. See "Replacing the Imaging Unit" on...; Change to lighter weight pages. See "Paper Specifications" on page 6.30 • Check the paper type and quality. Install a new imaging unit. Color or Black background AaBbCc AaBbCc AaBbCc AaBbCc AaBbCc If the amount of the printer. SOLVING PROBLEMS 7.23
... the Printer" on page E.4. • Remove the transfer belt and install a new one . See "Cleaning the Inside of the problem color. Contact a service representative. After cleaning the inside of background shading becomes unacceptable, the procedures below may be dirty. Clean the LSU. See "Replacing the Imaging Unit" on...; Change to lighter weight pages. See "Paper Specifications" on page 6.30 • Check the paper type and quality. Install a new imaging unit. Color or Black background AaBbCc AaBbCc AaBbCc AaBbCc AaBbCc If the amount of the printer. SOLVING PROBLEMS 7.23
User Manual (ENGLISH)
Page 192
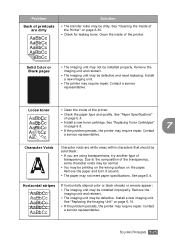
... voids may be normal. • You may be installed properly. Remove the imaging unit and reinsert. • The imaging unit may be solid black: • If you are using transparencies, try another type of transparency. Solid Color or Black pages A • The imaging unit may be dirty. Install a new imaging unit. • The printer may not meet paper specifications. Problem Back of...
... voids may be normal. • You may be installed properly. Remove the imaging unit and reinsert. • The imaging unit may be solid black: • If you are using transparencies, try another type of transparency. Solid Color or Black pages A • The imaging unit may be dirty. Install a new imaging unit. • The printer may not meet paper specifications. Problem Back of...
User Manual (ENGLISH)
Page 194
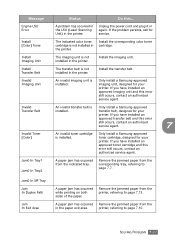
..., contact an authorized service agent. Install Imaging Unit The imaging unit is not installed in the printer. Install the transfer belt. Install the corresponding color toner cartridge. transfer belt, designed for service. Unplug the power cord and plug it in the printer. If the problem persists, call for your printer. Only install a Samsung-approved toner cartridge, designed for your printer. Jam0 In MP Tray Jam...
..., contact an authorized service agent. Install Imaging Unit The imaging unit is not installed in the printer. Install the transfer belt. Install the corresponding color toner cartridge. transfer belt, designed for service. Unplug the power cord and plug it in the printer. If the problem persists, call for your printer. Only install a Samsung-approved toner cartridge, designed for your printer. Jam0 In MP Tray Jam...

User Manual (ENGLISH)
Page 263
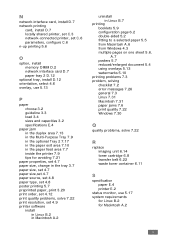
... of the printer 6.29 color mode 4.9, 4.10 components 1.4 configuration page, print 6.2 connect Ethernet D.11 control panel 2.2 buttons 2.3 display 2.2 menus 2.5 custom-sized materials, print 3.21 D double-sided printing 5.2 E envelopes, print 3.14 error messages 7.26 Ethernet cable, print D.11 F Favorite setting, use 4.13 features printer 1.2 G graphic properties, set 4.9 H help, use 4.14 I imaging unit, replace 6.14 install Memory D.2 Network...
... of the printer 6.29 color mode 4.9, 4.10 components 1.4 configuration page, print 6.2 connect Ethernet D.11 control panel 2.2 buttons 2.3 display 2.2 menus 2.5 custom-sized materials, print 3.21 D double-sided printing 5.2 E envelopes, print 3.14 error messages 7.26 Ethernet cable, print D.11 F Favorite setting, use 4.13 features printer 1.2 G graphic properties, set 4.9 H help, use 4.14 I imaging unit, replace 6.14 install Memory D.2 Network...
User Manual (ENGLISH)
Page 264
... 4.8 poster printing 5.7 preprinted paper, print 3.20 print order, set 4.12 print quality problems, solve 7.22 print resolution, set 4.9 printer software install in Linux B.2 in Macintosh A.2 uninstall in Linux B.7 printing booklets 5.9 configuration page 6.2 double-sided 5.2 fitting to a selected paper 5.5...paper jams 7.6 print quality 7.22 Windows 7.30 Q quality problems, solve 7.22 R replace imaging unit 6.14 toner cartridge 6.8 transfer belt 6.22 waste toner container 6.11 S specification paper E.4 printer E.2 status monitor, use 5.17 system requirements for Linux B.2 for Macintosh A.2 ii
... 4.8 poster printing 5.7 preprinted paper, print 3.20 print order, set 4.12 print quality problems, solve 7.22 print resolution, set 4.9 printer software install in Linux B.2 in Macintosh A.2 uninstall in Linux B.7 printing booklets 5.9 configuration page 6.2 double-sided 5.2 fitting to a selected paper 5.5...paper jams 7.6 print quality 7.22 Windows 7.30 Q quality problems, solve 7.22 R replace imaging unit 6.14 toner cartridge 6.8 transfer belt 6.22 waste toner container 6.11 S specification paper E.4 printer E.2 status monitor, use 5.17 system requirements for Linux B.2 for Macintosh A.2 ii


