User Manual (ENGLISH)
Page 8
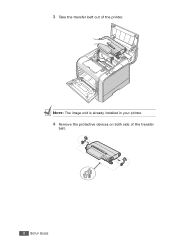
NOTE: The image unit is already installed in your printer. 4 Remove the protective devices on both side of the printer. 3 Take the transfer belt out of the transfer belt. 8 SETUP GUIDE
NOTE: The image unit is already installed in your printer. 4 Remove the protective devices on both side of the printer. 3 Take the transfer belt out of the transfer belt. 8 SETUP GUIDE
User Manual (ENGLISH)
Page 9
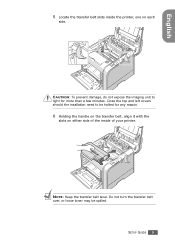
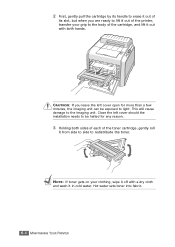
Close the top and left covers should the insallation need to light for any reason. 6 Holding the handle on the transfer belt, align it with the slots on each side. Do not turn the transfer belt over, or loose toner may be halted for more than a few minutes. SETUP GUIDE 9 CAUTION: To prevent damage, do not expose the imaging unit to be spilled. English 5 Locate the transfer belt slots inside the printer, one on either side of the inside of your printer. NOTE: Keep the transfer belt level.
Close the top and left covers should the insallation need to light for any reason. 6 Holding the handle on the transfer belt, align it with the slots on each side. Do not turn the transfer belt over, or loose toner may be halted for more than a few minutes. SETUP GUIDE 9 CAUTION: To prevent damage, do not expose the imaging unit to be spilled. English 5 Locate the transfer belt slots inside the printer, one on either side of the inside of your printer. NOTE: Keep the transfer belt level.
User Manual (ENGLISH)
Page 10
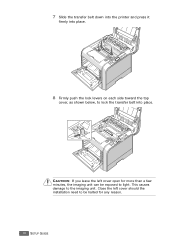
Close the left cover open for any reason. 10 SETUP GUIDE This causes damage to lock the transfer belt into place. CAUTION: If you leave the left cover should the installation need to be halted for more than a few minutes, the imaging unit can be exposed to light. 7 Slide the transfer belt down into the printer and press it firmly into place. 8 Firmly push the lock levers on each side toward the top cover, as shown below, to the imaging unit.
Close the left cover open for any reason. 10 SETUP GUIDE This causes damage to lock the transfer belt into place. CAUTION: If you leave the left cover should the installation need to be halted for more than a few minutes, the imaging unit can be exposed to light. 7 Slide the transfer belt down into the printer and press it firmly into place. 8 Firmly push the lock levers on each side toward the top cover, as shown below, to the imaging unit.
User Manual (ENGLISH)
Page 37
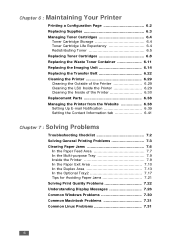
... Toner Container 6.11 Replacing the Imaging Unit 6.14 Replacing the Transfer Belt 6.22 Cleaning the Printer 6.29 Cleaning the Outside of the Printer 6.29 Cleaning the LSU Inside the Printer 6.29 Cleaning the Inside of the Printer 6.30 Replacement Parts 6.38 Managing the Printer from the Website 6.38 Setting ... Checklist 7.2 Solving General Printing Problems 7.3 Clearing Paper Jams 7.6 In the Paper Feed Area 7.7 In the Multi-purpose Tray 7.9 Inside the Printer 7.9 In the Paper Exit Area 7.10 In the Duplex Area 7.13 In the Optional Tray2 7.17 Tips for Avoiding Paper Jams 7.21 ...
... Toner Container 6.11 Replacing the Imaging Unit 6.14 Replacing the Transfer Belt 6.22 Cleaning the Printer 6.29 Cleaning the Outside of the Printer 6.29 Cleaning the LSU Inside the Printer 6.29 Cleaning the Inside of the Printer 6.30 Replacement Parts 6.38 Managing the Printer from the Website 6.38 Setting ... Checklist 7.2 Solving General Printing Problems 7.3 Clearing Paper Jams 7.6 In the Paper Feed Area 7.7 In the Multi-purpose Tray 7.9 Inside the Printer 7.9 In the Paper Exit Area 7.10 In the Duplex Area 7.13 In the Optional Tray2 7.17 Tips for Avoiding Paper Jams 7.21 ...
User Manual (ENGLISH)
Page 64
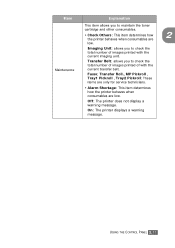
... CONTROL PANEL 2.11 Off: The printer does not display a warning message. Imaging Unit: allows you to check the total number of with the current imaging unit. Fuser, Transfer Roll., MP Pickroll , Tray1 Pickroll , Tray2 Pickroll: These items are only for service technicians. • Alarm Shortage: This item determines how the printer behaves when consumables are low...
... CONTROL PANEL 2.11 Off: The printer does not display a warning message. Imaging Unit: allows you to check the total number of with the current imaging unit. Fuser, Transfer Roll., MP Pickroll , Tray1 Pickroll , Tray2 Pickroll: These items are only for service technicians. • Alarm Shortage: This item determines how the printer behaves when consumables are low...
User Manual (ENGLISH)
Page 126
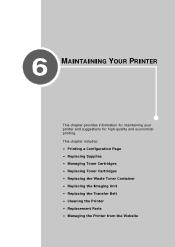
6 MAINTAINING YOUR PRINTER This chapter provides information for maintaining your printer and suggestions for high-quality and economical printing. This chapter includes: • Printing a Configuration Page • Replacing Supplies • Managing Toner Cartridges • Replacing Toner Cartridges • Replacing the Waste Toner Container • Replacing the Imaging Unit • Replacing the Transfer Belt • Cleaning the Printer • Replacement Parts • Managing the Printer from the Website
6 MAINTAINING YOUR PRINTER This chapter provides information for maintaining your printer and suggestions for high-quality and economical printing. This chapter includes: • Printing a Configuration Page • Replacing Supplies • Managing Toner Cartridges • Replacing Toner Cartridges • Replacing the Waste Toner Container • Replacing the Imaging Unit • Replacing the Transfer Belt • Cleaning the Printer • Replacement Parts • Managing the Printer from the Website

User Manual (ENGLISH)
Page 128
...Printer Message Pages Printed See Page Black toner cartridge Black Toner Empty 7,000 pages, 3,000 pages* 6.8 Color toner cartridges [Color] Toner Empty 5,000 pages, 2,000 pages* 6.8 12,000 pages Waste toner container Replace/Install Waste Toner Tank for black and 3,000 pages for 6.11 color** 50,000 pages 6 Imaging Unit Replace Imaging Unit... for black and 12,500 pages 6.14 for color** Transfer Belt Replace Transfer Belt 50,000 pages for black and 12...
...Printer Message Pages Printed See Page Black toner cartridge Black Toner Empty 7,000 pages, 3,000 pages* 6.8 Color toner cartridges [Color] Toner Empty 5,000 pages, 2,000 pages* 6.8 12,000 pages Waste toner container Replace/Install Waste Toner Tank for black and 3,000 pages for 6.11 color** 50,000 pages 6 Imaging Unit Replace Imaging Unit... for black and 12,500 pages 6.14 for color** Transfer Belt Replace Transfer Belt 50,000 pages for black and 12...
User Manual (ENGLISH)
Page 131
...left cover open for any reason. 3 Holding both hands. Hot water sets toner into fabric. 6.6 MAINTAINING YOUR PRINTER This will cause damage to light. NOTE: If toner gets on your grip to the body of the toner cartridge...gently roll it from side to side to redistribute the toner. CAUTION: If you are ready to lift it out of the printer, transfer your clothing, wipe it off with both sides of each of the cartridge, and lift it out with a dry cloth... you leave the left cover should the installation needs to be halted for more than a few minutes, the imaging unit can be exposed to the...
...left cover open for any reason. 3 Holding both hands. Hot water sets toner into fabric. 6.6 MAINTAINING YOUR PRINTER This will cause damage to light. NOTE: If toner gets on your grip to the body of the toner cartridge...gently roll it from side to side to redistribute the toner. CAUTION: If you are ready to lift it out of the printer, transfer your clothing, wipe it off with both sides of each of the cartridge, and lift it out with a dry cloth... you leave the left cover should the installation needs to be halted for more than a few minutes, the imaging unit can be exposed to the...
User Manual (ENGLISH)
Page 133
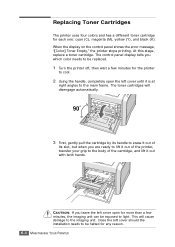
The control panel display tells you which color needs to be replaced. 1 Turn the printer off, then wait a few minutes, the imaging unit can be halted for any reason. 6.8 MAINTAINING YOUR PRINTER Close the left cover until it out of its handle to erase it out with both hands....and lift it out of the printer, transfer your grip to the imaging unit. When the display on the control panel shows the error message, "[Color] Toner Empty," the printer stops printing. Replacing Toner Cartridges The printer uses four colors and has a different toner cartridge for the printer to cool. 2 Using the...
The control panel display tells you which color needs to be replaced. 1 Turn the printer off, then wait a few minutes, the imaging unit can be halted for any reason. 6.8 MAINTAINING YOUR PRINTER Close the left cover until it out of its handle to erase it out with both hands....and lift it out of the printer, transfer your grip to the imaging unit. When the display on the control panel shows the error message, "[Color] Toner Empty," the printer stops printing. Replacing Toner Cartridges The printer uses four colors and has a different toner cartridge for the printer to cool. 2 Using the...
User Manual (ENGLISH)
Page 139
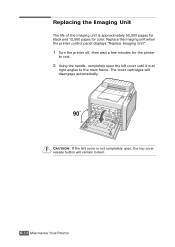
Replace the imaging unit when the printer control panel displays "Replace Imaging Unit". 1 Turn the printer off, then wait a few minutes for color. CAUTION: If the left cover is not completely open the left cover until it is approximately 50,000 pages for black and 12,500 pages for the printer to the main frame. The toner cartridges will remain locked. 6.14 MAINTAINING YOUR PRINTER Replacing the Imaging Unit The life of the imaging unit is at right angles to cool. 2 Using the handle, completely open , the top cover release button will disengage automatically.
Replace the imaging unit when the printer control panel displays "Replace Imaging Unit". 1 Turn the printer off, then wait a few minutes for color. CAUTION: If the left cover is not completely open the left cover until it is approximately 50,000 pages for black and 12,500 pages for the printer to the main frame. The toner cartridges will remain locked. 6.14 MAINTAINING YOUR PRINTER Replacing the Imaging Unit The life of the imaging unit is at right angles to cool. 2 Using the handle, completely open , the top cover release button will disengage automatically.
User Manual (ENGLISH)
Page 141
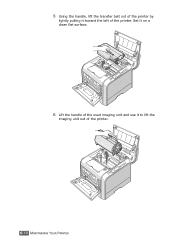
5 Using the handle, lift the transfer belt out of the printer by lightly pulling it to lift the imaging unit out of the printer. Set it on a clean flat surface. 6 Lift the handle of the used imaging unit and use it toward the left of the printer. 6.16 MAINTAINING YOUR PRINTER
5 Using the handle, lift the transfer belt out of the printer by lightly pulling it to lift the imaging unit out of the printer. Set it on a clean flat surface. 6 Lift the handle of the used imaging unit and use it toward the left of the printer. 6.16 MAINTAINING YOUR PRINTER

User Manual (ENGLISH)
Page 142
MAINTAINING YOUR PRINTER 6.17 Cover it by its package. You could damage the surface of the imaging unit. • To prevent damage, do not expose the imaging unit to light for any reason. • Do not touch the surface of the imaging unit. CAUTIONS: • Don't use sharp ...imaging unit package and tape on each side. 7 Take a new imaging unit out of its handle. 8 Remove the paper covering the imaging unit by removing the tape under the handle of the green roller on the imaging unit, or print quality problems can occur. 9 Locate the imaging unit slots inside the printer...
MAINTAINING YOUR PRINTER 6.17 Cover it by its package. You could damage the surface of the imaging unit. • To prevent damage, do not expose the imaging unit to light for any reason. • Do not touch the surface of the imaging unit. CAUTIONS: • Don't use sharp ...imaging unit package and tape on each side. 7 Take a new imaging unit out of its handle. 8 Remove the paper covering the imaging unit by removing the tape under the handle of the green roller on the imaging unit, or print quality problems can occur. 9 Locate the imaging unit slots inside the printer...

User Manual (ENGLISH)
Page 143
Fold the handle down into the corresponding colors of the imaging unit slide into the printer until it cannot be pushed in your printer so that the colors on both sides of the slots. CAUTION: Insert the imaging unit carefully so as not to scratch or damage the surface of the green roller. 11 Slide the imaging unit down . 6.18 MAINTAINING YOUR PRINTER 10 Hold the handle of the new imaging unit with the slots in any further. Align the imaging unit with the green roller facing you.
Fold the handle down into the corresponding colors of the imaging unit slide into the printer until it cannot be pushed in your printer so that the colors on both sides of the slots. CAUTION: Insert the imaging unit carefully so as not to scratch or damage the surface of the green roller. 11 Slide the imaging unit down . 6.18 MAINTAINING YOUR PRINTER 10 Hold the handle of the new imaging unit with the slots in any further. Align the imaging unit with the green roller facing you.
User Manual (ENGLISH)
Page 146
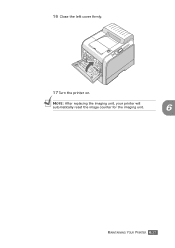
16 Close the left cover firmly. 17 Turn the printer on. NOTE: After replacing the imaging unit, your printer will automatically reset the image counter for the imaging unit. 6 MAINTAINING YOUR PRINTER 6.21
16 Close the left cover firmly. 17 Turn the printer on. NOTE: After replacing the imaging unit, your printer will automatically reset the image counter for the imaging unit. 6 MAINTAINING YOUR PRINTER 6.21
User Manual (ENGLISH)
Page 150
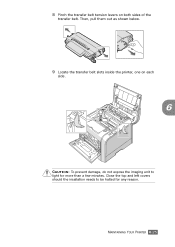
Then, pull them out as shown below. 9 Locate the transfer belt slots inside the printer, one on both sides of the transfer belt. MAINTAINING YOUR PRINTER 6.25 Close the top and left covers should the insallation needs to light for any reason. 8 Pinch the transfer belt tension levers on each side. 6 CAUTION: To prevent damage, do not expose the imaging unit to be halted for more than a few minutes.
Then, pull them out as shown below. 9 Locate the transfer belt slots inside the printer, one on both sides of the transfer belt. MAINTAINING YOUR PRINTER 6.25 Close the top and left covers should the insallation needs to light for any reason. 8 Pinch the transfer belt tension levers on each side. 6 CAUTION: To prevent damage, do not expose the imaging unit to be halted for more than a few minutes.

User Manual (ENGLISH)
Page 156
Close the top and left cover open it all the way. 6 CAUTION: If you are ready to lift them out of the printer, transfer your grip to the body of their handle to erase them out of the cartridges, and lift them on a clean flat surface. 4 Press the ...top cover release button to unlatch the top cover and open for any reason. Set them out with both hands. MAINTAINING YOUR PRINTER 6.31 This will cause damage to the imaging unit. 3 First, gently pull the cartridges by their slot, but when you leave the left covers should the insallation needs to be...
Close the top and left cover open it all the way. 6 CAUTION: If you are ready to lift them out of the printer, transfer your grip to the body of their handle to erase them out of the cartridges, and lift them on a clean flat surface. 4 Press the ...top cover release button to unlatch the top cover and open for any reason. Set them out with both hands. MAINTAINING YOUR PRINTER 6.31 This will cause damage to the imaging unit. 3 First, gently pull the cartridges by their slot, but when you leave the left covers should the insallation needs to be...
User Manual (ENGLISH)
Page 158
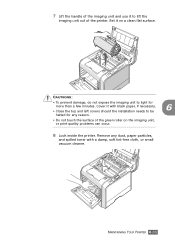
...be halted for more than a few minutes. Remove any reason. • Do not touch the surface of the printer. CAUTIONS: • To prevent damage, do not expose the imaging unit to light for any dust, paper particles, and spilled toner with a damp, soft lint-free cloth, or ...small vacuum cleaner. Set it on the imaging unit, or print quality problems can occur. 8 Look inside the printer. MAINTAINING YOUR PRINTER 6.33 7 Lift the handle of the imaging unit and use it to lift the imaging unit out of the green roller on a clean flat surface.
...be halted for more than a few minutes. Remove any reason. • Do not touch the surface of the printer. CAUTIONS: • To prevent damage, do not expose the imaging unit to light for any dust, paper particles, and spilled toner with a damp, soft lint-free cloth, or ...small vacuum cleaner. Set it on the imaging unit, or print quality problems can occur. 8 Look inside the printer. MAINTAINING YOUR PRINTER 6.33 7 Lift the handle of the imaging unit and use it to lift the imaging unit out of the green roller on a clean flat surface.
User Manual (ENGLISH)
Page 159
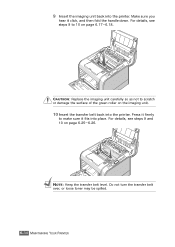
Press it firmly to 10 on page 6.17~6.18. 9 Insert the imaging unit back into place. For details, see steps 9 to make sure it click, and then fold the handle down. For details, see steps 9 and 10 on the imaging unit. 10 Insert the transfer belt back into the printer. Make sure you hear it fits into the printer. Do not turn the transfer belt over, or loose toner may be spilled. 6.34 MAINTAINING YOUR PRINTER CAUTION: Replace the imaging unit carefully so as not to scratch or damage the surface of the green roller on page 6.25~6.26. NOTE: Keep the transfer belt level.
Press it firmly to 10 on page 6.17~6.18. 9 Insert the imaging unit back into place. For details, see steps 9 to make sure it click, and then fold the handle down. For details, see steps 9 and 10 on the imaging unit. 10 Insert the transfer belt back into the printer. Make sure you hear it fits into the printer. Do not turn the transfer belt over, or loose toner may be spilled. 6.34 MAINTAINING YOUR PRINTER CAUTION: Replace the imaging unit carefully so as not to scratch or damage the surface of the green roller on page 6.25~6.26. NOTE: Keep the transfer belt level.
User Manual (ENGLISH)
Page 190
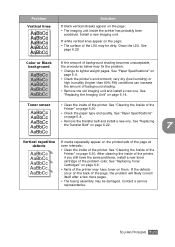
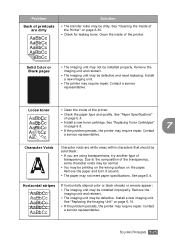
... Cartridges" on page 6.30. SOLVING PROBLEMS 7.23 See "Replacing the Imaging Unit" on the page: • The imaging unit inside of the Printer" on page 6.8. • Parts of background shading becomes unacceptable, the procedures below may fix the problem. • Change to lighter weight pages. Color or Black background AaBbCc AaBbCc AaBbCc AaBbCc AaBbCc If the...
... Cartridges" on page 6.30. SOLVING PROBLEMS 7.23 See "Replacing the Imaging Unit" on the page: • The imaging unit inside of the Printer" on page 6.8. • Parts of background shading becomes unacceptable, the procedures below may fix the problem. • Change to lighter weight pages. Color or Black background AaBbCc AaBbCc AaBbCc AaBbCc AaBbCc If the...
User Manual (ENGLISH)
Page 192
... paper may require repair. See page E.4. See "Replacing the Imaging Unit" on page 6.14. • If the problem persists, the printer may not meet paper specifications. Solid Color or Black pages A • The imaging unit may be installed properly. See "Paper Specifications" on page ...page 6.8. 7 • If the problem persists, the printer may require repair. Horizontal stripes AaBbCc AaBbCc AaBbCc AaBbCc AaBbCc If horizontally aligned color or black streaks or smears appear: • The imaging unit may be defective and need replacing. SOLVING PROBLEMS 7.25 ...
... paper may require repair. See page E.4. See "Replacing the Imaging Unit" on page 6.14. • If the problem persists, the printer may not meet paper specifications. Solid Color or Black pages A • The imaging unit may be installed properly. See "Paper Specifications" on page ...page 6.8. 7 • If the problem persists, the printer may require repair. Horizontal stripes AaBbCc AaBbCc AaBbCc AaBbCc AaBbCc If horizontally aligned color or black streaks or smears appear: • The imaging unit may be defective and need replacing. SOLVING PROBLEMS 7.25 ...


