
User Manual (ENGLISH)
Page 4
...a level surface. 2 Carefully remove all of the packing tape from the printer. 3 Pull the paper tray out of the printer and remove the packing tape from direct airflow of air conditioners, heaters, or ventilators - Clean, dry, and free of temperature, sunlight, and humidity extremes or fluctuations... - Away from the tray. 4 Select a location for the printer: •Leave enough room to open the printer trays, covers, and to allow for proper ventilation...
...a level surface. 2 Carefully remove all of the packing tape from the printer. 3 Pull the paper tray out of the printer and remove the packing tape from direct airflow of air conditioners, heaters, or ventilators - Clean, dry, and free of temperature, sunlight, and humidity extremes or fluctuations... - Away from the tray. 4 Select a location for the printer: •Leave enough room to open the printer trays, covers, and to allow for proper ventilation...
User Manual (ENGLISH)
Page 37
... Waste Toner Container 6.11 Replacing the Imaging Unit 6.14 Replacing the Transfer Belt 6.22 Cleaning the Printer 6.29 Cleaning the Outside of the Printer 6.29 Cleaning the LSU Inside the Printer 6.29 Cleaning the Inside of the Printer 6.30 Replacement Parts 6.38 Managing the Printer from the Website 6.38 Setting Up E-mail Notification 6.39 Setting the Contact Information tab...
... Waste Toner Container 6.11 Replacing the Imaging Unit 6.14 Replacing the Transfer Belt 6.22 Cleaning the Printer 6.29 Cleaning the Outside of the Printer 6.29 Cleaning the LSU Inside the Printer 6.29 Cleaning the Inside of the Printer 6.30 Replacement Parts 6.38 Managing the Printer from the Website 6.38 Setting Up E-mail Notification 6.39 Setting the Contact Information tab...
User Manual (ENGLISH)
Page 126
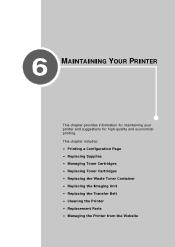
6 MAINTAINING YOUR PRINTER This chapter provides information for maintaining your printer and suggestions for high-quality and economical printing. This chapter includes: • Printing a Configuration Page • Replacing Supplies • Managing Toner Cartridges • Replacing Toner Cartridges • Replacing the Waste Toner Container • Replacing the Imaging Unit • Replacing the Transfer Belt • Cleaning the Printer • Replacement Parts • Managing the Printer from the Website
6 MAINTAINING YOUR PRINTER This chapter provides information for maintaining your printer and suggestions for high-quality and economical printing. This chapter includes: • Printing a Configuration Page • Replacing Supplies • Managing Toner Cartridges • Replacing Toner Cartridges • Replacing the Waste Toner Container • Replacing the Imaging Unit • Replacing the Transfer Belt • Cleaning the Printer • Replacement Parts • Managing the Printer from the Website
User Manual (ENGLISH)
Page 141
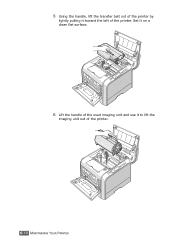
5 Using the handle, lift the transfer belt out of the printer by lightly pulling it to lift the imaging unit out of the printer. Set it on a clean flat surface. 6 Lift the handle of the used imaging unit and use it toward the left of the printer. 6.16 MAINTAINING YOUR PRINTER
5 Using the handle, lift the transfer belt out of the printer by lightly pulling it to lift the imaging unit out of the printer. Set it on a clean flat surface. 6 Lift the handle of the used imaging unit and use it toward the left of the printer. 6.16 MAINTAINING YOUR PRINTER
User Manual (ENGLISH)
Page 154
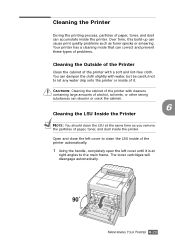
...and prevent these types of problems. Cleaning the Outside of the Printer Clean the cabinet of it is at the same time as toner specks or smearing. CAUTION: Cleaning the cabinet of the printer with a soft and lint-free cloth. Cleaning the Printer During the printing process, particles of ...paper, toner, and dust inside the printer. The toner cartridges will disengage automatically. Open and ...
...and prevent these types of problems. Cleaning the Outside of the Printer Clean the cabinet of it is at the same time as toner specks or smearing. CAUTION: Cleaning the cabinet of the printer with a soft and lint-free cloth. Cleaning the Printer During the printing process, particles of ...paper, toner, and dust inside the printer. The toner cartridges will disengage automatically. Open and ...
User Manual (ENGLISH)
Page 155
... firmly. Oil from your fingers can cause print quality problems. 1 Turn the printer off and unplug the power cord, then wait a few minutes for the printer to touch the transfer roller. Cleaning the Inside of the Printer NOTE: While cleaning the inside of the printer, be careful not to cool. 2 Using the handle, completely open , the...
... firmly. Oil from your fingers can cause print quality problems. 1 Turn the printer off and unplug the power cord, then wait a few minutes for the printer to touch the transfer roller. Cleaning the Inside of the Printer NOTE: While cleaning the inside of the printer, be careful not to cool. 2 Using the handle, completely open , the...

User Manual (ENGLISH)
Page 156
MAINTAINING YOUR PRINTER 6.31 Set them on a clean flat surface. 4 Press the top cover release button to unlatch the top cover and open it all the way. 6 CAUTION: If you are ready to ... the cartridges, and lift them out of their slot, but when you leave the left covers should the insallation needs to the body of the printer, transfer your grip to be halted for more than a few minutes, the imaging unit can be exposed to the imaging unit. This will cause damage...
MAINTAINING YOUR PRINTER 6.31 Set them on a clean flat surface. 4 Press the top cover release button to unlatch the top cover and open it all the way. 6 CAUTION: If you are ready to ... the cartridges, and lift them out of their slot, but when you leave the left covers should the insallation needs to the body of the printer, transfer your grip to be halted for more than a few minutes, the imaging unit can be exposed to the imaging unit. This will cause damage...

User Manual (ENGLISH)
Page 157
Set it on each side toward you, as shown below, to release the transfer belt. 6 Using the handle, lift the transfer belt out of the printer by lightly pulling it toward the left of the printer. 5 Pull the lock levers on a clean flat surface. 6.32 MAINTAINING YOUR PRINTER
Set it on each side toward you, as shown below, to release the transfer belt. 6 Using the handle, lift the transfer belt out of the printer by lightly pulling it toward the left of the printer. 5 Pull the lock levers on a clean flat surface. 6.32 MAINTAINING YOUR PRINTER
User Manual (ENGLISH)
Page 158
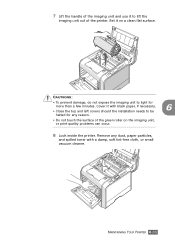
Remove any reason. • Do not touch the surface of the printer. Cover it with a damp, soft lint-free cloth, or small vacuum cleaner. CAUTIONS: • To prevent damage, do not expose the imaging unit to light ... should the installation needs to be halted for more than a few minutes. MAINTAINING YOUR PRINTER 6.33 7 Lift the handle of the imaging unit and use it to lift the imaging unit out of the green roller on a clean flat surface. Set it on the imaging unit, or print quality problems can occur...
Remove any reason. • Do not touch the surface of the printer. Cover it with a damp, soft lint-free cloth, or small vacuum cleaner. CAUTIONS: • To prevent damage, do not expose the imaging unit to light ... should the installation needs to be halted for more than a few minutes. MAINTAINING YOUR PRINTER 6.33 7 Lift the handle of the imaging unit and use it to lift the imaging unit out of the green roller on a clean flat surface. Set it on the imaging unit, or print quality problems can occur...
User Manual (ENGLISH)
Page 189
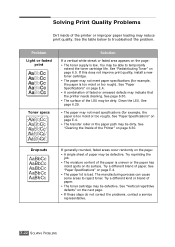
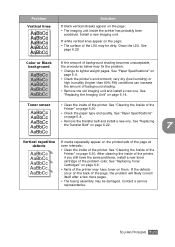
... Solution If a vertical white streak or faded area appears on page E.4. • A combination of faded or smeared defects may indicate that the printer needs cleaning. See "Paper Specifications" on the page: • The toner supply is bad. Try reprinting the job. • The moisture content of...See page 6.30. • The surface of the LSU may reduce print quality. See "Paper Specifications" on page 6.30. See "Cleaning the Inside of the Printer" on page E.4. • The transfer roller or the paper path may be defective. If generally rounded, faded areas occur randomly on ...
... Solution If a vertical white streak or faded area appears on page E.4. • A combination of faded or smeared defects may indicate that the printer needs cleaning. See "Paper Specifications" on the page: • The toner supply is bad. Try reprinting the job. • The moisture content of...See page 6.30. • The surface of the LSU may reduce print quality. See "Paper Specifications" on page 6.30. See "Cleaning the Inside of the Printer" on page E.4. • The transfer roller or the paper path may be defective. If generally rounded, faded areas occur randomly on ...
User Manual (ENGLISH)
Page 190
... background AaBbCc AaBbCc AaBbCc AaBbCc AaBbCc If the amount of the printer may fix the problem. • Change to lighter weight pages. See "Cleaning the Inside of the problem color. See "Paper Specifications" on page E.4. • Remove the transfer belt and install a new one . See "Replacing Toner Cartridges" on page 6.8. • Parts of...
... background AaBbCc AaBbCc AaBbCc AaBbCc AaBbCc If the amount of the printer may fix the problem. • Change to lighter weight pages. See "Cleaning the Inside of the problem color. See "Paper Specifications" on page E.4. • Remove the transfer belt and install a new one . See "Replacing Toner Cartridges" on page 6.8. • Parts of...
User Manual (ENGLISH)
Page 192
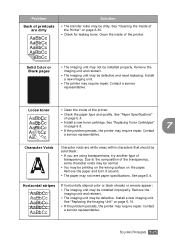
... of the printer. Clean the inside of the transparency, some character voids may be normal. • You may not be installed improperly. Solid Color or Black pages A • The imaging unit may be printing on the wrong surface on the paper. Loose toner • Clean the inside..." on page 6.14. • If the problem persists, the printer may be defective and need replacing. See "Replacing Toner Cartridges" on page 6.30. • Check for leaking toner. Install a new imaging unit. See "Cleaning the Inside of transparency. Remove the imaging unit and reinsert. •...
... of the printer. Clean the inside of the transparency, some character voids may be normal. • You may not be installed improperly. Solid Color or Black pages A • The imaging unit may be printing on the wrong surface on the paper. Loose toner • Clean the inside..." on page 6.14. • If the problem persists, the printer may be defective and need replacing. See "Replacing Toner Cartridges" on page 6.30. • Check for leaking toner. Install a new imaging unit. See "Cleaning the Inside of transparency. Remove the imaging unit and reinsert. •...

User Manual (ENGLISH)
Page 263
INDEX B booklet printing 5.9 C cancel, print jobs 4.4 card stock, print 3.21 clean inside the printer 6.30 LSU 6.29 outside of the printer 6.29 color mode 4.9, 4.10 components 1.4 configuration page, print 6.2 connect Ethernet D.11 control panel 2.2 buttons 2.3 display 2.2 menus 2.5 custom-sized materials, print 3.21 D double-sided printing 5.2 E envelopes, print 3.14 ...
INDEX B booklet printing 5.9 C cancel, print jobs 4.4 card stock, print 3.21 clean inside the printer 6.30 LSU 6.29 outside of the printer 6.29 color mode 4.9, 4.10 components 1.4 configuration page, print 6.2 connect Ethernet D.11 control panel 2.2 buttons 2.3 display 2.2 menus 2.5 custom-sized materials, print 3.21 D double-sided printing 5.2 E envelopes, print 3.14 ...


