
User Manual (ENGLISH)
Page 4
..., and to allow for proper ventilation. •Provide the proper environment: - Free of dust CAUTION: You must place your printer on a level surface. 2 Carefully remove all of the packing tape from the printer. 3 Pull the paper tray out of the printer and remove the packing tape from direct airflow of air conditioners, heaters, or ventilators -
..., and to allow for proper ventilation. •Provide the proper environment: - Free of dust CAUTION: You must place your printer on a level surface. 2 Carefully remove all of the packing tape from the printer. 3 Pull the paper tray out of the printer and remove the packing tape from direct airflow of air conditioners, heaters, or ventilators -
User Manual (ENGLISH)
Page 5
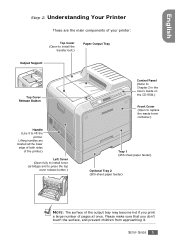
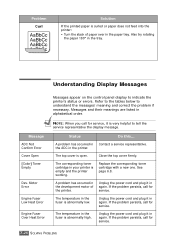
...the printer.) Left Cover (Open fully to install toner cartridges and to press the top cover release button.) Control Panel (Refer to Chapter 2 in the User's Guide on the CD-ROM.) Front Cover (Open to replace the waste toner container.) Tray 1 (250-sheet paper feeder) Optional Tray 2 (500-sheet paper ...feeder) NOTE: The surface of the output tray may become hot if you don't touch the surface, and prevent children from approaching it to ...
...the printer.) Left Cover (Open fully to install toner cartridges and to press the top cover release button.) Control Panel (Refer to Chapter 2 in the User's Guide on the CD-ROM.) Front Cover (Open to replace the waste toner container.) Tray 1 (250-sheet paper feeder) Optional Tray 2 (500-sheet paper ...feeder) NOTE: The surface of the output tray may become hot if you don't touch the surface, and prevent children from approaching it to ...

User Manual (ENGLISH)
Page 6
...Right Cover (Open to remove paper jams.) Muti-purpose Tray (Open to load special print materials.) Handle (Use it to lift the printer.) Optional Tray 2 Jam Cover (Open to remove jams from the optional tray 2.) Control Board Cover (...Open to install optional accessories.) Power Switch Power Receptacle Wireless Network Antenna* Network Port** USB Port * A wireless network card is fitted as standard on the CLP-510N...
...Right Cover (Open to remove paper jams.) Muti-purpose Tray (Open to load special print materials.) Handle (Use it to lift the printer.) Optional Tray 2 Jam Cover (Open to remove jams from the optional tray 2.) Control Board Cover (...Open to install optional accessories.) Power Switch Power Receptacle Wireless Network Antenna* Network Port** USB Port * A wireless network card is fitted as standard on the CLP-510N...

User Manual (ENGLISH)
Page 14
Tap the edges of the stack on the metal plate until it locks into position. 3 Flex the paper sheets back and forth to even it up. 14 SETUP GUIDE You can hold a maximum of 250 sheets of the printer. 2 Push down on a flat surface to separate the pages and then fan them while holding one edge. Step 4. Loading Paper The tray (Tray 1) can use A4 and letter-sized paper. To load paper: 1 Pull the tray out of plain paper.
Tap the edges of the stack on the metal plate until it locks into position. 3 Flex the paper sheets back and forth to even it up. 14 SETUP GUIDE You can hold a maximum of 250 sheets of the printer. 2 Push down on a flat surface to separate the pages and then fan them while holding one edge. Step 4. Loading Paper The tray (Tray 1) can use A4 and letter-sized paper. To load paper: 1 Pull the tray out of plain paper.

User Manual (ENGLISH)
Page 15
SETUP GUIDE 15 Make sure that all four corners are flat in the tray and under the corner brackets, as shown below. 5 Do not exceed the maximum stack height. Overfilling the tray may cause a paper jam. English 4 Load paper with the print side facing up.
SETUP GUIDE 15 Make sure that all four corners are flat in the tray and under the corner brackets, as shown below. 5 Do not exceed the maximum stack height. Overfilling the tray may cause a paper jam. English 4 Load paper with the print side facing up.
User Manual (ENGLISH)
Page 16
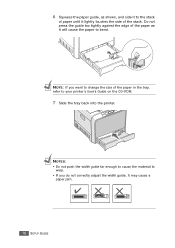
Do not press the guide too tightly against the edge of the paper as shown, and side it to the stack of paper until it will cause the paper to your printer's User's Guide on the CD-ROM. 7 Slide the tray back into the printer. 6 Squeeze the paper guide, as it lightly touches the side of the stack. NOTE: If you do not correctly adjust the width guide, it may cause a paper jam. 16 SETUP GUIDE NOTES: • Do not push the width guide far enough to cause the material to warp. • If you want to change the size of the paper in the tray, refer to bend.
Do not press the guide too tightly against the edge of the paper as shown, and side it to the stack of paper until it will cause the paper to your printer's User's Guide on the CD-ROM. 7 Slide the tray back into the printer. 6 Squeeze the paper guide, as it lightly touches the side of the stack. NOTE: If you do not correctly adjust the width guide, it may cause a paper jam. 16 SETUP GUIDE NOTES: • Do not push the width guide far enough to cause the material to warp. • If you want to change the size of the paper in the tray, refer to bend.
User Manual (ENGLISH)
Page 35
... Panel Menus 2.6 Information Menu 2.6 Layout Menu 2.7 Printer Menu 2.8 Color Menu 2.9 Setup Menu 2.9 Network Menu 2.12 Chapter 3 : Using Print Materials Choosing Paper and Other Materials 3.2 Sizes and Capacities 3.2 Guidelines for Paper and Special Materials 3.3 Loading Paper 3.4 Using Tray 1 3.4 Changing the Size of the Paper in the Tray 3.7 Using the Optional Tray 2 3.8 Using the Multi-purpose Tray 3.9 Using the Manual Feed 3.12 4
... Panel Menus 2.6 Information Menu 2.6 Layout Menu 2.7 Printer Menu 2.8 Color Menu 2.9 Setup Menu 2.9 Network Menu 2.12 Chapter 3 : Using Print Materials Choosing Paper and Other Materials 3.2 Sizes and Capacities 3.2 Guidelines for Paper and Special Materials 3.3 Loading Paper 3.4 Using Tray 1 3.4 Changing the Size of the Paper in the Tray 3.7 Using the Optional Tray 2 3.8 Using the Multi-purpose Tray 3.9 Using the Manual Feed 3.12 4

User Manual (ENGLISH)
Page 68
3 USING PRINT MATERIALS This chapter will help you understand the types of paper you can use with your printer and how to properly load paper in the different paper trays for the best print quality. This chapter includes: • Choosing Paper and Other Materials • Loading Paper • Printing on Special Print Materials
3 USING PRINT MATERIALS This chapter will help you understand the types of paper you can use with your printer and how to properly load paper in the different paper trays for the best print quality. This chapter includes: • Choosing Paper and Other Materials • Loading Paper • Printing on Special Print Materials
User Manual (ENGLISH)
Page 69
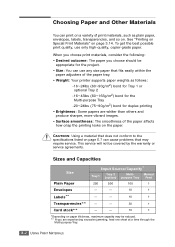
... produce sharper, more vibrant images. • Surface smoothness: The smoothness of the paper tray. • Weight: Your printer supports paper weights as plain paper, envelopes, labels, transparencies, and so on page 3.14. Sizes and Capacities Size Plain Paper Input Source/Capacity* Tray 1 Tray 2 (option) Multi- Manual purpose Tray Feed 250 500 100 1 Envelopes - - 10 1 Labels** - - 10 1 Transparencies** - - 30 1 Card...
... produce sharper, more vibrant images. • Surface smoothness: The smoothness of the paper tray. • Weight: Your printer supports paper weights as plain paper, envelopes, labels, transparencies, and so on page 3.14. Sizes and Capacities Size Plain Paper Input Source/Capacity* Tray 1 Tray 2 (option) Multi- Manual purpose Tray Feed 250 500 100 1 Envelopes - - 10 1 Labels** - - 10 1 Transparencies** - - 30 1 Card...

User Manual (ENGLISH)
Page 71
... an additional 500 sheets of paper. 1 Pull the tray out of plain A4 and lettersized paper. Using Tray 1 Tray 1 can purchase an optional tray, Tray 2, and attach it locks into position. 3.4 USING PRINT MATERIALS Doing so may cause a paper jam. You can hold a maximum of 250 sheets of the printer. 2 Push down on page 3.2 for acceptable paper capacities for each...
... an additional 500 sheets of paper. 1 Pull the tray out of plain A4 and lettersized paper. Using Tray 1 Tray 1 can purchase an optional tray, Tray 2, and attach it locks into position. 3.4 USING PRINT MATERIALS Doing so may cause a paper jam. You can hold a maximum of 250 sheets of the printer. 2 Push down on page 3.2 for acceptable paper capacities for each...

User Manual (ENGLISH)
Page 76
... there is located on letterhead, colored paper for use as transparencies, cards, and envelopes. USING PRINT MATERIALS 3.9 You may also want to other special materials that you are not using it, making the printer more compact. 3 Multi-purpose Tray The Multi-purpose Tray can load approximately 100 sheets of plain paper, 10 envelopes, 30 transparencies, 10...
... there is located on letterhead, colored paper for use as transparencies, cards, and envelopes. USING PRINT MATERIALS 3.9 You may also want to other special materials that you are not using it, making the printer more compact. 3 Multi-purpose Tray The Multi-purpose Tray can load approximately 100 sheets of plain paper, 10 envelopes, 30 transparencies, 10...

User Manual (ENGLISH)
Page 99
... Tray1 in the Source option and MP Tray in the following order: Multi-purpose Tray, Tray1, Optional Tray2. 4 Type Make sure that Source is set to print the first page using a different paper type from None, Scale Printing, and Fit to automatically or manually scale your printer job on print material, refer to Cotton...
... Tray1 in the Source option and MP Tray in the following order: Multi-purpose Tray, Tray1, Optional Tray2. 4 Type Make sure that Source is set to print the first page using a different paper type from None, Scale Printing, and Fit to automatically or manually scale your printer job on print material, refer to Cotton...
User Manual (ENGLISH)
Page 169
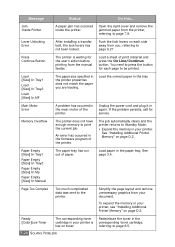
... Problems" on page 7.3. See the Setup Guide supplied with your printer. • If a demo page does not print, check the paper supply in the paper tray. • If the paper jams in the printer, go to "Clearing Paper Jams" on page 7.6. • If an error message appears ...application to ensure that the computer and printer are connected and are using the proper printer driver and communication port. Quality Problems" on page 7.22. Check Solution Make sure that the printer is feeding paper correctly. Troubleshooting Checklist If the printer is not working properly, consult the ...
... Problems" on page 7.3. See the Setup Guide supplied with your printer. • If a demo page does not print, check the paper supply in the paper tray. • If the paper jams in the printer, go to "Clearing Paper Jams" on page 7.6. • If an error message appears ...application to ensure that the computer and printer are connected and are using the proper printer driver and communication port. Quality Problems" on page 7.22. Check Solution Make sure that the printer is feeding paper correctly. Troubleshooting Checklist If the printer is not working properly, consult the ...
User Manual (ENGLISH)
Page 171
... setting. See page 4.6. Or, ensure that the paper size adjusters are set correctly. The paper size and the paper size settings do not match. Use only paper that the paper size in the printer driver settings matches the paper in the tray. Half the page is too thick. The job may...you use. 7.4 SOLVING PROBLEMS Right-click the Samsung CLP510 Series printer icon, choose Properties, click the Details tab, and then choose the Spool Settings button. Change the page orientation in black & white mode. In color mode, A4/ letter-sized paper prints at 25 ppm in your application. There...
... setting. See page 4.6. Or, ensure that the paper size adjusters are set correctly. The paper size and the paper size settings do not match. Use only paper that the paper size in the printer driver settings matches the paper in the tray. Half the page is too thick. The job may...you use. 7.4 SOLVING PROBLEMS Right-click the Samsung CLP510 Series printer icon, choose Properties, click the Details tab, and then choose the Spool Settings button. Change the page orientation in black & white mode. In color mode, A4/ letter-sized paper prints at 25 ppm in your application. There...
User Manual (ENGLISH)
Page 172
... may be defective. The illustrations print incorrectly in the paper tray. Print the document. Remove excess paper from another computer and try a new printer cable. contain blank pages. Finally, try a print job that you know works. Check the application's printer selection menu to ensure that your printer is wrong, garbled, or incomplete. Turn malfunctioning. Contact a service...
... may be defective. The illustrations print incorrectly in the paper tray. Print the document. Remove excess paper from another computer and try a new printer cable. contain blank pages. Finally, try a print job that you know works. Check the application's printer selection menu to ensure that your printer is wrong, garbled, or incomplete. Turn malfunctioning. Contact a service...

User Manual (ENGLISH)
Page 188
... page 3.4. Ensure that the adjustable guides are positioned correctly. • Do not overload the paper tray. Tips for Avoiding Paper Jams By selecting the correct paper types, most paper jams can be avoided. If a paper jam occurs, follow the steps outlined in "Clearing Paper Jams" on page 7.6. • Follow the procedures on the inside wall of the...
... page 3.4. Ensure that the adjustable guides are positioned correctly. • Do not overload the paper tray. Tips for Avoiding Paper Jams By selecting the correct paper types, most paper jams can be avoided. If a paper jam occurs, follow the steps outlined in "Clearing Paper Jams" on page 7.6. • Follow the procedures on the inside wall of the...
User Manual (ENGLISH)
Page 191
...tray. Printing on the reverse side. Both high temperature and humidity can cause problems. • If background scatter covers the entire surface area of a printed page, adjust the print resolution through your software application or via the printer properties window. Do not open packages of paper until necessary so that the paper... that it also occurs on page E.4. • Turn the stack of paper over in the paper tray. See "Paper Specifications" on page E.4. • Ensure that the paper or other material is loaded correctly and the guides are improperly formed and ...
...tray. Printing on the reverse side. Both high temperature and humidity can cause problems. • If background scatter covers the entire surface area of a printed page, adjust the print resolution through your software application or via the printer properties window. Do not open packages of paper until necessary so that the paper... that it also occurs on page E.4. • Turn the stack of paper over in the paper tray. See "Paper Specifications" on page E.4. • Ensure that the paper or other material is loaded correctly and the guides are improperly formed and ...
User Manual (ENGLISH)
Page 193
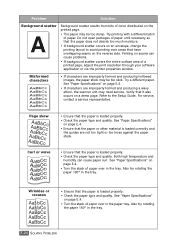
... Display Messages Message ADC Not Confirm Error Cover Open [Color] Toner Empty Dev. Status Do this... The corresponding toner cartridge in again. Unplug the power cord and plug it in the paper tray. Problem Curl Solution If the printed paper is empty and the printer working. If the problem persists, call for service. Close the...
... Display Messages Message ADC Not Confirm Error Cover Open [Color] Toner Empty Dev. Status Do this... The corresponding toner cartridge in again. Unplug the power cord and plug it in the paper tray. Problem Curl Solution If the printed paper is empty and the printer working. If the problem persists, call for service. Close the...
User Manual (ENGLISH)
Page 195
... Manual The paper tray has run out of print material and press the On Line/Continue button. Page Too Complex Too much complicated data was sent to print the current job. Ready [Color]Low Toner The corresponding toner cartridge in the printer properties does not match the paper you , referring to page 6.5. Load paper in again...
... Manual The paper tray has run out of print material and press the On Line/Continue button. Page Too Complex Too much complicated data was sent to print the current job. Ready [Color]Low Toner The corresponding toner cartridge in the printer properties does not match the paper you , referring to page 6.5. Load paper in again...
User Manual (ENGLISH)
Page 264
... card D.7 paper tray 2 D.12 optional tray, install D.12 orientation, select 4.6 overlay, use 5.13 P paper choose 3.2 guideline 3.3 load 3.4 sizes and capacities 3.2 specifications E.4 paper jam in the duplex area 7.13 in the Multi-Purpose Tray 7.9 in the optional Tray 2 7.17 in the paper exit area 7.10 in the paper feed area 7.7 inside the printer 7.9 tips for avoiding 7.21 paper properties, set 4.7 paper size, change...
... card D.7 paper tray 2 D.12 optional tray, install D.12 orientation, select 4.6 overlay, use 5.13 P paper choose 3.2 guideline 3.3 load 3.4 sizes and capacities 3.2 specifications E.4 paper jam in the duplex area 7.13 in the Multi-Purpose Tray 7.9 in the optional Tray 2 7.17 in the paper exit area 7.10 in the paper feed area 7.7 inside the printer 7.9 tips for avoiding 7.21 paper properties, set 4.7 paper size, change...


