User Manual (ENGLISH)
Page 5
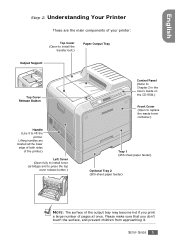
Lifting handles are the main components of pages at the lower edge of both sides of the printer.) Left Cover (Open fully to install toner cartridges and to press the top cover release button.) Control Panel (Refer to Chapter 2 in the User's Guide ... at once. SETUP GUIDE 5 English Step 2. Please make sure that you print a large number of your printer: Top Cover (Open to install the transfer belt.) Paper Output Tray Output Support Top Cover Release Button Handle (Use it to replace the waste toner container.) Tray 1 (250-sheet paper feeder) Optional Tray 2 (500-sheet paper feeder...
Lifting handles are the main components of pages at the lower edge of both sides of the printer.) Left Cover (Open fully to install toner cartridges and to press the top cover release button.) Control Panel (Refer to Chapter 2 in the User's Guide ... at once. SETUP GUIDE 5 English Step 2. Please make sure that you print a large number of your printer: Top Cover (Open to install the transfer belt.) Paper Output Tray Output Support Top Cover Release Button Handle (Use it to replace the waste toner container.) Tray 1 (250-sheet paper feeder) Optional Tray 2 (500-sheet paper feeder...
User Manual (ENGLISH)
Page 37
... 6.4 Toner Cartridge Life Expectancy 6.4 Redistributing Toner 6.5 Replacing Toner Cartridges 6.8 Replacing the Waste Toner Container 6.11 Replacing the Imaging Unit 6.14 Replacing the Transfer Belt 6.22 Cleaning the Printer 6.29 Cleaning the Outside of the Printer 6.29 Cleaning the LSU Inside the Printer 6.29 Cleaning the Inside of the Printer 6.30 Replacement Parts 6.38 Managing the Printer from the Website 6.38 Setting Up...
... 6.4 Toner Cartridge Life Expectancy 6.4 Redistributing Toner 6.5 Replacing Toner Cartridges 6.8 Replacing the Waste Toner Container 6.11 Replacing the Imaging Unit 6.14 Replacing the Transfer Belt 6.22 Cleaning the Printer 6.29 Cleaning the Outside of the Printer 6.29 Cleaning the LSU Inside the Printer 6.29 Cleaning the Inside of the Printer 6.30 Replacement Parts 6.38 Managing the Printer from the Website 6.38 Setting Up...

User Manual (ENGLISH)
Page 51
... Top Cover (Open to install the transfer belt.) Paper Output Tray Output Support Top Cover Release Button Handle (Use it to lift the printer.) Left Cover (Open fully to install toner cartridges and to press the top cover release button.) Control Panel (See page 2.2.) Front Cover (Open to replace the waste toner container.) Tray...
... Top Cover (Open to install the transfer belt.) Paper Output Tray Output Support Top Cover Release Button Handle (Use it to lift the printer.) Left Cover (Open fully to install toner cartridges and to press the top cover release button.) Control Panel (See page 2.2.) Front Cover (Open to replace the waste toner container.) Tray...
User Manual (ENGLISH)
Page 126
This chapter includes: • Printing a Configuration Page • Replacing Supplies • Managing Toner Cartridges • Replacing Toner Cartridges • Replacing the Waste Toner Container • Replacing the Imaging Unit • Replacing the Transfer Belt • Cleaning the Printer • Replacement Parts • Managing the Printer from the Website 6 MAINTAINING YOUR PRINTER This chapter provides information for maintaining your printer and suggestions for high-quality and economical printing.
This chapter includes: • Printing a Configuration Page • Replacing Supplies • Managing Toner Cartridges • Replacing Toner Cartridges • Replacing the Waste Toner Container • Replacing the Imaging Unit • Replacing the Transfer Belt • Cleaning the Printer • Replacement Parts • Managing the Printer from the Website 6 MAINTAINING YOUR PRINTER This chapter provides information for maintaining your printer and suggestions for high-quality and economical printing.

User Manual (ENGLISH)
Page 128
... black and 3,000 pages for 6.11 color** 50,000 pages 6 Imaging Unit Replace Imaging Unit for black and 12,500 pages 6.14 for color** Transfer Belt Replace Transfer Belt 50,000 pages for black and 12,500 pages for color** 6.22 *Average A4-/letter-sized page count based on each page. MAINTAINING YOUR PRINTER 6.3 black printing. Usage conditions and print...
... black and 3,000 pages for 6.11 color** 50,000 pages 6 Imaging Unit Replace Imaging Unit for black and 12,500 pages 6.14 for color** Transfer Belt Replace Transfer Belt 50,000 pages for black and 12,500 pages for color** 6.22 *Average A4-/letter-sized page count based on each page. MAINTAINING YOUR PRINTER 6.3 black printing. Usage conditions and print...
User Manual (ENGLISH)
Page 147
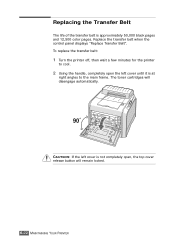
Replace the transfer belt when the control panel displays "Replace Transfer Belt". CAUTION: If the left cover is not completely open the left cover until it is approximately 50,000 black pages and 12,500 color pages. To replace the transfer belt: 1 Turn the printer off, then wait a few minutes for the printer to the main frame. The toner cartridges will remain locked. 6.22 MAINTAINING YOUR PRINTER Replacing the Transfer Belt The life of the transfer belt is at right angles to cool. 2 Using the handle, completely open , the top cover release button will disengage automatically.
Replace the transfer belt when the control panel displays "Replace Transfer Belt". CAUTION: If the left cover is not completely open the left cover until it is approximately 50,000 black pages and 12,500 color pages. To replace the transfer belt: 1 Turn the printer off, then wait a few minutes for the printer to the main frame. The toner cartridges will remain locked. 6.22 MAINTAINING YOUR PRINTER Replacing the Transfer Belt The life of the transfer belt is at right angles to cool. 2 Using the handle, completely open , the top cover release button will disengage automatically.
User Manual (ENGLISH)
Page 153
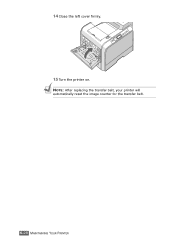
14 Close the left cover firmly. 15 Turn the printer on. NOTE: After replacing the transfer belt, your printer will automatically reset the image counter for the transfer belt. 6.28 MAINTAINING YOUR PRINTER
14 Close the left cover firmly. 15 Turn the printer on. NOTE: After replacing the transfer belt, your printer will automatically reset the image counter for the transfer belt. 6.28 MAINTAINING YOUR PRINTER
User Manual (ENGLISH)
Page 159
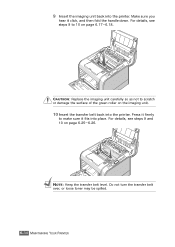
CAUTION: Replace the imaging unit carefully so as not to 10 on page 6.17~6.18. For details, see steps 9 to scratch or damage the surface of the green roller on page 6.25~6.26. Press it firmly to make sure it click, and then fold the handle down. For details, see steps 9 and 10 on the imaging unit. 10 Insert the transfer belt back into the printer. Do not turn the transfer belt over, or loose toner may be spilled. 6.34 MAINTAINING YOUR PRINTER 9 Insert the imaging unit back into place. Make sure you hear it fits into the printer. NOTE: Keep the transfer belt level.
CAUTION: Replace the imaging unit carefully so as not to 10 on page 6.17~6.18. For details, see steps 9 to scratch or damage the surface of the green roller on page 6.25~6.26. Press it firmly to make sure it click, and then fold the handle down. For details, see steps 9 and 10 on the imaging unit. 10 Insert the transfer belt back into the printer. Do not turn the transfer belt over, or loose toner may be spilled. 6.34 MAINTAINING YOUR PRINTER 9 Insert the imaging unit back into place. Make sure you hear it fits into the printer. NOTE: Keep the transfer belt level.
User Manual (ENGLISH)
Page 190
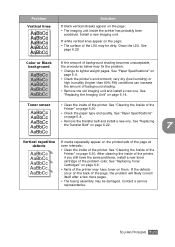
... Imaging Unit" on the printed side of the page at even intervals: • Clean the inside the printer has probably been scratched. See "Replacing the Transfer Belt" on page 6.22. 7 Vertical repetitive defects AaBbCc AaBbCc AaBbCc AaBbCc AaBbCc If marks repeatedly appear on page 6.14. SOLVING ...page E.4. • Remove the transfer belt and install a new one . very dry (low humidity) or high humidity (higher than 80% RH) conditions can increase the amount of the problem color. Clean the LSU. Toner smear • Clean the inside of the printer, if you still have toner...
... Imaging Unit" on the printed side of the page at even intervals: • Clean the inside the printer has probably been scratched. See "Replacing the Transfer Belt" on page 6.22. 7 Vertical repetitive defects AaBbCc AaBbCc AaBbCc AaBbCc AaBbCc If marks repeatedly appear on page 6.14. SOLVING ...page E.4. • Remove the transfer belt and install a new one . very dry (low humidity) or high humidity (higher than 80% RH) conditions can increase the amount of the problem color. Clean the LSU. Toner smear • Clean the inside of the printer, if you still have toner...
User Manual (ENGLISH)
Page 196
... representative. However, the printer continues printing, even though print quality is nearly empty. When "Replace Imaging Unit" appears on the display, replace the transfer belt. Replace the transfer belt with a new one . Replace Transfer Belt The life span of the Replace the imaging unit with any other devices on the network. When "Replace Transfer Belt" appears on the display, replace the imaging unit. Replace Fuser Soon The...
... representative. However, the printer continues printing, even though print quality is nearly empty. When "Replace Imaging Unit" appears on the display, replace the transfer belt. Replace the transfer belt with a new one . Replace Transfer Belt The life span of the Replace the imaging unit with any other devices on the network. When "Replace Transfer Belt" appears on the display, replace the imaging unit. Replace Fuser Soon The...
User Manual (ENGLISH)
Page 197
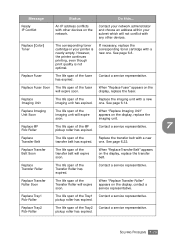
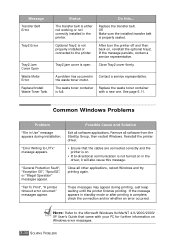
... printing. Do this message. Close Tray2 cover firmly. Reinstall the printer driver. • Ensure that came with a new one. Message Transfer Belt Error Tray2 Error Tray2 Jam Cover Open Waste Motor Error Replace/Install Waste Toner Tank Status The transfer belt is properly seated. Common Windows Problems Problem "File in the driver, it will also cause...
... printing. Do this message. Close Tray2 cover firmly. Reinstall the printer driver. • Ensure that came with a new one. Message Transfer Belt Error Tray2 Error Tray2 Jam Cover Open Waste Motor Error Replace/Install Waste Toner Tank Status The transfer belt is properly seated. Common Windows Problems Problem "File in the driver, it will also cause...
User Manual (ENGLISH)
Page 264
...set 4.8 poster printing 5.7 preprinted paper, print 3.20 print order, set 4.12 print quality problems, solve 7.22 print resolution, set 4.9 printer software install in Linux B.2 in Macintosh A.2 uninstall in Linux B.7 printing booklets 5.9 configuration page 6.2 double-sided 5.2 fitting to a selected ...7.31 paper jams 7.6 print quality 7.22 Windows 7.30 Q quality problems, solve 7.22 R replace imaging unit 6.14 toner cartridge 6.8 transfer belt 6.22 waste toner container 6.11 S specification paper E.4 printer E.2 status monitor, use 5.17 system requirements for Linux B.2 for Macintosh A.2 ii
...set 4.8 poster printing 5.7 preprinted paper, print 3.20 print order, set 4.12 print quality problems, solve 7.22 print resolution, set 4.9 printer software install in Linux B.2 in Macintosh A.2 uninstall in Linux B.7 printing booklets 5.9 configuration page 6.2 double-sided 5.2 fitting to a selected ...7.31 paper jams 7.6 print quality 7.22 Windows 7.30 Q quality problems, solve 7.22 R replace imaging unit 6.14 toner cartridge 6.8 transfer belt 6.22 waste toner container 6.11 S specification paper E.4 printer E.2 status monitor, use 5.17 system requirements for Linux B.2 for Macintosh A.2 ii

User Manual (ENGLISH)
Page 265
T toner cartridge maintain 6.4 redistribute 6.5, 6.8 replace 6.8 transfer belt, replace 6.22 transparencies, print 3.17 Tray1, use 3.4 U uninstall Linux B.7 W waste toner container, replace 6.11 watermarks, use 5.10 iii
T toner cartridge maintain 6.4 redistribute 6.5, 6.8 replace 6.8 transfer belt, replace 6.22 transparencies, print 3.17 Tray1, use 3.4 U uninstall Linux B.7 W waste toner container, replace 6.11 watermarks, use 5.10 iii


