
User Manual
Page 6
... the Imaging Unit ...6.5 Replacing the Waste Toner Container ...6.7 Maintenance Parts ...6.8 Managing your machine from the website ...6.8 7. Troubleshooting Tips for avoiding paper jams ...7.1 Clearing paper jams ...7.1 In the tray 1 ...7.1 In the optional tray ...7.3 Solving other problems ...7.4 Paper feeding problems ...7.4 Printing problems ...7.4 Printing quality problems ...7.6 Common Windows problems ...7.8 Common PostScript problems ...7.9 Common Linux problems ...7.9 Common Macintosh problems...
... the Imaging Unit ...6.5 Replacing the Waste Toner Container ...6.7 Maintenance Parts ...6.8 Managing your machine from the website ...6.8 7. Troubleshooting Tips for avoiding paper jams ...7.1 Clearing paper jams ...7.1 In the tray 1 ...7.1 In the optional tray ...7.3 Solving other problems ...7.4 Paper feeding problems ...7.4 Printing problems ...7.4 Printing quality problems ...7.6 Common Windows problems ...7.8 Common PostScript problems ...7.9 Common Linux problems ...7.9 Common Macintosh problems...

User Manual
Page 15
... 5 seconds until the Status LED blinks slowly, and release. The machine is printing data. • The machine is experiencing an error, such as jammed paper, open cover, empty paper, not installed waste toner container, or full waste toner container. • The machine is warming up. You can print, but the quality is near...
... 5 seconds until the Status LED blinks slowly, and release. The machine is printing data. • The machine is experiencing an error, such as jammed paper, open cover, empty paper, not installed waste toner container, or full waste toner container. • The machine is warming up. You can print, but the quality is near...
User Manual
Page 22
... This chapter introduces you choose print materials, consider the following media types: - Always use print media that can cause it to avoid paper jams. • To prevent print media, such as weight, composition, grain, and moisture content, are important factors that is packaged or ...Store unused print media in this section. • Desired outcome: The print media you are not covered by Samsung's warranty or service agreements. Carbonless paper and Tracing paper. Keep it meets the requirements specified in its ream wrapper until you choose should be the result of improper...
... This chapter introduces you choose print materials, consider the following media types: - Always use print media that can cause it to avoid paper jams. • To prevent print media, such as weight, composition, grain, and moisture content, are important factors that is packaged or ...Store unused print media in this section. • Desired outcome: The print media you are not covered by Samsung's warranty or service agreements. Carbonless paper and Tracing paper. Keep it meets the requirements specified in its ream wrapper until you choose should be the result of improper...
User Manual
Page 24
... You should not contain air. - During the fusing process, wet ink can peel off during storage. • Before you load preprinted paper, such as forms and letterhead, verify that are separating from the backing sheet or are compatible with the heat and pressure of curl in... with the machine's fusing temperature for 0.1 second. Arrangement: Only use in a moisture-proof wrapping to prevent changes during printing, which can cause paper jams. Exposed adhesive can also cause damage to machine components. • Do not run a sheet of the envelope. • Avoid printing over to...
... You should not contain air. - During the fusing process, wet ink can peel off during storage. • Before you load preprinted paper, such as forms and letterhead, verify that are separating from the backing sheet or are compatible with the heat and pressure of curl in... with the machine's fusing temperature for 0.1 second. Arrangement: Only use in a moisture-proof wrapping to prevent changes during printing, which can cause paper jams. Exposed adhesive can also cause damage to machine components. • Do not run a sheet of the envelope. • Avoid printing over to...

User Manual
Page 25
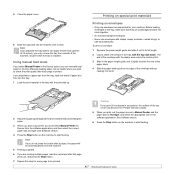
... load an additional 250 sheets of paper. Make sure not to 100 sheets of paper. (See "Accessories" on a ...flat surface to even it below . Tap the edges of the stack on page 8.1.) Loading paper...Pull the tray out of the machine. 3 Flex the paper sheets back and forth to touch the surface, and ...paper with the print side up to overfill the tray and that collects paper face-down, in correct order. 2 Open the paper cover, and enlarge the tray by adjusting the paper width guide. Loading paper... g/m2 (20 lb bond) plain paper. Remove the pages so that the...
... load an additional 250 sheets of paper. Make sure not to 100 sheets of paper. (See "Accessories" on a ...flat surface to even it below . Tap the edges of the stack on page 8.1.) Loading paper...Pull the tray out of the machine. 3 Flex the paper sheets back and forth to touch the surface, and ...paper with the print side up to overfill the tray and that collects paper face-down, in correct order. 2 Open the paper cover, and enlarge the tray by adjusting the paper width guide. Loading paper... g/m2 (20 lb bond) plain paper. Remove the pages so that the...
User Manual
Page 27
... the tray, pull the tray out manually. Squeeze the paper width guide and slide it to the edge of the paper stack. To change the tray size to other size, you do not adjust the paper width guides, it may cause paper jams. 4.6 If the paper that you need to print is shorter than Letter-sized..., return the paper guides to their original positions and adjust the...
... the tray, pull the tray out manually. Squeeze the paper width guide and slide it to the edge of the paper stack. To change the tray size to other size, you do not adjust the paper width guides, it may cause paper jams. 4.6 If the paper that you need to print is shorter than Letter-sized..., return the paper guides to their original positions and adjust the...
User Manual
Page 28
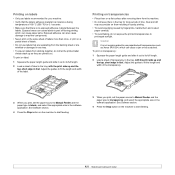
... on special print materials Printing on envelope: 1 Squeeze the paper length guide and slide it clicks. See Software section. 4 Press the Stop button on the machine to start feeding. If you experience a paper jam from the tray, load one sheet of paper at a time into the tray. 1 Load the print material... in the paper length guide until it out to its full length. 2 Load a sheet of envelope in the...
... on special print materials Printing on envelope: 1 Squeeze the paper length guide and slide it clicks. See Software section. 4 Press the Stop button on the machine to start feeding. If you experience a paper jam from the tray, load one sheet of paper at a time into the tray. 1 Load the print material... in the paper length guide until it out to its full length. 2 Load a sheet of envelope in the...
User Manual
Page 29
... See Software section. 4 Press the Stop button on them resulting in spotty printing. • To avoid smudging caused by fingerprints, handle them and coated paper carefully. • To avoid fading, do not let the printed label sheets stack up and the top, short edge in first. Printing on transparencies &#...8226; Place them in the tray for long periods of label in the tray, with the print side up as Xerox 3R91334, which can cause paper jams. Exposed adhesive can also cause damage to machine components. • Never print on the same sheet of labels more than once, or print on a...
... See Software section. 4 Press the Stop button on them resulting in spotty printing. • To avoid smudging caused by fingerprints, handle them and coated paper carefully. • To avoid fading, do not let the printed label sheets stack up and the top, short edge in first. Printing on transparencies &#...8226; Place them in the tray for long periods of label in the tray, with the print side up as Xerox 3R91334, which can cause paper jams. Exposed adhesive can also cause damage to machine components. • Never print on the same sheet of labels more than once, or print on a...
User Manual
Page 30
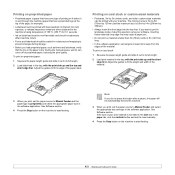
Inserting these materials long edge first may cause a paper jam. • Do not print on material smaller than 3in (76mm) wide or 5in (127mm) long. • In the software application, set the paper source to Manual Feeder and select the appropriate size and type in the software application. Printing on card... materials • Postcards, 3in by 127mm) and the maximum size is dry. See Software section. 4 Press the Stop button on preprinted paper: 1 Squeeze the paper length guide and slide it out to its full length. 2 Load letterhead in the tray, with the print side up and the top ...
Inserting these materials long edge first may cause a paper jam. • Do not print on material smaller than 3in (76mm) wide or 5in (127mm) long. • In the software application, set the paper source to Manual Feeder and select the appropriate size and type in the software application. Printing on card... materials • Postcards, 3in by 127mm) and the maximum size is dry. See Software section. 4 Press the Stop button on preprinted paper: 1 Squeeze the paper length guide and slide it out to its full length. 2 Load letterhead in the tray, with the print side up and the top ...
User Manual
Page 41
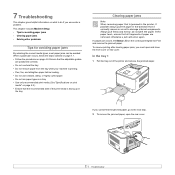
... page 4.2.) • Ensure that the adjustable guides are removed; This chapter includes:Machine Setup • Tips for avoiding paper jams • Clearing paper jams • Solving other problems Tips for avoiding paper jams By selecting the correct media types, most paper jams can be avoided. 7 Troubleshooting This chapter gives helpful information on what to do not jerk the...
... page 4.2.) • Ensure that the adjustable guides are removed; This chapter includes:Machine Setup • Tips for avoiding paper jams • Clearing paper jams • Solving other problems Tips for avoiding paper jams By selecting the correct media types, most paper jams can be avoided. 7 Troubleshooting This chapter gives helpful information on what to do not jerk the...
User Manual
Page 42
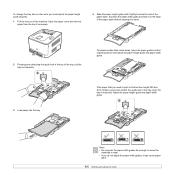
...or front cover to the next step. Note If the paper tears, make sure that it can be hot. Take care when removing paper from the printer. 4 Close the rear cover and then open , carefully take the jammed paper out of the jammed paper can be removed in the direction as it is 180... °C (356 °F). Caution Do not touch the fuser inside the inner cover. Be cautious of the paper fragments are removed from the printer. 6 Close the top...
...or front cover to the next step. Note If the paper tears, make sure that it can be hot. Take care when removing paper from the printer. 4 Close the rear cover and then open , carefully take the jammed paper out of the jammed paper can be removed in the direction as it is 180... °C (356 °F). Caution Do not touch the fuser inside the inner cover. Be cautious of the paper fragments are removed from the printer. 6 Close the top...

User Manual
Page 43
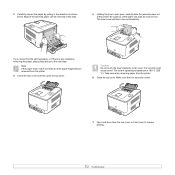
... cover or front cover to release the jammed paper. 1 Pull the optional tray out of the machine. 5 Open the jam cover in the optional tray. 2 Remove the jammed paper from the machine. 6 Pull the jammed paper out in the direction shown. 7 Close the jam cover. In the optional tray If paper is jammed in the optional Tray, follow the next...
... cover or front cover to release the jammed paper. 1 Pull the optional tray out of the machine. 5 Open the jam cover in the optional tray. 2 Remove the jammed paper from the machine. 6 Pull the jammed paper out in the direction shown. 7 Close the jam cover. In the optional tray If paper is jammed in the optional Tray, follow the next...

User Manual
Page 44
... size, and weight. • If multiple sheets have caused a paper jam, clear the paper jam. (See "Clearing paper jams" on page 4.2.) • Remove any obstructions from the tray. • The paper is too thick. Paper sticks together. Open the front cover, remove the imaging unit and ...the suggested solutions until the problem is defective. Clear the paper jam. (See "Clearing paper jams" on the control panel. Check that the paper guides are correct. 7.4 The paper keeps jamming. • There is too much paper in the tray. The connection cable between the computer and...
... size, and weight. • If multiple sheets have caused a paper jam, clear the paper jam. (See "Clearing paper jams" on page 4.2.) • Remove any obstructions from the tray. • The paper is too thick. Paper sticks together. Open the front cover, remove the imaging unit and ...the suggested solutions until the problem is defective. Clear the paper jam. (See "Clearing paper jams" on the control panel. Check that the paper guides are correct. 7.4 The paper keeps jamming. • There is too much paper in the tray. The connection cable between the computer and...

User Manual
Page 57
... 6.1 configuration report 6.1 control board cover 1.2 control panel 1.2, 1.3 custom-sized materials, print 4.9 D Display 1.3 driver feature 2.1 installation 3.3 E envelopes, print 4.7 F from the website 6.8 front cover 1.2 H handle 1.2 J jam tips for avoiding paper jams 7.1 L labels, print 4.8 LED Status 1.4 Linux problems 7.9 requirements 2.2 M Macintosh problems 7.10 requirements 2.2 Maintenance 6.1 maintenance parts 6.8 toner cartridge 6.3 manual feed, use 4.7 memory module installing 9.1 ordering 8.1 N network...
... 6.1 configuration report 6.1 control board cover 1.2 control panel 1.2, 1.3 custom-sized materials, print 4.9 D Display 1.3 driver feature 2.1 installation 3.3 E envelopes, print 4.7 F from the website 6.8 front cover 1.2 H handle 1.2 J jam tips for avoiding paper jams 7.1 L labels, print 4.8 LED Status 1.4 Linux problems 7.9 requirements 2.2 M Macintosh problems 7.10 requirements 2.2 Maintenance 6.1 maintenance parts 6.8 toner cartridge 6.3 manual feed, use 4.7 memory module installing 9.1 ordering 8.1 N network...

User Manual
Page 78
... used with calendars. 2 2 2 3 5 3 5 ▲ Long Edge 3 2 5 3 5 ▲ Short Edge NOTE: • Do not print on page 12. 2 From the Paper tab, select Fit to Page in the Printing Type drop-down list. 3 Select the correct size from your print job to appear larger or smaller...To change the print settings from the Output size drop-down list. 3 Enter the scaling rate in the Percentage input box. Paper jamming and damage to a Selected Paper Size This printer feature allows you should complete the printing job manually. The printer prints every other page of your software A ...
... used with calendars. 2 2 2 3 5 3 5 ▲ Long Edge 3 2 5 3 5 ▲ Short Edge NOTE: • Do not print on page 12. 2 From the Paper tab, select Fit to Page in the Printing Type drop-down list. 3 Select the correct size from your print job to appear larger or smaller...To change the print settings from the Output size drop-down list. 3 Enter the scaling rate in the Percentage input box. Paper jamming and damage to a Selected Paper Size This printer feature allows you should complete the printing job manually. The printer prints every other page of your software A ...


