User Manual (ENGLISH)
Page 7
... expose you continuously print multiple pages, the surface of electric shock, do not disassemble the machine. Be careful not to a qualified service technician when repair work by the operating instructions. Laser Safety Statement The printer is required. If you are using a cord which is never any kind onto...chew on the machine and in the U.S. There may become hot. If you cannot resolve the conflict, contact your eyes. The laser system and printer are not considered to be followed to reduce risk of fire or electric shock. 10 Do not allow anything to dangerous voltages ...
... expose you continuously print multiple pages, the surface of electric shock, do not disassemble the machine. Be careful not to a qualified service technician when repair work by the operating instructions. Laser Safety Statement The printer is required. If you are using a cord which is never any kind onto...chew on the machine and in the U.S. There may become hot. If you cannot resolve the conflict, contact your eyes. The laser system and printer are not considered to be followed to reduce risk of fire or electric shock. 10 Do not allow anything to dangerous voltages ...
User Manual (ENGLISH)
Page 20
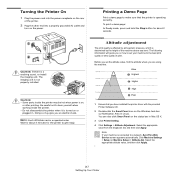
... or best quality of print. CAUTION: • Some parts inside the printer. • Do not disassemble the printer when it is on, or after printing. Altitude adjustment The print quality is... determined by the height of the printer. 2 Plug the other end into a properly grounded AC outlet and turn on the power. Wait for the printer to a network, SyncThru Web Service screen appears automatically...is turned on or plugged in Linux). Before you set your machine is connected to get ready. Turning the Printer On 1 Plug the power cord into the power receptacle on the rear of the machine ...
... or best quality of print. CAUTION: • Some parts inside the printer. • Do not disassemble the printer when it is on, or after printing. Altitude adjustment The print quality is... determined by the height of the printer. 2 Plug the other end into a properly grounded AC outlet and turn on the power. Wait for the printer to a network, SyncThru Web Service screen appears automatically...is turned on or plugged in Linux). Before you set your machine is connected to get ready. Turning the Printer On 1 Plug the power cord into the power receptacle on the rear of the machine ...
Service Manual
Page 4
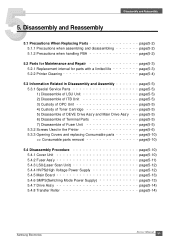
... 7-7 7.5 Common Windows Problems 7-11 7.6 Common Macintosh Problems 7-11 7.7 Common Linux Problems 7-12 7.8 Major Problems Trouble shooting 7-15 Disassembly and Reassembly 5.1 Precautions When Replacing Parts 5-2 5.2 Parts for Maintenance and Repair 5-3 5.3 Information Related in Disassembly and Assembly 5-5 5.4 Disassembly Procedure 5-10 6. Continued 4.9 CRUM Overview 4-5 4.10 FW Upgrade 4-5 4.11 Initailize Flow 4-6 5. Alignment and Adjustments 6.1 Control Panel 6-1 6.2 Function...
... 7-7 7.5 Common Windows Problems 7-11 7.6 Common Macintosh Problems 7-11 7.7 Common Linux Problems 7-12 7.8 Major Problems Trouble shooting 7-15 Disassembly and Reassembly 5.1 Precautions When Replacing Parts 5-2 5.2 Parts for Maintenance and Repair 5-3 5.3 Information Related in Disassembly and Assembly 5-5 5.4 Disassembly Procedure 5-10 6. Continued 4.9 CRUM Overview 4-5 4.10 FW Upgrade 4-5 4.11 Initailize Flow 4-6 5. Alignment and Adjustments 6.1 Control Panel 6-1 6.2 Function...
Service Manual
Page 9
... make a note of any electrical parts. (3) Disconnect printer interface cables and power cables. (4) Only use Samsung parts. Take care not to light. Samsung Electronics Service Manual 1-3 Take extra care when servicing the printer. Failure to do not catch your own personal safety,...Ensure that power is installed on the printer, these rotating devices. (3) Do not place any small metal objects, containers of supporting its weight. Take great care to the printer which if spilled could cause a fire. 1.2.4 Assembly / Disassembly Precautions Replace parts carefully, always use ...
... make a note of any electrical parts. (3) Disconnect printer interface cables and power cables. (4) Only use Samsung parts. Take care not to light. Samsung Electronics Service Manual 1-3 Take extra care when servicing the printer. Failure to do not catch your own personal safety,...Ensure that power is installed on the printer, these rotating devices. (3) Do not place any small metal objects, containers of supporting its weight. Take great care to the printer which if spilled could cause a fire. 1.2.4 Assembly / Disassembly Precautions Replace parts carefully, always use ...

Service Manual
Page 10
...not put finger or hair into the rotating parts (Paper feeding entrance, motor, fan, etc.). The printer weighs 13.6Kg, ensure the printer is stable. 1-4 Service Manual Samsung Electronics When operating a printer, do , you can get harm. (3) When you do so could be caused if you move ...the printer. Use safe lifting and handling techniques. This printer weighs 13.6kg including Consumables. Failure to do not lift carefully. (4) Ensure the printer is installed safely. Back injury could cause the printer to cool down before disassembly. (2) Do not put hand ...
...not put finger or hair into the rotating parts (Paper feeding entrance, motor, fan, etc.). The printer weighs 13.6Kg, ensure the printer is stable. 1-4 Service Manual Samsung Electronics When operating a printer, do , you can get harm. (3) When you do so could be caused if you move ...the printer. Use safe lifting and handling techniques. This printer weighs 13.6kg including Consumables. Failure to do not lift carefully. (4) Ensure the printer is installed safely. Back injury could cause the printer to cool down before disassembly. (2) Do not put hand ...
Service Manual
Page 47
... Ass'y and Main Drive Ass'y 6) Disassemble of Terminal Parts 7) Disassemble of Fuser Unit 5.3.2 Screws Used in the Printer 5.3.3 Opening Covers and replacing Consumable parts >> Consumable parts removal page(5-5) page(5-5) page(5-5) page(5-5) page(5-5) page(5-5) page(5-5) page(5-5) page(5-5) page(5-6) page(5-10) page(5-10) 5.4 Disassembly Procedure 5.4.1 Cover Unit 5.4.2 Fuser Ass'y 5.4.3 LSU(Laser Scan Unit) 5.4.4 HVPS(High Voltage Power...
... Ass'y and Main Drive Ass'y 6) Disassemble of Terminal Parts 7) Disassemble of Fuser Unit 5.3.2 Screws Used in the Printer 5.3.3 Opening Covers and replacing Consumable parts >> Consumable parts removal page(5-5) page(5-5) page(5-5) page(5-5) page(5-5) page(5-5) page(5-5) page(5-5) page(5-5) page(5-6) page(5-10) page(5-10) 5.4 Disassembly Procedure 5.4.1 Cover Unit 5.4.2 Fuser Ass'y 5.4.3 LSU(Laser Scan Unit) 5.4.4 HVPS(High Voltage Power...

Service Manual
Page 48
...2. There are correct. Always ensure that when toothed washers are removed they may get an electric shock. Damaged cables could cause the printer to malfunction and create electric shock or fire hazards. * Take care when dismantling the unit to direct sunlight. >> Precautions when replacing ...such parts, press the hook end of the latch away from the part to which it is latched. 5-2 Service Manual Samsung Electronics Once it is disassembled dust is used approved anti-static precautions when handling or storing a PBA. >> Precautions when moving parts fitted such as ...
...2. There are correct. Always ensure that when toothed washers are removed they may get an electric shock. Damaged cables could cause the printer to malfunction and create electric shock or fire hazards. * Take care when dismantling the unit to direct sunlight. >> Precautions when replacing ...such parts, press the hook end of the latch away from the part to which it is latched. 5-2 Service Manual Samsung Electronics Once it is disassembled dust is used approved anti-static precautions when handling or storing a PBA. >> Precautions when moving parts fitted such as ...
Service Manual
Page 49
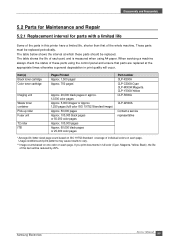
... or 25,000 color pages Part number CLP-K300A CLP-C300A:Cyan CLP-M300A:Magenta CLP-Y300A:Yellow CLP-R300A CLP-W300A Contact a service representative * Average A4-/letter-sized page count based on ISO 19752 Standard coverage of this printer have a limited life, shorter than that parts are replaced at which these parts using A4 paper. Disassembly and Reassembly...
... or 25,000 color pages Part number CLP-K300A CLP-C300A:Cyan CLP-M300A:Magenta CLP-Y300A:Yellow CLP-R300A CLP-W300A Contact a service representative * Average A4-/letter-sized page count based on ISO 19752 Standard coverage of this printer have a limited life, shorter than that parts are replaced at which these parts using A4 paper. Disassembly and Reassembly...

Service Manual
Page 50
... regularly cleaned, especially if it is less likely to occur. * Clean the printer with a soft, lint free, cloth dipped in a dusty environment. Disassembly and Reassembly 5.2.2 Printer Cleaning A printer should be low. * Please refer to the User Manual for cleaning instructions. 5-4 Service Manual Samsung Electronics This will contaminate the surface and reduce print quality. * Do not...
... regularly cleaned, especially if it is less likely to occur. * Clean the printer with a soft, lint free, cloth dipped in a dusty environment. Disassembly and Reassembly 5.2.2 Printer Cleaning A printer should be low. * Please refer to the User Manual for cleaning instructions. 5-4 Service Manual Samsung Electronics This will contaminate the surface and reduce print quality. * Do not...

Service Manual
Page 51
...quality degradation. 3) Care of the Toner cartridge Toner cartridges contain an extremely fine powder. Incorrect re-assembly will allow dust into the laser and significantly reduce print quality. Do not touch an AC line (Copper contact) on a special jig. If not, it has ...alignment of the home sensor is critical and is set that waste toner powder would be leaked Samsung Electronics Service Manual 5-5 Take care not to Disassembly and Assembly. 5.3.1 Special service parts Never disassemble or adjust the items mentioned, a stock of these items should contact a doctor. Do not ...
...quality degradation. 3) Care of the Toner cartridge Toner cartridges contain an extremely fine powder. Incorrect re-assembly will allow dust into the laser and significantly reduce print quality. Do not touch an AC line (Copper contact) on a special jig. If not, it has ...alignment of the home sensor is critical and is set that waste toner powder would be leaked Samsung Electronics Service Manual 5-5 Take care not to Disassembly and Assembly. 5.3.1 Special service parts Never disassemble or adjust the items mentioned, a stock of these items should contact a doctor. Do not ...

Service Manual
Page 52
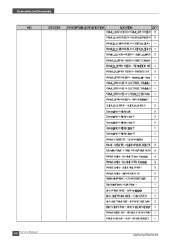
Disassembly and Reassembly 5.3.2 Screws used in the printer The screws listed in the table below are used in the appropriate places. 5-6 Service Manual Samsung Electronics Please ensure that, when you disassemble the printer, you keep a note of which screw is used for which part and that, when reassembling the printer, the correct screws are used in this printer.
Disassembly and Reassembly 5.3.2 Screws used in the printer The screws listed in the table below are used in the appropriate places. 5-6 Service Manual Samsung Electronics Please ensure that, when you disassemble the printer, you keep a note of which screw is used for which part and that, when reassembling the printer, the correct screws are used in this printer.

Service Manual
Page 53
Disassembly and Reassembly Samsung Electronics Service Manual 5-7
Disassembly and Reassembly Samsung Electronics Service Manual 5-7
Service Manual
Page 54
Disassembly and Reassembly 5-8 Service Manual Samsung Electronics
Disassembly and Reassembly 5-8 Service Manual Samsung Electronics

Service Manual
Page 55
Disassembly and Reassembly Samsung Electronics Service Manual 5-9
Disassembly and Reassembly Samsung Electronics Service Manual 5-9

Service Manual
Page 56
Open a Front-Cover and Remove the Imagine Unit. 3. Remove the ITB Unit 1) Pull out the unit toward out side of printer slightly. 2) Lift up the unit gently. 3) Pull out the unit gently. 4. Unscrew 1 screw on the Top Cover and then remove the Top Cover. 2. Unscrew 2 screws on the Right Cover and then remove the Right Cover after open the Rear Cover. 5-10 Service Manual Samsung Electronics Disassembly and Reassembly 5.4 Disassembly Procedure 5.4.1 Cover Unit 1.
Open a Front-Cover and Remove the Imagine Unit. 3. Remove the ITB Unit 1) Pull out the unit toward out side of printer slightly. 2) Lift up the unit gently. 3) Pull out the unit gently. 4. Unscrew 1 screw on the Top Cover and then remove the Top Cover. 2. Unscrew 2 screws on the Right Cover and then remove the Right Cover after open the Rear Cover. 5-10 Service Manual Samsung Electronics Disassembly and Reassembly 5.4 Disassembly Procedure 5.4.1 Cover Unit 1.

Service Manual
Page 57
5. Remove the Left Cover. Push the Holder Shaft Fuser as shown in Picture. 3. Samsung Electronics Service Manual 5-11 Unscrew 4 screws on the Fuser after open the Rear Cover. 2. Take out the Fuser Ass'y from Printer. Disassembly and Reassembly 5.4.2 Fuser Ass'y 1.
5. Remove the Left Cover. Push the Holder Shaft Fuser as shown in Picture. 3. Samsung Electronics Service Manual 5-11 Unscrew 4 screws on the Fuser after open the Rear Cover. 2. Take out the Fuser Ass'y from Printer. Disassembly and Reassembly 5.4.2 Fuser Ass'y 1.
Service Manual
Page 58
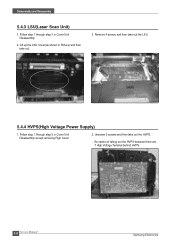
Remove 4 screws and then take out the HVPS. Unscrew 6 screws and then take out the LSU. 5.4.4 HVPS(High Voltage Power Supply) 1. Disassembly and Reassembly 5.4.3 LSU(Laser Scan Unit) 1. Follow step 1 through step 3 in Cover Unit Disassembly 2. Follow step 1 through step 5 in Picture) and then take out. 3. Be careful of taking out the HVPS because there are 7 High Voltage Terminal behind HVPS. 5-12 Service Manual Samsung Electronics Lift up the LSU Cover(as shown in Cover Unit Disassembly except removing Righ Cover 2.
Remove 4 screws and then take out the HVPS. Unscrew 6 screws and then take out the LSU. 5.4.4 HVPS(High Voltage Power Supply) 1. Disassembly and Reassembly 5.4.3 LSU(Laser Scan Unit) 1. Follow step 1 through step 3 in Cover Unit Disassembly 2. Follow step 1 through step 5 in Picture) and then take out. 3. Be careful of taking out the HVPS because there are 7 High Voltage Terminal behind HVPS. 5-12 Service Manual Samsung Electronics Lift up the LSU Cover(as shown in Cover Unit Disassembly except removing Righ Cover 2.
Service Manual
Page 59
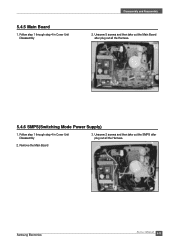
Follow step 1 through step 4 in Cover Unit Disassembly 3. Unscrew 2 screws and then take out the Main Board after plug out all the Harness. 5.4.6 SMPS(Switching Mode Power Supply) 1. Remove the Main Board Samsung Electronics Service Manual 5-13 5.4.5 Main Board 1. Unscrew 5 screws and then take out the SMPS after plug out all the Harness. 2. Follow step 1 through step 4 in Cover Unit Disassembly Disassembly and Reassembly 2.
Follow step 1 through step 4 in Cover Unit Disassembly 3. Unscrew 2 screws and then take out the Main Board after plug out all the Harness. 5.4.6 SMPS(Switching Mode Power Supply) 1. Remove the Main Board Samsung Electronics Service Manual 5-13 5.4.5 Main Board 1. Unscrew 5 screws and then take out the SMPS after plug out all the Harness. 2. Follow step 1 through step 4 in Cover Unit Disassembly Disassembly and Reassembly 2.

Service Manual
Page 60
Follow step 1 through step 4 in Cover Unit Disassembly 2. Remove the Main Board 3. Unscrew 8 screws and then take out the Drive Ass'y. 5.4.8 Transfer Roller 1. Open Rear Cover. 2. Disassembly and Reassembly 5.4.7 Drive Ass'y 1. Remove the SMPS 4. Pull back the hook, which holds the Roller, like below picture and remove the Transfer Roller 5-14 Service Manual Samsung Electronics
Follow step 1 through step 4 in Cover Unit Disassembly 2. Remove the Main Board 3. Unscrew 8 screws and then take out the Drive Ass'y. 5.4.8 Transfer Roller 1. Open Rear Cover. 2. Disassembly and Reassembly 5.4.7 Drive Ass'y 1. Remove the SMPS 4. Pull back the hook, which holds the Roller, like below picture and remove the Transfer Roller 5-14 Service Manual Samsung Electronics
