
User Manual (ENGLISH)
Page 14
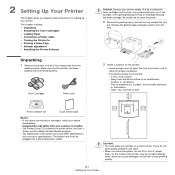
... 3 Select a location for the printer: • Leave enough room to open the tray and covers, and to move the printer. 2 Remove the packing tape in front of the tray and pull the tray out. 2 Setting Up Your Printer This chapter gives you use it ...• Unpacking • Installing the Toner Cartridges • Loading Paper • Connecting a Printer Cable • Turning the Printer On • Printing a Demo Page • Altitude adjustment • Installing the Printer Software Unpacking 1 Remove the printer and all of the accessories from the direct airflow of temperature, sunlight...
... 3 Select a location for the printer: • Leave enough room to open the tray and covers, and to move the printer. 2 Remove the packing tape in front of the tray and pull the tray out. 2 Setting Up Your Printer This chapter gives you use it ...• Unpacking • Installing the Toner Cartridges • Loading Paper • Connecting a Printer Cable • Turning the Printer On • Printing a Demo Page • Altitude adjustment • Installing the Printer Software Unpacking 1 Remove the printer and all of the accessories from the direct airflow of temperature, sunlight...
User Manual (ENGLISH)
Page 15
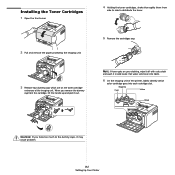
...to the dummy caps, it out. 4 Holding the toner cartridges, shake thoroughly them from the cartridge, lift the handle up and pull it may cause problem. 2.2 Setting Up Your Printer When you force too much to distribute the toner. 5 Remove the cartridges cap. Hot water sets toner into fabric. 6 On ...the imaging unit of the imaging unit. NOTE: If toner gets on the toner cartridge entrances of the printer, labels identify which are on your clothing, wipe it off with a dry cloth and wash it in cold water. Installing the Toner Cartridges 1 Open...
...to the dummy caps, it out. 4 Holding the toner cartridges, shake thoroughly them from the cartridge, lift the handle up and pull it may cause problem. 2.2 Setting Up Your Printer When you force too much to distribute the toner. 5 Remove the cartridges cap. Hot water sets toner into fabric. 6 On ...the imaging unit of the imaging unit. NOTE: If toner gets on the toner cartridge entrances of the printer, labels identify which are on your clothing, wipe it off with a dry cloth and wash it in cold water. Installing the Toner Cartridges 1 Open...
User Manual (ENGLISH)
Page 16
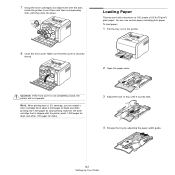
...colors. 3 Adjust the size of the printer. 8 Close the front cover. You can use various paper including plain paper. CAUTION: If the front cover is not completely closed . 2 Open the paper cover. However, the toner cartridge that the cover is shipped with the slots inside the printer. To load paper: 1 Pull... the tray out of tray until they click into place. Make sure that is securely closed , the printer will not operate. 7 Grasp the toner cartridges and align them into...
...colors. 3 Adjust the size of the printer. 8 Close the front cover. You can use various paper including plain paper. CAUTION: If the front cover is not completely closed . 2 Open the paper cover. However, the toner cartridge that the cover is shipped with the slots inside the printer. To load paper: 1 Pull... the tray out of tray until they click into place. Make sure that is securely closed , the printer will not operate. 7 Grasp the toner cartridges and align them into...
User Manual (ENGLISH)
Page 18
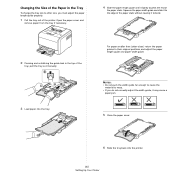
... guide far enough to cause the material to warp. • If you must adjust the paper length guide properly. 1 Pull the tray out of the printer. Squeeze the paper width guide and slide it to the edge of the paper stack without causing it to bend. 2 Pressing and unlatching the guide lock in the Tray...
... guide far enough to cause the material to warp. • If you must adjust the paper length guide properly. 1 Pull the tray out of the printer. Squeeze the paper width guide and slide it to the edge of the paper stack without causing it to bend. 2 Pressing and unlatching the guide lock in the Tray...
User Manual (ENGLISH)
Page 23
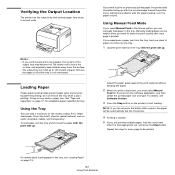
...paper, pull the tray and the load the paper with the uncurled edge toward the printer. NOTES: • If you want to touch the surface, and especially keep children away from the software application, and then select the correct paper size and type. Be careful not to print on page 3.1 for acceptable paper...select Manual Feed for tray. Doing so may become hot. Verifying the Output Location The printer has the output tray that the tray is not overloaded. For details, see "Loading Paper" on the printer to check the print quality after each page is printed. For details about loading...
...paper, pull the tray and the load the paper with the uncurled edge toward the printer. NOTES: • If you want to touch the surface, and especially keep children away from the software application, and then select the correct paper size and type. Be careful not to print on page 3.1 for acceptable paper...select Manual Feed for tray. Doing so may become hot. Verifying the Output Location The printer has the output tray that the tray is not overloaded. For details, see "Loading Paper" on the printer to check the print quality after each page is printed. For details about loading...

User Manual (ENGLISH)
Page 32
Cover it with a piece of its package. NOTE: Each LED blinks red in to the printer. CAUTION: • Don't use it to pull the imaging unit out of the printer completely. 8 Remove four dummy caps which are on the new imaging unit, push the imaging unit until they click into their ... cracking sound, re-install the imaging unit. CAUTION: If the front cover is not completely closed, the printer will not operate. 11 Turn the printer on both sides of the imaging unit and the paper protecting the surface of the imaging unit. • To prevent damage, do not expose the imaging unit...
Cover it with a piece of its package. NOTE: Each LED blinks red in to the printer. CAUTION: • Don't use it to pull the imaging unit out of the printer completely. 8 Remove four dummy caps which are on the new imaging unit, push the imaging unit until they click into their ... cracking sound, re-install the imaging unit. CAUTION: If the front cover is not completely closed, the printer will not operate. 11 Turn the printer on both sides of the imaging unit and the paper protecting the surface of the imaging unit. • To prevent damage, do not expose the imaging unit...
User Manual (ENGLISH)
Page 34
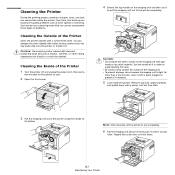
...the power cord, then wait a few minutes for more than a few minutes. Cover it with a piece of paper to protect it to pull the imaging unit out of the printer completely. Remove any other strong substances can cause print quality problems such as toner specks or smearing. NOTE: After ... • Do not touch the green surface on the imaging unit with your hands or any dust, paper particles, and spilled toner with a damp, soft lint-free cloth. 3 Pull the imaging unit out of the Printer Clean the printer cabinet with a soft lint-free cloth. Use the handle on its bottom.
...the power cord, then wait a few minutes for more than a few minutes. Cover it with a piece of paper to protect it to pull the imaging unit out of the printer completely. Remove any other strong substances can cause print quality problems such as toner specks or smearing. NOTE: After ... • Do not touch the green surface on the imaging unit with your hands or any dust, paper particles, and spilled toner with a damp, soft lint-free cloth. 3 Pull the imaging unit out of the Printer Clean the printer cabinet with a soft lint-free cloth. Use the handle on its bottom.
User Manual (ENGLISH)
Page 38
...size in the software application is a temporary issue. If you know works. After printing about 100 color pages, there will occur again. It is wrong. Find and remove the jammed paper. Ensure that it does not contain blank pages. There is selected. Finally, try printing again.... document again. The resolution is jammed in the printer, if possible always pull the paper in the tray. The resolution of the photo is blank. Always pull firmly and evenly; Problem Half the page is very low. The paper keeps jamming. The printer prints, but are blank. Pages print, but ...
...size in the software application is a temporary issue. If you know works. After printing about 100 color pages, there will occur again. It is wrong. Find and remove the jammed paper. Ensure that it does not contain blank pages. There is selected. Finally, try printing again.... document again. The resolution is jammed in the printer, if possible always pull the paper in the tray. The resolution of the photo is blank. Always pull firmly and evenly; Problem Half the page is very low. The paper keeps jamming. The printer prints, but are blank. Pages print, but ...

User Manual (ENGLISH)
Page 39
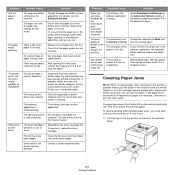
... If you cannot find the jammed paper, or if there is any resistance removing the paper, stop pulling and go to the next step. 2 To remove the jammed paper, open the rear cover. 4 Close the rear cover and then open , carefully take the jammed paper out of the printer. It is 180 °C ...(356 °F). Most of the paper fragments are removed from the printer. 6 Close...
... If you cannot find the jammed paper, or if there is any resistance removing the paper, stop pulling and go to the next step. 2 To remove the jammed paper, open the rear cover. 4 Close the rear cover and then open , carefully take the jammed paper out of the printer. It is 180 °C ...(356 °F). Most of the paper fragments are removed from the printer. 6 Close...

Service Manual
Page 8
.... Do not touch the machine or the power cord if it firmly and pull. (7) Take care of an incorrectly specified cable could cause the cable to ...to a fire. Do not allow paper clips, pins or other foreign objects to fall into the printer these weather conditions. (10) Avoid damp or dusty areas, install the printer in these could cause overheating possibly leading...an electric shock. 1-2 Service Manual Samsung Electronics Some chemicals can cause electric shock. Damp and dust build up inside the printer to rise possibly leading to the printer failing to work properly and in...
.... Do not touch the machine or the power cord if it firmly and pull. (7) Take care of an incorrectly specified cable could cause the cable to ...to a fire. Do not allow paper clips, pins or other foreign objects to fall into the printer these weather conditions. (10) Avoid damp or dusty areas, install the printer in these could cause overheating possibly leading...an electric shock. 1-2 Service Manual Samsung Electronics Some chemicals can cause electric shock. Damp and dust build up inside the printer to rise possibly leading to the printer failing to work properly and in...

Service Manual
Page 66
...printer. * Jam In Exit Area: Jam2, Paper is jammed in the direction as shown below. If the paper tears, ensure that all possible, remove the paper as not to the next step. Find and remove the jammed paper. Carefully remove the paper by pulling in the exit area when ejecting paper. If the paper tears ensures ALL paper... fragments are removed; do not jerk the paper. Samsung Electronics To remove the jammed paper, open and close ...
...printer. * Jam In Exit Area: Jam2, Paper is jammed in the direction as shown below. If the paper tears, ensure that all possible, remove the paper as not to the next step. Find and remove the jammed paper. Carefully remove the paper by pulling in the exit area when ejecting paper. If the paper tears ensures ALL paper... fragments are removed; do not jerk the paper. Samsung Electronics To remove the jammed paper, open and close ...


