

User Manual (user Manual) (ver.1.0) (English)
Page 1
SyncMaster B1630N/B1730NW/B1930N/B1930NW/B2030/B2030N/B2230/B2230N/ B2230W/B2330/B2430L LCD Monitor User Manual The color and the appearance may differ depending on the product, and the specifications are subject to change without prior notice to improve the performance.
SyncMaster B1630N/B1730NW/B1930N/B1930NW/B2030/B2030N/B2230/B2230N/ B2230W/B2330/B2430L LCD Monitor User Manual The color and the appearance may differ depending on the product, and the specifications are subject to change without prior notice to improve the performance.
User Manual (user Manual) (ver.1.0) (English)
Page 2
Table Of Contents MAJOR SAFETY PRECAUTIONS Before You Start 1-1 Custody and Maintenance 1-2 Safety Precautions 1-3 INSTALLING THE PRODUCT Package Contents 2-1 Installing the Stand 2-2 Removing the Stand 2-3 Installing the Stand for the Wall Mount 2-4 Connecting with a PC 2-5 Kensington Lock 2-6 USING THE PRODUCT Setting the Optimal Resolution 3-1 Standard Signal Mode Table 3-2 Standard Signal Mode Table 3-3 Standard Signal Mode Table 3-4 Standard Signal Mode Table 3-5 Standard Signal Mode Table 3-6 Standard Signal Mode Table 3-7 Standard Signal Mode Table 3-8 Standard Signal ...
Table Of Contents MAJOR SAFETY PRECAUTIONS Before You Start 1-1 Custody and Maintenance 1-2 Safety Precautions 1-3 INSTALLING THE PRODUCT Package Contents 2-1 Installing the Stand 2-2 Removing the Stand 2-3 Installing the Stand for the Wall Mount 2-4 Connecting with a PC 2-5 Kensington Lock 2-6 USING THE PRODUCT Setting the Optimal Resolution 3-1 Standard Signal Mode Table 3-2 Standard Signal Mode Table 3-3 Standard Signal Mode Table 3-4 Standard Signal Mode Table 3-5 Standard Signal Mode Table 3-6 Standard Signal Mode Table 3-7 Standard Signal Mode Table 3-8 Standard Signal ...
User Manual (user Manual) (ver.1.0) (English)
Page 3
Europe only 6-24 Specifications 6-5 Power Saving Function 6-6 Specifications 6-7 Power Saving Function 6-8 Specifications 6-9 Power Saving Function 6-10 Specifications 6-11 Power Saving Function 6-12 Specifications 6-13 Power Saving Function 6-14 Specifications 6-15 Power Saving Function 6-16 Specifications 6-17 Power Saving Function 6-18 Specifications 6-19 Power Saving Function 6-20 Specifications 6-21 Power Saving Function 6-22 Contact SAMSUNG WORLDWIDE 6-23 Correct Disposal of This Product (Waste Electrical & Electronic Equipment) -
Europe only 6-24 Specifications 6-5 Power Saving Function 6-6 Specifications 6-7 Power Saving Function 6-8 Specifications 6-9 Power Saving Function 6-10 Specifications 6-11 Power Saving Function 6-12 Specifications 6-13 Power Saving Function 6-14 Specifications 6-15 Power Saving Function 6-16 Specifications 6-17 Power Saving Function 6-18 Specifications 6-19 Power Saving Function 6-20 Specifications 6-21 Power Saving Function 6-22 Contact SAMSUNG WORLDWIDE 6-23 Correct Disposal of This Product (Waste Electrical & Electronic Equipment) -

User Manual (user Manual) (ver.1.0) (English)
Page 4
..., refer to change without the written permission of the Video Electronics Standard Association. The ENERGY STAR® logo is reserved by Samsung Electronics, Co., Ltd. The copyright of this manual is the registered trademark of the safety precautions before using this manual are the... registered trademarks of Samsung Electronics, Co., Ltd. Note Indicates a hint or tip to their respective companies. 1-1 Major Safety Precautions All Rights Reserved. The...
..., refer to change without the written permission of the Video Electronics Standard Association. The ENERGY STAR® logo is reserved by Samsung Electronics, Co., Ltd. The copyright of this manual is the registered trademark of the safety precautions before using this manual are the... registered trademarks of Samsung Electronics, Co., Ltd. Note Indicates a hint or tip to their respective companies. 1-1 Major Safety Precautions All Rights Reserved. The...
User Manual (user Manual) (ver.1.0) (English)
Page 5
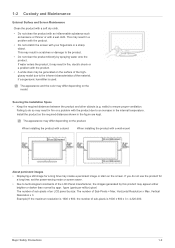
The appearance and the color may appear either brighter or darker than normal by appr. 1ppm (parts per million) pixel. Securing the Installation Space • Keep the required distances between the product and other objects (e.g. When installing the product with a stand When installing the product with a wall-mount About persistent images • Displaying a still image for a long time, set the power-saving mode or screen saver. • Due to the product. • Do not clean the product directly by size: The number of the material, if a supersonic humidifier is 1600 x 900 x 3 = ...
The appearance and the color may appear either brighter or darker than normal by appr. 1ppm (parts per million) pixel. Securing the Installation Space • Keep the required distances between the product and other objects (e.g. When installing the product with a stand When installing the product with a wall-mount About persistent images • Displaying a still image for a long time, set the power-saving mode or screen saver. • Due to the product. • Do not clean the product directly by size: The number of the material, if a supersonic humidifier is 1600 x 900 x 3 = ...

User Manual (user Manual) (ver.1.0) (English)
Page 6
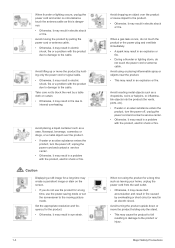
Avoid plugging in or unplugging the power supply with wet hands. • Otherwise, it may result in fire. Do not touch. Power Related The following images are covered in dust, clean it using a damaged power cord or plug or a loose power outlet. • Otherwise, it may result in electric shock or fire due to a damaged power cord. Make sure to connect the power cord to a grounded wall outlet (for insulation class 1 equipment only). • Otherwise, it may differ depending on the cord. • Otherwise, it may result in electric shock or injury. Plug the power plug in...
Avoid plugging in or unplugging the power supply with wet hands. • Otherwise, it may result in fire. Do not touch. Power Related The following images are covered in dust, clean it using a damaged power cord or plug or a loose power outlet. • Otherwise, it may result in electric shock or fire due to a damaged power cord. Make sure to connect the power cord to a grounded wall outlet (for insulation class 1 equipment only). • Otherwise, it may differ depending on the cord. • Otherwise, it may result in electric shock or injury. Plug the power plug in...

User Manual (user Manual) (ver.1.0) (English)
Page 7
Connect the power plug to a wall outlet that is operating. • Otherwise, it may result in electric shock or fire. Ask an installation engineer or relevant company to install the product onto the wall. • Otherwise, it may result in injury. • Make sure to electric shock. Make sure to cut the power off completely. Caution Avoid unplugging the power plug while the product is unstable or exposed to excessive vibrations such as inside a bookshelf or closet. • Otherwise, it may result in fire due to pack the product away from children. • If ...
Connect the power plug to a wall outlet that is operating. • Otherwise, it may result in electric shock or fire. Ask an installation engineer or relevant company to install the product onto the wall. • Otherwise, it may result in injury. • Make sure to electric shock. Make sure to cut the power off completely. Caution Avoid unplugging the power plug while the product is unstable or exposed to excessive vibrations such as inside a bookshelf or closet. • Otherwise, it may result in fire due to pack the product away from children. • If ...

User Manual (user Manual) (ver.1.0) (English)
Page 8
You can purchase the recommended cleansing agent from a service center. 1-3 Major Safety Precautions When installing the product on the floor. • This may damage the panel of our service engineers about the matter. • Places exposed to the surrounding environment. Do not place the product face down , handle it gently. • Otherwise, it . • If a child touches the product, the product may fall off , be sure to the size of the console or shelf. • Otherwise, this may cause the product to fall and this case, install the product only after consulting one of...
You can purchase the recommended cleansing agent from a service center. 1-3 Major Safety Precautions When installing the product on the floor. • This may damage the panel of our service engineers about the matter. • Places exposed to the surrounding environment. Do not place the product face down , handle it gently. • Otherwise, it . • If a child touches the product, the product may fall off , be sure to the size of the console or shelf. • Otherwise, this may cause the product to fall and this case, install the product only after consulting one of...

User Manual (user Manual) (ver.1.0) (English)
Page 9
Use a soft, damp cloth with a "monitorexclusive cleansing agent" and wipe the product with it may result in fire or electric shock. Since the exterior of the product is available, dilute a cleansing agent with water at a ratio of the product or the panel coming off any alien substances from the cloth before cleaning the product. therefore shake off . Contact a service center. • Otherwise, it . • If no monitor-exclusive cleansing agent is easily scratched, be fixed, contact a service center. Use the cleansing cloth with the product. Before cleaning the product,...
Use a soft, damp cloth with a "monitorexclusive cleansing agent" and wipe the product with it may result in fire or electric shock. Since the exterior of the product is available, dilute a cleansing agent with water at a ratio of the product or the panel coming off any alien substances from the cloth before cleaning the product. therefore shake off . Contact a service center. • Otherwise, it . • If no monitor-exclusive cleansing agent is easily scratched, be fixed, contact a service center. Use the cleansing cloth with the product. Before cleaning the product,...
User Manual (user Manual) (ver.1.0) (English)
Page 10
Take care not to block the vent by holding only the stand. • This may create a persistent image or stain on the screen. • If you do not use the product for a long time such as leaving your home, unplug the power cord from the wall outlet. • Otherwise, it may result in a problem with the product due to damage to the cable. When not using or placing inflammable spray or objects near the product. • This may result in electric shock, fire or a problem with the product, electric shock or fire. Avoid lifting up or move the product holding only the power cord or ...
Take care not to block the vent by holding only the stand. • This may create a persistent image or stain on the screen. • If you do not use the product for a long time such as leaving your home, unplug the power cord from the wall outlet. • Otherwise, it may result in a problem with the product due to damage to the cable. When not using or placing inflammable spray or objects near the product. • This may result in electric shock, fire or a problem with the product, electric shock or fire. Avoid lifting up or move the product holding only the power cord or ...

User Manual (user Manual) (ver.1.0) (English)
Page 11
Avoid placing a heavy object over the product. • Otherwise, it may result in electric shock or fire. Major Safety Precautions 1-3 Keep small accessories away from your eyes to give your back. • Keep a distance of your arm so that your heart. Watching the product from too close a distance continuously may result in injury. Maintaining the Correct Posture when Using this Product Maintain the correct posture when using it may result in a problem with the back of your hand. • Keep your elbow at a right angle. • Place your heels flat on the ...
Avoid placing a heavy object over the product. • Otherwise, it may result in electric shock or fire. Major Safety Precautions 1-3 Keep small accessories away from your eyes to give your back. • Keep a distance of your arm so that your heart. Watching the product from too close a distance continuously may result in injury. Maintaining the Correct Posture when Using this Product Maintain the correct posture when using it may result in a problem with the back of your hand. • Keep your elbow at a right angle. • Place your heels flat on the ...
User Manual (user Manual) (ver.1.0) (English)
Page 12
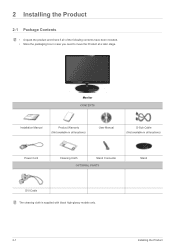
Stand 2-1 Installing the Product 2 Installing the Product 2-1 Package Contents • Unpack the product and check if all locations) Power Cord Cleaning Cloth Stand Connector OPTIONAL PARTS DVI Cable The cleaning cloth is supplied with black high-glossy models only. Monitor CONTENTS Installation Manual Product Warranty (Not available in all locations) User Manual D-Sub Cable (Not available in all of the following contents have been included. • Store the packaging box in case you need to move the Product at a later stage.
Stand 2-1 Installing the Product 2 Installing the Product 2-1 Package Contents • Unpack the product and check if all locations) Power Cord Cleaning Cloth Stand Connector OPTIONAL PARTS DVI Cable The cleaning cloth is supplied with black high-glossy models only. Monitor CONTENTS Installation Manual Product Warranty (Not available in all locations) User Manual D-Sub Cable (Not available in all of the following contents have been included. • Store the packaging box in case you need to move the Product at a later stage.

User Manual (user Manual) (ver.1.0) (English)
Page 13
Insert the Stand Connector into the main body in the direction shown by the figure. Place a soft cloth over the table to protect the product and place the product onto the cloth so that it is facing downwards. Hold the main body of the product with your hand as shown in the figure. Installing the Product 2-2 Turn the connecting screw at the bottom of the stand fully so that the front of the arrow as shown by the figure. Push the assembled stand into the Stand in the direction of the product is completely fixed. 2-2 Installing the Stand Before assembling the product,...
Insert the Stand Connector into the main body in the direction shown by the figure. Place a soft cloth over the table to protect the product and place the product onto the cloth so that it is facing downwards. Hold the main body of the product with your hand as shown in the figure. Installing the Product 2-2 Turn the connecting screw at the bottom of the stand fully so that the front of the arrow as shown by the figure. Push the assembled stand into the Stand in the direction of the product is completely fixed. 2-2 Installing the Stand Before assembling the product,...

User Manual (user Manual) (ver.1.0) (English)
Page 14
- Caution Avoid lifting the product holding only the stand. 2-2 Installing the Product
- Caution Avoid lifting the product holding only the stand. 2-2 Installing the Product

User Manual (user Manual) (ver.1.0) (English)
Page 15
Hold the main body of the arrow as shown by pulling it . Take the Stand Connector out of the Stand by the figure. Place a soft cloth over the table to separate it. Turn the connecting screw at the bottom of the stand to protect the product and place the product onto the cloth so that the screen faces downwards. Installing the Product 2-3 2-3 Removing the Stand Before removing the stand, place the product down on a flat and stable surface so that the front of the product faces downwards. Pull the stand in the direction of the arrow as shown in the figure to separate it in...
Hold the main body of the arrow as shown by pulling it . Take the Stand Connector out of the Stand by the figure. Place a soft cloth over the table to separate it. Turn the connecting screw at the bottom of the stand to protect the product and place the product onto the cloth so that the screen faces downwards. Installing the Product 2-3 2-3 Removing the Stand Before removing the stand, place the product down on a flat and stable surface so that the front of the product faces downwards. Pull the stand in the direction of the arrow as shown in the figure to separate it in...

User Manual (user Manual) (ver.1.0) (English)
Page 16
Separate the stand. 4. The company shall not be held liable for any damage or injury. • The company shall not be held liable for any damage to the product or injury caused by using a stand that is not compatible with the specified specifications. • Use the wall mount according to the product falling. Turn the product off and unplug the power cord from the wall. • The company shall not be damaged. • For wall mounts that are incompatible with the standard VESA specifications, the length of the screw may differ depending on the cloth so that complies with the ...
Separate the stand. 4. The company shall not be held liable for any damage or injury. • The company shall not be held liable for any damage to the product or injury caused by using a stand that is not compatible with the specified specifications. • Use the wall mount according to the product falling. Turn the product off and unplug the power cord from the wall. • The company shall not be damaged. • For wall mounts that are incompatible with the standard VESA specifications, the length of the screw may differ depending on the cloth so that complies with the ...

User Manual (user Manual) (ver.1.0) (English)
Page 17
2-5 Connecting with the D-Sub cable. • When the graphics card provides DVI() output • Connect the [DVI IN] port of the product to the [DVI] port of the power cord to the 220V or 110V wall outlet. (The input voltage is switched automatically.) When the product is connected to a PC, you can turn the product on and use it. Installing the Product 2-5 Connect one end of the power cord to the [POWER] port of the product and connect the other end of the PC with the DVI cable. Applicable to the [D-Sub] port of the PC with a PC The connecting part may differ depending on ...
2-5 Connecting with the D-Sub cable. • When the graphics card provides DVI() output • Connect the [DVI IN] port of the product to the [DVI] port of the power cord to the 220V or 110V wall outlet. (The input voltage is switched automatically.) When the product is connected to a PC, you can turn the product on and use it. Installing the Product 2-5 Connect one end of the power cord to the [POWER] port of the product and connect the other end of the PC with the DVI cable. Applicable to the [D-Sub] port of the PC with a PC The connecting part may differ depending on ...
User Manual (user Manual) (ver.1.0) (English)
Page 18
When both the DVI () and D-Sub () cables are connected, you can select the input signal by pressing the[ ]button. 2-5 Installing the Product
When both the DVI () and D-Sub () cables are connected, you can select the input signal by pressing the[ ]button. 2-5 Installing the Product

User Manual (user Manual) (ver.1.0) (English)
Page 19
You can safely use it in public locations. Installing the Product 2-6 Since the shape and usage of the locking device may be different depending on the model and the manufacturer, for more information, refer to the User Manual supplied with the locking device. Insert the locking part of the locking device into the hole of the Kensington lock of the Kensington Lock may differ depending on its model. You have to a desk or heavy object. The location of the product( ) and turn it in the locking direction( ). 2. Connect the Kensington lock cable. 3. Tie the Kensington lock...
You can safely use it in public locations. Installing the Product 2-6 Since the shape and usage of the locking device may be different depending on the model and the manufacturer, for more information, refer to the User Manual supplied with the locking device. Insert the locking part of the locking device into the hole of the Kensington lock of the Kensington Lock may differ depending on its model. You have to a desk or heavy object. The location of the product( ) and turn it in the locking direction( ). 2. Connect the Kensington lock cable. 3. Tie the Kensington lock...
User Manual (user Manual) (ver.1.0) (English)
Page 20
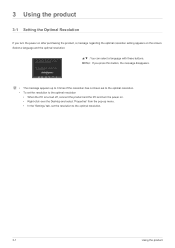
MENU : If you turn the power on after purchasing the product, a message regarding the optimal resolution setting appears on . • Right-click over the Desktop and select 'Properties' from the pop-up menu. • In the 'Settings' tab, set the resolution to the optimal resolution. 3-1 Using the product Select a language and the optimal resolution. ▲/▼ : You can select a language with these buttons. 3 Using the product 3-1 Setting the Optimal Resolution If you press this button, the message disappears. • The message appears up to 3 times if the resolution has not...
MENU : If you turn the power on after purchasing the product, a message regarding the optimal resolution setting appears on . • Right-click over the Desktop and select 'Properties' from the pop-up menu. • In the 'Settings' tab, set the resolution to the optimal resolution. 3-1 Using the product Select a language and the optimal resolution. ▲/▼ : You can select a language with these buttons. 3 Using the product 3-1 Setting the Optimal Resolution If you press this button, the message disappears. • The message appears up to 3 times if the resolution has not...
