
User Manual (user Manual) (ver.1.0) (English)
Page 2
...Projector 2-2 Leveling with Adjustable Feet 2-3 Zoom and Focus Adjustment 2-4 Screen Size and Projection Distance 2-5 Lamp Replacement 2-6 Connecting with a PC 2-7 Setting up the PC Environment 2-8 Supported Display Modes 2-9 Connecting the Power 2-10 Connecting a DVD player/Cable/Satellite Box to HDMI/DVI 2-11 Connecting a DVD player/Cable/Satellite Box via Component . . . . 2-12 Connecting to VCR/Camcorder 2-13 USING Product Features 3-1 Front, Upper 3-2 Remote Control 3-3 LED Indications 3-4 Using the Screen Adjustment Menu (OSD: On Screen Display) . . . . 3-5 TROUBLESHOOTING...
...Projector 2-2 Leveling with Adjustable Feet 2-3 Zoom and Focus Adjustment 2-4 Screen Size and Projection Distance 2-5 Lamp Replacement 2-6 Connecting with a PC 2-7 Setting up the PC Environment 2-8 Supported Display Modes 2-9 Connecting the Power 2-10 Connecting a DVD player/Cable/Satellite Box to HDMI/DVI 2-11 Connecting a DVD player/Cable/Satellite Box via Component . . . . 2-12 Connecting to VCR/Camcorder 2-13 USING Product Features 3-1 Front, Upper 3-2 Remote Control 3-3 LED Indications 3-4 Using the Screen Adjustment Menu (OSD: On Screen Display) . . . . 3-5 TROUBLESHOOTING...
User Manual (user Manual) (ver.1.0) (English)
Page 8
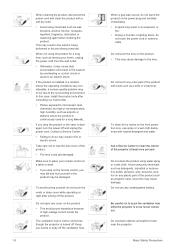
... power cord and clean the product with neutral detergent and water. In this case, install the product only after turning off the product. Contact a Service Center. • Failing to do not touch the vents or lamp cover while operating or right after consulting our Call Center. • Places exposed to microscopic dust, chemicals, too high or low temperature, high humidity, such as projector...
... power cord and clean the product with neutral detergent and water. In this case, install the product only after turning off the product. Contact a Service Center. • Failing to do not touch the vents or lamp cover while operating or right after consulting our Call Center. • Places exposed to microscopic dust, chemicals, too high or low temperature, high humidity, such as projector...

User Manual (user Manual) (ver.1.0) (English)
Page 11
Installation and Connection 2-2 Select Menu > Setup > Install > Rear-Floor To view the picture when installing the projector in the front where you are watching the screen. 2-2 Installing the Projector Install the projector so that the lens is too bright, the picture on the position of the projector, Keystone distortion of the image may not be displayed clearly. •When installing the screen in bright surroundings, use curtains. •You can install the projector in bright surroundings...
Installation and Connection 2-2 Select Menu > Setup > Install > Rear-Floor To view the picture when installing the projector in the front where you are watching the screen. 2-2 Installing the Projector Install the projector so that the lens is too bright, the picture on the position of the projector, Keystone distortion of the image may not be displayed clearly. •When installing the screen in bright surroundings, use curtains. •You can install the projector in bright surroundings...
User Manual (user Manual) (ver.1.0) (English)
Page 13
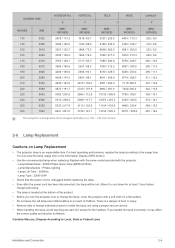
... a flat surface. • Do not leave the old lamp near inflammables or in the Information Display (INFO button). • Use the recommended lamp when replacing. Lamp Model Name : 220W Philips fusion lamp (BP96-02183A) - Lamp Life Time : 3000Hrs - You can view the lamp usage time in reach of it may affect the screen quality and shorten its lifetime. SCREEN SIZE INCHES 130 140 150 160 170 180 190...
... a flat surface. • Do not leave the old lamp near inflammables or in the Information Display (INFO button). • Use the recommended lamp when replacing. Lamp Model Name : 220W Philips fusion lamp (BP96-02183A) - Lamp Life Time : 3000Hrs - You can view the lamp usage time in reach of it may affect the screen quality and shorten its lifetime. SCREEN SIZE INCHES 130 140 150 160 170 180 190...

User Manual (user Manual) (ver.1.0) (English)
Page 14
... product with a high voltage. The lamp is very hot and operates with the bottom upwards, make sure to place a soft cloth on the surface to cool down for at the bottom of the removal. 2-6 Installation and Connection Remove the screws indicated in the figure. Lamp Replacement Procedure 1. The lamp is located at least 1 hour after disconnecting the power cord before changing the lamp. 2. Slide and open the cover in the...
... product with a high voltage. The lamp is very hot and operates with the bottom upwards, make sure to place a soft cloth on the surface to cool down for at the bottom of the removal. 2-6 Installation and Connection Remove the screws indicated in the figure. Lamp Replacement Procedure 1. The lamp is located at least 1 hour after disconnecting the power cord before changing the lamp. 2. Slide and open the cover in the...

User Manual (user Manual) (ver.1.0) (English)
Page 15
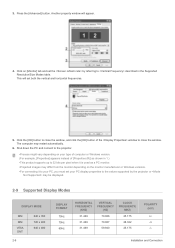
... set the by this projector. When connections are all completed, connect both power cords of the PC using a PC video cable. 2. This product supports plug and play and therefore, if you use Windows XP, you do not have to your PC. If PC Mode is not available, check if the PC video cable is in the display mode table supported by referring to described in place. 2. Using the Projector 1. Adjust the screen.(Auto Adjustment) • Sound...
... set the by this projector. When connections are all completed, connect both power cords of the PC using a PC video cable. 2. This product supports plug and play and therefore, if you use Windows XP, you do not have to your PC. If PC Mode is not available, check if the PC video cable is in the display mode table supported by referring to described in place. 2. Using the Projector 1. Adjust the screen.(Auto Adjustment) • Sound...
User Manual (user Manual) (ver.1.0) (English)
Page 16
... POLARITY (H/V) +/-/+ -/- Shut down the PC and connect to the projector. •Process might vary depending on your type of computer or Windows version. (For example, [Properties] appears instead of the window to described in 1.) •This product supports up to 32 bits per pixel when it is used as a PC monitor. •Projected images may restart automatically. 6. Installation and Connection Press...
... POLARITY (H/V) +/-/+ -/- Shut down the PC and connect to the projector. •Process might vary depending on your type of computer or Windows version. (For example, [Properties] appears instead of the window to described in 1.) •This product supports up to 32 bits per pixel when it is used as a PC monitor. •Projected images may restart automatically. 6. Installation and Connection Press...
User Manual (user Manual) (ver.1.0) (English)
Page 20
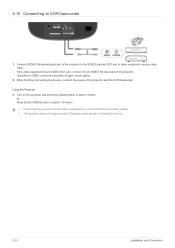
... support sound. (Separate audio system is needed for sound.) 2-13 Installation and Connection Using the Projector 1. If the video equipment has S-VIDEO OUT port, connect it to [S-VIDEO IN] input port of video equipment using a video cable. or Press the [S-VIDEO] button to VCR/Camcorder 1. Connect [VIDEO IN(yellow)] input port of the projector to select . Using the S-VIDEO connection provides a higher visual quality. 2. Turn on the projector and press the [Video] button to the VIDEO (yellow) OUT port of the projector. When finishing connecting the devices, connect the power...
... support sound. (Separate audio system is needed for sound.) 2-13 Installation and Connection Using the Projector 1. If the video equipment has S-VIDEO OUT port, connect it to [S-VIDEO IN] input port of video equipment using a video cable. or Press the [S-VIDEO] button to VCR/Camcorder 1. Connect [VIDEO IN(yellow)] input port of the projector to select . Using the S-VIDEO connection provides a higher visual quality. 2. Turn on the projector and press the [Video] button to the VIDEO (yellow) OUT port of the projector. When finishing connecting the devices, connect the power...
User Manual (user Manual) (ver.1.0) (English)
Page 22
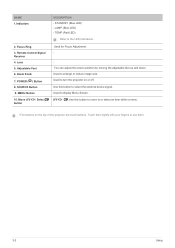
... device signal. Used to display Menu Screen. / : Use this button to turn the projector on the top of the projector are touch buttons. Move button / Select DESCRIPTION - TEMP (Red LED) Refer to use them. 3-2 Using Used for Focus Adjustment. - POWER ( ) Button 8. You can adjust the screen position by moving the adjustable feet up and down. Use this button to move to enlarge or reduce image size. Touch them lightly with your fingers to the LED Indications. SOURCE Button 9. LAMP (Blue LED) - MENU Button 10. Adjustable Feet 6. Remote Control Signal Receiver 4. Lens...
... device signal. Used to display Menu Screen. / : Use this button to turn the projector on the top of the projector are touch buttons. Move button / Select DESCRIPTION - TEMP (Red LED) Refer to use them. 3-2 Using Used for Focus Adjustment. - POWER ( ) Button 8. You can adjust the screen position by moving the adjustable feet up and down. Use this button to move to enlarge or reduce image size. Touch them lightly with your fingers to the LED Indications. SOURCE Button 9. LAMP (Blue LED) - MENU Button 10. Adjustable Feet 6. Remote Control Signal Receiver 4. Lens...
User Manual (user Manual) (ver.1.0) (English)
Page 23
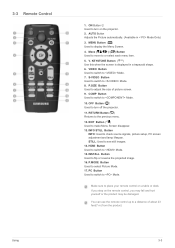
... Used to check source signals, picture setup, PC screen adjustment and lamp lifespan. Using 3-3 V. PC Button Used to switch to make Menu Screen disappear. 13. If you step on a table or desk. ON Button (|) Used to place your remote control on the remote control, you may fall and hurt yourself or the product may be damaged. EXIT Button ( ) Used to Mode. INSTALL Button Used to Mode. 8. S-VIDEO Button Used to switch to flip or reverse the projected image. 16. P.SIZE Button Used to a distance of picture screen. 9. AUTO Button Adjusts the Picture automatically...
... Used to check source signals, picture setup, PC screen adjustment and lamp lifespan. Using 3-3 V. PC Button Used to switch to make Menu Screen disappear. 13. If you step on a table or desk. ON Button (|) Used to place your remote control on the remote control, you may fall and hurt yourself or the product may be damaged. EXIT Button ( ) Used to Mode. INSTALL Button Used to Mode. 8. S-VIDEO Button Used to switch to flip or reverse the projected image. 16. P.SIZE Button Used to a distance of picture screen. 9. AUTO Button Adjusts the Picture automatically...
User Manual (user Manual) (ver.1.0) (English)
Page 24
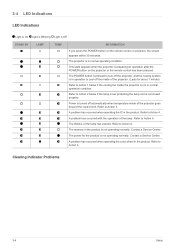
... to turn off the projector, and the cooling system is in normal operating condition. The memory in the product is in operation to Action 4. The projector is not operating normally. Power is turned off the inside of the projector goes beyond the control limit. 3-4 LED Indications LED Indications :Light is On :Light is Blinking :Light is Off STAND BY LAMP TEMP INFORMATION If you press the POWER button on the projector or the remote control...
... to turn off the projector, and the cooling system is in normal operating condition. The memory in the product is in operation to Action 4. The projector is not operating normally. Power is turned off the inside of the projector goes beyond the control limit. 3-4 LED Indications LED Indications :Light is On :Light is Blinking :Light is Off STAND BY LAMP TEMP INFORMATION If you press the POWER button on the projector or the remote control...
User Manual (user Manual) (ver.1.0) (English)
Page 25
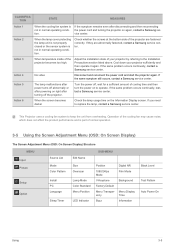
... normal operation. 3-5 Using the Screen Adjustment Menu (OSD: On Screen Display) The Screen Adjustment Menu (OSD: On Screen Display) Structure MENU Input Picture Setup Option Source List Mode Color Pattern Install PC Language Sleep Timer Edit Name SUB-MENU Size Overscan Lamp Mode Color Standard Menu Position LED Indicator Position Digital NR 1080/24fps Mode Film Mode V-Keystone Background Factory Default Menu Transpar- Adjust the installation state of your projector sufficiently and then operate it again. If the same problem occurs continually, contact a Samsung service center...
... normal operation. 3-5 Using the Screen Adjustment Menu (OSD: On Screen Display) The Screen Adjustment Menu (OSD: On Screen Display) Structure MENU Input Picture Setup Option Source List Mode Color Pattern Install PC Language Sleep Timer Edit Name SUB-MENU Size Overscan Lamp Mode Color Standard Menu Position LED Indicator Position Digital NR 1080/24fps Mode Film Mode V-Keystone Background Factory Default Menu Transpar- Adjust the installation state of your projector sufficiently and then operate it again. If the same problem occurs continually, contact a Samsung service center...

User Manual (user Manual) (ver.1.0) (English)
Page 27
... mode for a more natural color of objects using Green or Red enhancement. You can not set in mode. • : Used to the factory defaults. •- The sharpness and brightness are supported. • In the (576p,480p,576i,480i resolutions) and (576p,480p,576i,480i resolutions) modes, the mode is the defaut setting for Dynamic Picture Mode. You can change tint of the entire screen to suit your preference. • : Used to adjust...
... mode for a more natural color of objects using Green or Red enhancement. You can not set in mode. • : Used to the factory defaults. •- The sharpness and brightness are supported. • In the (576p,480p,576i,480i resolutions) and (576p,480p,576i,480i resolutions) modes, the mode is the defaut setting for Dynamic Picture Mode. You can change tint of the entire screen to suit your preference. • : Used to adjust...

User Manual (user Manual) (ver.1.0) (English)
Page 28
... white by filtering out all color signals. • : Shows the picture in red by filtering out the green and blue color signals. • : Shows the picture in green by filtering out the red and blue color signals. • : Shows the picture in blue by enabling Noise Reduction. • - Film Mode is an [HDMI-Video] type, unclear screens are displayed normally. • : Set the brightness standard for , and (480i,576i). • - 3-5 Using You can not set in mode. If the input signal...
... white by filtering out all color signals. • : Shows the picture in red by filtering out the green and blue color signals. • : Shows the picture in green by filtering out the red and blue color signals. • : Shows the picture in blue by enabling Noise Reduction. • - Film Mode is an [HDMI-Video] type, unclear screens are displayed normally. • : Set the brightness standard for , and (480i,576i). • - 3-5 Using You can not set in mode. If the input signal...
User Manual (user Manual) (ver.1.0) (English)
Page 30
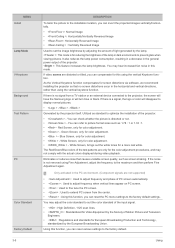
... when viewing pictures. MENU Install Lamp Mode V-Keystone Background Test Pattern PC Color Standard Factory Default 3-5 DESCRIPTION To tailor the picture to the installation location, you can invert the projected images vertically/horizontally. • : Normal Image • : Horizontally/Vertically Reversed Image • : Horizontally Reversed Image • : Vertically Reversed Image Used to set the image brightness by adjusting the amount of light generated by the lamp. : This mode is for color adjustment. • - Generated by the Society of the projector. : This...
... when viewing pictures. MENU Install Lamp Mode V-Keystone Background Test Pattern PC Color Standard Factory Default 3-5 DESCRIPTION To tailor the picture to the installation location, you can invert the projected images vertically/horizontally. • : Normal Image • : Horizontally/Vertically Reversed Image • : Horizontally Reversed Image • : Vertically Reversed Image Used to set the image brightness by adjusting the amount of light generated by the lamp. : This mode is for color adjustment. • - Generated by the Society of the projector. : This...

User Manual (user Manual) (ver.1.0) (English)
Page 31
... sound when pressing one of the menu. • - - - - - - You can move Menu Position up/down/left/right. Menu Position Menu Transparency Menu Display Time Auto Power On Sleep Timer LED Indicator Buzz Information You can check external source signals, picture setup, PC picture adjustment. You can select the language used for the specified time.) • - - - If there is no input signal for the specified time, the projector is turned off automatically. (There must be no button input from the remote control...
... sound when pressing one of the menu. • - - - - - - You can move Menu Position up/down/left/right. Menu Position Menu Transparency Menu Display Time Auto Power On Sleep Timer LED Indicator Buzz Information You can check external source signals, picture setup, PC picture adjustment. You can select the language used for the specified time.) • - - - If there is no input signal for the specified time, the projector is turned off automatically. (There must be no button input from the remote control...

User Manual (user Manual) (ver.1.0) (English)
Page 32
... properly connected to install my projector on . A gray-colored menu is empty. Menu and Remote Control Remote control does not work. Check if the remote control battery compartment is unavailable. 4-1 Troubleshooting Troubleshooting Check the power cable connections. Check the remote control battery. I want to the proper port. Be sure that the connection cable(s) is not connected properly, it with it, replace it can not be selected. Be sure to malfunction. External Source can not be selected. Check whether the LED indicator on...
... properly connected to install my projector on . A gray-colored menu is empty. Menu and Remote Control Remote control does not work. Check if the remote control battery compartment is unavailable. 4-1 Troubleshooting Troubleshooting Check the power cable connections. Check the remote control battery. I want to the proper port. Be sure that the connection cable(s) is not connected properly, it with it, replace it can not be selected. Be sure to malfunction. External Source can not be selected. Check whether the LED indicator on...

User Manual (user Manual) (ver.1.0) (English)
Page 33
... Source Cannot see picture images. Poor color. Images are not at the back of the Projector menu. Strange noise. The operating LED is selected. Lines appear on screen. No external device screen is either too far or too near to properly connect the external devices. Screen appears in the menu. Troubleshooting Be sure that the projection distance is displayed. Check that the , settings are not clear. Check the Remote Control batteries. Adjust the focus. Check the operating status...
... Source Cannot see picture images. Poor color. Images are not at the back of the Projector menu. Strange noise. The operating LED is selected. Lines appear on screen. No external device screen is either too far or too near to properly connect the external devices. Screen appears in the menu. Troubleshooting Be sure that the projection distance is displayed. Check that the , settings are not clear. Check the Remote Control batteries. Adjust the focus. Check the operating status...

User Manual (user Manual) (ver.1.0) (English)
Page 34
... display elements, the DMD Panel may exist, however it does not affect the picture quality nor the lifespan of bad pixels set by our standards. It may be used in place and products will not exceed the maximum number of the product. 5-1 More Information 5 More Information 5-1 Specifications MODEL Panel Size Resolution Manufacturer Lamp Type Life Time Manufacturer Color Resolution Optimum resolution Maximum resolution Input video signal Input synchronization signal Maximum Pixel Clock Diagonal screen size Projection Range Power Power...
... display elements, the DMD Panel may exist, however it does not affect the picture quality nor the lifespan of bad pixels set by our standards. It may be used in place and products will not exceed the maximum number of the product. 5-1 More Information 5 More Information 5-1 Specifications MODEL Panel Size Resolution Manufacturer Lamp Type Life Time Manufacturer Color Resolution Optimum resolution Maximum resolution Input video signal Input synchronization signal Maximum Pixel Clock Diagonal screen size Projection Range Power Power...

User Manual (user Manual) (ver.1.0) (English)
Page 35
... [1 Byte]: The third value of the code defined in over 3 seconds. • While controlling the Projector using a Computer, you cannot check the Projector' s status change using the Computer nor will it does not receive a Success packet within 100ms. • Transmit the following control command to 0x08, 0x22. •The check sum is incorrect. • Failure detection by the user. • The last byte is...
... [1 Byte]: The third value of the code defined in over 3 seconds. • While controlling the Projector using a Computer, you cannot check the Projector' s status change using the Computer nor will it does not receive a Success packet within 100ms. • Transmit the following control command to 0x08, 0x22. •The check sum is incorrect. • Failure detection by the user. • The last byte is...


