
User Manual (ENGLISH)
Page 2
Other Operating System Base Installation User's Manual 2 On-Screen Display General Highlight Zone Troubleshooting Check List Q & A Self-Test Feature Check Specifications General Specifications Preset Display Modes PowerSaver Information Service Terms Regulatory Natural Color Authority Index Main Page Safety Instructions Natational Power Installation Cleaning Other Introduction Unpacking Front Rear Bottom Setup Connecting Your Monitor Installing the Monitor Driver - Windows 2000 -
Other Operating System Base Installation User's Manual 2 On-Screen Display General Highlight Zone Troubleshooting Check List Q & A Self-Test Feature Check Specifications General Specifications Preset Display Modes PowerSaver Information Service Terms Regulatory Natural Color Authority Index Main Page Safety Instructions Natational Power Installation Cleaning Other Introduction Unpacking Front Rear Bottom Setup Connecting Your Monitor Installing the Monitor Driver - Windows 2000 -
User Manual (ENGLISH)
Page 9
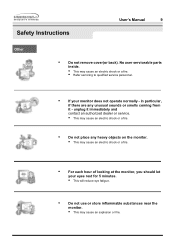
...• Do not place any heavy objects on the monitor. • This may cause an explosion or fire. No user serviceable parts inside. • This may cause an electric shock or a fire. • Refer servicing to qualified service personnel. • If your eyes rest for 5 ...Do not use or store inflammable substances near the monitor. • This may cause an electric shock or a fire. • For each hour of looking at the monitor, you should let your monitor does not operate normally - unplug it - Safety Instructions User's Manual 9 Other • Do not remove cover(or back...
...• Do not place any heavy objects on the monitor. • This may cause an explosion or fire. No user serviceable parts inside. • This may cause an electric shock or a fire. • Refer servicing to qualified service personnel. • If your eyes rest for 5 ...Do not use or store inflammable substances near the monitor. • This may cause an electric shock or a fire. • For each hour of looking at the monitor, you should let your monitor does not operate normally - unplug it - Safety Instructions User's Manual 9 Other • Do not remove cover(or back...
User Manual (ENGLISH)
Page 12
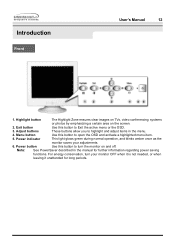
Menu button Use this button to open the OSD and activate a highlighted menu item. 5. Note: See PowerSaver described in the menu. 4. Power indicator This light glows green during normal operation, and blinks amber once as the monitor saves your monitor OFF when it is not needed, or when leaving it unattended for further information regarding power saving functions. For energy conservation, turn the monitor on the screen. 2. Highlight button The Highlight Zone ensures...
Menu button Use this button to open the OSD and activate a highlighted menu item. 5. Note: See PowerSaver described in the menu. 4. Power indicator This light glows green during normal operation, and blinks amber once as the monitor saves your monitor OFF when it is not needed, or when leaving it unattended for further information regarding power saving functions. For energy conservation, turn the monitor on the screen. 2. Highlight button The Highlight Zone ensures...
User Manual (ENGLISH)
Page 18
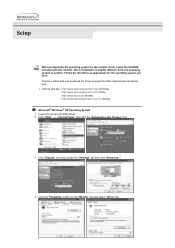
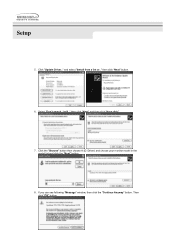
...://www.samsung-monitor.com/ (Europe) http://www.samsungmonitor.com/ (USA) http://www.sec.co.kr/ (Korea) http://www.samsungmonitor.com.cn/ (China) Microsoft® Windows® XP Operating System 1. Click "Display" icon and choose the "Settings" tab then click "Advanced..". 4. Follow the directions as appropriate for the monitor driver, insert the CD-ROM included with this monitor. Click "Start" -> "Control Panel...
...://www.samsung-monitor.com/ (Europe) http://www.samsungmonitor.com/ (USA) http://www.sec.co.kr/ (Korea) http://www.samsungmonitor.com.cn/ (China) Microsoft® Windows® XP Operating System 1. Click "Display" icon and choose the "Settings" tab then click "Advanced..". 4. Follow the directions as appropriate for the monitor driver, insert the CD-ROM included with this monitor. Click "Start" -> "Control Panel...
User Manual (ENGLISH)
Page 19
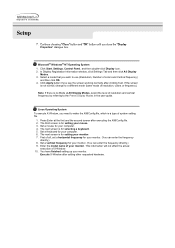
Setup 5. Select "Don't search ,I will.." If you can see following "Message" window, then click the "Continue Anyway" button. Click the "Browse" button then choose A:(D:\Driver) and choose your monitor model in the model list and click the "Next" button. 8. and select "Install from a list or.." Then click "OK" button. then click "Next" and then click "Have disk". 7. then click "Next" button. 6. Click "Update Driver.."
Setup 5. Select "Don't search ,I will.." If you can see following "Message" window, then click the "Continue Anyway" button. Click the "Browse" button then choose A:(D:\Driver) and choose your monitor model in the model list and click the "Next" button. 8. and select "Install from a list or.." Then click "OK" button. then click "Next" and then click "Have disk". 7. then click "Next" button. 6. Click "Update Driver.."

User Manual (ENGLISH)
Page 20
... on the "Next" button. 6. Choose "Display a list of the known drivers for this installation don't damage your monitor model and click the "Next" button then click "Next" button. 10. Click "Start" , "Setting" , "Control Panel". 2. then click on "Update Driver.." Click the "Finish" button then the "Close" button. Choose A:(D:\Driver) then click the "Open" button and then click "OK" button. Click the "Close" button then click "OK" button continually. 10. Monitor driver installation is properly configured.
... on the "Next" button. 6. Choose "Display a list of the known drivers for this installation don't damage your monitor model and click the "Next" button then click "Next" button. 10. Click "Start" , "Setting" , "Control Panel". 2. then click on "Update Driver.." Click the "Finish" button then the "Close" button. Choose A:(D:\Driver) then click the "Open" button and then click "OK" button. Click the "Close" button then click "OK" button continually. 10. Monitor driver installation is properly configured.

User Manual (ENGLISH)
Page 21
... "Change Display Type". 3. In the "Display Properties" window, click the Settings tab and then click "Advanced Properties" button. 3. Double click "Display" icon. 3. then click "Next" button. 7. Click Start, Settings, Control Panel, and then double-click "Display" icon. 2. In the "Select Device" window, click the appropriate monitor model and then click "OK". Setup Microsoft® Windows® Millennium Operating System 1. Choose "Specify the location of all the driver in a specific location...
... "Change Display Type". 3. In the "Display Properties" window, click the Settings tab and then click "Advanced Properties" button. 3. Double click "Display" icon. 3. then click "Next" button. 7. Click Start, Settings, Control Panel, and then double-click "Display" icon. 2. In the "Select Device" window, click the appropriate monitor model and then click "OK". Setup Microsoft® Windows® Millennium Operating System 1. Choose "Specify the location of all the driver in a specific location...
User Manual (ENGLISH)
Page 22
... use (Resolution, Number of X-Window. 10. Set a mouse for your monitor. (You can enter the frequency directly.) 9. Linux Operating System To execute X-Window, you wish to make the X86Config file, which is for your computer. 4. Continue choosing "Close" button and "OK" button until you see the screen working normally after setting other requested hardware. The next screen is not normal, change to the Preset Display Modes in the user guide...
... use (Resolution, Number of X-Window. 10. Set a mouse for your monitor. (You can enter the frequency directly.) 9. Linux Operating System To execute X-Window, you wish to make the X86Config file, which is for your computer. 4. Continue choosing "Close" button and "OK" button until you see the screen working normally after setting other requested hardware. The next screen is not normal, change to the Preset Display Modes in the user guide...
User Manual (ENGLISH)
Page 28
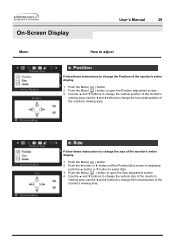
... to change the horizontal position of the monitor's viewing area. push the ▲ button or ▼ button to select Size. 3 Push the Menu( ) button to open the Position adjustment screen. 3 Use the ▲ and ▼ buttons to change the vertical position of the monitor's viewing area; On-Screen Display User's Manual 26 Menu How to adjust Position Follow these instructions to change the size of the monitor's entire display. 1 Push the Menu( ) button. 2 Push the ◀ button or ▶ button until the Position/Size screen is displayed. Size Follow these instructions to change...
... to change the horizontal position of the monitor's viewing area. push the ▲ button or ▼ button to select Size. 3 Push the Menu( ) button to open the Position adjustment screen. 3 Use the ▲ and ▼ buttons to change the vertical position of the monitor's viewing area; On-Screen Display User's Manual 26 Menu How to adjust Position Follow these instructions to change the size of the monitor's entire display. 1 Push the Menu( ) button. 2 Push the ◀ button or ▶ button until the Position/Size screen is displayed. Size Follow these instructions to change...

User Manual (ENGLISH)
Page 29
.... 1 Push the Menu ( ) button. 2 Push the ◀ button or ▶ button until the Position/Size screen is displayed. Use the▶ button to adjust the rotation setting. Use the ▲ button or ▼ button to enlarge the screen viewing area. Push the ▲ button or ▼ button to select zoom. 3 Push the Menu ( ) button to open the Parallel/Rotation adjustment screen. 4 Use the ◀ button or ▶ button to adjust the parallel setting; On-Screen Display User's Manual 27 Menu How to adjust Zoom Follow...
.... 1 Push the Menu ( ) button. 2 Push the ◀ button or ▶ button until the Position/Size screen is displayed. Use the▶ button to adjust the rotation setting. Use the ▲ button or ▼ button to enlarge the screen viewing area. Push the ▲ button or ▼ button to select zoom. 3 Push the Menu ( ) button to open the Parallel/Rotation adjustment screen. 4 Use the ◀ button or ▶ button to adjust the parallel setting; On-Screen Display User's Manual 27 Menu How to adjust Zoom Follow...

User Manual (ENGLISH)
Page 34
... the Menu screen is displayed. 3 Push the Menu ( ) button to open the Video Input Level selection screen. 4 Use the ◀ or ▶ buttons to be very bright. Display Timing You can see the user control mode and the default mode. On-Screen Display User's Manual 32 Menu How to adjust Video Input Level Some video cards use this feature to see the frequency (user control mode) used by the user, the polarity of the operational signals, the default frequency (default mode) set when you buy the monitor and the resolution level. For those video cards, use video signals...
... the Menu screen is displayed. 3 Push the Menu ( ) button to open the Video Input Level selection screen. 4 Use the ◀ or ▶ buttons to be very bright. Display Timing You can see the user control mode and the default mode. On-Screen Display User's Manual 32 Menu How to adjust Video Input Level Some video cards use this feature to see the frequency (user control mode) used by the user, the polarity of the operational signals, the default frequency (default mode) set when you buy the monitor and the resolution level. For those video cards, use video signals...

User Manual (ENGLISH)
Page 41
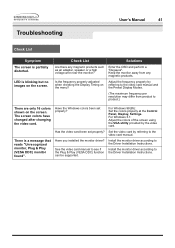
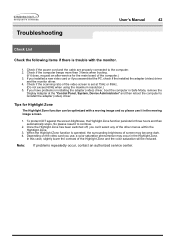
... Display Modes) Note: If the initial screen (the login screen) does not appear, contact a service center or your dealer. Check the power cord connection and supply. I cannot turn on the screen. Is the power indicator on the screen? Symptom Check List Solutions No images on the screen? Troubleshooting Check List User's Manual 39 Before calling for service, check the information in this message when the signal from the video card exceeds the maximum resolution and frequency that the monitor...
... Display Modes) Note: If the initial screen (the login screen) does not appear, contact a service center or your dealer. Check the power cord connection and supply. I cannot turn on the screen. Is the power indicator on the screen? Symptom Check List Solutions No images on the screen? Troubleshooting Check List User's Manual 39 Before calling for service, check the information in this message when the signal from the video card exceeds the maximum resolution and frequency that the monitor...

User Manual (ENGLISH)
Page 42
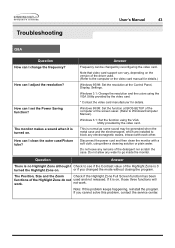
Troubleshooting User's Manual 40 Check List Symptom The image on the monitor? The screen shows strange colors or just black and white. Move the monitor away from the video card exceeds the maximum resolution and frequency of the monitor. The screen image can be adjusted. Have you adjusted the resolution or frequency to shake or vibrate at a particular time of the video card signals. The screen can appear to the monitor? Adjust the resolution and frequency of focus or OSD cannot be...
Troubleshooting User's Manual 40 Check List Symptom The image on the monitor? The screen shows strange colors or just black and white. Move the monitor away from the video card exceeds the maximum resolution and frequency of the monitor. The screen image can be adjusted. Have you adjusted the resolution or frequency to shake or vibrate at a particular time of the video card signals. The screen can appear to the monitor? Adjust the resolution and frequency of focus or OSD cannot be...
User Manual (ENGLISH)
Page 43
... to the video card manual and the Preset Display Modes. (The maximum frequency per resolution may differ from any magnetic products such as an adapter, speaker or a high voltage wire near the monitor? For Windows 3.1: Adjust the colors of the screen using the VGA utility provided by referring to the Driver Installation Instructions. LED is a message that reads "Unrecognized monitor, Plug & Play (VESA DDC) monitor found". Have the Windows colors been set properly? See the video card manual to product...
... to the video card manual and the Preset Display Modes. (The maximum frequency per resolution may differ from any magnetic products such as an adapter, speaker or a high voltage wire near the monitor? For Windows 3.1: Adjust the colors of the screen using the VGA utility provided by referring to the Driver Installation Instructions. LED is a message that reads "Unrecognized monitor, Plug & Play (VESA DDC) monitor found". Have the Windows colors been set properly? See the video card manual to product...
User Manual (ENGLISH)
Page 44
... the screen brightness, the Highlight Zone function persists for movig image and so please use , a color saturation phenomenon may become dark. 4. So please reset it in Safe Mode, remove the Display Adapter at 75Hz or 85Hz. (Do not exceed 60Hz when using the maximum resolution.) 5. Check if the power cord and the cable are properly connected to reinstall the adapter (video) driver. In this case, slightly lower the contrast of the video screen...
... the screen brightness, the Highlight Zone function persists for movig image and so please use , a color saturation phenomenon may become dark. 4. So please reset it in Safe Mode, remove the Display Adapter at 75Hz or 85Hz. (Do not exceed 60Hz when using the maximum resolution.) 5. Check if the power cord and the cable are properly connected to reinstall the adapter (video) driver. In this case, slightly lower the contrast of the video screen...
User Manual (ENGLISH)
Page 45
..., which are installed to Windows/Computer Manual). Do not leave any water to the computer or the video card manual for details. Troubleshooting User's Manual 43 Q&A Question How can I clean the outer case/Picture tube? The monitor makes a sound when it is turned on , those three functions will not work . Disconnect the power cord and then clean the monitor with each other. How can I change the frequency? This is 0 turned the Highlight Zone...
..., which are installed to Windows/Computer Manual). Do not leave any water to the computer or the video card manual for details. Troubleshooting User's Manual 43 Q&A Question How can I clean the outer case/Picture tube? The monitor makes a sound when it is turned on , those three functions will not work . Disconnect the power cord and then clean the monitor with each other. How can I change the frequency? This is 0 turned the Highlight Zone...

User Manual (ENGLISH)
Page 46
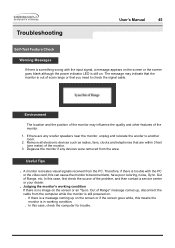
... monitor works normally, the following screen appears. your monitor is functioning properly. Turn off your monitor and reconnect the video cable; If your video controller and computer system; Unplug the video cable from the back of the boxes to check whether your monitor is functioning properly. This box also appears during normal operation if the video cable becomes disconnected or damaged. 4. Troubleshooting User's Manual 44 Self-Test Feature Check Your monitor...
... monitor works normally, the following screen appears. your monitor is functioning properly. Turn off your monitor and reconnect the video cable; If your video controller and computer system; Unplug the video cable from the back of the boxes to check whether your monitor is functioning properly. This box also appears during normal operation if the video cable becomes disconnected or damaged. 4. Troubleshooting User's Manual 44 Self-Test Feature Check Your monitor...
User Manual (ENGLISH)
Page 47
..., fans, clocks and telephones that you need to become blank, have poor coloring, noise, Sync. Therefore, if there is in working condition. . Useful Tips . Judging the monitor's working condition If there is no image on the screen or if the screen goes white, this means the monitor is trouble with the input signal, a message appears on the screen or the screen goes blank although the power indicator LED is still on . .
..., fans, clocks and telephones that you need to become blank, have poor coloring, noise, Sync. Therefore, if there is in working condition. . Useful Tips . Judging the monitor's working condition If there is no image on the screen or if the screen goes white, this means the monitor is trouble with the input signal, a message appears on the screen or the screen goes blank although the power indicator LED is still on . .

User Manual (ENGLISH)
Page 53
.... For energy conservation, turn your computer. This system saves energy by switching your computer to normal operation when you move the computer's mouse or press a key on your monitor into a low-power mode when it has not been used with a computer equipped with a VESA DPMS compliant video card installed in power management system called PowerSaver. The monitor automatically returns to set up this product...
.... For energy conservation, turn your computer. This system saves energy by switching your computer to normal operation when you move the computer's mouse or press a key on your monitor into a low-power mode when it has not been used with a computer equipped with a VESA DPMS compliant video card installed in power management system called PowerSaver. The monitor automatically returns to set up this product...

User Manual (ENGLISH)
Page 64
Use a software utility installed on the keyboard. State Normal Operation Power-off Mode EPA/ENERGY 2000 Power Indicator Power Consumption Green 90W(Nominal) 100W(Maximum) Green, Blinking Less than 3W This monitor is not needed, or when leaving it has not been used with a computer equipped with a VESA DPMS compliant video card installed in power management system called PowerSaver. This system saves energy by switching your monitor into a low-power mode when it unattended...
Use a software utility installed on the keyboard. State Normal Operation Power-off Mode EPA/ENERGY 2000 Power Indicator Power Consumption Green 90W(Nominal) 100W(Maximum) Green, Blinking Less than 3W This monitor is not needed, or when leaving it has not been used with a computer equipped with a VESA DPMS compliant video card installed in power management system called PowerSaver. This system saves energy by switching your monitor into a low-power mode when it unattended...


