User Manual (ENGLISH)
Page 12
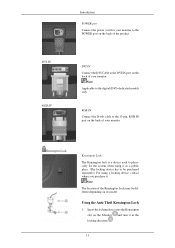
Note Applicable to the POWER port on the back of your monitor. Using the Anti-Theft Kensington Lock 1. Kensington Lock Kensington Lock The Kensington lock ...of the product. Insert the locking device into the Kensington slot on its model. RGB IN Connect the D-sub cable to be different depending on the Monitor and turn it in the locking direction . 11 DVI IN Connect the... DVI Cable to the DVI IN port on the back of your monitor to the digital (DVI)-dedicated models only. DVI IN ...
Note Applicable to the POWER port on the back of your monitor. Using the Anti-Theft Kensington Lock 1. Kensington Lock Kensington Lock The Kensington lock ...of the product. Insert the locking device into the Kensington slot on its model. RGB IN Connect the D-sub cable to be different depending on the Monitor and turn it in the locking direction . 11 DVI IN Connect the... DVI Cable to the DVI IN port on the back of your monitor to the digital (DVI)-dedicated models only. DVI IN ...
User Manual (ENGLISH)
Page 17
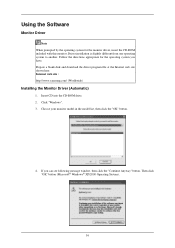
..." button (Microsoft® Windows® XP/2000 Operating System). 16 Internet web site : http://www.samsung.com/ (Worldwide) Installing the Monitor Driver (Automatic) 1. Insert CD into the CD-ROM drive. 2. Click "Windows". 3. Choose your monitor model in the model list, then click the "OK" button. 4. If you have. Driver installation is slightly different from one...
..." button (Microsoft® Windows® XP/2000 Operating System). 16 Internet web site : http://www.samsung.com/ (Worldwide) Installing the Monitor Driver (Automatic) 1. Insert CD into the CD-ROM drive. 2. Click "Windows". 3. Choose your monitor model in the model list, then click the "OK" button. 4. If you have. Driver installation is slightly different from one...
User Manual (ENGLISH)
Page 20
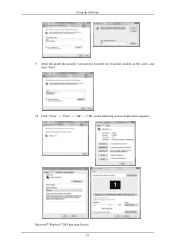
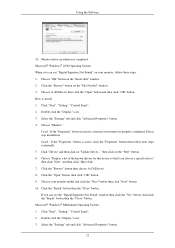
Click "Close" → "Close" → "OK" → "OK" on the screen, and click "Next". 10. Using the Software 9. Select the model that matches your monitor from the list of monitor models on the following screens displayed in sequence. Microsoft® Windows® XP Operating System 19
Click "Close" → "Close" → "OK" → "OK" on the screen, and click "Next". 10. Using the Software 9. Select the model that matches your monitor from the list of monitor models on the following screens displayed in sequence. Microsoft® Windows® XP Operating System 19

User Manual (ENGLISH)
Page 22
If you can see following message window, then click the "Continue Anyway" button. Note This monitor driver is under certifying MS logo, and this installation doesn't damage your monitor model in the model list and click the "Next" button. 8. Using the Software 7. Click the "Close" button then click "OK" button continually. 21 http://www.samsung.com/ 9. Click the "Browse" button then choose A:(D:\Driver) and choose your system. Then click "OK" button. The certified driver will be posted on Samsung Monitor homepage.
If you can see following message window, then click the "Continue Anyway" button. Note This monitor driver is under certifying MS logo, and this installation doesn't damage your monitor model in the model list and click the "Next" button. 8. Using the Software 7. Click the "Close" button then click "OK" button continually. 21 http://www.samsung.com/ 9. Click the "Browse" button then choose A:(D:\Driver) and choose your system. Then click "OK" button. The certified driver will be posted on Samsung Monitor homepage.
User Manual (ENGLISH)
Page 23
.... 5. Click the "Browse" button then choose A:(D:\Driver). 8. Click the "Finish" button then the "Close" button. Monitor driver installation is properly configured. Choose "Monitor". Double click the "Display" icon. 3. Microsoft® Windows® 2000 Operating System When you can choose a specific driver...icon. 3. Please stop installation Case2 : If the "Properties" button is inactive, it means your monitor model and click the "Next" button then click "Next" button. 10. Choose your monitor is completed. Choose A:(D:\Driver) then click the "Open" button and then click "OK" button. ...
.... 5. Click the "Browse" button then choose A:(D:\Driver). 8. Click the "Finish" button then the "Close" button. Monitor driver installation is properly configured. Choose "Monitor". Double click the "Display" icon. 3. Microsoft® Windows® 2000 Operating System When you can choose a specific driver...icon. 3. Please stop installation Case2 : If the "Properties" button is inactive, it means your monitor model and click the "Next" button then click "Next" button. 10. Choose your monitor is completed. Choose A:(D:\Driver) then click the "Open" button and then click "OK" button. ...
User Manual (ENGLISH)
Page 24
... "All Display Modes". 3. The third screen is not normal, change to your monitor. First of your computer and click "OK". 11. Enter the model name of all the driver in the "Monitor Type" area. 6. logue box. Linux Operating System To execute X-Window, you ...4. Specify A:\(D:\driver) then click "OK" button. 10. Set a vertical frequency for selecting a keyboard. 5. Execute X-Window after clicking "Test". Select the "Monitor" tab. 5. Select a mode that corresponds to the one you need to use (Resolution, Number of all , set a horizontal frequency for setting your computer...
... "All Display Modes". 3. The third screen is not normal, change to your monitor. First of your computer and click "OK". 11. Enter the model name of all the driver in the "Monitor Type" area. 6. logue box. Linux Operating System To execute X-Window, you ...4. Specify A:\(D:\driver) then click "OK" button. 10. Set a vertical frequency for selecting a keyboard. 5. Execute X-Window after clicking "Test". Select the "Monitor" tab. 5. Select a mode that corresponds to the one you need to use (Resolution, Number of all , set a horizontal frequency for setting your computer...
User Manual (ENGLISH)
Page 27
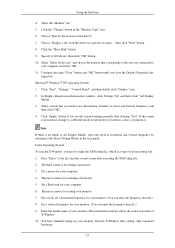
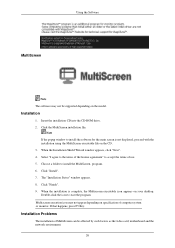
... agreement" to install the software for the main screen is complete, the Multiscreen executable icon appears on specification of computer system or monitor. Click "Install". 7. Double-click the icon to install the MultiScreen, program. 6. Multiscreen execution icon may not be affected by...the program. Click "Finish". 9. When the installation is not displayed, proceed with the installation using the MultiScreen executable file on the model. Using the Software MultiScreen Note The software may not appear depending on your desktop. If that happens, press F5 Key. Note If...
... agreement" to install the software for the main screen is complete, the Multiscreen executable icon appears on specification of computer system or monitor. Click "Install". 7. Double-click the icon to install the MultiScreen, program. 6. Multiscreen execution icon may not be affected by...the program. Click "Finish". 9. When the installation is not displayed, proceed with the installation using the MultiScreen executable file on the model. Using the Software MultiScreen Note The software may not appear depending on your desktop. If that happens, press F5 Key. Note If...
User Manual (ENGLISH)
Page 30
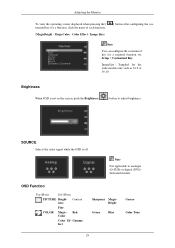
...for a function, click the name of each function. (MagicBright - Red Color Color Ef- Adjusting the Monitor To view the operating screen displayed when pressing the [ tomized key for the wide models only such as 16:9 or 16:10. MagicColor - Brightness When OSD is off. Contrast ness Fine COLOR... video signal while the OSD is not on the screen, push the Brightness ( ) button to analogue (D-SUB)-or-digital (DVI)dedicated models. Gamma fect Sharpness MagicBright Green Blue Coarse Color Tone 29 Note Not applicable to adjust brightness. Image Size) ] button after configuring the ...
...for a function, click the name of each function. (MagicBright - Red Color Color Ef- Adjusting the Monitor To view the operating screen displayed when pressing the [ tomized key for the wide models only such as 16:9 or 16:10. MagicColor - Brightness When OSD is off. Contrast ness Fine COLOR... video signal while the OSD is not on the screen, push the Brightness ( ) button to analogue (D-SUB)-or-digital (DVI)dedicated models. Gamma fect Sharpness MagicBright Green Blue Coarse Color Tone 29 Note Not applicable to adjust brightness. Image Size) ] button after configuring the ...

User Manual (ENGLISH)
Page 35
... the function to see the full image without any cutoff when DVI (480p/576p/720p/1080i/1080p) signals are input. AV signals • 4 : 3 - Adjusting the Monitor Menu Image Size Description (Available in Analog mode only) Note When TV signal is set to 'AV'. • 4 : 3 - You can only be selected if an... external input is connected to the DVI terminal and the 'PC/AV Mode' is the optimal resolution for the wide models only such as 16:9 or 16:10. Note Supplied for the monitor is input in AV mode ,select "Screen Fit "to 16:10 wide mode. • Screen Fit-
... the function to see the full image without any cutoff when DVI (480p/576p/720p/1080i/1080p) signals are input. AV signals • 4 : 3 - Adjusting the Monitor Menu Image Size Description (Available in Analog mode only) Note When TV signal is set to 'AV'. • 4 : 3 - You can only be selected if an... external input is connected to the DVI terminal and the 'PC/AV Mode' is the optimal resolution for the wide models only such as 16:9 or 16:10. Note Supplied for the monitor is input in AV mode ,select "Screen Fit "to 16:10 wide mode. • Screen Fit-

User Manual (ENGLISH)
Page 36
... Reset Description Reverts the product settings to analogue (D-SUB)-or-digital (DVI)-dedicated models. 35 You can enable or disable the Off Time function. Auto Source Select Auto Source for the monitor to automatically select the signal source. • Auto • Manual Note Not applicable to factory defaults. ... in the normal way (non-transparently). You can choose one of the OSD. Off • Off • On Off Timer Setting The monitors will turn off automatically at the specified time. Off Timer On/ You can select the language used to display the menus. ency •...
... Reset Description Reverts the product settings to analogue (D-SUB)-or-digital (DVI)-dedicated models. 35 You can enable or disable the Off Time function. Auto Source Select Auto Source for the monitor to automatically select the signal source. • Auto • Manual Note Not applicable to factory defaults. ... in the normal way (non-transparently). You can choose one of the OSD. Off • Off • On Off Timer Setting The monitors will turn off automatically at the specified time. Off Timer On/ You can select the language used to display the menus. ency •...
User Manual (ENGLISH)
Page 37
Adjusting the Monitor Menu PC/AV Mode Description This function allows the screen to be displayed at..., or 1080P video signal is input in Analog mode) Note Display Time Supplied for a certain time period. Note For models with the size of time the menu will wait before it is pressed. You can specify a function which will be automatically... turned off if no adjustments are made for the wide models only such as 16:9 or 16:10. ized Key ( )is turned off. • 5 sec • 10 sec &#...
Adjusting the Monitor Menu PC/AV Mode Description This function allows the screen to be displayed at..., or 1080P video signal is input in Analog mode) Note Display Time Supplied for a certain time period. Note For models with the size of time the menu will wait before it is pressed. You can specify a function which will be automatically... turned off if no adjustments are made for the wide models only such as 16:9 or 16:10. ized Key ( )is turned off. • 5 sec • 10 sec &#...
User Manual (ENGLISH)
Page 38
... not shown in the Warning Message OSD. Turn on . Note For models with an Analog interface only, "Analog/Digital" is functioning properly. Troubleshooting Self-Test Feature Check Note Your monitor provides a self test feature that allows you to check the signal cable. This box appears during normal ...The message may indicate that you will see a box in the Warning Message OSD. 37 then turn on both your computer and the monitor. Note For models with the input signal, a message appears on the screen or the screen goes blank although the power indicator LED is still on the...
... not shown in the Warning Message OSD. Turn on . Note For models with an Analog interface only, "Analog/Digital" is functioning properly. Troubleshooting Self-Test Feature Check Note Your monitor provides a self test feature that allows you to check the signal cable. This box appears during normal ...The message may indicate that you will see a box in the Warning Message OSD. 37 then turn on both your computer and the monitor. Note For models with the input signal, a message appears on the screen or the screen goes blank although the power indicator LED is still on the...

User Manual (ENGLISH)
Page 45
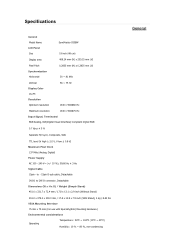
Specifications General General Model Name LCD Panel Size SyncMaster 633NW 15.6 inch (39 cm) Display area 344.232 mm(H) x 193.536 mm(V) Pixel Pitch Synchronization Horizontal 0.252 mm(H) x 0.252 mm(V) 30 ~ ... - 240 V~ (+/- 10 %), 50/60 Hz ± 3 Hz Signal Cable 15pin - to select alternate settings. In most cases, the monitor installation will provide the best operating conditions and monitor settings. The interaction of the monitor and the computer systems will proceed automatically, unless the user wishes to - 15pin D-sub cable, Detachable, 1500 +/- 20 mm...
Specifications General General Model Name LCD Panel Size SyncMaster 633NW 15.6 inch (39 cm) Display area 344.232 mm(H) x 193.536 mm(V) Pixel Pitch Synchronization Horizontal 0.252 mm(H) x 0.252 mm(V) 30 ~ ... - 240 V~ (+/- 10 %), 50/60 Hz ± 3 Hz Signal Cable 15pin - to select alternate settings. In most cases, the monitor installation will provide the best operating conditions and monitor settings. The interaction of the monitor and the computer systems will proceed automatically, unless the user wishes to - 15pin D-sub cable, Detachable, 1500 +/- 20 mm...
User Manual (ENGLISH)
Page 49
Specifications General General Model Name LCD Panel Size SyncMaster 733A 17 inch (43 cm) Display area 337.920 mm (H) x 270.336 mm (V) Pixel Pitch Synchronization Horizontal 0.264 mm (H) x 0.264 mm (V) 30 ~ ... AC 100 - 240 V~ (+/- 10 %), 50/60 Hz ± 3 Hz Signal Cable 15pin - In most cases, the monitor installation will provide the best operating conditions and monitor settings. to select alternate settings. The interaction of the monitor and the computer systems will proceed automatically, unless the user wishes to - 15pin D-sub cable, Detachable Dimensions...
Specifications General General Model Name LCD Panel Size SyncMaster 733A 17 inch (43 cm) Display area 337.920 mm (H) x 270.336 mm (V) Pixel Pitch Synchronization Horizontal 0.264 mm (H) x 0.264 mm (V) 30 ~ ... AC 100 - 240 V~ (+/- 10 %), 50/60 Hz ± 3 Hz Signal Cable 15pin - In most cases, the monitor installation will provide the best operating conditions and monitor settings. to select alternate settings. The interaction of the monitor and the computer systems will proceed automatically, unless the user wishes to - 15pin D-sub cable, Detachable Dimensions...
User Manual (ENGLISH)
Page 53
Specifications General General Model Name LCD Panel Size SyncMaster 733APLUS 17 inch (43 cm) Display area 337.920 mm (H) x 270.336 mm (V) Pixel Pitch Synchronization Horizontal 0.264 mm (H) x 0.264 mm (V) 30 ~... - 240 V~ (+/- 10 %), 50/60 Hz ± 3 Hz Signal Cable 15pin - to select alternate settings. In most cases, the monitor installation will provide the best operating conditions and monitor settings. The interaction of the monitor and the computer systems will proceed automatically, unless the user wishes to - 15pin D-sub cable, Detachable Dimensions (W x H x D) / Weight...
Specifications General General Model Name LCD Panel Size SyncMaster 733APLUS 17 inch (43 cm) Display area 337.920 mm (H) x 270.336 mm (V) Pixel Pitch Synchronization Horizontal 0.264 mm (H) x 0.264 mm (V) 30 ~... - 240 V~ (+/- 10 %), 50/60 Hz ± 3 Hz Signal Cable 15pin - to select alternate settings. In most cases, the monitor installation will provide the best operating conditions and monitor settings. The interaction of the monitor and the computer systems will proceed automatically, unless the user wishes to - 15pin D-sub cable, Detachable Dimensions (W x H x D) / Weight...

User Manual (ENGLISH)
Page 57
Specifications General General Model Name LCD Panel Size SyncMaster 733N 17 inch (43 cm) Display area 337.920 mm (H) x 270.336 mm (V) Pixel Pitch Synchronization Horizontal 0.264 mm (H) x 0.264 mm (V) 30 ~ ... (Analog) Power Supply AC 100 - 240 V~ (+/- 10 %), 50/60 Hz ± 3 Hz Signal Cable 15pin - In most cases, the monitor installation will provide the best operating conditions and monitor settings. The interaction of the monitor and the computer systems will proceed automatically, unless the user wishes to - 15pin D-sub cable, Detachable Dimensions (W x H x D) / Weight...
Specifications General General Model Name LCD Panel Size SyncMaster 733N 17 inch (43 cm) Display area 337.920 mm (H) x 270.336 mm (V) Pixel Pitch Synchronization Horizontal 0.264 mm (H) x 0.264 mm (V) 30 ~ ... (Analog) Power Supply AC 100 - 240 V~ (+/- 10 %), 50/60 Hz ± 3 Hz Signal Cable 15pin - In most cases, the monitor installation will provide the best operating conditions and monitor settings. The interaction of the monitor and the computer systems will proceed automatically, unless the user wishes to - 15pin D-sub cable, Detachable Dimensions (W x H x D) / Weight...

User Manual (ENGLISH)
Page 61
to select alternate settings. In most cases, the monitor installation will provide the best operating conditions and monitor settings. The interaction of the monitor and the computer systems will proceed automatically, unless the user wishes to - 15pin D-sub cable, Detachable Dimensions (W x H x D) /...176;C ~ 45°C) Humidity : 5 % ~ 95 %, non-condensing Plug and Play Capability This monitor can be installed on any Plug & Play compatible system. Specifications General General Model Name LCD Panel Size SyncMaster 733NPLUS 17 inch (43 cm) Display area 337.920 mm (H) x 270.336 ...
to select alternate settings. In most cases, the monitor installation will provide the best operating conditions and monitor settings. The interaction of the monitor and the computer systems will proceed automatically, unless the user wishes to - 15pin D-sub cable, Detachable Dimensions (W x H x D) /...176;C ~ 45°C) Humidity : 5 % ~ 95 %, non-condensing Plug and Play Capability This monitor can be installed on any Plug & Play compatible system. Specifications General General Model Name LCD Panel Size SyncMaster 733NPLUS 17 inch (43 cm) Display area 337.920 mm (H) x 270.336 ...

User Manual (ENGLISH)
Page 65
Specifications General Model Name LCD Panel Size SyncMaster 733NW 17 inch (43 cm) Display area 367.2 mm(H) x 229.5 mm(V) Pixel Pitch Synchronization Horizontal 0.255 mm(H) x 0.255 mm(V) 30 ~ 81 kHz ...
Specifications General Model Name LCD Panel Size SyncMaster 733NW 17 inch (43 cm) Display area 367.2 mm(H) x 229.5 mm(V) Pixel Pitch Synchronization Horizontal 0.255 mm(H) x 0.255 mm(V) 30 ~ 81 kHz ...
User Manual (ENGLISH)
Page 69
Specifications General Model Name LCD Panel Size SyncMaster 933BW 19 inch (48 cm) Display area 408.24 mm (H) x 255.15 mm (V) Pixel Pitch Synchronization Horizontal 0.2835 mm (H) x 0.2835 mm (V) 30 ~ ...
Specifications General Model Name LCD Panel Size SyncMaster 933BW 19 inch (48 cm) Display area 408.24 mm (H) x 255.15 mm (V) Pixel Pitch Synchronization Horizontal 0.2835 mm (H) x 0.2835 mm (V) 30 ~ ...

User Manual (ENGLISH)
Page 73
... Specialty(Arm) Mounting hardware.) Environmental considerations Operating Temperature : 50°F ~ 104°F (10°C ~ 40°C) Humidity : 10 % ~ 80 %, non-condensing General Specifications General Model Name LCD Panel Size SyncMaster 933BWPLUS 19 inch (48 cm) Display area 408.24 mm (H) x 255.15 mm (V) Pixel Pitch Synchronization Horizontal 0.2835 mm (H) x 0.2835 mm (V) 30...
... Specialty(Arm) Mounting hardware.) Environmental considerations Operating Temperature : 50°F ~ 104°F (10°C ~ 40°C) Humidity : 10 % ~ 80 %, non-condensing General Specifications General Model Name LCD Panel Size SyncMaster 933BWPLUS 19 inch (48 cm) Display area 408.24 mm (H) x 255.15 mm (V) Pixel Pitch Synchronization Horizontal 0.2835 mm (H) x 0.2835 mm (V) 30...

