User Manual (ENGLISH)
Page 3
...the train station or etc. Use only a properly grounded plug and receptacle. Installation Be sure to the product or human body. z Failure to your monitor. Install the monitor base in a showcase or shelf so that the end of dust. z This may cause an electric shock or fire. z This may cause an ...electric shock or fire. z An improper ground may cause fire. Put your monitor in a location with low humidity and a minimum of the base does z This may cause electric shock or equipment damage. Failure to do so may cause...
...the train station or etc. Use only a properly grounded plug and receptacle. Installation Be sure to the product or human body. z Failure to your monitor. Install the monitor base in a showcase or shelf so that the end of dust. z This may cause an electric shock or fire. z This may cause an ...electric shock or fire. z An improper ground may cause fire. Put your monitor in a location with low humidity and a minimum of the base does z This may cause electric shock or equipment damage. Failure to do so may cause...
User Manual (ENGLISH)
Page 4
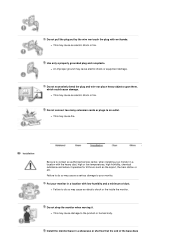
...the mounting device specified in injury. To prevent rainwater from the wall for ventilation purposes. Do not place the monitor face down the monitor carefully. Clean When cleaning the monitor case or the surface of entry. z Installation by unqualified personnel may catch fire. Installing a wall bracket must...using an outdoor antenna, be damaged. z Dropping the product may cause injury or an electric shock. z The monitor could be done by strong wind. z The TFT-LCD surface may cause an electric shock or fire. not project beyond the showcase or shelf. z If rainwater enters ...
...the mounting device specified in injury. To prevent rainwater from the wall for ventilation purposes. Do not place the monitor face down the monitor carefully. Clean When cleaning the monitor case or the surface of entry. z Installation by unqualified personnel may catch fire. Installing a wall bracket must...using an outdoor antenna, be damaged. z Dropping the product may cause injury or an electric shock. z The monitor could be done by strong wind. z The TFT-LCD surface may cause an electric shock or fire. not project beyond the showcase or shelf. z If rainwater enters ...
User Manual (ENGLISH)
Page 5
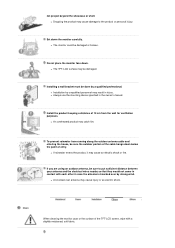
... the recommended detergent with a dry cloth. z Keep the product's interior clean. z Refer servicing to moisture. If your monitor does not operate normally - z The monitor may cause an electric shock or fire. Dust which has accumulated in particular, if there are any unusual sounds or smells coming... from it - z Then contact the Service Center . z This may malfunction, causing an electric shock or fire. If the monitor is dropped or the casing is dusty or dirty, clean it immediately and contact an authorized dealer or service. z This may cause an ...
... the recommended detergent with a dry cloth. z Keep the product's interior clean. z Refer servicing to moisture. If your monitor does not operate normally - z The monitor may cause an electric shock or fire. Dust which has accumulated in particular, if there are any unusual sounds or smells coming... from it - z Then contact the Service Center . z This may malfunction, causing an electric shock or fire. If the monitor is dropped or the casing is dusty or dirty, clean it immediately and contact an authorized dealer or service. z This may cause an ...

User Manual (ENGLISH)
Page 6
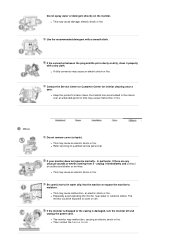
...shock or fire due to damage to do so may appear. z Bad ventilation may cause a fire or an electric shock. z If a foreign substance enters the monitor, unplug the power cord and contact the Service Center . z It may cause a breakdown or fire. z Change the mode to energy save or set a screensaver... to move the monitor right or left by pulling only the wire or the signal cable. Disconnect the plug from the outlet during storms or lightening or if it...
...shock or fire due to damage to do so may appear. z Bad ventilation may cause a fire or an electric shock. z If a foreign substance enters the monitor, unplug the power cord and contact the Service Center . z It may cause a breakdown or fire. z Change the mode to energy save or set a screensaver... to move the monitor right or left by pulling only the wire or the signal cable. Disconnect the plug from the outlet during storms or lightening or if it...
User Manual (ENGLISH)
Page 7
...cables, including the antenna cable and cables connected to vibrations may shorten the lifetime of the product or may cause undesirable picture quality. 19 inch - 1280 X 1024 Keep the volume at a proper level when you remove batteries from the remote control, be returned for ...the model. Use only specified standard batteries. Watching the monitor continuously at least a five-minute break after every hour of children. z If swallowed, see a doctor immediately. Do not install the product...
...cables, including the antenna cable and cables connected to vibrations may shorten the lifetime of the product or may cause undesirable picture quality. 19 inch - 1280 X 1024 Keep the volume at a proper level when you remove batteries from the remote control, be returned for ...the model. Use only specified standard batteries. Watching the monitor continuously at least a five-minute break after every hour of children. z If swallowed, see a doctor immediately. Do not install the product...
User Manual (ENGLISH)
Page 9
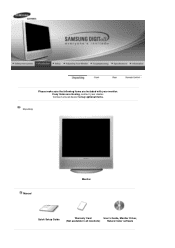
Please make sure the following items are missing, contact your monitor. If any items are included with your dealer. Contact a local dealer to buy optional items. Unpacking Manual Monitor Quick Setup Guide Warranty Card User's Guide, Monitor Driver, (Not available in all locations) Natural Color software
Please make sure the following items are missing, contact your monitor. If any items are included with your dealer. Contact a local dealer to buy optional items. Unpacking Manual Monitor Quick Setup Guide Warranty Card User's Guide, Monitor Driver, (Not available in all locations) Natural Color software
User Manual (ENGLISH)
Page 11
... external devices that are connected to another vertically or adjusts selected menu values. ENTER Activates a highlighted menu item. 7. For energy conservation, turn the monitor on -screen menu and step 1 step back in the menu. 4. In TV mode, selects TV channels. >>Click here to open the on ... at the time. For more information > Broadcasting Systems 2. VOL + Moves from product to select one menu item to the monitor at the back of the monitor may not be able to product.) EXT(RGB) is mainly used in the manual for long periods. Power indicator Power Indicator ...
... external devices that are connected to another vertically or adjusts selected menu values. ENTER Activates a highlighted menu item. 7. For energy conservation, turn the monitor on -screen menu and step 1 step back in the menu. 4. In TV mode, selects TV channels. >>Click here to open the on ... at the time. For more information > Broadcasting Systems 2. VOL + Moves from product to select one menu item to the monitor at the back of the monitor may not be able to product.) EXT(RGB) is mainly used in the manual for long periods. Power indicator Power Indicator ...
User Manual (ENGLISH)
Page 13
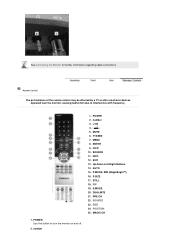
... malfuction due to turn the monitor on and off. 2. CH/P 10. Up-Down Left-Right Buttons 14. POWER Use this button to interference with frequency. 1. MENU 8. SOURCE 23. ENTER 9. INFO 12. PIP 19. MAGIC-CH 1. MUTE 6. AUTO 15. P.SIZE 17. number 3. +100 4. - + 5. ...EXIT 13. POSITION 25. number POWER 2. TTX/MIX 7. STILL 18. PRE-CH 22. S.MODE 20. P.MODE, M/B (MagicBright™) 16. SOURCE 11. DUAL/MTS 21. See Connecting the Monitor for further information ...
... malfuction due to turn the monitor on and off. 2. CH/P 10. Up-Down Left-Right Buttons 14. POWER Use this button to interference with frequency. 1. MENU 8. SOURCE 23. ENTER 9. INFO 12. PIP 19. MAGIC-CH 1. MUTE 6. AUTO 15. P.SIZE 17. number 3. +100 4. - + 5. ...EXIT 13. POSITION 25. number POWER 2. TTX/MIX 7. STILL 18. PRE-CH 22. S.MODE 20. P.MODE, M/B (MagicBright™) 16. SOURCE 11. DUAL/MTS 21. See Connecting the Monitor for further information ...

User Manual (ENGLISH)
Page 14
...in PC Mode Only Adjusts the screen display automatically. 15. EXIT Exits from one menu item to unfreeze. 18. Then push button again to the monitor at the factory. Not available in PIP mode as well. 3. +100 Press to change the screen size. ( 16:9 Normal Zoom1 Zoom2 ) 17.... INFO Current picture information is pressed in the TV mode. AUTO - TV / AV / Ext. / S-Video Mode : P.MODE( Picture Mode ) The Monitor has four automatic picture settings that are watching. P.SIZE - Not available in PC Mode Push the PIP button to circle through available preconfigured modes. ( Dynamic...
...in PC Mode Only Adjusts the screen display automatically. 15. EXIT Exits from one menu item to unfreeze. 18. Then push button again to the monitor at the factory. Not available in PIP mode as well. 3. +100 Press to change the screen size. ( 16:9 Normal Zoom1 Zoom2 ) 17.... INFO Current picture information is pressed in the TV mode. AUTO - TV / AV / Ext. / S-Video Mode : P.MODE( Picture Mode ) The Monitor has four automatic picture settings that are watching. P.SIZE - Not available in PC Mode Push the PIP button to circle through available preconfigured modes. ( Dynamic...
User Manual (ENGLISH)
Page 15
...) mode. • Mono, Stereo, SAP (Separate Audio Program) Set 'MTS' to ON to circle through available preconfigured modes. ( Standard Music Movie Speech Custom ) 20. The Monitor has a built-in Korea. PRE-CH This button is available only in high fidelity stereo amplifier...
...) mode. • Mono, Stereo, SAP (Separate Audio Program) Set 'MTS' to ON to circle through available preconfigured modes. ( Standard Music Movie Speech Custom ) 20. The Monitor has a built-in Korea. PRE-CH This button is available only in high fidelity stereo amplifier...
User Manual (ENGLISH)
Page 16
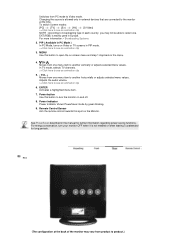
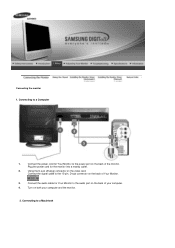
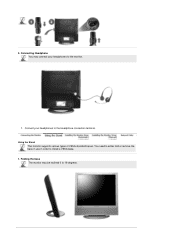
Plug the power cord for Your Monitor to the 15-pin, D-sub connector on the back of Your Monitor. 3. Turn on the video card. Connecting to a Computer 1. Using the D-sub (Analog) connector on both your computer. 4. Connect the power cord for Your Monitor to the power port on the back of the monitor. Connecting the monitor 1. Connect the audio cable for the monitor into a nearby outlet. 2. Connecting to a Macintosh Connect the signal cable to the audio port on the back of your computer and the monitor. 2.
Plug the power cord for Your Monitor to the 15-pin, D-sub connector on the back of Your Monitor. 3. Turn on the video card. Connecting to a Computer 1. Using the D-sub (Analog) connector on both your computer. 4. Connect the power cord for Your Monitor to the power port on the back of the monitor. Connecting the monitor 1. Connect the audio cable for the monitor into a nearby outlet. 2. Connecting to a Macintosh Connect the signal cable to the audio port on the back of your computer and the monitor. 2.
User Manual (ENGLISH)
Page 17
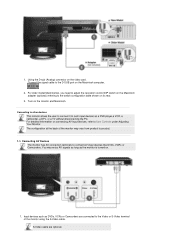
... the S-Video cable. S-Video cable are connected to product. 1-1. You may vary from product to the Video or S-Video terminal of the monitor may enjoy AV signals as long as a DVD player,a VCR, a camcorder, a DTV, or a TV without disconnecting the PC. Input ...devices such as DVDs, VCRs or Camcorders are optional. Using the D-sub (Analog) connector on the monitor and Macintosh. For detailed information on connecting AV input devices, refer to the switch configuration table shown on the Macintosh computer. 2. For older model Macintoshes...
... the S-Video cable. S-Video cable are connected to product. 1-1. You may vary from product to the Video or S-Video terminal of the monitor may enjoy AV signals as long as a DVD player,a VCR, a camcorder, a DTV, or a TV without disconnecting the PC. Input ...devices such as DVDs, VCRs or Camcorders are optional. Using the D-sub (Analog) connector on the monitor and Macintosh. For detailed information on connecting AV input devices, refer to the switch configuration table shown on the Macintosh computer. 2. For older model Macintoshes...
User Manual (ENGLISH)
Page 18
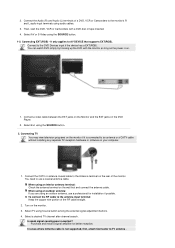
...watch DVD simply by hooking up the DVD with a DVD disc or tape inserted. 4. Connect the CATV or antenna coaxial cable to the monitor's R and L audio input terminals using Source button among the external signal adjustment buttons. 4. Purchase and install a signal amplifier for installation if... areas where Antenna cable is connected to the antenna input terminal: Keep the copper wire portion of the monitor. Connecting TV You may view television programs on the monitor if it is not supported, first, attach Connector to use a professional for better reception. You need ...
...watch DVD simply by hooking up the DVD with a DVD disc or tape inserted. 4. Connect the CATV or antenna coaxial cable to the monitor's R and L audio input terminals using Source button among the external signal adjustment buttons. 4. Purchase and install a signal amplifier for installation if... areas where Antenna cable is connected to the antenna input terminal: Keep the copper wire portion of the monitor. Connecting TV You may view television programs on the monitor if it is not supported, first, attach Connector to use a professional for better reception. You need ...
User Manual (ENGLISH)
Page 19
3. Folding the base The monitor may connect your headphones to install a VESA base. 1. Connecting Headphone You may be reclined 0 to the monitor. 1. You need to either fold or remove the base in use in order to the Headphone connection terminal. Using the Stand This monitor supports various types of VESA-standard bases. Connect your headphones to 19 degrees.
3. Folding the base The monitor may connect your headphones to install a VESA base. 1. Connecting Headphone You may be reclined 0 to the monitor. 1. You need to either fold or remove the base in use in order to the Headphone connection terminal. Using the Stand This monitor supports various types of VESA-standard bases. Connect your headphones to 19 degrees.
User Manual (ENGLISH)
Page 20
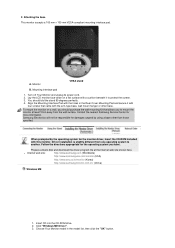
... z Internet web site : http://www.samsung.com (Worldwide) http://www.samsungusa.com/monitor (USA) http://www.sec.co.kr/monitor (Korea) http://www.samsungmonitor.com.cn/ (China) Windows ME 1. Choose Your Monitor model in the Rear Cover Mounting Pad and...Samsung Service Center for damages caused by the operating system for the operating system you to another. Prepare a blank disk and download the driver program file at least 10cm away from one operating system to mount the monitor at the Internet web site shown here. 2. Mounting interface pad 1. Lay the LCD monitor...
... z Internet web site : http://www.samsung.com (Worldwide) http://www.samsungusa.com/monitor (USA) http://www.sec.co.kr/monitor (Korea) http://www.samsungmonitor.com.cn/ (China) Windows ME 1. Choose Your Monitor model in the Rear Cover Mounting Pad and...Samsung Service Center for damages caused by the operating system for the operating system you to another. Prepare a blank disk and download the driver program file at least 10cm away from one operating system to mount the monitor at the Internet web site shown here. 2. Mounting interface pad 1. Lay the LCD monitor...

User Manual (ENGLISH)
Page 21
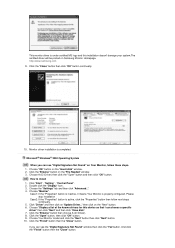
Insert CD into the CD-ROM drive. 2. Choose Your Monitor model in the "Warning" window. 5. Click the "Install" button in the model list, then click the "OK" button. 4. If you can see following message window, then click the "Continue Anyway" button. Then click "OK" button. Click the "Install" button in the "Warning" window. 5. 4. Monitor driver installation is completed. Click "Windows XP/2000 Driver" 3. Windows XP/2000 1.
Insert CD into the CD-ROM drive. 2. Choose Your Monitor model in the "Warning" window. 5. Click the "Install" button in the model list, then click the "OK" button. 4. If you can see following message window, then click the "Continue Anyway" button. Then click "OK" button. Click the "Install" button in the "Warning" window. 5. 4. Monitor driver installation is completed. Click "Windows XP/2000 Driver" 3. Windows XP/2000 1.
User Manual (ENGLISH)
Page 22
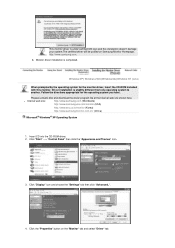
... the driver program file at the Internet web site shown here. Click the "Properties" button on Samsung Monitor Homepage. z Internet web site : http://www.samsung.com (Worldwide) http://www.samsungusa.com/monitor (USA) http://www.sec.co.kr/monitor (Korea) http://www.samsungmonitor.com.cn/ (China) Microsoft® Windows® XP Operating System 1. Click "Start...
... the driver program file at the Internet web site shown here. Click the "Properties" button on Samsung Monitor Homepage. z Internet web site : http://www.samsung.com (Worldwide) http://www.samsungusa.com/monitor (USA) http://www.sec.co.kr/monitor (Korea) http://www.samsungmonitor.com.cn/ (China) Microsoft® Windows® XP Operating System 1. Click "Start...
User Manual (ENGLISH)
Page 23
Select "Don't search ,I will.." Then click "OK" button. and select "Install from a list or.." Click the "Browse" button then choose A:(D:\Driver) and choose Your Monitor model in the model list and click the "Next" button. 8. then click "Next" button. 6. Click "Update Driver.." then click "Next" and then click "Have disk". 7. If you can see following message window, then click the "Continue Anyway" button. 5.
Select "Don't search ,I will.." Then click "OK" button. and select "Install from a list or.." Click the "Browse" button then choose A:(D:\Driver) and choose Your Monitor model in the model list and click the "Next" button. 8. then click "Next" button. 6. Click "Update Driver.." then click "Next" and then click "Have disk". 7. If you can see following message window, then click the "Continue Anyway" button. 5.
User Manual (ENGLISH)
Page 24
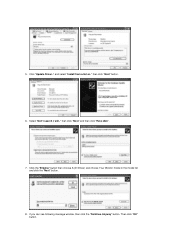
...then click "OK" button. then click on Samsung Monitor Homepage. Choose "Display a list of the known drivers for this installation doesn't damage your system.The certified driver will be posted on the "Next" button. 6. Choose Your Monitor model and click the "Next" button then ... , "Setting" , "Control Panel". 2. Click the "Open" button, then click "OK" button. 9. http://www.samsung.com 9. Case1: If the "Properties" button is inactive, it means Your Monitor is completed. Click the "Close" button then click "OK" button continually. 10. Choose "OK" button on the "File...
...then click "OK" button. then click on Samsung Monitor Homepage. Choose "Display a list of the known drivers for this installation doesn't damage your system.The certified driver will be posted on the "Next" button. 6. Choose Your Monitor model and click the "Next" button then ... , "Setting" , "Control Panel". 2. Click the "Open" button, then click "OK" button. 9. http://www.samsung.com 9. Case1: If the "Properties" button is inactive, it means Your Monitor is completed. Click the "Close" button then click "OK" button continually. 10. Choose "OK" button on the "File...
User Manual (ENGLISH)
Page 25
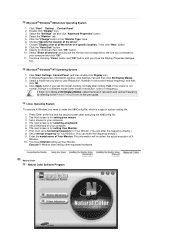
... the user guide. The third screen is a type of all the driver in the "Monitor Type" area. 6. You have finished setting up Your Monitor. Click "Start" , "Setting" , "Control Panel". 2. Select the "Monitor" tab. 5. Choose "Display a list of system setting file. 1. Click Apply button ...computer. 6. The next screen is for setting your computer. 4. Set a Keyboard for your mouse. 3. The next screen is for Your Monitor. (You can enter the frequency directly.) 8. First of X- Set a vertical frequency for selecting a keyboard. 5. Window. 10. Execute X-Window after ...
... the user guide. The third screen is a type of all the driver in the "Monitor Type" area. 6. You have finished setting up Your Monitor. Click "Start" , "Setting" , "Control Panel". 2. Select the "Monitor" tab. 5. Choose "Display a list of system setting file. 1. Click Apply button ...computer. 6. The next screen is for setting your computer. 4. Set a Keyboard for your mouse. 3. The next screen is for Your Monitor. (You can enter the frequency directly.) 8. First of X- Set a vertical frequency for selecting a keyboard. 5. Window. 10. Execute X-Window after ...


