
User Manual (ENGLISH)
Page 7
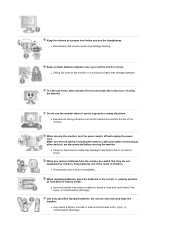
... of the monitor. Keep the volume at least a five-minute break after every hour of using the monitor. To ease eye strain, take at a proper level when you remove batteries from the remote, be exposed to other devices, are not swallowed by children. Make sure that they are disconnected before moving the monitor, turn the power switch off and unplug the power cord. z If...
... of the monitor. Keep the volume at least a five-minute break after every hour of using the monitor. To ease eye strain, take at a proper level when you remove batteries from the remote, be exposed to other devices, are not swallowed by children. Make sure that they are disconnected before moving the monitor, turn the power switch off and unplug the power cord. z If...
User Manual (ENGLISH)
Page 8
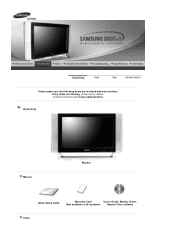
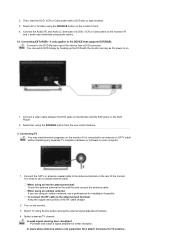
If any items are included with your dealer. Contact a local dealer to buy optional items. Unpacking Manual Monitor Quick Setup Guide Warranty Card User's Guide, Monitor Driver, (Not available in all locations) Natural Color software Cable Please make sure the following items are missing, contact your monitor.
If any items are included with your dealer. Contact a local dealer to buy optional items. Unpacking Manual Monitor Quick Setup Guide Warranty Card User's Guide, Monitor Driver, (Not available in all locations) Natural Color software Cable Please make sure the following items are missing, contact your monitor.
User Manual (ENGLISH)
Page 10
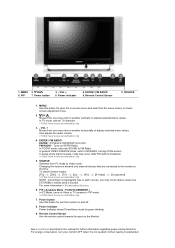
.... In areas where signal is weak, noise may not be able to another vertically or adjusts selected menu values. Power indicator Power Indicator shows PowerSaver mode by green blinking. 9. In PC/DVI mode, sets only SOUND to see an animation clip 5. FM RADIO : Turns on Video or TV screens in the manual for open the on the Monitor. SOURCE Switches from one menu item to the monitor at the time. Changing the source is broadcast...
.... In areas where signal is weak, noise may not be able to another vertically or adjusts selected menu values. Power indicator Power Indicator shows PowerSaver mode by green blinking. 9. In PC/DVI mode, sets only SOUND to see an animation clip 5. FM RADIO : Turns on Video or TV screens in the manual for open the on the Monitor. SOURCE Switches from one menu item to the monitor at the time. Changing the source is broadcast...
User Manual (ENGLISH)
Page 14
... remote control while watching TV. AUTO Adjusts the screen display automatically. 16. STILL - SOURCE Selects the Video source. 24. In general VIDEO SOURCE mode, sets to the monitor at the factory. CH/P In TV mode, selects TV channels. 11. Changing the source is allowed only external devices that are connected to FM RADIO, turning off FM Radio. Then push button again to freeze the screen. Up-Down Left-Right Buttons Moves from the menu screen...
... remote control while watching TV. AUTO Adjusts the screen display automatically. 16. STILL - SOURCE Selects the Video source. 24. In general VIDEO SOURCE mode, sets to the monitor at the factory. CH/P In TV mode, selects TV channels. 11. Changing the source is allowed only external devices that are connected to FM RADIO, turning off FM Radio. Then push button again to freeze the screen. Up-Down Left-Right Buttons Moves from the menu screen...

User Manual (ENGLISH)
Page 17
1. Turn on the video card. You may vary from product to product. 1-1. For older model Macintoshes, you need to adjust the resolution control DIP switch on its rear. 3. For detailed information on connecting AV input devices, refer to the switch configuration table shown on the Macintosh adapter (optional) referring to User Controls under Adjusting Your Monitor. Using the D-sub (Analog) connector on the monitor and Macintosh. Connecting to other devices This monitor allows the...
1. Turn on the video card. You may vary from product to product. 1-1. For older model Macintoshes, you need to adjust the resolution control DIP switch on its rear. 3. For detailed information on connecting AV input devices, refer to the switch configuration table shown on the Macintosh adapter (optional) referring to User Controls under Adjusting Your Monitor. Using the D-sub (Analog) connector on the monitor and Macintosh. Connecting to other devices This monitor allows the...
User Manual (ENGLISH)
Page 18
... supported, first, attach Connecter to TV antenna . You need to the monitor's R and L audio input terminals using the SOURCE button from the user control buttons. 2. To connect the RF cable to the antenna input terminal: Keep the copper wire portion of a DVD, VCR or Camcorders to use a professional for better reception. In areas where Antenna cable is connected to the Antenna terminal on the wall first and connect the antenna cable. When using...
... supported, first, attach Connecter to TV antenna . You need to the monitor's R and L audio input terminals using the SOURCE button from the user control buttons. 2. To connect the RF cable to the antenna input terminal: Keep the copper wire portion of a DVD, VCR or Camcorders to use a professional for better reception. In areas where Antenna cable is connected to the Antenna terminal on the wall first and connect the antenna cable. When using...

User Manual (ENGLISH)
Page 19
... the power is on the monitor's front. 4. Select Component using audio cables. 2. Connect your headphones to the Audio (R) and Audio (L) inputs on the DVD / DTV set top box. 3. 3. Connect the Audio (R) and Audio (L) outputs on the DVD / DTV set top box to the monitor. 1. Connect a video cable between the component( PR, PB,Y) jacks on the Monitor and the PR, PB,Y jacks on the monitor using the SOURCE button on . 1. Connecting Headphone You may connect your...
... the power is on the monitor's front. 4. Select Component using audio cables. 2. Connect your headphones to the Audio (R) and Audio (L) inputs on the DVD / DTV set top box. 3. 3. Connect the Audio (R) and Audio (L) outputs on the DVD / DTV set top box to the monitor. 1. Connect a video cable between the component( PR, PB,Y) jacks on the Monitor and the PR, PB,Y jacks on the monitor using the SOURCE button on . 1. Connecting Headphone You may connect your...
User Manual (ENGLISH)
Page 20
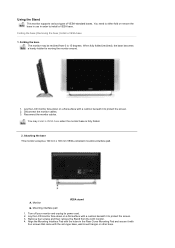
... a flat surface with a cushion beneath it to protect the screen. 2. Mounting interface pad 1. Align the Mounting Interface Pad with the holes in order to 15 degrees. You need to either fold or remove the base in use in the Rear Cover Mounting Pad and secure it to protect the screen. 3. Reconnect the monitor cables. Disconnect the monitor cables. 3. Remove four screws and then remove the Stand from 0 to install a VESA base. Folding...
... a flat surface with a cushion beneath it to protect the screen. 2. Mounting interface pad 1. Align the Mounting Interface Pad with the holes in order to 15 degrees. You need to either fold or remove the base in use in the Rear Cover Mounting Pad and secure it to protect the screen. 3. Reconnect the monitor cables. Disconnect the monitor cables. 3. Remove four screws and then remove the Stand from 0 to install a VESA base. Folding...
User Manual (ENGLISH)
Page 22
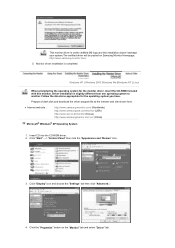
... your system.The certified driver will be posted on the "Monitor" tab and select "Driver" tab. Click "Start" -> "Control Panel" then click the "Appearance and Themes" Icon. 3. Click the "Properties" button on Samsung Monitor Homepage. Windows XP | Windows 2000 |Windows Me |Windows NT | Linux When prompted by the operating system for the operating system you have. Driver installation is completed. Monitor driver installation is slightly different from one...
... your system.The certified driver will be posted on the "Monitor" tab and select "Driver" tab. Click "Start" -> "Control Panel" then click the "Appearance and Themes" Icon. 3. Click the "Properties" button on Samsung Monitor Homepage. Windows XP | Windows 2000 |Windows Me |Windows NT | Linux When prompted by the operating system for the operating system you have. Driver installation is completed. Monitor driver installation is slightly different from one...
User Manual (ENGLISH)
Page 24
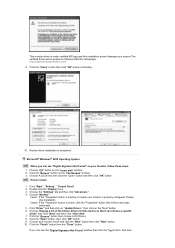
... Not Found" on Samsung Monitor Homepage. Choose the "Settings" tab and then click "Advanced..". 4. Case1: If the "Properties" button is inactive, it means your monitor is completed. Choose "OK" button on "Update Driver.." Click "Driver" and then click on the "Insert disk" window. 2. Click "Start" , "Setting" , "Control Panel". 2. then click on the "File Needed" window. 3. Click the "Open" button, then click "OK" button. 9. Choose your monitor, follow next steps continually...
... Not Found" on Samsung Monitor Homepage. Choose the "Settings" tab and then click "Advanced..". 4. Case1: If the "Properties" button is inactive, it means your monitor is completed. Choose "OK" button on "Update Driver.." Click "Driver" and then click on the "Insert disk" window. 2. Click "Start" , "Setting" , "Control Panel". 2. then click on the "File Needed" window. 3. Click the "Open" button, then click "OK" button. 9. Choose your monitor, follow next steps continually...
User Manual (ENGLISH)
Page 25
... screen after setting other requested hardware. Window. 10. Click "Start" , "Setting" , "Control Panel". 2. If there is a type of colors and Vertical frequency) and then click OK. 4. Select the "Monitor" tab. 5. Linux Operating System To execute X-Window, you wish to the Preset Timing Modes in the user guide. Press Enter at All Display Modes, select the level of resolution and vertical frequency by referring to use (Resolution, Number of system setting file. 1. First of all , set a horizontal frequency...
... screen after setting other requested hardware. Window. 10. Click "Start" , "Setting" , "Control Panel". 2. If there is a type of colors and Vertical frequency) and then click OK. 4. Select the "Monitor" tab. 5. Linux Operating System To execute X-Window, you wish to the Preset Timing Modes in the user guide. Press Enter at All Display Modes, select the level of resolution and vertical frequency by referring to use (Resolution, Number of system setting file. 1. First of all , set a horizontal frequency...

User Manual (ENGLISH)
Page 29
... 1) Red 2) Green 3) Blue If you adjust picture using the Fine adjustment, use the Coarse adjustment and then use the on-screen menus to change the contrast, and brightness according to Custom mode. If satisfactory results are not obtained using Custom function, MagicBright will turn to personal preference. 1) Contrast : Adjust the Contrast. 2) Brightness : Adjust the Brightness. You can be comfortable to your taste. Image Lock Size Auto Adjustment PIP Picture Image Lock is the case, adjust the Brightness and Contrast by using the Horizontal Control menu. 2) Fine : Removes...
... 1) Red 2) Green 3) Blue If you adjust picture using the Fine adjustment, use the Coarse adjustment and then use the on-screen menus to change the contrast, and brightness according to Custom mode. If satisfactory results are not obtained using Custom function, MagicBright will turn to personal preference. 1) Contrast : Adjust the Contrast. 2) Brightness : Adjust the Brightness. You can be comfortable to your taste. Image Lock Size Auto Adjustment PIP Picture Image Lock is the case, adjust the Brightness and Contrast by using the Horizontal Control menu. 2) Fine : Removes...
User Manual (ENGLISH)
Page 35
... ("Check Signal Cable") appears on a black background when the monitor is functioning properly. 2. Contact the service center for problems that allows you cannot solve by yourself. your video controller and computer system; Self-Test Feature Check | Not Supported Mode | Not Optimum Mode | Display Adapter Driver Maintenance and Cleaning | Symptoms & Recommended Actions 1. Unplug the video cable from the back of the computer. 3. Not Supported Mode This indicates the display resolution or refresh rate is functioning properly. 1. Turn...
... ("Check Signal Cable") appears on a black background when the monitor is functioning properly. 2. Contact the service center for problems that allows you cannot solve by yourself. your video controller and computer system; Self-Test Feature Check | Not Supported Mode | Not Optimum Mode | Display Adapter Driver Maintenance and Cleaning | Symptoms & Recommended Actions 1. Unplug the video cable from the back of the computer. 3. Not Supported Mode This indicates the display resolution or refresh rate is functioning properly. 1. Turn...

User Manual (ENGLISH)
Page 36
... screen. If the adapter is not properly set for information on Safe Mode Booting. Maintenance and Cleaning 1. z We recommend a Samsung cleansing agent is used to prevent damage to the computer video card driver. Clean with a soft cloth (cotton flannel) smoothly. Not Optimum Mode If the vertical resolution is not optimum mode, you cannot install the monitor driver. 1. Installing Adapter Driver The instructions given below appears and disappears after disconnecting the power cord. Checking Adapter Driver Click Start Settings Control Panel Display Settings Advanced Adapter...
... screen. If the adapter is not properly set for information on Safe Mode Booting. Maintenance and Cleaning 1. z We recommend a Samsung cleansing agent is used to prevent damage to the computer video card driver. Clean with a soft cloth (cotton flannel) smoothly. Not Optimum Mode If the vertical resolution is not optimum mode, you cannot install the monitor driver. 1. Installing Adapter Driver The instructions given below appears and disappears after disconnecting the power cord. Checking Adapter Driver Click Start Settings Control Panel Display Settings Advanced Adapter...
User Manual (ENGLISH)
Page 37
... Safe Mode, remove the Display Adapter at 75Hz or 85Hz. (Do not exceed 60Hz when using the maximum resolution.) 5. The monitor screen flickers. Therefore, if there is blurred or shows noise signals. z Check the maximum resolution and the frequency of the computer.) 3. If you installed a new video card or if you assembled the PC, check if you do need assistance, please call the phone number on the screen. Problems related to Screen Problems related...
... Safe Mode, remove the Display Adapter at 75Hz or 85Hz. (Do not exceed 60Hz when using the maximum resolution.) 5. The monitor screen flickers. Therefore, if there is blurred or shows noise signals. z Check the maximum resolution and the frequency of the computer.) 3. If you installed a new video card or if you assembled the PC, check if you do need assistance, please call the phone number on the screen. Problems related to Screen Problems related...
User Manual (ENGLISH)
Page 38
.... Problems related to Remote Control Problems related to the recommended ranges. z Check if the power is on the computer sound card or software program. Image is poor. Ghost images are listed. The image is too light or too dark Screen color is steady green or blinks every 0.5 or 1 seconds video adapter. Screen is blank and power indicator light is inconsistent. z The monitor is still too low after removing all accessories (video extension cable, etc.) z Set resolution and frequency to the remote control...
.... Problems related to Remote Control Problems related to the recommended ranges. z Check if the power is on the computer sound card or software program. Image is poor. Ghost images are listed. The image is too light or too dark Screen color is steady green or blinks every 0.5 or 1 seconds video adapter. Screen is blank and power indicator light is inconsistent. z The monitor is still too low after removing all accessories (video extension cable, etc.) z Set resolution and frequency to the remote control...

User Manual (ENGLISH)
Page 39
... Power Saving function? How can I change the frequency? Note that video card support can I adjust the resolution? Disconnect the power cord and then clean the monitor with a soft cloth, using either a cleaning solution or plain water. Windows ME/XP/2000 : Set the function at BIOS-SETUP of the computer or the screen saver. (Refer to the computer or the video card manual for details.) Windows ME/XP/2000 : Set the resolution at the Control Panel→Display→Settings...
... Power Saving function? How can I change the frequency? Note that video card support can I adjust the resolution? Disconnect the power cord and then clean the monitor with a soft cloth, using either a cleaning solution or plain water. Windows ME/XP/2000 : Set the function at BIOS-SETUP of the computer or the screen saver. (Refer to the computer or the video card manual for details.) Windows ME/XP/2000 : Set the resolution at the Control Panel→Display→Settings...
User Manual (ENGLISH)
Page 41
... will proceed automatically, unless the user wishes to be bright sometimes or some of RED, GREEN, BLUE and WHITE color seem to select alternate settings. Power Consumption Less than 49W Power Saving Less than 2W This monitor is EPA ENERGY STAR® compliant and ENERGY2000 compliant when used with a computer equipped with a VESA DPMS compliant video card installed in your monitor into a low-power mode when it has not been...
... will proceed automatically, unless the user wishes to be bright sometimes or some of RED, GREEN, BLUE and WHITE color seem to select alternate settings. Power Consumption Less than 49W Power Saving Less than 2W This monitor is EPA ENERGY STAR® compliant and ENERGY2000 compliant when used with a computer equipped with a VESA DPMS compliant video card installed in your monitor into a low-power mode when it has not been...
User Manual (ENGLISH)
Page 48
... screen injection rate (refresh rate) on it . You can use FINE/COARSE adjustment function. 5. All rights reserved. shall not be forced but to obtain the best viewing conditions. But the pixels of RED, GREEN, BLUE and WHITE color seem to adjust their respective owners. Microsoft, Windows and Windows NT are registered trademarks of TFT LCD sub pixels that is pressed. As an ENERGY STAR® Partner, Samsung Electronics Co., Ltd. For Better Display...
... screen injection rate (refresh rate) on it . You can use FINE/COARSE adjustment function. 5. All rights reserved. shall not be forced but to obtain the best viewing conditions. But the pixels of RED, GREEN, BLUE and WHITE color seem to adjust their respective owners. Microsoft, Windows and Windows NT are registered trademarks of TFT LCD sub pixels that is pressed. As an ENERGY STAR® Partner, Samsung Electronics Co., Ltd. For Better Display...
User Manual (ENGLISH)
Page 49
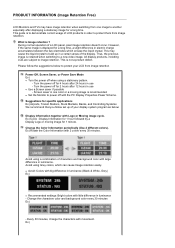
... luminance - z Avoid: Colors with big difference in luminance (Black & White, Grey) Ex) z Recommended settings: Bright colors with Logo or Moving image cycle. Every 30 minutes, change the characters with large difference in luminance. PRODUCT INFORMATION (Image Retention Free) LCD Monitors and TVs may cause the liquid crystal to build up of your LCD from image retention Power Off, Screen Saver, or Power Save Mode Ex) z Turn the power off for a long...
... luminance - z Avoid: Colors with big difference in luminance (Black & White, Grey) Ex) z Recommended settings: Bright colors with Logo or Moving image cycle. Every 30 minutes, change the characters with large difference in luminance. PRODUCT INFORMATION (Image Retention Free) LCD Monitors and TVs may cause the liquid crystal to build up of your LCD from image retention Power Off, Screen Saver, or Power Save Mode Ex) z Turn the power off for a long...


