
User Manual (ENGLISH)
Page 5
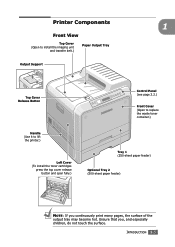
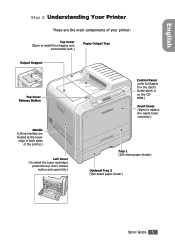
... the lower edge of both sides of the printer.) Left Cover (To install the toner cartridges press the top cover release button and open fully.) Control Panel (refer to Chapter 5 in the User's Guide which is on the CDROM.) Front Cover (Open to replace the waste toner container.) Tray 1 (250-sheet paper feeder) Optional...
... the lower edge of both sides of the printer.) Left Cover (To install the toner cartridges press the top cover release button and open fully.) Control Panel (refer to Chapter 5 in the User's Guide which is on the CDROM.) Front Cover (Open to replace the waste toner container.) Tray 1 (250-sheet paper feeder) Optional...

User Manual (ENGLISH)
Page 38
... 6.2 Replacing the Supplies 6.3 Managing the Toner Cartridges 6.4 Toner Cartridge Storage 6.4 Toner Cartridge Life Expectancy 6.4 Redistributing the Toner 6.5 Replacing the Toner Cartridges 6.8 Replacing the Waste Toner Container 6.11 Replacing the Imaging Unit 6.14 Replacing the Transfer Belt 6.22 Cleaning the Printer 6.29 Cleaning the Outside of the Printer 6.29 Cleaning the LSU Inside the Printer 6.30 Cleaning the Inside of the...
... 6.2 Replacing the Supplies 6.3 Managing the Toner Cartridges 6.4 Toner Cartridge Storage 6.4 Toner Cartridge Life Expectancy 6.4 Redistributing the Toner 6.5 Replacing the Toner Cartridges 6.8 Replacing the Waste Toner Container 6.11 Replacing the Imaging Unit 6.14 Replacing the Transfer Belt 6.22 Cleaning the Printer 6.29 Cleaning the Outside of the Printer 6.29 Cleaning the LSU Inside the Printer 6.30 Cleaning the Inside of the...
User Manual (ENGLISH)
Page 53
... Tray Output Support Top Cover Release Button Handle (Use it to lift the printer.) Left Cover (To install the toner cartridges press the top cover release button and open fully.) Control Panel (see page 2.2.) Front Cover (Open to replace the waste toner container.) Tray 1 (250-sheet paper feeder) Optional Tray 2 (500-sheet paper feeder...
... Tray Output Support Top Cover Release Button Handle (Use it to lift the printer.) Left Cover (To install the toner cartridges press the top cover release button and open fully.) Control Panel (see page 2.2.) Front Cover (Open to replace the waste toner container.) Tray 1 (250-sheet paper feeder) Optional Tray 2 (500-sheet paper feeder...

User Manual (ENGLISH)
Page 131
This chapter includes: • Printing a Configuration Page • Replacing the Supplies • Managing the Toner Cartridges • Replacing the Toner Cartridges • Replacing the Waste Toner Container • Replacing the Imaging Unit • Replacing the Transfer Belt • Cleaning the Printer • Replacement Parts 6 MAINTAINING YOUR PRINTER This chapter provides information for maintaining your printer and suggestions for high-quality and economical printing.
This chapter includes: • Printing a Configuration Page • Replacing the Supplies • Managing the Toner Cartridges • Replacing the Toner Cartridges • Replacing the Waste Toner Container • Replacing the Imaging Unit • Replacing the Transfer Belt • Cleaning the Printer • Replacement Parts 6 MAINTAINING YOUR PRINTER This chapter provides information for maintaining your printer and suggestions for high-quality and economical printing.
User Manual (ENGLISH)
Page 133
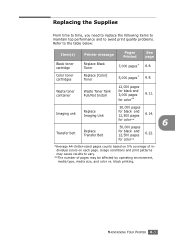
...Waste toner container Waste Toner Tank Full/Not Install 12,000 pages for black and 3,000 pages for black and 12,500 pages 6.22. Imaging unit Replace Imaging Unit Transfer belt Replace Transfer Belt 50,000 pages for color** *Average A4-/letter-sized pages counts based on each page. MAINTAINING YOUR PRINTER 6.3 Color toner cartridges Replace [Color] Toner.... **The number of individual colors on 5% coverage of pages may cause results to the table below: Item(s) Printer message Pages Printed See page Black toner cartridge Replace Black Toner 7,000 pages* 6.8. Usage ...
...Waste toner container Waste Toner Tank Full/Not Install 12,000 pages for black and 3,000 pages for black and 12,500 pages 6.22. Imaging unit Replace Imaging Unit Transfer belt Replace Transfer Belt 50,000 pages for color** *Average A4-/letter-sized pages counts based on each page. MAINTAINING YOUR PRINTER 6.3 Color toner cartridges Replace [Color] Toner.... **The number of individual colors on 5% coverage of pages may cause results to the table below: Item(s) Printer message Pages Printed See page Black toner cartridge Replace Black Toner 7,000 pages* 6.8. Usage ...
User Manual (ENGLISH)
Page 141
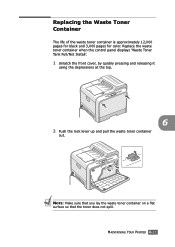
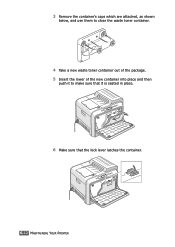
MAINTAINING YOUR PRINTER 6.11 NOTE: Make sure that you lay the waste toner container on a flat surface so that the toner does not spill. Replacing the Waste Toner Container The life of the waste toner container is approximately 12,000 pages for black and 3,000 pages for color. Replace the waste toner container when the control panel displays 'Waste Toner Tank Full/Not Install'. 1 Unlatch the front cover, by quickly pressing and releasing it using the depressions at the top. 6 2 Push the lock lever up and pull the waste toner container out.
MAINTAINING YOUR PRINTER 6.11 NOTE: Make sure that you lay the waste toner container on a flat surface so that the toner does not spill. Replacing the Waste Toner Container The life of the waste toner container is approximately 12,000 pages for black and 3,000 pages for color. Replace the waste toner container when the control panel displays 'Waste Toner Tank Full/Not Install'. 1 Unlatch the front cover, by quickly pressing and releasing it using the depressions at the top. 6 2 Push the lock lever up and pull the waste toner container out.
User Manual (ENGLISH)
Page 142
3 Remove the container's caps which are attached, as shown below, and use them to close the waste toner container. 4 Take a new waste toner container out of the package. 5 Insert the lower of the new container into place and then push it to make sure that it is seated in place. 6 Make sure that the lock lever latches the container. 6.12 MAINTAINING YOUR PRINTER
3 Remove the container's caps which are attached, as shown below, and use them to close the waste toner container. 4 Take a new waste toner container out of the package. 5 Insert the lower of the new container into place and then push it to make sure that it is seated in place. 6 Make sure that the lock lever latches the container. 6.12 MAINTAINING YOUR PRINTER
User Manual (ENGLISH)
Page 198
...messages. 7.30 SOLVING PROBLEMS Replace the waste toner container with your PC for further information on in Use" message appears during printing. "Error Writing to the Microsoft Windows 9x/Me/NT 4.0/2000/XP User's Guide that the printer is on. • If bi-...and Solution Exit all software applications. Message Tray2 Jam Cover Open Waste Motor Error Waste Toner Tank Full/Not Install Status Do this message. Contact a service representative. "Fail To Print", "A printer timeout error occurred." Reinstall the printer driver. • Ensure that the cables are connected correctly and...
...messages. 7.30 SOLVING PROBLEMS Replace the waste toner container with your PC for further information on in Use" message appears during printing. "Error Writing to the Microsoft Windows 9x/Me/NT 4.0/2000/XP User's Guide that the printer is on. • If bi-...and Solution Exit all software applications. Message Tray2 Jam Cover Open Waste Motor Error Waste Toner Tank Full/Not Install Status Do this message. Contact a service representative. "Fail To Print", "A printer timeout error occurred." Reinstall the printer driver. • Ensure that the cables are connected correctly and...

User Manual (ENGLISH)
Page 276
... pages at 5% Coverage Imaging Unit: Approx. 50,000 black pages (12,500 color pages)*** Transfer Belt: Approx. 50,000 black pages (12,500 color pages)*** Waste Toner Container: Approx. 12,000 black pages (3,000 color pages)*** Monthly: Up to 9.6 IPM in Letter); Printer Specifications Item Print Speed* Resolution Warm-up Time First Printing out Time Power...
... pages at 5% Coverage Imaging Unit: Approx. 50,000 black pages (12,500 color pages)*** Transfer Belt: Approx. 50,000 black pages (12,500 color pages)*** Waste Toner Container: Approx. 12,000 black pages (3,000 color pages)*** Monthly: Up to 9.6 IPM in Letter); Printer Specifications Item Print Speed* Resolution Warm-up Time First Printing out Time Power...

User Manual (ENGLISH)
Page 287
...A.2 install, in Windows B.2 preprinted paper, print 3.20 print order, set 4.12 print quality problems 7.22 print quality problems, solve 7.22 print resolution, set 4.9 printer options F.1 printer software install in Linux C.2 in Macintosh A.2 uninstall in Linux C.7 printing booklets 5.9 configuration page 6.2 double-sided 5.2 fitting to a selected paper 5.5 from Macintosh A.6...PS errors 7.32 Windows 7.30 Q quality problems, solve 7.22 R Remote Control Panel install D.2 start D.5 tabs D.6 uninstall D.4 replace imaging unit 6.14 toner cartridge 6.8 transfer belt 6.22 waste toner container 6.11 ii
...A.2 install, in Windows B.2 preprinted paper, print 3.20 print order, set 4.12 print quality problems 7.22 print quality problems, solve 7.22 print resolution, set 4.9 printer options F.1 printer software install in Linux C.2 in Macintosh A.2 uninstall in Linux C.7 printing booklets 5.9 configuration page 6.2 double-sided 5.2 fitting to a selected paper 5.5 from Macintosh A.6...PS errors 7.32 Windows 7.30 Q quality problems, solve 7.22 R Remote Control Panel install D.2 start D.5 tabs D.6 uninstall D.4 replace imaging unit 6.14 toner cartridge 6.8 transfer belt 6.22 waste toner container 6.11 ii
User Manual (ENGLISH)
Page 288
S specification paper G.4 printer G.2 system requirements for Linux C.2 for Macintosh A.2 T toner cartridge maintain 6.4 redistribute 6.5, 6.8 replace 6.8 transfer belt, replace 6.22 transparencies, print 3.17 Tray1, use 3.4 U uninstall Linux C.7 Remote Control Panel D.4 W waste toner container, replace 6.11 watermarks, use 5.10 iii
S specification paper G.4 printer G.2 system requirements for Linux C.2 for Macintosh A.2 T toner cartridge maintain 6.4 redistribute 6.5, 6.8 replace 6.8 transfer belt, replace 6.22 transparencies, print 3.17 Tray1, use 3.4 U uninstall Linux C.7 Remote Control Panel D.4 W waste toner container, replace 6.11 watermarks, use 5.10 iii
Quick Guide (ENGLISH)
Page 5
... the lower edge of both sides of the printer.) Left Cover (To install the toner cartridges press the top cover release button and open fully.) Control Panel (refer to Chapter 5 in the User's Guide which is on the CDROM.) Front Cover (Open to replace the waste toner container.) Tray 1 (250-sheet paper feeder) Optional...
... the lower edge of both sides of the printer.) Left Cover (To install the toner cartridges press the top cover release button and open fully.) Control Panel (refer to Chapter 5 in the User's Guide which is on the CDROM.) Front Cover (Open to replace the waste toner container.) Tray 1 (250-sheet paper feeder) Optional...

