User Manual (KOREAN)
Page 120
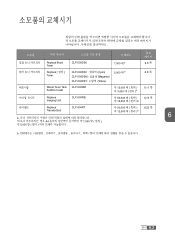
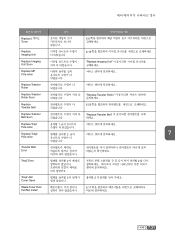
A4 7,000 ( ), 5,000 ( ) . b. , , , , / . 6.3 Replace Black Toner CLP-500D5K 7,000 a 6.8 Replace [ ] CLP-500D5C : (Cyan) 5,000 a 6.8 Toner CLP-500D5M : (Magenta) CLP-500D5Y : (Yellow) Waste Toner Tank CLP-500WB Full/Not Install 12,000 ( ) 6.11 3,000 ( ) b Replace Imaging Unit CLP-500RB 50,000 ( 12,500 ( ) 6.15 )b Replace CLP-500RT 50,000 ( ) 6.23 Transfer Belt 12,500 ( ) b 6 a. . . . .
A4 7,000 ( ), 5,000 ( ) . b. , , , , / . 6.3 Replace Black Toner CLP-500D5K 7,000 a 6.8 Replace [ ] CLP-500D5C : (Cyan) 5,000 a 6.8 Toner CLP-500D5M : (Magenta) CLP-500D5Y : (Yellow) Waste Toner Tank CLP-500WB Full/Not Install 12,000 ( ) 6.11 3,000 ( ) b Replace Imaging Unit CLP-500RB 50,000 ( 12,500 ( ) 6.15 )b Replace CLP-500RT 50,000 ( ) 6.23 Transfer Belt 12,500 ( ) b 6 a. . . . .
User Manual (KOREAN)
Page 128
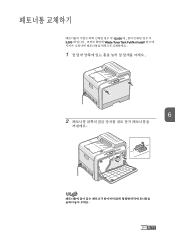
3,000 . 1 12,000 , 'Waste Toner Tank Full/Not Install' . . 6 2 . . 6.11
3,000 . 1 12,000 , 'Waste Toner Tank Full/Not Install' . . 6 2 . . 6.11

User Manual (KOREAN)
Page 184
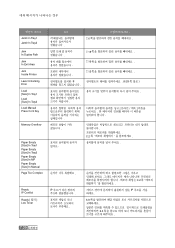
Motor Error Engine Fuser Low Heat Error Engine Fuser Over Heat Error Engine LSU Error Main Motor Error Waste Motor Error Install Imaging Unit Install Transfer Belt Install [ ] Toner Invalid Imaging Unit Invalid NewToner [ ] Invalid Toner [ ] Invalid Transfer Belt . ADC . . ADC Not Confirm Error Cover Open CTD Calibration Error Dev. CTD . . . . . . . . . . . . . . . . 7 . . . . . . . . 7.29
Motor Error Engine Fuser Low Heat Error Engine Fuser Over Heat Error Engine LSU Error Main Motor Error Waste Motor Error Install Imaging Unit Install Transfer Belt Install [ ] Toner Invalid Imaging Unit Invalid NewToner [ ] Invalid Toner [ ] Invalid Transfer Belt . ADC . . ADC Not Confirm Error Cover Open CTD Calibration Error Dev. CTD . . . . . . . . . . . . . . . . 7 . . . . . . . . 7.29
User Manual (KOREAN)
Page 185
IP . 7.30 C.2 ' . Jam0 In Tray1 Jam0 In Tray2 Jam In Duplex Path Jam In Exit Area Jam Inside Printer Lever Unlocking Error Load [Size] In Tray1 Load [Size] In Tray2 Load Manual Press Cont Key Memory Overflow Paper Empty [Size] In Tray1 Paper Empty [Size] In Tray2 Paper Empty [Size] In MP Paper Empty [Size] In Manual Page Too Complex Ready IP Conflict Ready [ ] Low Toner 7.6 . 7.19 . 7.16 . 7.15 . . . . . . . . . C.2 ' . . ' IP . . 6.8 . . 6.5 . . . . . . (6.28 ) . [ / ] . ' . . .
IP . 7.30 C.2 ' . Jam0 In Tray1 Jam0 In Tray2 Jam In Duplex Path Jam In Exit Area Jam Inside Printer Lever Unlocking Error Load [Size] In Tray1 Load [Size] In Tray2 Load Manual Press Cont Key Memory Overflow Paper Empty [Size] In Tray1 Paper Empty [Size] In Tray2 Paper Empty [Size] In MP Paper Empty [Size] In Manual Page Too Complex Ready IP Conflict Ready [ ] Low Toner 7.6 . 7.19 . 7.16 . 7.15 . . . . . . . . . C.2 ' . . ' IP . . 6.8 . . 6.5 . . . . . . (6.28 ) . [ / ] . ' . . .
User Manual (KOREAN)
Page 186
"Replace Transfer Belt" . . 1 . . 2 . . . . 7 . . 2 2 . . . 2 2 . . 6.11 . . 7.31 "Replace Transfer Roller" . . 6.23 . Replace [ ] Toner Replace Imaging Unit Replace Imaging Unit Soon Replace MP Pick-roller Replace Transfer Roller Replace Transfer Roller Soon Replace Transfer Belt Replace Transfer Belt Soon Replace Tray1 Pick-roller Replace Tray2 Pick-roller Transfer Belt Error Tray2 Error Tray2 Jam Cover Open Waste Toner Tank Full/Not Install . 6.8 . . 6.15 . "Replace Imaging Unit" . . . . . .
"Replace Transfer Belt" . . 1 . . 2 . . . . 7 . . 2 2 . . . 2 2 . . 6.11 . . 7.31 "Replace Transfer Roller" . . 6.23 . Replace [ ] Toner Replace Imaging Unit Replace Imaging Unit Soon Replace MP Pick-roller Replace Transfer Roller Replace Transfer Roller Soon Replace Transfer Belt Replace Transfer Belt Soon Replace Tray1 Pick-roller Replace Tray2 Pick-roller Transfer Belt Error Tray2 Error Tray2 Jam Cover Open Waste Toner Tank Full/Not Install . 6.8 . . 6.15 . "Replace Imaging Unit" . . . . . .
User Manual (ENGLISH)
Page 2
... the User's Guide 27 In Windows 27 In Linux 28 2 SETUP GUIDE Connecting a Printer Cable 19 Using a Parallel Cable 19 Using a USB Cable 20 For Networking Printing 21 Step 6. Installing the Imaging Unit, Transfer Belt and Toner Cartridges 7 Step 4. Understanding Your Printer 5 Step 3. CONTENTS Step 1. Changing the Display Language .......... 23 Step 9. Turning the...
... the User's Guide 27 In Windows 27 In Linux 28 2 SETUP GUIDE Connecting a Printer Cable 19 Using a Parallel Cable 19 Using a USB Cable 20 For Networking Printing 21 Step 6. Installing the Imaging Unit, Transfer Belt and Toner Cartridges 7 Step 4. Understanding Your Printer 5 Step 3. CONTENTS Step 1. Changing the Display Language .......... 23 Step 9. Turning the...
User Manual (ENGLISH)
Page 3
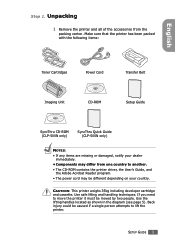
... handles located as shown in the diagram (see page 5). Make sure that the printer has been packed with the following items: Toner Cartridges Power Cord Transfer Belt Imaging Unit CD-ROM Setup Guide SyncThru CD-ROM (CLP-500N only) SyncThru Quick Guide (CLP-500N only) NOTES: • If any items are missing or damaged, notify your...
... handles located as shown in the diagram (see page 5). Make sure that the printer has been packed with the following items: Toner Cartridges Power Cord Transfer Belt Imaging Unit CD-ROM Setup Guide SyncThru CD-ROM (CLP-500N only) SyncThru Quick Guide (CLP-500N only) NOTES: • If any items are missing or damaged, notify your...
User Manual (ENGLISH)
Page 5
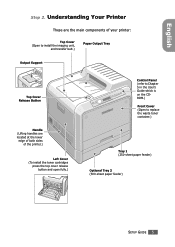
....) Paper Output Tray Output Support Top Cover Release Button Handle (Lifting handles are located at the lower edge of both sides of the printer.) Left Cover (To install the toner cartridges press the top cover release button and open fully.) Control Panel (refer to Chapter 5 in the User's Guide which is on...
....) Paper Output Tray Output Support Top Cover Release Button Handle (Lifting handles are located at the lower edge of both sides of the printer.) Left Cover (To install the toner cartridges press the top cover release button and open fully.) Control Panel (refer to Chapter 5 in the User's Guide which is on...
User Manual (ENGLISH)
Page 7
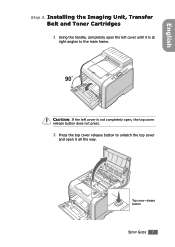
Top cover release button SETUP GUIDE 7 Installing the Imaging Unit, Transfer Belt and Toner Cartridges 1 Using the handle, completely open the left cover is at right angles to unlatch the top cover and open it is not completely open, the top cover release button does not press. 2 Press the top cover release button to the main frame. CAUTION: If the left cover until it all the way. English Step 3.
Top cover release button SETUP GUIDE 7 Installing the Imaging Unit, Transfer Belt and Toner Cartridges 1 Using the handle, completely open the left cover is at right angles to unlatch the top cover and open it is not completely open, the top cover release button does not press. 2 Press the top cover release button to the main frame. CAUTION: If the left cover until it all the way. English Step 3.
User Manual (ENGLISH)
Page 11
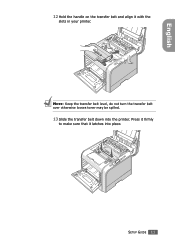
SETUP GUIDE 11 Press it firmly to make sure that it with the slots in your printer. NOTE: Keep the transfer belt level, do not turn the transfer belt over otherwise looses toner may be spilled. 13 Slide the transfer belt down into place. English 12 Hold the handle on the transfer belt and align it latches into the printer.
SETUP GUIDE 11 Press it firmly to make sure that it with the slots in your printer. NOTE: Keep the transfer belt level, do not turn the transfer belt over otherwise looses toner may be spilled. 13 Slide the transfer belt down into place. English 12 Hold the handle on the transfer belt and align it latches into the printer.
User Manual (ENGLISH)
Page 13
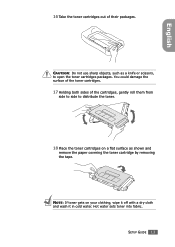
.... 17 Holding both sides of their packages. SETUP GUIDE 13 Hot water sets toner into fabric. NOTE: If toner gets on a flat surface as a knife or scissors, to distribute the toner. 18 Place the toner cartridges on your clothing, wipe it off with a dry cloth and wash it in cold water. CAUTION: Do not... use sharp objects, such as shown and remove the paper covering the toner cartridge by removing the tape. English 16 Take the toner cartridges out of the cartridges, gently roll them from side to side to open the...
.... 17 Holding both sides of their packages. SETUP GUIDE 13 Hot water sets toner into fabric. NOTE: If toner gets on a flat surface as a knife or scissors, to distribute the toner. 18 Place the toner cartridges on your clothing, wipe it off with a dry cloth and wash it in cold water. CAUTION: Do not... use sharp objects, such as shown and remove the paper covering the toner cartridge by removing the tape. English 16 Take the toner cartridges out of the cartridges, gently roll them from side to side to open the...
User Manual (ENGLISH)
Page 14
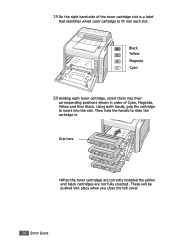
...left cover. 14 SETUP GUIDE Grip here. Then hold the handle to slide the cartridge in order of the toner cartridge slot is a label that identifies which color cartridge to fit into their corresponding positions shown in . These will be pushed into the slot. 19 On ...the right hand side of Cyan, Magenta, Yellow and then Black. K Black Y Yellow M Magenta C Cyan 20 Holding each toner cartridge, insert them into each slot. ...
...left cover. 14 SETUP GUIDE Grip here. Then hold the handle to slide the cartridge in order of the toner cartridge slot is a label that identifies which color cartridge to fit into their corresponding positions shown in . These will be pushed into the slot. 19 On ...the right hand side of Cyan, Magenta, Yellow and then Black. K Black Y Yellow M Magenta C Cyan 20 Holding each toner cartridge, insert them into each slot. ...
User Manual (ENGLISH)
Page 15
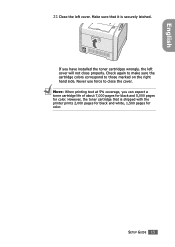
.... Make sure that is securely latched. If you can expect a toner cartridge life of about 7,000 pages for black and 5,000 pages for color. However, the toner cartridge that it is shipped with the printer prints 2,000 pages for black and white, 1,500 pages for color. NOTE: When printing text at 5% coverage, you have installed...
.... Make sure that is securely latched. If you can expect a toner cartridge life of about 7,000 pages for black and 5,000 pages for color. However, the toner cartridge that it is shipped with the printer prints 2,000 pages for black and white, 1,500 pages for color. NOTE: When printing text at 5% coverage, you have installed...
User Manual (ENGLISH)
Page 34
... 6.2 Replacing the Supplies 6.3 Managing the Toner Cartridges 6.4 Toner Cartridge Storage 6.4 Toner Cartridge Life Expectancy 6.4 Redistributing the Toner 6.5 Replacing the Toner Cartridges 6.8 Replacing the Waste Toner Container 6.11 Replacing the Imaging Unit 6.14 Replacing the Transfer Belt 6.22 Cleaning the Printer 6.29 Cleaning the Outside of the Printer 6.29 Cleaning the LSU Inside the Printer 6.30 Cleaning the Inside of...
... 6.2 Replacing the Supplies 6.3 Managing the Toner Cartridges 6.4 Toner Cartridge Storage 6.4 Toner Cartridge Life Expectancy 6.4 Redistributing the Toner 6.5 Replacing the Toner Cartridges 6.8 Replacing the Waste Toner Container 6.11 Replacing the Imaging Unit 6.14 Replacing the Transfer Belt 6.22 Cleaning the Printer 6.29 Cleaning the Outside of the Printer 6.29 Cleaning the LSU Inside the Printer 6.30 Cleaning the Inside of...
User Manual (ENGLISH)
Page 48
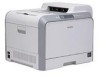
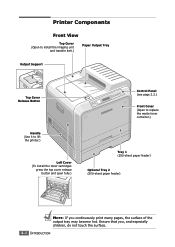
... to install the imaging unit and transfer belt.) Paper Output Tray Output Support Top Cover Release Button Handle (Use it to lift the printer.) Left Cover (To install the toner cartridges press the top cover release button and open fully.) Control Panel (see page 2.2.) Front Cover (Open to replace the waste... toner container.) Tray 1 (250-sheet paper feeder) Optional Tray 2 (500-sheet paper feeder) NOTE: If you , and especially children, do not touch the surface. 1.4 ...
... to install the imaging unit and transfer belt.) Paper Output Tray Output Support Top Cover Release Button Handle (Use it to lift the printer.) Left Cover (To install the toner cartridges press the top cover release button and open fully.) Control Panel (see page 2.2.) Front Cover (Open to replace the waste... toner container.) Tray 1 (250-sheet paper feeder) Optional Tray 2 (500-sheet paper feeder) NOTE: If you , and especially children, do not touch the surface. 1.4 ...

User Manual (ENGLISH)
Page 59
... menu item allows you to manually adjust the selected color contrast for each toner cartridge. Manual Adjust: It allows you to calibrate the printer for the best possible color printer quality. • Off: The printer is calibrated by the default setting. • Auto: It automatically calibrates the printer to produce the best possible print quality for a best...
... menu item allows you to manually adjust the selected color contrast for each toner cartridge. Manual Adjust: It allows you to calibrate the printer for the best possible color printer quality. • Off: The printer is calibrated by the default setting. • Auto: It automatically calibrates the printer to produce the best possible print quality for a best...
User Manual (ENGLISH)
Page 61
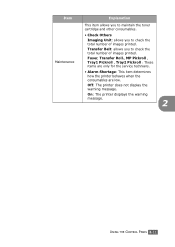
... of images printed. Off: The printer does not display the warning message. Fuser, Transfer Roll., MP Pickroll , Tray1 Pickroll , Tray2 Pickroll : These items are only for the service technians. • Alarm Shortage: This item determines how the printer behaves when the consumables are low.... On: The printer displays the warning message. 2 USING THE CONTROL PANEL 2.11 Item Maintenance Explanation This item allows you to maintain the...
... of images printed. Off: The printer does not display the warning message. Fuser, Transfer Roll., MP Pickroll , Tray1 Pickroll , Tray2 Pickroll : These items are only for the service technians. • Alarm Shortage: This item determines how the printer behaves when the consumables are low.... On: The printer displays the warning message. 2 USING THE CONTROL PANEL 2.11 Item Maintenance Explanation This item allows you to maintain the...
User Manual (ENGLISH)
Page 119
This chapter includes: • Printing a Configuration Page • Replacing the Supplies • Managing the Toner Cartridges • Replacing the Toner Cartridges • Replacing the Waste Toner Container • Replacing the Imaging Unit • Replacing the Transfer Belt • Cleaning the Printer • Replacement Part 6 MAINTAINING YOUR PRINTER This chapter provides information for maintaining your printer and suggestions for high-quality and economical printing.
This chapter includes: • Printing a Configuration Page • Replacing the Supplies • Managing the Toner Cartridges • Replacing the Toner Cartridges • Replacing the Waste Toner Container • Replacing the Imaging Unit • Replacing the Transfer Belt • Cleaning the Printer • Replacement Part 6 MAINTAINING YOUR PRINTER This chapter provides information for maintaining your printer and suggestions for high-quality and economical printing.
User Manual (ENGLISH)
Page 121
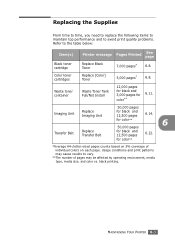
... pages for black and 12,500 pages 6.22. for color** 6.11. Color toner cartridges Replace [Color] Toner 5,000 pages* 6.8. Waste toner container Waste Toner Tank Full/Not Install 12,000 pages for black and 3,000 pages for color** *Average A4-/letter-sized pages counts based on each page. MAINTAINING YOUR PRINTER 6.3 black printing. Replacing the Supplies From time to...
... pages for black and 12,500 pages 6.22. for color** 6.11. Color toner cartridges Replace [Color] Toner 5,000 pages* 6.8. Waste toner container Waste Toner Tank Full/Not Install 12,000 pages for black and 3,000 pages for color** *Average A4-/letter-sized pages counts based on each page. MAINTAINING YOUR PRINTER 6.3 black printing. Replacing the Supplies From time to...
User Manual (ENGLISH)
Page 122
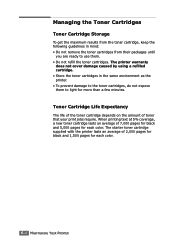
...of 7,000 pages for black and 5,000 pages for each color. The starter toner cartridge supplied with the printer lasts an average of toner that your print jobs require. Toner Cartridge Life Expectancy The life of the toner cartridge depends on the amount of 2,000 pages for black ...and 1,500 pages for each color. 6.4 MAINTAINING YOUR PRINTER The printer warranty does not cover damage caused by using a refilled cartridge. • Store the toner cartridges in mind: • Do not remove the toner cartridges from the toner cartridge, keep the following guidelines in the same...
...of 7,000 pages for black and 5,000 pages for each color. The starter toner cartridge supplied with the printer lasts an average of toner that your print jobs require. Toner Cartridge Life Expectancy The life of the toner cartridge depends on the amount of 2,000 pages for black ...and 1,500 pages for each color. 6.4 MAINTAINING YOUR PRINTER The printer warranty does not cover damage caused by using a refilled cartridge. • Store the toner cartridges in mind: • Do not remove the toner cartridges from the toner cartridge, keep the following guidelines in the same...


