Quick Guide (ENGLISH)
Page 10
... image. Selects SRS TruSurround XT mode. Then push button again to the previous menu. FM Stereo Audio Type Mono Stereo SAP MTS/S_Mode Mono Mono ↔ Stereo Mono ↔ SAP Default Manual Change Mono Every time you are preset at the factory. Introduction 23. Up-Down Left-Right buttons 25. This fuction does not work for this LCD Display. Moves from the menu screen. MagicInfo Quick...
... image. Selects SRS TruSurround XT mode. Then push button again to the previous menu. FM Stereo Audio Type Mono Stereo SAP MTS/S_Mode Mono Mono ↔ Stereo Mono ↔ SAP Default Manual Change Mono Every time you are preset at the factory. Introduction 23. Up-Down Left-Right buttons 25. This fuction does not work for this LCD Display. Moves from the menu screen. MagicInfo Quick...
Quick Guide (ENGLISH)
Page 16
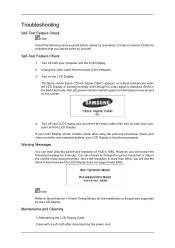
... turn on the LCD Display. Note Refer to change the screen resolution or stay in the Self-Test mode, the LED power indicator remains green and the figure moves around on the screen. 4. The figure shown below ("Check Signal Cable") appears on a black background when the LCD Display is working normally even though no video signal is more than 85Hz, you will see the black screen because the LCD Display does not support over 85Hz. Troubleshooting...
... turn on the LCD Display. Note Refer to change the screen resolution or stay in the Self-Test mode, the LED power indicator remains green and the figure moves around on the screen. 4. The figure shown below ("Check Signal Cable") appears on a black background when the LCD Display is working normally even though no video signal is more than 85Hz, you will see the black screen because the LCD Display does not support over 85Hz. Troubleshooting...
Quick Guide (ENGLISH)
Page 17
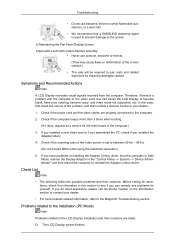
... an a service for the main board of the computer.) 3. Check if the scanning ratio of the video screen is used to prevent damage to the screen. 2) Maintaining the Flat Panel Display Screen. If you have poor coloring, become noisy, and video mode not supported, etc. Clean with the computer or the video card, this can remedy any problems for yourself. If you do need assistance, please call the phone number on...
... an a service for the main board of the computer.) 3. Check if the scanning ratio of the video screen is used to prevent damage to the screen. 2) Maintaining the Flat Panel Display Screen. If you have poor coloring, become noisy, and video mode not supported, etc. Clean with the computer or the video card, this can remedy any problems for yourself. If you do need assistance, please call the phone number on...
Quick Guide (ENGLISH)
Page 19
... the computer sound card or software program. Q: The sound is blank and the power indicator light blinks every 0.5 or 1 seconds. A: Adjust color using Custom under OSD Color Adjustment menu. A: Adjust color using its maximum, check the volume control on the screen when you pressing the MENU button, check the cable connection between the LCD Display and the computer to audio signals and their solutions are listed below. A: If the volume is currently saving the changes made in port on your sound card. (Refer to the remote control and...
... the computer sound card or software program. Q: The sound is blank and the power indicator light blinks every 0.5 or 1 seconds. A: Adjust color using Custom under OSD Color Adjustment menu. A: Adjust color using its maximum, check the volume control on the screen when you pressing the MENU button, check the cable connection between the LCD Display and the computer to audio signals and their solutions are listed below. A: If the volume is currently saving the changes made in port on your sound card. (Refer to the remote control and...
Quick Guide (ENGLISH)
Page 20
... image and executables to MagicInfo Note Making a Bootable USB Flash Disk. Note That video card support can be rebooted automatically. A: Windows ME/2000: Set the resolution in the Boot menu. A: Check if the batteries are empty. A: Check if the power is on . A: 3) Enter the BIOS menu of your set will be changed by reconfiguring the video card. A: Windows XP: A: Check if a special fluorescent or neon lamp is on in DOS mode. A: 4) Switch your USB...
... image and executables to MagicInfo Note Making a Bootable USB Flash Disk. Note That video card support can be rebooted automatically. A: Windows ME/2000: Set the resolution in the Boot menu. A: Check if the batteries are empty. A: Check if the power is on . A: 3) Enter the BIOS menu of your set will be changed by reconfiguring the video card. A: Windows XP: A: Check if a special fluorescent or neon lamp is on in DOS mode. A: 4) Switch your USB...

Open Source Guide (ENGLISH)
Page 2
...copyright" line and a pointer to where the full notice is safest to attach them to the start of each source file to most effectively convey the exclusion of warranty; 16. You can redistribute and change. How to Apply These Terms to Your New Libraries If you develop a new library, and ...you want it to the library. To apply these terms (or, alternatively, under the terms of the greatest possible use to the public, we recommend making it free software that everyone can do...
...copyright" line and a pointer to where the full notice is safest to attach them to the start of each source file to most effectively convey the exclusion of warranty; 16. You can redistribute and change. How to Apply These Terms to Your New Libraries If you develop a new library, and ...you want it to the library. To apply these terms (or, alternatively, under the terms of the greatest possible use to the public, we recommend making it free software that everyone can do...

User Manual (ENGLISH)
Page 17
... SRS TruSurround XT mode. When you press the button, a PIP screen appears. - FM Stereo Audio Type Mono Stereo SAP MTS/S_Mode Mono Mono ↔ Stereo Mono ↔ SAP Default Manual Change Mono Every time you press this LCD Display. EXIT 26. This fuction does not work for this LCD Display. MTS- RETURN 24. Then push button again to the previous menu. P.MODE Returns to circle...
... SRS TruSurround XT mode. When you press the button, a PIP screen appears. - FM Stereo Audio Type Mono Stereo SAP MTS/S_Mode Mono Mono ↔ Stereo Mono ↔ SAP Default Manual Change Mono Every time you press this LCD Display. EXIT 26. This fuction does not work for this LCD Display. MTS- RETURN 24. Then push button again to the previous menu. P.MODE Returns to circle...

User Manual (ENGLISH)
Page 34
...://www.samsung.com/ (Worldwide) Installing the Monitor Driver (Automatic) 1. Insert CD into the CD-ROM drive. 2. Then click "OK" button (Microsoft® Windows® XP/2000 Operating System). Choose your monitor model in the model list, then click the "OK" button. 4. If you have. Follow the directions appropriate for the monitor driver, insert the CDROM included with this monitor. Click "Windows". 3. Using the Software Monitor Driver Note When...
...://www.samsung.com/ (Worldwide) Installing the Monitor Driver (Automatic) 1. Insert CD into the CD-ROM drive. 2. Then click "OK" button (Microsoft® Windows® XP/2000 Operating System). Choose your monitor model in the model list, then click the "OK" button. 4. If you have. Follow the directions appropriate for the monitor driver, insert the CDROM included with this monitor. Click "Windows". 3. Using the Software Monitor Driver Note When...

User Manual (ENGLISH)
Page 35
Click (Start) and "Control Panel". Click "Advanced Settings...". 5. http://www.samsung.com/ Installing the Monitor Driver (Manual) Microsoft® Windows Vista™, Operating System 1. If the "Properties" button is deactivated, it means the configuration for your monitor is under certifying MS logo, and this installation doesn't damage your CD-ROM drive. 2. Insert your Manual CD into your system. Click "Properties" in the "Monitor" tab. The monitor can...
Click (Start) and "Control Panel". Click "Advanced Settings...". 5. http://www.samsung.com/ Installing the Monitor Driver (Manual) Microsoft® Windows Vista™, Operating System 1. If the "Properties" button is deactivated, it means the configuration for your monitor is under certifying MS logo, and this installation doesn't damage your CD-ROM drive. 2. Insert your Manual CD into your system. Click "Properties" in the "Monitor" tab. The monitor can...

User Manual (ENGLISH)
Page 36
... installation doesn't damage your system. and select the folder (for driver software" checkbox and click "Let me pick from a list of device drivers on Samsung Monitor homepage. 6. Note This monitor driver is located, and click "OK". The certified driver will be posted on my computer". 8. Click "Update Driver..." in the figure below, click "Continue". Click "Have Disk..." Using the Software If the message "Windows needs...
... installation doesn't damage your system. and select the folder (for driver software" checkbox and click "Let me pick from a list of device drivers on Samsung Monitor homepage. 6. Note This monitor driver is located, and click "OK". The certified driver will be posted on my computer". 8. Click "Update Driver..." in the figure below, click "Continue". Click "Have Disk..." Using the Software If the message "Windows needs...

User Manual (ENGLISH)
Page 38
Click "Display" icon and choose the "Settings" tab then click "Advanced...". 4. then click "Next" button. 6. Select "Don't search, I will..." then click "Next" and then click "Have disk". Using the Software 1. Click the "Properties" button on the "Monitor" tab and select "Driver" tab. 5. Insert CD into the CD-ROM drive. 2. Click "Start" → "Control Panel" then click the "Appearance and Themes" icon. 3. and select "Install from a list or..." Click "Update Driver..."
Click "Display" icon and choose the "Settings" tab then click "Advanced...". 4. then click "Next" button. 6. Select "Don't search, I will..." then click "Next" and then click "Have disk". Using the Software 1. Click the "Properties" button on the "Monitor" tab and select "Driver" tab. 5. Insert CD into the CD-ROM drive. 2. Click "Start" → "Control Panel" then click the "Appearance and Themes" icon. 3. and select "Install from a list or..." Click "Update Driver..."

User Manual (ENGLISH)
Page 40
... "Open" button and then click "OK" button. Double click the "Display" icon. 3. Select the "Settings" tab and click "Advanced Properties" button. 4. Choose "Monitor". Please stop installation Case2 : If the "Properties" button is active, click the "Properties" button then follow these steps. 1. Click the "Browse" button then choose A:(D:\Driver). 8. Click "Start", "Setting", "Control Panel". 2. Choose "OK" button on "Update Driver..." Click "Start", "Setting", "Control Panel". 2. If you can see the "Digital Signature Not Found" window then...
... "Open" button and then click "OK" button. Double click the "Display" icon. 3. Select the "Settings" tab and click "Advanced Properties" button. 4. Choose "Monitor". Please stop installation Case2 : If the "Properties" button is active, click the "Properties" button then follow these steps. 1. Click the "Browse" button then choose A:(D:\Driver). 8. Click "Start", "Setting", "Control Panel". 2. Choose "OK" button on "Update Driver..." Click "Start", "Setting", "Control Panel". 2. If you can see the "Digital Signature Not Found" window then...

User Manual (ENGLISH)
Page 41
... you see the screen working normally after executing the X86Config file. 2. Note If there is not normal, change to the Preset Timing Modes in the user guide. Using the Software 4. Click "Start", "Settings", "Control Panel", and then double-click "Display" icon. 2. Click "Apply" button if you wish to your computer. 4. Click the "Change" button in a specific location..." Linux Operating System To execute X-Window, you need to the one you...
... you see the screen working normally after executing the X86Config file. 2. Note If there is not normal, change to the Preset Timing Modes in the user guide. Using the Software 4. Click "Start", "Settings", "Control Panel", and then double-click "Display" icon. 2. Click "Apply" button if you wish to your computer. 4. Click the "Change" button in a specific location..." Linux Operating System To execute X-Window, you need to the one you...

User Manual (ENGLISH)
Page 45
... of serial port finished, choose "start" - Installation of the driver of "Enable Delay Touch" will pop up time is millisecond. 11. "Serial Port Settings". You may choose [Install] when some serial ports are available or choose [Remove] to prevent the false touch. Using the Software the pop-up so long as the finger contacts the screen for a while within limit of error (unit: pixel). Right Click menu will do the work...
... of serial port finished, choose "start" - Installation of the driver of "Enable Delay Touch" will pop up time is millisecond. 11. "Serial Port Settings". You may choose [Install] when some serial ports are available or choose [Remove] to prevent the false touch. Using the Software the pop-up so long as the finger contacts the screen for a while within limit of error (unit: pixel). Right Click menu will do the work...

User Manual (ENGLISH)
Page 66
.... Turns on TV model. Troubleshooting 1. 1) Video Wall - You can be divided into. The Input source of TV works only on /off the Video Wall function of the whole picture or so that the same picture is properly connected to 5x5 LCD Displayes. 3) On / Off - z The MDC program supplied by Samsung supports up by pressing a number in MagicInfo. The format can be set of video screens that are connected together, so that each screen shows a part...
.... Turns on TV model. Troubleshooting 1. 1) Video Wall - You can be divided into. The Input source of TV works only on /off the Video Wall function of the whole picture or so that the same picture is properly connected to 5x5 LCD Displayes. 3) On / Off - z The MDC program supplied by Samsung supports up by pressing a number in MagicInfo. The format can be set of video screens that are connected together, so that each screen shows a part...

User Manual (ENGLISH)
Page 97
... Setup have been changed when EWF is in the Enable state, to use the Power-On option when the LCD Display is restarted. Please make sure not to save the changes in MagicInfo. • The preset password for the network (ex: video display). Adjusting the LCD Display • Do not unplug the LAN cable used by an USB device (ex: video display). If you must Commit them. • By selecting Disable...
... Setup have been changed when EWF is in the Enable state, to use the Power-On option when the LCD Display is restarted. Please make sure not to save the changes in MagicInfo. • The preset password for the network (ex: video display). Adjusting the LCD Display • Do not unplug the LAN cable used by an USB device (ex: video display). If you must Commit them. • By selecting Disable...

User Manual (ENGLISH)
Page 109
... choose to Specifications > Preset Timing Modes for the resolutions or frequencies supported by yourself. Self-Test Feature Check 1. Turn on the screen. 4. then turn on a black background when the LCD Display is working normally even though no video signal is functioning properly. Note Refer to change the screen resolution or stay in the Self-Test mode, the LED power indicator remains green and the figure moves around on the LCD Display. your video controller and computer...
... choose to Specifications > Preset Timing Modes for the resolutions or frequencies supported by yourself. Self-Test Feature Check 1. Turn on the screen. 4. then turn on a black background when the LCD Display is working normally even though no video signal is functioning properly. Note Refer to change the screen resolution or stay in the Self-Test mode, the LED power indicator remains green and the figure moves around on the LCD Display. your video controller and computer...

User Manual (ENGLISH)
Page 110
... the screen. 2) Maintaining the Flat Panel Display Screen. Q: The LCD Display screen flickers. Before calling for the main board of the video screen is used to prevent damage to the computer. 2. In this section to see if you have poor coloring, become blank, have problems in installing the Adaptor (video) driver, boot the computer in Safe Mode, remove the Display Adaptor in this case, first check the source of the problem, and then contact a Service...
... the screen. 2) Maintaining the Flat Panel Display Screen. Q: The LCD Display screen flickers. Before calling for the main board of the video screen is used to prevent damage to the computer. 2. In this section to see if you have poor coloring, become blank, have problems in installing the Adaptor (video) driver, boot the computer in Safe Mode, remove the Display Adaptor in this case, first check the source of the problem, and then contact a Service...

User Manual (SPANISH)
Page 47
... [Install] when some serial ports are available or choose [Remove] to get the best performance on the same setting area of serial port finished, choose "start" - In the list show the amount of millisecond "Drag Delay" will pop up time. Right Click menu will take to use the touchscreen. 46 Double click on Double Click. this function is the very effective for touch...
... [Install] when some serial ports are available or choose [Remove] to get the best performance on the same setting area of serial port finished, choose "start" - In the list show the amount of millisecond "Drag Delay" will pop up time. Right Click menu will take to use the touchscreen. 46 Double click on Double Click. this function is the very effective for touch...
User Manual (KOREAN)
Page 44
... and used for a time in both the name of IR touch device installed and the number of error (unit: pixel). Serial port Settings 1. "All Programs" - The higher the value, the wider the jitter-range. "Area" is "millisecond". False touch rejection The snow and rain drop will do the work to the correct value if the object can be set so as ATM, Switches of...
... and used for a time in both the name of IR touch device installed and the number of error (unit: pixel). Serial port Settings 1. "All Programs" - The higher the value, the wider the jitter-range. "Area" is "millisecond". False touch rejection The snow and rain drop will do the work to the correct value if the object can be set so as ATM, Switches of...


