
User Manual (ENGLISH)
Page 11
D-Sub Cable Sold separately Power Cord Speaker Wire Cable Wall Mount KIT Speaker Set Stand KIT Others DVI Cable LAN Cable Remote Control Batteries (AAA X 2) Cover-Hole BNC to RCA Adapter Jack Semi Stand
D-Sub Cable Sold separately Power Cord Speaker Wire Cable Wall Mount KIT Speaker Set Stand KIT Others DVI Cable LAN Cable Remote Control Batteries (AAA X 2) Cover-Hole BNC to RCA Adapter Jack Semi Stand

User Manual (ENGLISH)
Page 14
Component Connection : connecting PR, Y, PBport 9. EXT SPEAKER(8 Ω) (EXT Speaker Connection Terminal) 16. MONITOR OUT is no degradation or signal source ten monitors can be connected to loopout may be connected. BNC/COMPONENT IN (BNC/...
Component Connection : connecting PR, Y, PBport 9. EXT SPEAKER(8 Ω) (EXT Speaker Connection Terminal) 16. MONITOR OUT is no degradation or signal source ten monitors can be connected to loopout may be connected. BNC/COMPONENT IN (BNC/...

User Manual (ENGLISH)
Page 25
D-Sub Cable Sold separately Power Cord Speaker Wire Cable Wall Mount KIT Speaker Set Stand KIT Others DVI Cable Remote Control Batteries (AAA X 2) Cover-Hole BNC to RCA Adapter Jack Semi Stand
D-Sub Cable Sold separately Power Cord Speaker Wire Cable Wall Mount KIT Speaker Set Stand KIT Others DVI Cable Remote Control Batteries (AAA X 2) Cover-Hole BNC to RCA Adapter Jack Semi Stand

User Manual (ENGLISH)
Page 28
...-R](Monitor Audio Connection Terminal (Input)) 11. BNC/COMPONENT OUT (BNC/Component Connection Terminal (Output)) - 7. AV OUT [VIDEO](VIDEO Connection Terminal) : AV mode (Output) 12. EXT SPEAKER(8 Ω) (EXT Speaker Connection Terminal) 16.
...-R](Monitor Audio Connection Terminal (Input)) 11. BNC/COMPONENT OUT (BNC/Component Connection Terminal (Output)) - 7. AV OUT [VIDEO](VIDEO Connection Terminal) : AV mode (Output) 12. EXT SPEAKER(8 Ω) (EXT Speaker Connection Terminal) 16.

User Manual (ENGLISH)
Page 32
Mechanical Lay-out | Monitor Head | Stand | Speaker | Installation VESA Bracket | Wall Bracket Installation 1. Mechanical Lay-out 2. Monitor Head
Mechanical Lay-out | Monitor Head | Stand | Speaker | Installation VESA Bracket | Wall Bracket Installation 1. Mechanical Lay-out 2. Monitor Head

User Manual (ENGLISH)
Page 33
z At least 2 persons are needed in order to place an order. Dimensions z Purchasing VESA Bracket and Installation Information : Please contact your order is not responsible for any product damage or any injury caused by installation at customer's discretion. Installation VESA Bracket z When installing VESA, make sure to comply with the international VESA standards. 3. Speaker 5. Stand 4. z Samsung is placed, installation professionals will visit you and install the bracket. After your nearest Samsung Distributor to move the LCD Monitor.
z At least 2 persons are needed in order to place an order. Dimensions z Purchasing VESA Bracket and Installation Information : Please contact your order is not responsible for any product damage or any injury caused by installation at customer's discretion. Installation VESA Bracket z When installing VESA, make sure to comply with the international VESA standards. 3. Speaker 5. Stand 4. z Samsung is placed, installation professionals will visit you and install the bracket. After your nearest Samsung Distributor to move the LCD Monitor.

User Manual (ENGLISH)
Page 40
.... R, G, B, H, V port on the back of your monitor. 2-2. Connecting to a Computer | Connecting to a VCR | Connecting to a DVD Player | Connecting a Camcorder Connecting DTV Set Top Box | Connecting Speakers | Connecting to the 15-pin, RGB port on the video card. Adjusting Your Monitor. Using the D-sub (Analog) connector on the computer. Using the DVI...
.... R, G, B, H, V port on the back of your monitor. 2-2. Connecting to a Computer | Connecting to a VCR | Connecting to a DVD Player | Connecting a Camcorder Connecting DTV Set Top Box | Connecting Speakers | Connecting to the 15-pin, RGB port on the video card. Adjusting Your Monitor. Using the D-sub (Analog) connector on the computer. Using the DVI...

User Manual (ENGLISH)
Page 43
...IN [L-AUDIO-R] on the Monitor and the AUDIO OUT jacks on the rear of the speaker without the speaker stand. 2. The speaker-bracket for a typical Set Top Box are shown below. 1. Tighten the SET and the speaker using the Source button on the Set Top Box. 3. Do not move the SET... the SET is connected to an Audio System Connect a Component cable between the speaker connection jack on the rear of the SET and the speaker connection jack on the Set Top Box. 2. Connect the speaker connection cable between the BNC/COMPONENT IN - Connecting to a DTV Set Top Box using the ...
...IN [L-AUDIO-R] on the Monitor and the AUDIO OUT jacks on the rear of the speaker without the speaker stand. 2. The speaker-bracket for a typical Set Top Box are shown below. 1. Tighten the SET and the speaker using the Source button on the Set Top Box. 3. Do not move the SET... the SET is connected to an Audio System Connect a Component cable between the speaker connection jack on the rear of the SET and the speaker connection jack on the Set Top Box. 2. Connect the speaker connection cable between the BNC/COMPONENT IN - Connecting to a DTV Set Top Box using the ...

User Manual (ENGLISH)
Page 66
... D-sub (Analog) connector on the video card. Connecting to a Computer | Connecting to a VCR | Connecting to a DVD Player | Connecting a Camcorder Connecting DTV Set Top Box | Connecting Speakers | Connecting to an Audio System 1.
... D-sub (Analog) connector on the video card. Connecting to a Computer | Connecting to a VCR | Connecting to a DVD Player | Connecting a Camcorder Connecting DTV Set Top Box | Connecting Speakers | Connecting to an Audio System 1.

User Manual (ENGLISH)
Page 69
... the Source button on the Set Top Box. 2. Connecting to a DTV Set Top Box using the screws. * Mount the set of the speaker. 5. PR, Y, PB port on the Monitor and the PR, Y, PB jacks on the rear of audio cables between the COMPONENT AUDIO IN [L-AUDIO-R] on the ...Monitor and the AUDIO OUT jacks on the monitor's front or remote control. The speaker-bracket for a typical Set Top Box are shown below. 1. Do not move the SET holding the speaker when the SET is connected to an Audio System For an explanation of the SET and the...
... the Source button on the Set Top Box. 2. Connecting to a DTV Set Top Box using the screws. * Mount the set of the speaker. 5. PR, Y, PB port on the Monitor and the PR, Y, PB jacks on the rear of audio cables between the COMPONENT AUDIO IN [L-AUDIO-R] on the ...Monitor and the AUDIO OUT jacks on the monitor's front or remote control. The speaker-bracket for a typical Set Top Box are shown below. 1. Do not move the SET holding the speaker when the SET is connected to an Audio System For an explanation of the SET and the...

User Manual (ENGLISH)
Page 92
... audio. 2) Treble : Emphasize high frequency audio. 3) Balance : Allows you want to adjust the settings according to adjust the sound balance between the left and right speakers. - The sound settings can be functioned at the same time. BBE (Bass Booster Effect) recreates the natural sound and improves sound clarity through boosting high...
... audio. 2) Treble : Emphasize high frequency audio. 3) Balance : Allows you want to adjust the settings according to adjust the sound balance between the left and right speakers. - The sound settings can be functioned at the same time. BBE (Bass Booster Effect) recreates the natural sound and improves sound clarity through boosting high...

User Manual (ENGLISH)
Page 105
... : Choose Speech when watching a show that is mostly dialogue (i.e., news). 5) Custom : Choose Custom if you to adjust the sound balance between the left and right speakers. - quality sound.) Off On The direct button on the remote control is On. Sound Select You can hear the sound even when the sound value...
... : Choose Speech when watching a show that is mostly dialogue (i.e., news). 5) Custom : Choose Custom if you to adjust the sound balance between the left and right speakers. - quality sound.) Off On The direct button on the remote control is On. Sound Select You can hear the sound even when the sound value...

User Manual (ENGLISH)
Page 141
Option / 30kg 1,312 X 715 X 293mm / 51.7 X 28.1 X 11.5 inch (With Speaker, With Stand) - In most cases, monitor installation will provide the best operating conditions and monitor settings. This is contained in this product. Interaction of TFT ...
Option / 30kg 1,312 X 715 X 293mm / 51.7 X 28.1 X 11.5 inch (With Speaker, With Stand) - In most cases, monitor installation will provide the best operating conditions and monitor settings. This is contained in this product. Interaction of TFT ...
User Manual (ENGLISH)
Page 142
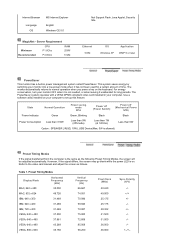
... Indicator Green Green, Blinking Black Black Power Consumption Less than 310W Less than 5W (Off-mode) Less than 1W (at 120Vac) Less than 0W Option : SPEAKER L/R(8Ω, 10W), USB Device(Max, 5W is allowed) Preset Timing Modes If the signal transferred from the computer is the same as follows. Preset Timing...
... Indicator Green Green, Blinking Black Black Power Consumption Less than 310W Less than 5W (Off-mode) Less than 1W (at 120Vac) Less than 0W Option : SPEAKER L/R(8Ω, 10W), USB Device(Max, 5W is allowed) Preset Timing Modes If the signal transferred from the computer is the same as follows. Preset Timing...

User Manual (ENGLISH)
Page 145
... to set up this feature. Power Consumption Less than 300W Power Saving Less than 0W Option / 30kg 1,312 X 715 X 293mm / 51.7 X 28.1 X 11.5 inch (With Speaker, With Stand) - PowerSaver This monitor has a built-in this product. Dot Acceptable TFT LCD panel manufactured by switching your computer. The PowerSaver system operates with...
... to set up this feature. Power Consumption Less than 300W Power Saving Less than 0W Option / 30kg 1,312 X 715 X 293mm / 51.7 X 28.1 X 11.5 inch (With Speaker, With Stand) - PowerSaver This monitor has a built-in this product. Dot Acceptable TFT LCD panel manufactured by switching your computer. The PowerSaver system operates with...

User Manual (ENGLISH)
Page 146
... Timing Modes Display Mode Horizontal Frequency (kHz) Vertical Frequency (Hz) Pixel Clock (MHz) Sync Polarity (H/V) MAC, 640 x 480 35.000 66.667 30.240 -/- Option : SPEAKER L/R(8Ω, 10W) Preset Timing Modes If the signal transferred from the computer is on. However, if the signal differs, the screen may go blank while...
... Timing Modes Display Mode Horizontal Frequency (kHz) Vertical Frequency (Hz) Pixel Clock (MHz) Sync Polarity (H/V) MAC, 640 x 480 35.000 66.667 30.240 -/- Option : SPEAKER L/R(8Ω, 10W) Preset Timing Modes If the signal transferred from the computer is on. However, if the signal differs, the screen may go blank while...


