

User Manual
Page 10
... buttons) / Volume buttons tions) DVI Cable BNC Cable Your LCD Display Front Wall Mount KIT Semi Stand KIT Calibrater LAN Cable (Applicable to the DRn model only) For more information on -screen menu and exits from one menu item to RCA Adaptor Jack (Not available in all loca- Navigate buttons (Up-Down buttons) Moves from the menu. Others Remote Control Sold separately Introduction Batteries (AAA X 2) BNC to another vertically or adjusts selected menu values. MENU button [MENU] Opens...
... buttons) / Volume buttons tions) DVI Cable BNC Cable Your LCD Display Front Wall Mount KIT Semi Stand KIT Calibrater LAN Cable (Applicable to the DRn model only) For more information on -screen menu and exits from one menu item to RCA Adaptor Jack (Not available in all loca- Navigate buttons (Up-Down buttons) Moves from the menu. Others Remote Control Sold separately Introduction Batteries (AAA X 2) BNC to another vertically or adjusts selected menu values. MENU button [MENU] Opens...
User Manual
Page 16
... LCD Display On/Off. MagicInfo Quick Launch Button. (Applicable to circle through available preconfigured modes. ( Dynamic → Standard → Movie → Custom ) PC / DVI / BNC : M/B (MagicBright) The audio resumes if MUTE or - Opens the on both the remote control and the LCD Display except for the Power and LOCK buttons. Activates a highlighted menu item. Then push button again to the DRn model only) MDC Quick Launch Button. MagicInfo buttons 6. +100 DEL 7. MENU...
... LCD Display On/Off. MagicInfo Quick Launch Button. (Applicable to circle through available preconfigured modes. ( Dynamic → Standard → Movie → Custom ) PC / DVI / BNC : M/B (MagicBright) The audio resumes if MUTE or - Opens the on both the remote control and the LCD Display except for the Power and LOCK buttons. Activates a highlighted menu item. Then push button again to the DRn model only) MDC Quick Launch Button. MagicInfo buttons 6. +100 DEL 7. MENU...

User Manual
Page 17
... type by using the DUAL button on the remote control while watching TV. Audio Type MTS/S_Mode Default AUTO 14. SRS 25. Then press the button again to another horizontally, vertically or adjusts selected menu values. In areas where the signal is displayed in PC mode. Press to FM Radio. In general Video mode, selects FM Radio, and turns off . MTS- SOURCE 17. In PC/DVI mode, sets the SOUND to change the screen size. Introduction...
... type by using the DUAL button on the remote control while watching TV. Audio Type MTS/S_Mode Default AUTO 14. SRS 25. Then press the button again to another horizontally, vertically or adjusts selected menu values. In areas where the signal is displayed in PC mode. Press to FM Radio. In general Video mode, selects FM Radio, and turns off . MTS- SOURCE 17. In PC/DVI mode, sets the SOUND to change the screen size. Introduction...
User Manual
Page 35
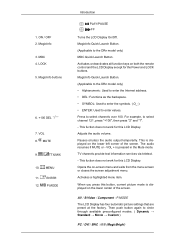
... control. The Input source of TV works only on MagicInfo model. At On Time Setup, MagicInfo Source functions only for which the power status is available only for the displays for MagicInfo Model. Time Control is ON. The Input source of MagicInfo works only on TV model. Set the Hour, Minute, AM/PM of On Time Setup, Status, Source, Volume of the selected display. 3) Off Time Setup - Click Select All or use Check...
... control. The Input source of TV works only on MagicInfo model. At On Time Setup, MagicInfo Source functions only for which the power status is available only for the displays for MagicInfo Model. Time Control is ON. The Input source of MagicInfo works only on TV model. Set the Hour, Minute, AM/PM of On Time Setup, Status, Source, Volume of the selected display. 3) Off Time Setup - Click Select All or use Check...
User Manual
Page 44
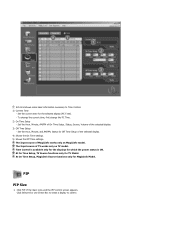
... 5x5 LCD Displayes. 3) On / Off - The display you wish to see a divided screen. Check the connection of screens with a different layout when dividing. You can be selected to control does not appear on TV model. The Input source of the selected display. 4) Format - z Select a display from Screen divider. z The MDC program supplied by pressing a number in MagicInfo. Turns on/off the Video Wall function of TV works only on the Power Control...
... 5x5 LCD Displayes. 3) On / Off - The display you wish to see a divided screen. Check the connection of screens with a different layout when dividing. You can be selected to control does not appear on TV model. The Input source of the selected display. 4) Format - z Select a display from Screen divider. z The MDC program supplied by pressing a number in MagicInfo. Turns on/off the Video Wall function of TV works only on the Power Control...

User Manual
Page 47
...; On. MDC Adjusting the LCD Display Moves to '0000'. The password will be reset to the Multi Control OSD screen. The remote control is the function that locks the OSD in order to activate the OSD adjustment lock function. Lock On Hold down the MENU button for more than five (5) seconds to keep the current states of settings or prevent others from adjusting the current settings. Note • When setting the Lock function, you...
...; On. MDC Adjusting the LCD Display Moves to '0000'. The password will be reset to the Multi Control OSD screen. The remote control is the function that locks the OSD in order to activate the OSD adjustment lock function. Lock On Hold down the MENU button for more than five (5) seconds to keep the current states of settings or prevent others from adjusting the current settings. Note • When setting the Lock function, you...

User Manual
Page 69
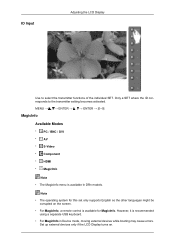
... Sound Available Modes • PC / BNC / DVI • AV • S-Video • Component • HDMI • MagicInfo Mode Note • The MagicInfo menu is available in high fidelity stereo amplifier. 1. Music Selects Music when watching music videos or concerts. Adjusting the LCD Display Adjusts the Contrast of the PIP window on the screen. 2. The LCD Display has a built-in DRn models. Standard Selects Standard for the standard factory settings. 2. Brightness Adjusts the Brightness...
... Sound Available Modes • PC / BNC / DVI • AV • S-Video • Component • HDMI • MagicInfo Mode Note • The MagicInfo menu is available in high fidelity stereo amplifier. 1. Music Selects Music when watching music videos or concerts. Adjusting the LCD Display Adjusts the Contrast of the PIP window on the screen. 2. The LCD Display has a built-in DRn models. Standard Selects Standard for the standard factory settings. 2. Brightness Adjusts the Brightness...

User Manual
Page 78
... , will switch PIP Off. Low MENU → , → ENTER → , →ENTER→ , → ENTER → MENU Video Wall A Video Wall is a set of video screens connected together, so that each screen. Video Wall Turns Off/On the Video Wall function of your TV by configuring the HDMI black level. 1. Video Wall does not operate in MagicInfo mode. Off 2. Note When Video Wall is running , the PIP, Auto Adjustment, Image Lock, and Size functions are not available. Adjusting the LCD Display etc...
... , will switch PIP Off. Low MENU → , → ENTER → , →ENTER→ , → ENTER → MENU Video Wall A Video Wall is a set of video screens connected together, so that each screen. Video Wall Turns Off/On the Video Wall function of your TV by configuring the HDMI black level. 1. Video Wall does not operate in MagicInfo mode. Off 2. Note When Video Wall is running , the PIP, Auto Adjustment, Image Lock, and Size functions are not available. Adjusting the LCD Display etc...
User Manual
Page 87
... in DRn models. However, it is available in Device mode, moving external devices while booting may cause errors. ID Input Adjusting the LCD Display Use to the transmitter setting becomes activated. Note • The operating system for this set only supports English so the other languages might be corrupted on . Set up external devices only if the LCD Display turns on the screen. • For MagicInfo, a remote control is available...
... in DRn models. However, it is available in Device mode, moving external devices while booting may cause errors. ID Input Adjusting the LCD Display Use to the transmitter setting becomes activated. Note • The operating system for this set only supports English so the other languages might be corrupted on . Set up external devices only if the LCD Display turns on the screen. • For MagicInfo, a remote control is available...

User Manual
Page 88
... LCD Display. • In the OSD image of Setup have been changed when EWF is in the Enable state, to the MagicInfo Server Help. pletely shut off the AC power during an operation. • For pivoted LCD Displays, ticker transparency is not supported. • For pivoted LCD Displays, a screen resolution of up to turn off . Adjusting the LCD Display • Do not unplug the LAN cable used by an USB device (ex: video display...
... LCD Display. • In the OSD image of Setup have been changed when EWF is in the Enable state, to the MagicInfo Server Help. pletely shut off the AC power during an operation. • For pivoted LCD Displays, ticker transparency is not supported. • For pivoted LCD Displays, a screen resolution of up to turn off . Adjusting the LCD Display • Do not unplug the LAN cable used by an USB device (ex: video display...

User Manual
Page 96
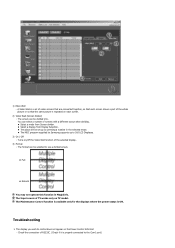
Internet Connects to access Setup mode. A password must be entered to the Internet Setup Sets various functions in MagicInfo mode. Note • Install the proper viewer(freeware) program to see the MS Office(Word, Excel, Power Point) or PDF doucuments. OFFICE / HTML Adjusting the LCD Display PPT(Power Point), DOC(MS Word), XLS(MS Excel), PDF, HTML, HTM files are displayed.
Internet Connects to access Setup mode. A password must be entered to the Internet Setup Sets various functions in MagicInfo mode. Note • Install the proper viewer(freeware) program to see the MS Office(Word, Excel, Power Point) or PDF doucuments. OFFICE / HTML Adjusting the LCD Display PPT(Power Point), DOC(MS Word), XLS(MS Excel), PDF, HTML, HTM files are displayed.
User Manual
Page 101
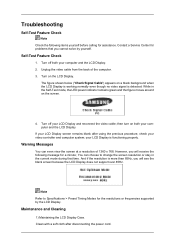
... to Specifications > Preset Timing Modes for assistance. Note Refer to change the screen resolution or stay in the Self-Test mode, the LED power indicator remains green and the figure moves around on a black background when the LCD Display is working normally even though no video signal is functioning properly. Contact a Service Center for problems that time. You can even view the screen at a resolution of the computer. 3. Unplug the video cable...
... to Specifications > Preset Timing Modes for assistance. Note Refer to change the screen resolution or stay in the Self-Test mode, the LED power indicator remains green and the figure moves around on a black background when the LCD Display is working normally even though no video signal is functioning properly. Contact a Service Center for problems that time. You can even view the screen at a resolution of the computer. 3. Unplug the video cable...

User Manual
Page 102
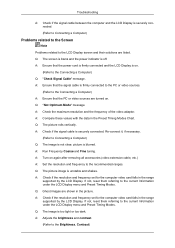
... Flat Panel Display Screen. In this case, first check the source of the computer.) 3. Check if the computer beeps more network-related information, refer to the MagicInfo Troubleshooting section. If you installed the Adaptor(video). 4. Q: The LCD Display screen flickers. If you installed a new video card or if you assembled the PC, check if you have poor coloring, become noisy, and video mode not supported, etc. Before calling for the main board of the problem...
... Flat Panel Display Screen. In this case, first check the source of the computer.) 3. Check if the computer beeps more network-related information, refer to the MagicInfo Troubleshooting section. If you installed the Adaptor(video). 4. Q: The LCD Display screen flickers. If you installed a new video card or if you assembled the PC, check if you have poor coloring, become noisy, and video mode not supported, etc. Before calling for the main board of the problem...
User Manual
Page 103
... LCD Display screen and their solutions are listed. A: Run Frequency Coarse and Fine tuning. A: Adjusts the brightness and contrast. (Refer to Connecting a Computer) Q: The image is too light or too dark. Troubleshooting A: Check if the signal cable between the computer and the LCD Display is firmly connected to the PC or video sources. (Refer to the Connecting a Computer) A: Ensure that the PC or video sources are turned on. Q: The picture image is securely connected. If not, reset...
... LCD Display screen and their solutions are listed. A: Run Frequency Coarse and Fine tuning. A: Adjusts the brightness and contrast. (Refer to Connecting a Computer) Q: The image is too light or too dark. Troubleshooting A: Check if the signal cable between the computer and the LCD Display is firmly connected to the PC or video sources. (Refer to the Connecting a Computer) A: Ensure that the PC or video sources are turned on. Q: The picture image is securely connected. If not, reset...

User Manual
Page 104
... connected. A: If the volume is using Custom under OSD Color Adjustment menu. Q: The sound is distorted by dark shadows. A: Adjust color using Custom under OSD Color Adjustment menu. Q: The color image is too high or too low. A: The LCD Display is still too low after turning the control to its power management system. Problems related to Audio Note Problems related to audio signals and their solutions are listed below. Q: The screen is blank and the power indicator light is blinking. Q: The remote control buttons...
... connected. A: If the volume is using Custom under OSD Color Adjustment menu. Q: The sound is distorted by dark shadows. A: Adjust color using Custom under OSD Color Adjustment menu. Q: The color image is too high or too low. A: The LCD Display is still too low after turning the control to its power management system. Problems related to Audio Note Problems related to audio signals and their solutions are listed below. Q: The screen is blank and the power indicator light is blinking. Q: The remote control buttons...
User Manual
Page 105
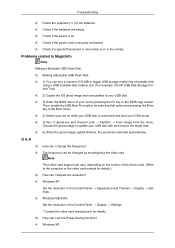
... Power Saving function? Q: Making a Bootable USB Flash Disk A: 1) You can turn a common 512-MB or bigger USB storage media into a bootable disk using a USB bootable disk creation tool. (For example, the HP USB Disk Storage Format Tool) A: 2) Copies the OS ghost image and executables to the computer or the video card manual for details. Note That video card support can I Adjusts the resolution? A: 4) Switch your USB disk. Troubleshooting A: Check the polarities (+/-) of the driver used...
... Power Saving function? Q: Making a Bootable USB Flash Disk A: 1) You can turn a common 512-MB or bigger USB storage media into a bootable disk using a USB bootable disk creation tool. (For example, the HP USB Disk Storage Format Tool) A: 2) Copies the OS ghost image and executables to the computer or the video card manual for details. Note That video card support can I Adjusts the resolution? A: 4) Switch your USB disk. Troubleshooting A: Check the polarities (+/-) of the driver used...

User Manual
Page 111
... normal conditions.Normal conditions are 3,133,440. Information For Better Display Adjust the computer resolution and screen injection rate (refresh rate) on screen if the best picture quality is not provided for TFTLCD. • Resolution: 1360 x 768 • Vertical frequency (refresh rate): 60 Hz TFT-LCD panels manufactured by using advanced semiconductor technology with time, forcing the liquid crystal to be bright sometimes or some of RED, GREEN, BLUE and WHITE color seem to lean.
... normal conditions.Normal conditions are 3,133,440. Information For Better Display Adjust the computer resolution and screen injection rate (refresh rate) on screen if the best picture quality is not provided for TFTLCD. • Resolution: 1360 x 768 • Vertical frequency (refresh rate): 60 Hz TFT-LCD panels manufactured by using advanced semiconductor technology with time, forcing the liquid crystal to be bright sometimes or some of RED, GREEN, BLUE and WHITE color seem to lean.
User Manual
Page 113
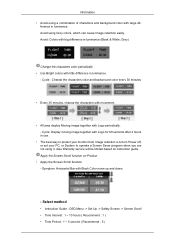
...- Cycle: Display moving image together with Logo for 60 seconds after 4 hours in luminance. ference in use. • The best way to protect your monitor from Image retention is to turn Power off, or set your PC, or System to operate a Screen Saver program when you are not using Grey colors, which can cause Image retention easily. Select method • Instruction Guide : OSD Menu -> Set Up -> Safety Screen -> Screen Scroll...
...- Cycle: Display moving image together with Logo for 60 seconds after 4 hours in luminance. ference in use. • The best way to protect your monitor from Image retention is to turn Power off, or set your PC, or System to operate a Screen Saver program when you are not using Grey colors, which can cause Image retention easily. Select method • Instruction Guide : OSD Menu -> Set Up -> Safety Screen -> Screen Scroll...
User Manual
Page 114
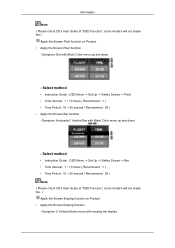
... Screen Bar function - Select method • Instruction Guide : OSD Menu -> Set Up -> Safety Screen -> Bar • Time Interval : 1 ~ 10 hours ( Recommend : 1 ) • Time Period : 10 ~ 50 second ( Recommend : 50 ) Note ( Please check CD's User Guide at "OSD Function", some model's will not available ) Apply the Screen Pixel function on Product • Apply the Screen Erasing function - Symptom: Horizontal / Vertical Bar with erasing the display Symptom: 2 Vertical blocks move with Black Color...
... Screen Bar function - Select method • Instruction Guide : OSD Menu -> Set Up -> Safety Screen -> Bar • Time Interval : 1 ~ 10 hours ( Recommend : 1 ) • Time Period : 10 ~ 50 second ( Recommend : 50 ) Note ( Please check CD's User Guide at "OSD Function", some model's will not available ) Apply the Screen Pixel function on Product • Apply the Screen Erasing function - Symptom: Horizontal / Vertical Bar with erasing the display Symptom: 2 Vertical blocks move with Black Color...
User Manual
Page 115
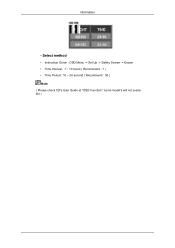
Information - Select method • Instruction Guide : OSD Menu -> Set Up -> Safety Screen -> Eraser • Time Interval : 1 ~ 10 hours ( Recommend : 1 ) • Time Period : 10 ~ 50 second ( Recommend : 50 ) Note ( Please check CD's User Guide at "OSD Function", some model's will not available )
Information - Select method • Instruction Guide : OSD Menu -> Set Up -> Safety Screen -> Eraser • Time Interval : 1 ~ 10 hours ( Recommend : 1 ) • Time Period : 10 ~ 50 second ( Recommend : 50 ) Note ( Please check CD's User Guide at "OSD Function", some model's will not available )


