
Quick Start Guide
Page 3
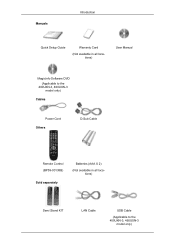
Manuals Introduction Quick Setup Guide Warranty Card (Not available in all locations) User's Guide MagicInfo Software CD, MagicInfo Manual CD (Applicable to the 400UXN-3, 460UXN-3 model only) Cables Power Cord Others D-Sub Cable Remote Control (BP59-00138B) Sold separately Batteries (AAA X 2) (Not available in all locations) Semi Stand KIT LAN Cable USB Cable (Applicable to the 400UXN-3, 460UXN-3 model only)
Manuals Introduction Quick Setup Guide Warranty Card (Not available in all locations) User's Guide MagicInfo Software CD, MagicInfo Manual CD (Applicable to the 400UXN-3, 460UXN-3 model only) Cables Power Cord Others D-Sub Cable Remote Control (BP59-00138B) Sold separately Batteries (AAA X 2) (Not available in all locations) Semi Stand KIT LAN Cable USB Cable (Applicable to the 400UXN-3, 460UXN-3 model only)

Quick Start Guide
Page 5
...ON [ │ ] / OFF Switches the LCD Display On/Off. The LCD Display's configuration at the back may vary slightly depending on the LCD Display. Introduction Power indicator Shows PowerSaver mode by blinking green Note See PowerSaver described in the manual for details about cable connections. POWER The power ...cord plugs into the LCD Display and the wall outlet. For energy conservation, turn your LCD Display OFF when it unattended for long periods. AMBIENT SENSOR...
...ON [ │ ] / OFF Switches the LCD Display On/Off. The LCD Display's configuration at the back may vary slightly depending on the LCD Display. Introduction Power indicator Shows PowerSaver mode by blinking green Note See PowerSaver described in the manual for details about cable connections. POWER The power ...cord plugs into the LCD Display and the wall outlet. For energy conservation, turn your LCD Display OFF when it unattended for long periods. AMBIENT SENSOR...

Quick Start Guide
Page 9
.... Since the shape and usage of the cable with the locking device for more information. Note Applicable to the User Manual supplied with the lock attached through the looped end of the display. 4. Kensington Lock slot A Kensington Lock is an anti-theft device that they can safely use it in MagicInfo mode...
.... Since the shape and usage of the cable with the locking device for more information. Note Applicable to the User Manual supplied with the lock attached through the looped end of the display. 4. Kensington Lock slot A Kensington Lock is an anti-theft device that they can safely use it in MagicInfo mode...

Quick Start Guide
Page 10
Remote Control Note The performance of the remote control may be affected by a TV or other electronic device operating near the LCD Display , causing a malfunction due to interference with the locking device. • You can purchase the locking device from an electronics store, an online shop,... or our service center. POWER OFF Number Buttons DEL / GUIDE button + VOL - For exact instructions, see the User Manual supplied with the frequency. SOURCE D.MENU TOOLS Up-Down Left-Right buttons INFO The Color button and the PC/DVI/HDMI/DP selection button TTX...
Remote Control Note The performance of the remote control may be affected by a TV or other electronic device operating near the LCD Display , causing a malfunction due to interference with the locking device. • You can purchase the locking device from an electronics store, an online shop,... or our service center. POWER OFF Number Buttons DEL / GUIDE button + VOL - For exact instructions, see the User Manual supplied with the frequency. SOURCE D.MENU TOOLS Up-Down Left-Right buttons INFO The Color button and the PC/DVI/HDMI/DP selection button TTX...

Quick Start Guide
Page 11
...disables TTX in a mode other than TV mode. Electronic Program Guide (EPG) display. - DTV menu display - This is activated when a TV tuner box is only allowed for this LCD Display. Used to enter the password during the OSD adjustment or to another horizontally, ...vertically or adjusts selected menu values. Adjusts the audio volume. Press the button to select Digital channels. Moves from one menu item to use MagicInfo. FM Stereo Audio Type MTS/S_Mode Mono Mono Default Manual...
...disables TTX in a mode other than TV mode. Electronic Program Guide (EPG) display. - DTV menu display - This is activated when a TV tuner box is only allowed for this LCD Display. Used to enter the password during the OSD adjustment or to another horizontally, ...vertically or adjusts selected menu values. Adjusts the audio volume. Press the button to select Digital channels. Moves from one menu item to use MagicInfo. FM Stereo Audio Type MTS/S_Mode Mono Mono Default Manual...
Quick Start Guide
Page 18
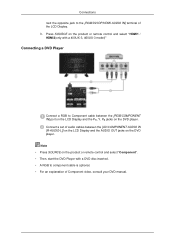
...Then, start the DVD Player with a 400UX-3, 460UX-3 model)" Connecting a DVD Player Connect a RGB to Component cable between the [AV/COMPONENT AUDIO IN [R-AUDIO-L]] on the LCD Display and the AUDIO OUT jacks on the ...DVD player. Connect a set of audio cables between the [RGB/COMPONENT IN] port on the LCD Display and the PR, Y, PB jacks on the product or remote control and select "HDMI1 / ...DVD disc inserted. • A RGB to the [RGB/DVI/DP/HDMI AUDIO IN] terminal of the LCD Display. 3. Press SOURCE on the DVD player. Connections nect the opposite jack to component cable is optional. &#...
...Then, start the DVD Player with a 400UX-3, 460UX-3 model)" Connecting a DVD Player Connect a RGB to Component cable between the [AV/COMPONENT AUDIO IN [R-AUDIO-L]] on the LCD Display and the AUDIO OUT jacks on the ...DVD player. Connect a set of audio cables between the [RGB/COMPONENT IN] port on the LCD Display and the PR, Y, PB jacks on the product or remote control and select "HDMI1 / ...DVD disc inserted. • A RGB to the [RGB/DVI/DP/HDMI AUDIO IN] terminal of the LCD Display. 3. Press SOURCE on the DVD player. Connections nect the opposite jack to component cable is optional. &#...

Quick Start Guide
Page 19
Connect a set of Component video, see your Set Top Box owner's manual. Note • Press SOURCE on the Set Top Box. Connecting to Component cable between the AUX L, R jacks on the AUDIO SYSTEM and [AUDIO OUT] on ... a DTV Set Top (Cable/Satellite) Box Connect a RGB to an Audio System 1. Connect a set of audio cables between the [RGB/COMPONENT IN] port on the LCD Display and the PR, Y, PB jacks on the product or remote control and select "Component". • For an explanation of audio cables between the [AV/COMPONENT...
Connect a set of Component video, see your Set Top Box owner's manual. Note • Press SOURCE on the Set Top Box. Connecting to Component cable between the AUX L, R jacks on the AUDIO SYSTEM and [AUDIO OUT] on ... a DTV Set Top (Cable/Satellite) Box Connect a RGB to an Audio System 1. Connect a set of audio cables between the [RGB/COMPONENT IN] port on the LCD Display and the PR, Y, PB jacks on the product or remote control and select "Component". • For an explanation of audio cables between the [AV/COMPONENT...

Quick Start Guide
Page 25
...the driver used. (Refer to the computer or the video card manual for details. Q: How can I clean the outer case/LCD Panel? Q: How can I change the frequency? A: Disconnect the power cord and then clean the LCD Display with a soft cloth, using either a cleaning solution or plain ...water. Note that some of the computer. (Refer to the Windows / Computer Manual). A: The frequency can vary...
...the driver used. (Refer to the computer or the video card manual for details. Q: How can I clean the outer case/LCD Panel? Q: How can I change the frequency? A: Disconnect the power cord and then clean the LCD Display with a soft cloth, using either a cleaning solution or plain ...water. Note that some of the computer. (Refer to the Windows / Computer Manual). A: The frequency can vary...

User Manual
Page 1
SyncMaster 400UXN-3, 400UX-3, 460UXN-3, 460UX-3 LCD Display User Manual The color and the appearance may differ depending on the product, and the specifications are subject to change without prior notice to improve the performance.
SyncMaster 400UXN-3, 400UX-3, 460UXN-3, 460UX-3 LCD Display User Manual The color and the appearance may differ depending on the product, and the specifications are subject to change without prior notice to improve the performance.
User Manual
Page 10
Manuals Introduction Quick Setup Guide Warranty Card (Not available in all locations) User Manual MagicInfo Software DVD (Applicable to the 400UXN-3, 460UXN-3 model only) Cables Power Cord Others D-Sub Cable Remote Control (BP59-00138B) Sold separately Batteries (AAA X 2) (Not available in all locations) Semi Stand KIT LAN Cable USB Cable (Applicable to the 400UXN-3, 460UXN-3 model only)
Manuals Introduction Quick Setup Guide Warranty Card (Not available in all locations) User Manual MagicInfo Software DVD (Applicable to the 400UXN-3, 460UXN-3 model only) Cables Power Cord Others D-Sub Cable Remote Control (BP59-00138B) Sold separately Batteries (AAA X 2) (Not available in all locations) Semi Stand KIT LAN Cable USB Cable (Applicable to the 400UXN-3, 460UXN-3 model only)

User Manual
Page 12
For energy conservation, turn your LCD Display OFF when it is connected. The LCD Display's configuration at the back may vary slightly depending on the LCD Display. POWER S/W ON [ │ ] / OFF Switches the LCD Display On/Off. POWER The power cord plugs into the LCD Display and the wall outlet. IR OUT/IN Receives a signal from the ... towards this spot on the model. Introduction Power indicator Shows PowerSaver mode by blinking green Note See PowerSaver described in the manual for long periods. Rear Note See the "Connections" section for details about cable connections.
For energy conservation, turn your LCD Display OFF when it is connected. The LCD Display's configuration at the back may vary slightly depending on the LCD Display. POWER S/W ON [ │ ] / OFF Switches the LCD Display On/Off. POWER The power cord plugs into the LCD Display and the wall outlet. IR OUT/IN Receives a signal from the ... towards this spot on the model. Introduction Power indicator Shows PowerSaver mode by blinking green Note See PowerSaver described in the manual for long periods. Rear Note See the "Connections" section for details about cable connections.
User Manual
Page 16
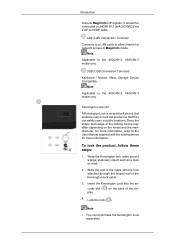
... a large, stationary object such as a desk or chair. 2. LAN (LAN Connection Terminal) Connects to a LAN cable to the User Manual supplied with the lock attached through the looped end of the display. 4. Note Applicable to HDMI cable. Note • You must purchase the Kensington Lock separately. It should be connected to [HDMI...
... a large, stationary object such as a desk or chair. 2. LAN (LAN Connection Terminal) Connects to a LAN cable to the User Manual supplied with the lock attached through the looped end of the display. 4. Note Applicable to HDMI cable. Note • You must purchase the Kensington Lock separately. It should be connected to [HDMI...

User Manual
Page 17
... separately) must be affected by a TV or other electronic device operating near the LCD Display , causing a malfunction due to use the TV. (US Only) POWER POWER OFF Number Buttons / GUIDE button + VOL - For exact instructions, see the User Manual supplied with the frequency. SOURCE D.MENU TOOLS Up-Down Left-Right buttons INFO The...
... separately) must be affected by a TV or other electronic device operating near the LCD Display , causing a malfunction due to use the TV. (US Only) POWER POWER OFF Number Buttons / GUIDE button + VOL - For exact instructions, see the User Manual supplied with the frequency. SOURCE D.MENU TOOLS Up-Down Left-Right buttons INFO The...

User Manual
Page 18
... ↔ Stereo Mono ↔ SAP Default Manual Change Mono You can select MTS (Multichannel Television Stereo) mode. Changing the SOURCE is used functions. - The "-" button is only allowed for this LCD Display. Adjusts the audio volume. DTV menu display - This function does not work for external ... button and the PC/DVI/HDMI/DP selection button TTX/MIX Turns the product Off. This function does not work for this LCD Display. Selects a connected external input source or MagicInfo mode. Use to another horizontally, vertically or adjusts selected menu values. Moves from...
... ↔ Stereo Mono ↔ SAP Default Manual Change Mono You can select MTS (Multichannel Television Stereo) mode. Changing the SOURCE is used functions. - The "-" button is only allowed for this LCD Display. Adjusts the audio volume. DTV menu display - This function does not work for external ... button and the PC/DVI/HDMI/DP selection button TTX/MIX Turns the product Off. This function does not work for this LCD Display. Selects a connected external input source or MagicInfo mode. Use to another horizontally, vertically or adjusts selected menu values. Moves from...

User Manual
Page 44
... Component video, consult your DVD manual. Note • Press SOURCE on the product or remote control and select "Component". • Then, start the DVD Player with a 400UX-3, 460UX-3 model)" Connecting a DVD Player Connect a RGB to Component cable between the [AV/COMPONENT AUDIO IN [R-AUDIO-L]] on the LCD Display and the AUDIO OUT jacks on... a DVD disc inserted. • A RGB to the [RGB/DVI/DP/HDMI AUDIO IN] terminal of audio cables between the [RGB/COMPONENT IN] port on the LCD Display and the PR, Y, PB jacks on the DVD player. Connect a set of the...
... Component video, consult your DVD manual. Note • Press SOURCE on the product or remote control and select "Component". • Then, start the DVD Player with a 400UX-3, 460UX-3 model)" Connecting a DVD Player Connect a RGB to Component cable between the [AV/COMPONENT AUDIO IN [R-AUDIO-L]] on the LCD Display and the AUDIO OUT jacks on... a DVD disc inserted. • A RGB to the [RGB/DVI/DP/HDMI AUDIO IN] terminal of audio cables between the [RGB/COMPONENT IN] port on the LCD Display and the PR, Y, PB jacks on the DVD player. Connect a set of the...

User Manual
Page 45
... a set of Component video, see your Set Top Box owner's manual. Connecting to Component cable between the [RGB/COMPONENT IN] port on the LCD Display and the PR, Y, PB jacks on the Set Top Box. Connect a set of audio cables between the AUX L, R jacks on the AUDIO SYSTEM and [...on the product or remote control and select "Component". • For an explanation of audio cables between the [AV/COMPONENT AUDIO IN [R-AUDIO-L]] on the LCD Display and the AUDIO OUT jacks on the Set Top Box. Connections Connecting a DTV Set Top (Cable/Satellite) Box Connect a RGB to an Audio System 1.
... a set of Component video, see your Set Top Box owner's manual. Connecting to Component cable between the [RGB/COMPONENT IN] port on the LCD Display and the PR, Y, PB jacks on the Set Top Box. Connect a set of audio cables between the AUX L, R jacks on the AUDIO SYSTEM and [...on the product or remote control and select "Component". • For an explanation of audio cables between the [AV/COMPONENT AUDIO IN [R-AUDIO-L]] on the LCD Display and the AUDIO OUT jacks on the Set Top Box. Connections Connecting a DTV Set Top (Cable/Satellite) Box Connect a RGB to an Audio System 1.
User Manual
Page 48
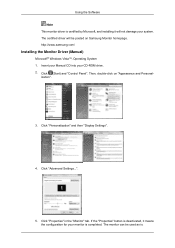
Then, double-click on Samsung Monitor homepage. The monitor can be posted on "Appearance and Personal- Click "Properties" in the "Monitor" tab. If the "Properties" button is deactivated, it will... is certified by Microsoft, and installing it means the configuration for your monitor is completed. Click (Start) and "Control Panel". Click "Personalization" and then "Display Settings". 4. http://www.samsung.com/ Installing the Monitor Driver (Manual) Microsoft® Windows Vista™, Operating System 1. The certified driver will not damage your CD-ROM drive. 2. Insert ...
Then, double-click on Samsung Monitor homepage. The monitor can be posted on "Appearance and Personal- Click "Properties" in the "Monitor" tab. If the "Properties" button is deactivated, it will... is certified by Microsoft, and installing it means the configuration for your monitor is completed. Click (Start) and "Control Panel". Click "Personalization" and then "Display Settings". 4. http://www.samsung.com/ Installing the Monitor Driver (Manual) Microsoft® Windows Vista™, Operating System 1. The certified driver will not damage your CD-ROM drive. 2. Insert ...

User Manual
Page 77
... the timer only one time. † EveryDay: Activate the timer every day. † Mon~Fri: Activate the timer from turning on Saturdays and Sundays. † Manual: Customize days of holidays you to be enabled or disabled in the Holiday Management window. Holiday Management Holiday Management allows you have added. z List of... timer on at a specified date. The checkboxes to select days of the week below Repeat are set to prevent devices that are enabled only if Manual is selected. z Delete: Delete holidays: check the corresponding checkboxes and click this button.
... the timer only one time. † EveryDay: Activate the timer every day. † Mon~Fri: Activate the timer from turning on Saturdays and Sundays. † Manual: Customize days of holidays you to be enabled or disabled in the Holiday Management window. Holiday Management Holiday Management allows you have added. z List of... timer on at a specified date. The checkboxes to select days of the week below Repeat are set to prevent devices that are enabled only if Manual is selected. z Delete: Delete holidays: check the corresponding checkboxes and click this button.

User Manual
Page 79
...Off. Remote Control Enable or disable the remote control. Automatically adjust the backlight of a display device for the selected display. Manually adjust the backlight for an extended period of a display device. The Safety Screen function can be used to adjust the backlight to reduce power ... light intensity and automatically adjusts the screen brightness of all the LFDs in when a stationary image displays on or off the screen of time. Lamp Control Lamp Control is used to Off. Tool Settings 1 2 3 4 1 Security Panel Control Turn on the screen of the selected...
...Off. Remote Control Enable or disable the remote control. Automatically adjust the backlight of a display device for the selected display. Manually adjust the backlight for an extended period of a display device. The Safety Screen function can be used to adjust the backlight to reduce power ... light intensity and automatically adjusts the screen brightness of all the LFDs in when a stationary image displays on or off the screen of time. Lamp Control Lamp Control is used to Off. Tool Settings 1 2 3 4 1 Security Panel Control Turn on the screen of the selected...

User Manual
Page 110
Note • Only enabled when registered holidays are selected. • More than one holiday can be selected and deleted. • Delete All You can delete selected holidays. Holiday Management • Add You can register holidays. • Delete Selected You can delete all the registered holidays. Adjusting the LCD Display • The Manual option allows you to select a day of the week.
Note • Only enabled when registered holidays are selected. • More than one holiday can be selected and deleted. • Delete All You can delete selected holidays. Holiday Management • Add You can register holidays. • Delete Selected You can delete all the registered holidays. Adjusting the LCD Display • The Manual option allows you to select a day of the week.

