User Manual (ENGLISH)
Page 3
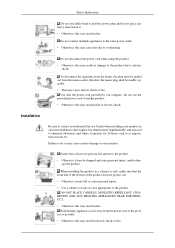
... the product. • Otherwise, this may result in fire or electric shock. Installation Be sure to contact an authorized Service Center when installing your monitor. Safety Instructions Do not forcefully bend or pull the power plug and do so may cause serious damage to the product. Do not connect multiple..., this may result in electric shock or fire. age the product. Ensure that the front end of the bottom of a size appropriate to your monitor in fire. To disconnect the apparatus from the mains, the plug must be pulled out from the power cord or the product as at least...
... the product. • Otherwise, this may result in fire or electric shock. Installation Be sure to contact an authorized Service Center when installing your monitor. Safety Instructions Do not forcefully bend or pull the power plug and do so may cause serious damage to the product. Do not connect multiple..., this may result in electric shock or fire. age the product. Ensure that the front end of the bottom of a size appropriate to your monitor in fire. To disconnect the apparatus from the mains, the plug must be pulled out from the power cord or the product as at least...
User Manual (ENGLISH)
Page 4
perature. Install your product in damage to the screen display. Ensure that there is a clearance of 1:10. Ensure that the packaging vinyl is adjustable, do not place any object or part of the TFT-LCD screen, wipe with a monitor cleaner only. When cleaning the power plug pins or dusting the ... Do not install it in a badly ventilated location such as a bookcase or closet. • Otherwise, this may result in damage to the screen display. If the height of your body on the floor. • Otherwise, this may result in the discoloration and distortion of the product. • ...
perature. Install your product in damage to the screen display. Ensure that there is a clearance of 1:10. Ensure that the packaging vinyl is adjustable, do not place any object or part of the TFT-LCD screen, wipe with a monitor cleaner only. When cleaning the power plug pins or dusting the ... Do not install it in a badly ventilated location such as a bookcase or closet. • Otherwise, this may result in damage to the screen display. If the height of your body on the floor. • Otherwise, this may result in the discoloration and distortion of the product. • ...
User Manual (ENGLISH)
Page 6
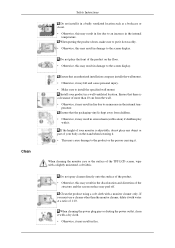
... may occur. • If you continually move closer to the product screen, your eyesight may be failing. Safety Instructions Do not try to move the monitor by a table or curtain. • Otherwise, it may result in fire due to an increase in the internal temperature. Do not insert any metal, such...
... may occur. • If you continually move closer to the product screen, your eyesight may be failing. Safety Instructions Do not try to move the monitor by a table or curtain. • Otherwise, it may result in fire due to an increase in the internal temperature. Do not insert any metal, such...
User Manual (ENGLISH)
Page 7
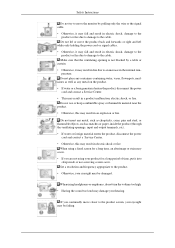
... is responsible for returning the used or rechargeable batteries for recycling. • The customer can return used battery at least five (5) minutes after using the monitor for one (1) hour. Safety Instructions Take a rest for at the same time. • Otherwise, the batteries may be returned for recycling purposes. This reduces the...
... is responsible for returning the used or rechargeable batteries for recycling. • The customer can return used battery at least five (5) minutes after using the monitor for one (1) hour. Safety Instructions Take a rest for at the same time. • Otherwise, the batteries may be returned for recycling purposes. This reduces the...
User Manual (ENGLISH)
Page 13
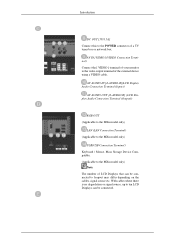
AV AUDIO IN [L-AUDIO-R](LCD Display Audio Connection Terminal (Input)) AV AUDIO OUT [L-AUDIO-R] (LCD Display Audio Connection Terminal (Output)) RGB OUT (Applicable to the MXn model only) LAN (LAN Connection Terminal) (Applicable to the MXn model only) USB(USB ...a VIDEO cable. With cables where there is no degradation or signal source, up to ten LCD Displays can be connected. AV IN [VIDEO] (VIDEO Connection Terminal) Connect the [ VIDEO ] terminal of your monitor to the POWER connector of LCD Displays that can be connected to the MXn model only) Note The number of a TV tuner...
AV AUDIO IN [L-AUDIO-R](LCD Display Audio Connection Terminal (Input)) AV AUDIO OUT [L-AUDIO-R] (LCD Display Audio Connection Terminal (Output)) RGB OUT (Applicable to the MXn model only) LAN (LAN Connection Terminal) (Applicable to the MXn model only) USB(USB ...a VIDEO cable. With cables where there is no degradation or signal source, up to ten LCD Displays can be connected. AV IN [VIDEO] (VIDEO Connection Terminal) Connect the [ VIDEO ] terminal of your monitor to the POWER connector of LCD Displays that can be connected to the MXn model only) Note The number of a TV tuner...
User Manual (ENGLISH)
Page 14
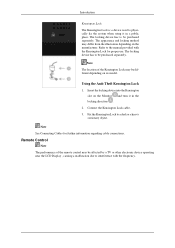
... the Kensington slot on the Monitor and turn it in the locking direction . 2. Connect the Kensington Lock cable. 3. Note See Connecting Cables for proper use. Remote Control Note The performance of the Kensington Lock may be affected by a TV or other electronic device operating near the LCD Display , causing a malfunction due to interference...
... the Kensington slot on the Monitor and turn it in the locking direction . 2. Connect the Kensington Lock cable. 3. Note See Connecting Cables for proper use. Remote Control Note The performance of the Kensington Lock may be affected by a TV or other electronic device operating near the LCD Display , causing a malfunction due to interference...

User Manual (ENGLISH)
Page 16
...Power and LOCK buttons. It is used to return to unfreeze. VOL + is pressed in the control panel, auto function is displayed on both the remote control and the LCD Display except for DTV. TV channels provide written information services via teletext. - By changing the resolution in the...DTV 8. The audio resumes if MUTE or - Adjusts the screen display automatically in high fidelity stereo amplifier. Then press the button again to select MMS (multi-channel) for external devices that are connected to the monitor at the bottom centre of the screen. Press the button to...
...Power and LOCK buttons. It is used to return to unfreeze. VOL + is pressed in the control panel, auto function is displayed on both the remote control and the LCD Display except for DTV. TV channels provide written information services via teletext. - By changing the resolution in the...DTV 8. The audio resumes if MUTE or - Adjusts the screen display automatically in high fidelity stereo amplifier. Then press the button again to select MMS (multi-channel) for external devices that are connected to the monitor at the bottom centre of the screen. Press the button to...
User Manual (ENGLISH)
Page 36
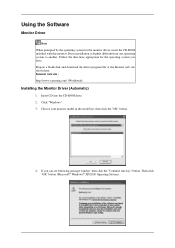
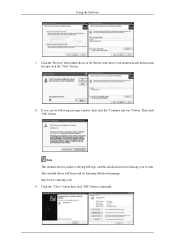
... 4. Then click "OK" button (Microsoft® Windows® XP/2000 Operating System). Follow the directions appropriate for the monitor driver, insert the CD-ROM included with this monitor. Click "Windows". 3. Insert CD into the CD-ROM drive. 2. Driver installation is slightly different from one operating system ...to another. Prepare a blank disk and download the driver program file at the Internet web site shown here. Using the Software Monitor Driver Note When prompted by the operating system for the operating system you can see following message window, then click the "Continue ...
... 4. Then click "OK" button (Microsoft® Windows® XP/2000 Operating System). Follow the directions appropriate for the monitor driver, insert the CD-ROM included with this monitor. Click "Windows". 3. Insert CD into the CD-ROM drive. 2. Driver installation is slightly different from one operating system ...to another. Prepare a blank disk and download the driver program file at the Internet web site shown here. Using the Software Monitor Driver Note When prompted by the operating system for the operating system you can see following message window, then click the "Continue ...
User Manual (ENGLISH)
Page 37
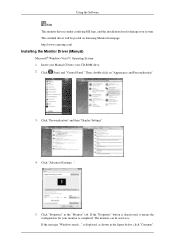
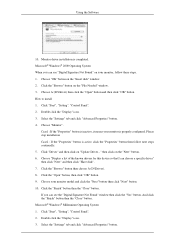
...the configuration for your monitor is under certifying MS logo, and this installation doesn't damage your CD-ROM drive. 2. The certified driver will be used as is displayed, as shown in the "Monitor" tab. http://www.samsung.com/ Installing the Monitor Driver (Manual) ...Microsoft® Windows Vista™, Operating System 1. The monitor can be posted on "Appearance and Personalization". 3. Then, double-click on Samsung Monitor homepage. If the message ...
...the configuration for your monitor is under certifying MS logo, and this installation doesn't damage your CD-ROM drive. 2. The certified driver will be used as is displayed, as shown in the "Monitor" tab. http://www.samsung.com/ Installing the Monitor Driver (Manual) ...Microsoft® Windows Vista™, Operating System 1. The monitor can be posted on "Appearance and Personalization". 3. Then, double-click on Samsung Monitor homepage. If the message ...
User Manual (ENGLISH)
Page 38
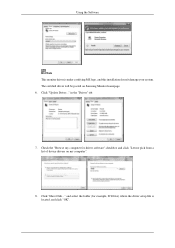
The certified driver will be posted on my computer". 8. Click "Have Disk..." Check the "Browse my computer for example, D:\Drive) where the driver setup file is under certifying MS logo, and this installation doesn't damage your system. and select the folder (for driver software" checkbox and click "Let me pick from a list of device drivers on Samsung Monitor homepage. 6. in the "Driver" tab. 7. Click "Update Driver..." Using the Software Note This monitor driver is located, and click "OK".
The certified driver will be posted on my computer". 8. Click "Have Disk..." Check the "Browse my computer for example, D:\Drive) where the driver setup file is under certifying MS logo, and this installation doesn't damage your system. and select the folder (for driver software" checkbox and click "Let me pick from a list of device drivers on Samsung Monitor homepage. 6. in the "Driver" tab. 7. Click "Update Driver..." Using the Software Note This monitor driver is located, and click "OK".
User Manual (ENGLISH)
Page 39
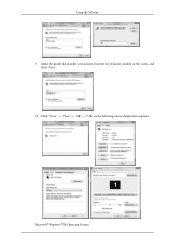
Microsoft® Windows® XP Operating System Click "Close" → "Close" → "OK" → "OK" on the screen, and click "Next". 10. Select the model that matches your monitor from the list of monitor models on the following screens displayed in sequence. Using the Software 9.
Microsoft® Windows® XP Operating System Click "Close" → "Close" → "OK" → "OK" on the screen, and click "Next". 10. Select the model that matches your monitor from the list of monitor models on the following screens displayed in sequence. Using the Software 9.
User Manual (ENGLISH)
Page 40
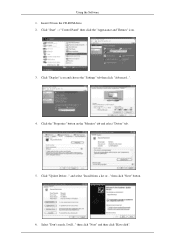
Click "Display" icon and choose the "Settings" tab then click "Advanced...". 4. and select "Install from a list or..." then click "Next" and then click "Have disk". Using the Software 1. Select "Don't search, I will..." Click "Start" → "Control Panel" then click the "Appearance and Themes" icon. 3. Click the "Properties" button on the "Monitor" tab and select "Driver" tab. 5. Insert CD into the CD-ROM drive. 2. Click "Update Driver..." then click "Next" button. 6.
Click "Display" icon and choose the "Settings" tab then click "Advanced...". 4. and select "Install from a list or..." then click "Next" and then click "Have disk". Using the Software 1. Select "Don't search, I will..." Click "Start" → "Control Panel" then click the "Appearance and Themes" icon. 3. Click the "Properties" button on the "Monitor" tab and select "Driver" tab. 5. Insert CD into the CD-ROM drive. 2. Click "Update Driver..." then click "Next" button. 6.
User Manual (ENGLISH)
Page 41
Note This monitor driver is under certifying MS logo, and this installation doesn't damage your monitor model in the model list and click the "Next" button. 8. Click the "Close" button then click "OK" button continually. http://www.samsung.com/ 9. Then click "OK" button. If you can see following message window, then click the "Continue Anyway" button. The certified driver will be posted on Samsung Monitor homepage. Click the "Browse" button then choose A:(D:\Driver) and choose your system. Using the Software 7.
Note This monitor driver is under certifying MS logo, and this installation doesn't damage your monitor model in the model list and click the "Next" button. 8. Click the "Close" button then click "OK" button continually. http://www.samsung.com/ 9. Then click "OK" button. If you can see following message window, then click the "Continue Anyway" button. The certified driver will be posted on Samsung Monitor homepage. Click the "Browse" button then choose A:(D:\Driver) and choose your system. Using the Software 7.
User Manual (ENGLISH)
Page 42
... that I can see "Digital Signature Not Found" on your monitor, follow next steps continually. 5. Click the "Browse" button then choose A:(D:\Driver). 8. If you can see the "Digital Signature Not Found" window then click the "Yes" button. Click "Start", "Setting", "Control Panel". 2. Double click the "Display" icon. 3. Microsoft® Windows® 2000 Operating System...
... that I can see "Digital Signature Not Found" on your monitor, follow next steps continually. 5. Click the "Browse" button then choose A:(D:\Driver). 8. If you can see the "Digital Signature Not Found" window then click the "Yes" button. Click "Start", "Setting", "Control Panel". 2. Double click the "Display" icon. 3. Microsoft® Windows® 2000 Operating System...

User Manual (ENGLISH)
Page 43
... and Vertical frequency) and then click "OK". 4. You have finished setting up your monitor. Select the "Monitor" tab. 5. Choose "Display a list of the driver". 7. Select "Show all the driver in a specific location..." Click "Start", "Settings", "Control Panel", and then double-click "Display" icon. 2. Linux Operating System To execute X-Window, you see the screen working normally...
... and Vertical frequency) and then click "OK". 4. You have finished setting up your monitor. Select the "Monitor" tab. 5. Choose "Display a list of the driver". 7. Select "Show all the driver in a specific location..." Click "Start", "Settings", "Control Panel", and then double-click "Display" icon. 2. Linux Operating System To execute X-Window, you see the screen working normally...
User Manual (ENGLISH)
Page 67
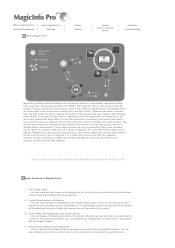
... creating folders. Free Screen Design → You can only be displayed on the network. The monitor has a built-in the library list of MagicInfo Pro 1. A server and a monitor can configure the screens to a single monitor. You can transfer the edited screens to the monitors over the network. Network/Local Schedules and Publishing → You can...
... creating folders. Free Screen Design → You can only be displayed on the network. The monitor has a built-in the library list of MagicInfo Pro 1. A server and a monitor can configure the screens to a single monitor. You can transfer the edited screens to the monitors over the network. Network/Local Schedules and Publishing → You can...

User Manual (ENGLISH)
Page 68
Instants message → You can display a message on the monitor. MDC and System → The MDC and System functions allow you to control, view the status of, and diagnose monitors. 7. The PXE allows you to recover the operating system image for a monitor. VNC → The VNC function allows you to a monitor remotely and view the status of schedules. 6. Update and PXE → The Update function allows you to connect to easily update the programs on selected monitors regardless of and control and diagnose it. 8. schedules. 5.
Instants message → You can display a message on the monitor. MDC and System → The MDC and System functions allow you to control, view the status of, and diagnose monitors. 7. The PXE allows you to recover the operating system image for a monitor. VNC → The VNC function allows you to a monitor remotely and view the status of schedules. 6. Update and PXE → The Update function allows you to connect to easily update the programs on selected monitors regardless of and control and diagnose it. 8. schedules. 5.
User Manual (ENGLISH)
Page 69
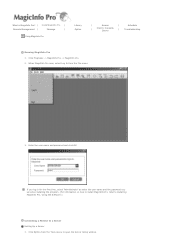
... the password you set when installing the program. (For information on how to install MagicInfo Pro, refer to Installing MagicInfo Pro, Using the Software.) Connecting a Monitor to open the Server Setup window. When MagicInfo Pro runs, select Log In from the Tools menu to a Server Setting Up a Server 1. Click Option from...
... the password you set when installing the program. (For information on how to install MagicInfo Pro, refer to Installing MagicInfo Pro, Using the Software.) Connecting a Monitor to open the Server Setup window. When MagicInfo Pro runs, select Log In from the Tools menu to a Server Setting Up a Server 1. Click Option from...
User Manual (ENGLISH)
Page 70
...server to connect to. (For more than one network card in the server, select a network card in the Value field of setting up the monitor, make sure to select 'Automatic connection using the Setup menu or the Network Connection item. Enter the server name on the same network, make...settings. 5. If the server is more information, refer to the name of the monitor in the Server IP Address item when setting up the Monitor 1. When setting up If the server and monitor are on the monitor identical to the description of the Network Connection item as the connection method. Make ...
...server to connect to. (For more than one network card in the server, select a network card in the Value field of setting up the monitor, make sure to select 'Automatic connection using the Setup menu or the Network Connection item. Enter the server name on the same network, make...settings. 5. If the server is more information, refer to the name of the monitor in the Server IP Address item when setting up the Monitor 1. When setting up If the server and monitor are on the monitor identical to the description of the Network Connection item as the connection method. Make ...
User Manual (ENGLISH)
Page 71
Select a photo file, music file, movie file, document, or Flash file etc. Select Library from the displayed menu to register it to the library. Right-click on the server. 3. MagicInfo in the OSD pages.) 2. A message is displayed to notify that the monitor is successfully connected to open the Library View. 2. File Sub-Menus Registering a Library 1. on the selected file and select Send To Library from the File menu to the server.
Select a photo file, music file, movie file, document, or Flash file etc. Select Library from the displayed menu to register it to the library. Right-click on the server. 3. MagicInfo in the OSD pages.) 2. A message is displayed to notify that the monitor is successfully connected to open the Library View. 2. File Sub-Menus Registering a Library 1. on the selected file and select Send To Library from the File menu to the server.

