Quick Guide (ENGLISH)
Page 7
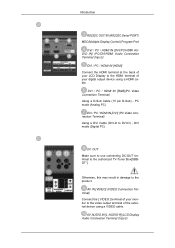
...Box[SBBDT*]. AV IN [VIDEO] (VIDEO Connection Terminal) Connect the [ VIDEO ] terminal of the external device using a HDMI cable. AV AUDIO IN [L-AUDIO-R](LCD Display Audio Connection Terminal (Input)) DVI / PC / HDMI IN [RGB](PC Video Connection Terminal) Using a D-Sub Cable (15 pin D-Sub) - Introduction RS232C ...DVI/HDMI Audio Connection Terminal (Input)) DVI / PC / HDMI IN [HDMI] Connect the HDMI terminal at the back of your LCD Display to the HDMI terminal of your monitor to the video output terminal of your digital output device using a VIDEO cable. PC mode (Analog PC) DVI / PC / ...
...Box[SBBDT*]. AV IN [VIDEO] (VIDEO Connection Terminal) Connect the [ VIDEO ] terminal of the external device using a HDMI cable. AV AUDIO IN [L-AUDIO-R](LCD Display Audio Connection Terminal (Input)) DVI / PC / HDMI IN [RGB](PC Video Connection Terminal) Using a D-Sub Cable (15 pin D-Sub) - Introduction RS232C ...DVI/HDMI Audio Connection Terminal (Input)) DVI / PC / HDMI IN [HDMI] Connect the HDMI terminal at the back of your LCD Display to the HDMI terminal of your monitor to the video output terminal of your digital output device using a VIDEO cable. PC mode (Analog PC) DVI / PC / ...

Quick Guide (ENGLISH)
Page 9
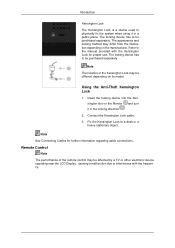
... performance of the Kensington Lock may differ from the illustration depending on the Monitor and turn it in the locking direction . 2. The appearance and locking method may be affected by a TV or other electronic device operating near the LCD Display , causing a malfunction due to interference with the Kensington Lock for further information regarding...
... performance of the Kensington Lock may differ from the illustration depending on the Monitor and turn it in the locking direction . 2. The appearance and locking method may be affected by a TV or other electronic device operating near the LCD Display , causing a malfunction due to interference with the Kensington Lock for further information regarding...
Quick Guide (ENGLISH)
Page 11
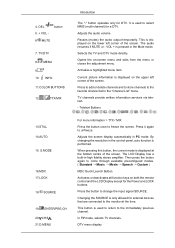
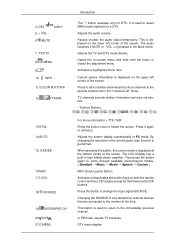
... buttons. Adjusts the audio volume. This is used to select MMS (multi-channel) for external devices that are connected to the monitor at the bottom centre of the screen. When pressing this button, the current mode is performed. In TV mode, selects TV channels....if MUTE or - VOL + is only allowed for a DTV. Adjusts the screen display automatically in high fidelity stereo amplifier. Changing the SOURCE is pressed in the control panel, auto function is displayed at the time. The LCD Display has a built-in PC mode. Selects the TV and DTV mode directly. It...
... buttons. Adjusts the audio volume. This is used to select MMS (multi-channel) for external devices that are connected to the monitor at the bottom centre of the screen. When pressing this button, the current mode is performed. In TV mode, selects TV channels....if MUTE or - VOL + is only allowed for a DTV. Adjusts the screen display automatically in high fidelity stereo amplifier. Changing the SOURCE is pressed in the control panel, auto function is displayed at the time. The LCD Display has a built-in PC mode. Selects the TV and DTV mode directly. It...
User Manual (ENGLISH)
Page 14
... D-Sub Cable (15 pin D-Sub) - AV AUDIO IN [L-AUDIO-R](LCD Display Audio Connection Terminal (Input)) AV IN [VIDEO] (VIDEO Connection Terminal) Connect the [ VIDEO ] terminal of your monitor to the video output terminal of your LCD Display to the HDMI terminal of the external device using a HDMI cable. .../ HDMI IN [DVI] (PC Video Connection Terminal) Using a DVI Cable (DVI-D to DVI-D) - Introduction RS232C OUT/IN (RS232C Serial PORT) MDC(Multiple Display Control) Program Port DVI / PC / HDMI IN [DVI/PC/HDMI AUDIO IN] (PC/DVI/HDMI Audio Connection Terminal (Input)) DVI / PC / HDMI ...
... D-Sub Cable (15 pin D-Sub) - AV AUDIO IN [L-AUDIO-R](LCD Display Audio Connection Terminal (Input)) AV IN [VIDEO] (VIDEO Connection Terminal) Connect the [ VIDEO ] terminal of your monitor to the video output terminal of your LCD Display to the HDMI terminal of the external device using a HDMI cable. .../ HDMI IN [DVI] (PC Video Connection Terminal) Using a DVI Cable (DVI-D to DVI-D) - Introduction RS232C OUT/IN (RS232C Serial PORT) MDC(Multiple Display Control) Program Port DVI / PC / HDMI IN [DVI/PC/HDMI AUDIO IN] (PC/DVI/HDMI Audio Connection Terminal (Input)) DVI / PC / HDMI ...
User Manual (ENGLISH)
Page 16
... Kensington Lock for further information regarding cable connections. The appearance and locking method may be affected by a TV or other electronic device operating near the LCD Display , causing a malfunction due to be purchased separately. Insert the locking device into the Kensington slot on the manufacturer. Note See Connecting Cables for proper use... device has to a desk or a heavy stationary object. Remote Control Note The performance of the Kensington Lock may differ from the illustration depending on the Monitor and turn it in the locking direction . 2.
... Kensington Lock for further information regarding cable connections. The appearance and locking method may be affected by a TV or other electronic device operating near the LCD Display , causing a malfunction due to be purchased separately. Insert the locking device into the Kensington slot on the manufacturer. Note See Connecting Cables for proper use... device has to a desk or a heavy stationary object. Remote Control Note The performance of the Kensington Lock may differ from the illustration depending on the Monitor and turn it in the locking direction . 2.
User Manual (ENGLISH)
Page 18
...to the immediately previous channel. Opens the on the lower left corner of the screen. Teletext Buttons 13.STILL 14.AUTO 15. SOURCE 19. The LCD Display has a built-in PC mode. Then press the button again to unfreeze. This button is performed. TTX/MIX Introduction The "-" button operates only ...corner of the screen. Press to add or delete channels and to store channels to the favorite channel list in the control panel, auto function is used to the monitor at the bottom centre of the screen. Press the button to freeze the screen. MENU 9. 10. TV channels provide ...
...to the immediately previous channel. Opens the on the lower left corner of the screen. Teletext Buttons 13.STILL 14.AUTO 15. SOURCE 19. The LCD Display has a built-in PC mode. Then press the button again to unfreeze. This button is performed. TTX/MIX Introduction The "-" button operates only ...corner of the screen. Press to add or delete channels and to store channels to the favorite channel list in the control panel, auto function is used to the monitor at the bottom centre of the screen. Press the button to freeze the screen. MENU 9. 10. TV channels provide ...
User Manual (ENGLISH)
Page 91
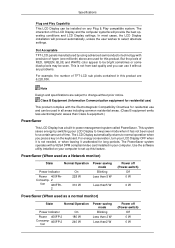
...select alternate settings. PowerSaver (When used for this product. Dot Acceptable TFT-LCD panels manufactured by switching your LCD Display to low-power mode when it has not been used as a Network monitor) State Normal Operation Power Indicator Power 400FPnConsump- 2 tion 460FPn2 On 228 W... installed in this product are used as a normal monitor) State Normal Operation Power Indicator Power 400FP-2 Consump- 460FP-2 tion On 180 W 240 W Power saving mode Blinking Less than Class A equipment.) PowerSaver This LCD Display has a built-in power management system called PowerSaver....
...select alternate settings. PowerSaver (When used for this product. Dot Acceptable TFT-LCD panels manufactured by switching your LCD Display to low-power mode when it has not been used as a Network monitor) State Normal Operation Power Indicator Power 400FPnConsump- 2 tion 460FPn2 On 228 W... installed in this product are used as a normal monitor) State Normal Operation Power Indicator Power 400FP-2 Consump- 460FP-2 tion On 180 W 240 W Power saving mode Blinking Less than Class A equipment.) PowerSaver This LCD Display has a built-in power management system called PowerSaver....
User Manual (ENGLISH)
Page 94
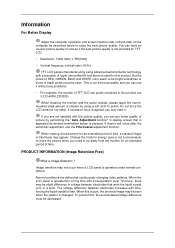
...display screen that work the liquid crystal (LC) in this product. PRODUCT INFORMATION (Image Retention Free) What is operated under normal conditions. But the pixels of RED, GREEN, BLUE and WHITE color seem to polish. This is not from the monitor for an extended period of time. When the LCD panel...hours), there may stain it without any problems. • For example, the number of TFT-LCD sub pixels contained in a pixel. When cleaning the monitor and the panel outside, please apply the recommended small amount of cleaner by using advanced semiconductor technology with time, ...
...display screen that work the liquid crystal (LC) in this product. PRODUCT INFORMATION (Image Retention Free) What is operated under normal conditions. But the pixels of RED, GREEN, BLUE and WHITE color seem to polish. This is not from the monitor for an extended period of time. When the LCD panel...hours), there may stain it without any problems. • For example, the number of TFT-LCD sub pixels contained in a pixel. When cleaning the monitor and the panel outside, please apply the recommended small amount of cleaner by using advanced semiconductor technology with time, ...
User Manual (KOREAN)
Page 1
SyncMaster 400FP-2,460FP-2,400FPn-2, 460FPn-2 LCD Monitor
SyncMaster 400FP-2,460FP-2,400FPn-2, 460FPn-2 LCD Monitor
Quick Guide (ENGLISH)
Page 6
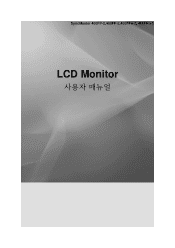
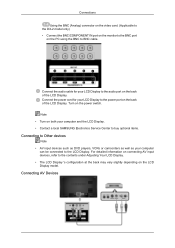
... cable. • Connect the RGB/COMPONENT IN port on the monitor to the BNC port on the PC using the D-SUB to the DXN-2 model only. Applicable to BNC cable. POWER S/W ON [ │ ] / OFF [O] Switches the LCD Display On/Off. RS232C OUT/IN (RS232C Serial PORT) MDC(Multiple... Display Control) Program Port RGB/COMPONENT IN (PC/COMPONENT Connection Terminal (Input)) • Use a D-Sub Cable (15 pin D-Sub) -...
... cable. • Connect the RGB/COMPONENT IN port on the monitor to the BNC port on the PC using the D-SUB to the DXN-2 model only. Applicable to BNC cable. POWER S/W ON [ │ ] / OFF [O] Switches the LCD Display On/Off. RS232C OUT/IN (RS232C Serial PORT) MDC(Multiple... Display Control) Program Port RGB/COMPONENT IN (PC/COMPONENT Connection Terminal (Input)) • Use a D-Sub Cable (15 pin D-Sub) -...
Quick Guide (ENGLISH)
Page 7
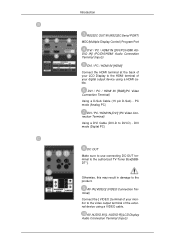
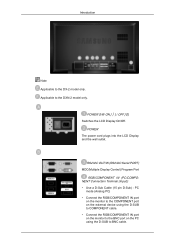
...-Top Box) to the HDMI IN port on the other monitor using a VIDEO cable. AUDIO - AUDIOR] Connect the port of the external device using the DVI to the HDMI terminal of the LCD Display. DVI OUT • Connect a monitor to another monitor through a DVI cable. • Connect the DVI OUT ...port on the monitor to the [ L- AV IN [VIDEO] Connect the [ VIDEO ] terminal of your LCD Display to HDMI cable. • DVI, HDMI and ...
...-Top Box) to the HDMI IN port on the other monitor using a VIDEO cable. AUDIO - AUDIOR] Connect the port of the external device using the DVI to the HDMI terminal of the LCD Display. DVI OUT • Connect a monitor to another monitor through a DVI cable. • Connect the DVI OUT ...port on the monitor to the [ L- AV IN [VIDEO] Connect the [ VIDEO ] terminal of your LCD Display to HDMI cable. • DVI, HDMI and ...
Quick Guide (ENGLISH)
Page 13
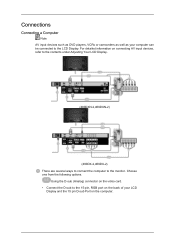
Using the D-sub (Analog) connector on the video card. • Connect the D-sub to the 15-pin, RGB port on the back of your computer can be connected to the monitor. Choose one from the following options. For detailed information on connecting AV input devices, refer to the contents under Adjusting Your LCD Display. (400DXN-2,460DXN-2) (400DX-2,460DX-2) There are several ways to connect the computer to the LCD Display. Connections Connecting a Computer Note AV input devices such as DVD players, VCRs or camcorders as well as your LCD Display and the 15 pin D-sub Port on the computer.
Using the D-sub (Analog) connector on the video card. • Connect the D-sub to the 15-pin, RGB port on the back of your computer can be connected to the monitor. Choose one from the following options. For detailed information on connecting AV input devices, refer to the contents under Adjusting Your LCD Display. (400DXN-2,460DXN-2) (400DX-2,460DX-2) There are several ways to connect the computer to the LCD Display. Connections Connecting a Computer Note AV input devices such as DVD players, VCRs or camcorders as well as your LCD Display and the 15 pin D-sub Port on the computer.
Quick Guide (ENGLISH)
Page 14
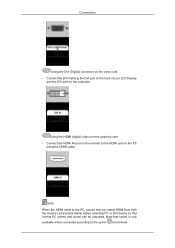
... selecting PC or DVI device so that follows. Using the HDMI (digital) output on the graphics card. • Connect the HDMI IN port on the monitor to the HDMI port on the computer. Connections Using the DVI (Digital) connector on the video card. • Connect the DVI Cable to the DVI...
... selecting PC or DVI device so that follows. Using the HDMI (digital) output on the graphics card. • Connect the HDMI IN port on the monitor to the HDMI port on the computer. Connections Using the DVI (Digital) connector on the video card. • Connect the DVI Cable to the DVI...
Quick Guide (ENGLISH)
Page 15
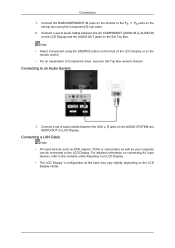
...LCD Display. • The LCD Display 's configuration at the back may vary slightly depending on the power switch. Note • Turn on both your computer and the LCD Display. • Contact a local SAMSUNG... Electronics Service Center to buy optional items. Connecting to Other devices Note • AV input devices such as DVD players, VCRs or camcorders as well as your LCD Display to the power port on the back of the LCD Display. Connect the power cord for your LCD Display... be connected to the LCD Display. Connecting AV Devices Connections...
...LCD Display. • The LCD Display 's configuration at the back may vary slightly depending on the power switch. Note • Turn on both your computer and the LCD Display. • Contact a local SAMSUNG... Electronics Service Center to buy optional items. Connecting to Other devices Note • AV input devices such as DVD players, VCRs or camcorders as well as your LCD Display to the power port on the back of the LCD Display. Connect the power cord for your LCD Display... be connected to the LCD Display. Connecting AV Devices Connections...
Quick Guide (ENGLISH)
Page 16
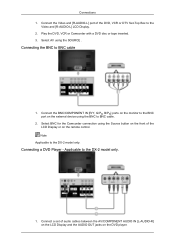
... Box to the DX-2 model only. Select AV using the Source button on the front of the LCD Display or on the remote control. Connections 1. Note Applicable to the Video and [R-AUDIO-L] LCD Display. 2. Connect the Video and [R-AUDIO-L] port of audio cables between the AV/COMPONENT AUDIO IN [L-AUDIO...-R] on the LCD Display and the AUDIO OUT jacks on the external device using the BNC to BNC cable. 2. Connecting a DVD Player - Connect the BNC/COMPONENT IN [R/Y, G/PB, B/PR] ports on the monitor to the BNC port on the DVD player.
... Box to the DX-2 model only. Select AV using the Source button on the front of the LCD Display or on the remote control. Connections 1. Note Applicable to the Video and [R-AUDIO-L] LCD Display. 2. Connect the Video and [R-AUDIO-L] port of audio cables between the AV/COMPONENT AUDIO IN [L-AUDIO...-R] on the LCD Display and the AUDIO OUT jacks on the external device using the BNC to BNC cable. 2. Connecting a DVD Player - Connect the BNC/COMPONENT IN [R/Y, G/PB, B/PR] ports on the monitor to the BNC port on the DVD player.
Quick Guide (ENGLISH)
Page 17
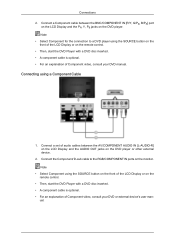
..., start the DVD Player with a DVD disc inserted. • A component cable is optional. • For an explanation of the LCD Display or on the monitor. Connect the Component/ D-sub cable to a DVD player using the SOURCE button on the front of Component video, consult your DVD or... • A component cable is optional. • For an explanation of audio cables between the BNC/COMPONENT IN [R/Y, G/PB, B/PR] port on the LCD Display and the PR, Y, PB jacks on the DVD player or other external device. 2. Note • Select Component using a Component Cable 1. Connect a Component...
..., start the DVD Player with a DVD disc inserted. • A component cable is optional. • For an explanation of the LCD Display or on the monitor. Connect the Component/ D-sub cable to a DVD player using the SOURCE button on the front of Component video, consult your DVD or... • A component cable is optional. • For an explanation of audio cables between the BNC/COMPONENT IN [R/Y, G/PB, B/PR] port on the LCD Display and the PR, Y, PB jacks on the DVD player or other external device. 2. Note • Select Component using a Component Cable 1. Connect a Component...

Quick Guide (ENGLISH)
Page 19
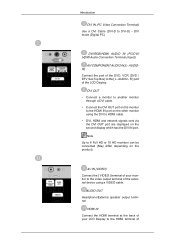
Connect between the DVI OUT port on the LCD Display and the input port on another monitor using the SOURCE button on the front of the LCD Display or on another monitor using a DVI cable. 2. Select DVI using a stereo cable. 3. Connecting Using a DVI to HDMI Cable Note DVI OUT does not support HDCP. Connections Note In HDMI mode, only PCM format audio is supported. Connect between the AUDIO OUT port on the LCD Display and the audio input port on the remote control. Connecting Using a DVI Cable 1.
Connect between the DVI OUT port on the LCD Display and the input port on another monitor using the SOURCE button on the front of the LCD Display or on another monitor using a DVI cable. 2. Select DVI using a stereo cable. 3. Connecting Using a DVI to HDMI Cable Note DVI OUT does not support HDCP. Connections Note In HDMI mode, only PCM format audio is supported. Connect between the AUDIO OUT port on the LCD Display and the audio input port on the remote control. Connecting Using a DVI Cable 1.
Quick Guide (ENGLISH)
Page 21
... under Adjusting Your LCD Display. • The LCD Display 's configuration at the back may vary slightly depending on the remote control. • For an explanation of the LCD Display or on the LCD Display model. Connections 1.... button on the front of Component video, see your computer can be connected to the LCD Display. Connect a set of audio cables between the AUX L, R jacks on the AUDIO ...set of audio cables between the AV COMPONENT AUDIO IN [L-AUDIO-R] on the LCD Display and the AUDIO OUT jacks on LCD Display. Connecting a LAN Cable Note • AV input devices such as DVD ...
... under Adjusting Your LCD Display. • The LCD Display 's configuration at the back may vary slightly depending on the remote control. • For an explanation of the LCD Display or on the LCD Display model. Connections 1.... button on the front of Component video, see your computer can be connected to the LCD Display. Connect a set of audio cables between the AUX L, R jacks on the AUDIO ...set of audio cables between the AV COMPONENT AUDIO IN [L-AUDIO-R] on the LCD Display and the AUDIO OUT jacks on LCD Display. Connecting a LAN Cable Note • AV input devices such as DVD ...


