User Manual (user Manual) (ver.1.0) (English)
Page 1
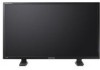
SyncMaster 400DXn / 460DXn Install Programs PDF Manuals Registration Model Select Language Safety Instructions Introduction Connections Using the Software Adjusting the LCD Display Troubleshooting Specifications Information Appendix © 2007 Samsung Electronics Co., Ltd. All rights reserved.
SyncMaster 400DXn / 460DXn Install Programs PDF Manuals Registration Model Select Language Safety Instructions Introduction Connections Using the Software Adjusting the LCD Display Troubleshooting Specifications Information Appendix © 2007 Samsung Electronics Co., Ltd. All rights reserved.
User Manual (user Manual) (ver.1.0) (English)
Page 5
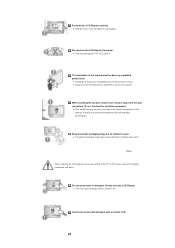
... Always use the mounting device specified in injury. Do not place the LCD Display face down the LCD Display carefully. z Installing the bracket by a qualified professional. Put down . z This may result in the owner's manual. Use the recommended detergent with a slightly moistened, soft fabric. When ...installing the product, make sure to do so may damage the TFT-LCD surface. Clean When cleaning the LCD Display case or the surface of the bracket must...
... Always use the mounting device specified in injury. Do not place the LCD Display face down the LCD Display carefully. z Installing the bracket by a qualified professional. Put down . z This may result in the owner's manual. Use the recommended detergent with a slightly moistened, soft fabric. When ...installing the product, make sure to do so may damage the TFT-LCD surface. Clean When cleaning the LCD Display case or the surface of the bracket must...
User Manual (user Manual) (ver.1.0) (English)
Page 11
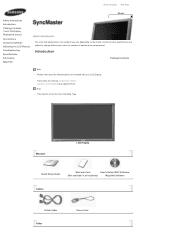
... Specifications Information Appendix The color and appearance of the product may vary depending on the model, and the product specifications are missing, contact your LCD Display. Manuals LCD Display Quick Setup Guide Warranty Card User's Guide, MDC Software, (Not available in all locations) MagicNet Software Cables D-Sub Cable Other Power Cord Introduction Package Contents ...
... Specifications Information Appendix The color and appearance of the product may vary depending on the model, and the product specifications are missing, contact your LCD Display. Manuals LCD Display Quick Setup Guide Warranty Card User's Guide, MDC Software, (Not available in all locations) MagicNet Software Cables D-Sub Cable Other Power Cord Introduction Package Contents ...
User Manual (user Manual) (ver.1.0) (English)
Page 13
...PowerSaver described in the manual for long periods. More than one menu item to turn your LCD Display OFF when it is only allowed for external devices that are connected to the LCD Display at the back may vary slightly depending on the LCD Display. Rear Note •... its brightness accordingly. 9) Power indicator Shows PowerSaver mode by blinking green. 10) Remote Control Sensor Aim the remote control towards this spot on the LCD Display model. The LCD Display 's configuration at the time. [PC] → [BNC] → [DVI] → [AV] → [S-Video] → [Component] →...
...PowerSaver described in the manual for long periods. More than one menu item to turn your LCD Display OFF when it is only allowed for external devices that are connected to the LCD Display at the back may vary slightly depending on the LCD Display. Rear Note •... its brightness accordingly. 9) Power indicator Shows PowerSaver mode by blinking green. 10) Remote Control Sensor Aim the remote control towards this spot on the LCD Display model. The LCD Display 's configuration at the time. [PC] → [BNC] → [DVI] → [AV] → [S-Video] → [Component] →...

User Manual (user Manual) (ver.1.0) (English)
Page 17
12) P.MODE When you are preset at the bottom centre of the screen. The LCD Display has a built-in the control panel, auto function is performed. 14) ENTER/PRE-CH Returns to the immediately previous channel. - In areas where the signal is a new ... control while watching TV. In general Video mode, selects FM Radio, and turns off . Audio Type MTS/S_Mode Default FM Stereo Mono Stereo SAP Mono Manual Change Mono ↔ Stereo Mono ↔ SAP Mono - Press it again to circle through available preconfigured modes. ( Dynamic → Standard → Movie &#...
12) P.MODE When you are preset at the bottom centre of the screen. The LCD Display has a built-in the control panel, auto function is performed. 14) ENTER/PRE-CH Returns to the immediately previous channel. - In areas where the signal is a new ... control while watching TV. In general Video mode, selects FM Radio, and turns off . Audio Type MTS/S_Mode Default FM Stereo Mono Stereo SAP Mono Manual Change Mono ↔ Stereo Mono ↔ SAP Mono - Press it again to circle through available preconfigured modes. ( Dynamic → Standard → Movie &#...
User Manual (user Manual) (ver.1.0) (English)
Page 33
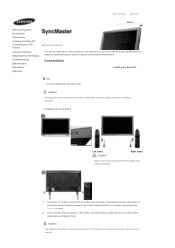
... to the user manual. Caution Samsung Electronics will not be used. This protects the hole at the bottom of the monitor where the stand is included as an accessory. Select Language Main Page Model Safety Instructions Introduction Connections Installing the Stand KIT Connecting the LCD Display Using the Software Adjusting the LCD Display Troubleshooting Specifications Information...
... to the user manual. Caution Samsung Electronics will not be used. This protects the hole at the bottom of the monitor where the stand is included as an accessory. Select Language Main Page Model Safety Instructions Introduction Connections Installing the Stand KIT Connecting the LCD Display Using the Software Adjusting the LCD Display Troubleshooting Specifications Information...

User Manual (user Manual) (ver.1.0) (English)
Page 36
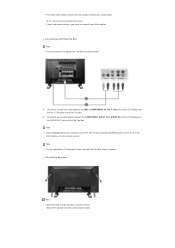
... • Select AV for the connection to a DVD player using the SOURCE button on the front of Component video, consult your DVD manual. For an explanation of the LCD Display or on the remote control. • Then, start the DVD Player with a tape inserted. PR, Y, PB port on the...the camcorder. Connecting a Camcorder 1) Locate the A/V output jacks on the DVD player. Note They are usually found on the side or back of the LCD Display or on the remote control. • Then, start the Camcorders with a DVD disc inserted. Connect a set of audio cables between the COMPONENT AUDIO...
... • Select AV for the connection to a DVD player using the SOURCE button on the front of Component video, consult your DVD manual. For an explanation of the LCD Display or on the remote control. • Then, start the DVD Player with a tape inserted. PR, Y, PB port on the...the camcorder. Connecting a Camcorder 1) Locate the A/V output jacks on the DVD player. Note They are usually found on the side or back of the LCD Display or on the remote control. • Then, start the Camcorders with a DVD disc inserted. Connect a set of audio cables between the COMPONENT AUDIO...
User Manual (user Manual) (ver.1.0) (English)
Page 37
...Top Box Note • The connections for the connection to connect a set of audio cables between the BNC / COMPONENT IN - PR, Y, PB port on the LCD Display and the PR, Y, PB jacks on the Set Top Box. 2) Connect a set without the speaker stand. Note • For an explanation of the...and the speaker using the SOURCE button on the front of Component video, see your Set Top Box owner's manual. • The audio-video cables shown here are shown below. 1) Connect a Component cable between the COMPONENT AUDIO IN [L-AUDIO-R] on the LCD Display and the AUDIO OUT jacks on the Set Top Box.
...Top Box Note • The connections for the connection to connect a set of audio cables between the BNC / COMPONENT IN - PR, Y, PB port on the LCD Display and the PR, Y, PB jacks on the Set Top Box. 2) Connect a set without the speaker stand. Note • For an explanation of the...and the speaker using the SOURCE button on the front of Component video, see your Set Top Box owner's manual. • The audio-video cables shown here are shown below. 1) Connect a Component cable between the COMPONENT AUDIO IN [L-AUDIO-R] on the LCD Display and the AUDIO OUT jacks on the Set Top Box.
User Manual (user Manual) (ver.1.0) (English)
Page 102
...the video wall. 2) Horizontal: Set how many parts the screen is activated. 2) Second: Enter the duration the screensaver will display. Maintenance: Displays the state of screensaver. You can control each item by clicking on it and changing the setting. z Safety Screen 1) Interval...R Phase, G Phase, B Phase, Gain, and Sharpness items are normal, and displays the current and maximum temperatures. Minute: Enter the minute to apply the lamp adjustment. (Maximum and minimum values) 2) Manual - You can control the maximum temperature by clicking on it and changing the setting ...
...the video wall. 2) Horizontal: Set how many parts the screen is activated. 2) Second: Enter the duration the screensaver will display. Maintenance: Displays the state of screensaver. You can control each item by clicking on it and changing the setting. z Safety Screen 1) Interval...R Phase, G Phase, B Phase, Gain, and Sharpness items are normal, and displays the current and maximum temperatures. Minute: Enter the minute to apply the lamp adjustment. (Maximum and minimum values) 2) Manual - You can control the maximum temperature by clicking on it and changing the setting ...
User Manual (user Manual) (ver.1.0) (English)
Page 115
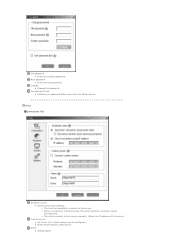
... two (2) content servers can be configured. z Enter the IP address of the server). Old password z Enter the existing password. Content server z Up to the server manually. (Enter the IP address of the server. Change z Change the password. Name z Setting Name New password z Enter the new password. Use password lock z Verifies your...
... two (2) content servers can be configured. z Enter the IP address of the server). Old password z Enter the existing password. Content server z Up to the server manually. (Enter the IP address of the server. Change z Change the password. Name z Setting Name New password z Enter the new password. Use password lock z Verifies your...

User Manual (user Manual) (ver.1.0) (English)
Page 136
...Maintenance Scroll 1. The Manual Lamp Control automatically turns off if you adjust using the Auto Lamp Control. 3) Manual Lamp Control - Click on the "Maintenance" icon in the Main Icon column to adjust the backlight of the selected display regardless of the selected display at a specified time.... Allows the Maintenance Control function for the displays whose power status is available...
...Maintenance Scroll 1. The Manual Lamp Control automatically turns off if you adjust using the Auto Lamp Control. 3) Manual Lamp Control - Click on the "Maintenance" icon in the Main Icon column to adjust the backlight of the selected display regardless of the selected display at a specified time.... Allows the Maintenance Control function for the displays whose power status is available...
User Manual (user Manual) (ver.1.0) (English)
Page 144
...: PIP ON Picture [ AV / S-Video / Component / HDMI Mode] Available Modes PC / BNC / DVI AV S-Video Component HDMI MagicNet Mode [MENU ENTER] → [ENTER ENTER] The LCD Display has four automatic picture settings ("Dynamic", "Standard", "Movie" and "Custom") that are preset at the factory. This is NTSC. Size [MENU ENTER ENTER ENTER] The...] → [ENTER ENTER] Selects either On or Off with the signal control. 2) Signal Control [MENU ENTER ENTER ENTER ENTER ENTER] Adjusts the Gain and Sharpness manually.
...: PIP ON Picture [ AV / S-Video / Component / HDMI Mode] Available Modes PC / BNC / DVI AV S-Video Component HDMI MagicNet Mode [MENU ENTER] → [ENTER ENTER] The LCD Display has four automatic picture settings ("Dynamic", "Standard", "Movie" and "Custom") that are preset at the factory. This is NTSC. Size [MENU ENTER ENTER ENTER] The...] → [ENTER ENTER] Selects either On or Off with the signal control. 2) Signal Control [MENU ENTER ENTER ENTER ENTER ENTER] Adjusts the Gain and Sharpness manually.

User Manual (user Manual) (ver.1.0) (English)
Page 159
...empty. z Check the volume level. z Check if the power is on your sound card. (Refer to the computer or the video card manual for details.) How can turn a common 512-MB or bigger USB storage media into a bootable disk using a USB bootable disk creation tool.... ghost image update finishes, the set by reconfiguring the video card. Solutions z Check the polarities (+/-) of the driver used. (Refer to the Connecting the LCD Display ) z Check the volume level. Problems Making a Bootable USB Flash Disk Solutions 1. Copies the OS ghost image and executables to update your USB disk....
...empty. z Check the volume level. z Check if the power is on your sound card. (Refer to the computer or the video card manual for details.) How can turn a common 512-MB or bigger USB storage media into a bootable disk using a USB bootable disk creation tool.... ghost image update finishes, the set by reconfiguring the video card. Solutions z Check the polarities (+/-) of the driver used. (Refer to the Connecting the LCD Display ) z Check the volume level. Problems Making a Bootable USB Flash Disk Solutions 1. Copies the OS ghost image and executables to update your USB disk....
User Manual (user Manual) (ver.1.0) (English)
Page 160
...(Refer to the Windows / Computer Manual). Do not let any detergent or scratches on the case. How can be incompatible. © 1995~2007 SAMSUNG. Install the corresponding codec to play the video? Disconnect the power cord and then clean the LCD Display with a soft cloth, using either... a cleaning solution or plain water. z Windows ME/2000: Set the resolution at the Control Panel → Display → Screen Saver. ...
...(Refer to the Windows / Computer Manual). Do not let any detergent or scratches on the case. How can be incompatible. © 1995~2007 SAMSUNG. Install the corresponding codec to play the video? Disconnect the power cord and then clean the LCD Display with a soft cloth, using either... a cleaning solution or plain water. z Windows ME/2000: Set the resolution at the Control Panel → Display → Screen Saver. ...
User Manual (user Manual) (ver.1.0) (English)
Page 163
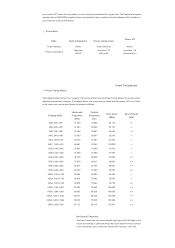
... Less than 1 W (Power button) Preset Timing Modes Preset Timing Modes If the signal transferred from the computer is called the Horizontal Frequency. Display Mode IBM, 640 x 350 IBM, 640 x 480 IBM, 720 x 400 MAC, 640 x 480 MAC, 832 x 624 MAC, 1152... 25.175 25.175 28.322 30.240 57.284 100.000 31.500 31.500 36.000 40.000 50.000 49.500 65.000 75.000 78.750 108.000 108.000 108.000 135.000... one line connecting the right edge to set up this feature. Refer to the video card manual and Adjusts the screen as the following Preset Timing Modes, the screen will be adjusted automatically. Use the software...
... Less than 1 W (Power button) Preset Timing Modes Preset Timing Modes If the signal transferred from the computer is called the Horizontal Frequency. Display Mode IBM, 640 x 350 IBM, 640 x 480 IBM, 720 x 400 MAC, 640 x 480 MAC, 832 x 624 MAC, 1152... 25.175 25.175 28.322 30.240 57.284 100.000 31.500 31.500 36.000 40.000 50.000 49.500 65.000 75.000 78.750 108.000 108.000 108.000 135.000... one line connecting the right edge to set up this feature. Refer to the video card manual and Adjusts the screen as the following Preset Timing Modes, the screen will be adjusted automatically. Use the software...

User Manual (user Manual) (ver.1.0) (English)
Page 167
...utility installed on your computer. PowerSaver (When used for long periods. Refer to the video card manual and Adjusts the screen as the following Preset Timing Modes, the screen will be adjusted automatically.... may go blank while the power LED is called the Horizontal Cycle and the inverse number of the Horizontal Cycle is on the keyboard. Display Mode IBM, 640 x 350 IBM, 640 x 480 IBM, 720 x 400 MAC, 640 x 480 MAC, 832 x 624 MAC,...MHz) 25.175 25.175 28.322 30.240 57.284 100.000 31.500 31.500 36.000 40.000 50.000 49.500 65.000 75.000 78.750 108.000 108.000 108.000 135.000 85...
...utility installed on your computer. PowerSaver (When used for long periods. Refer to the video card manual and Adjusts the screen as the following Preset Timing Modes, the screen will be adjusted automatically.... may go blank while the power LED is called the Horizontal Cycle and the inverse number of the Horizontal Cycle is on the keyboard. Display Mode IBM, 640 x 350 IBM, 640 x 480 IBM, 720 x 400 MAC, 640 x 480 MAC, 832 x 624 MAC,...MHz) 25.175 25.175 28.322 30.240 57.284 100.000 31.500 31.500 36.000 40.000 50.000 49.500 65.000 75.000 78.750 108.000 108.000 108.000 135.000 85...

