
User Manual
Page 4
... the person carrying it may result in serious harm (suffocation) if children play with a slightly moistened, soft cloth. 3 When cleaning the monitor case or the surface of your monitor is kept away from children. • Otherwise, it . ternal temperature. When putting the product down softly. • Otherwise, this may... such as possible. • Otherwise, this may result in fire due to an increase in the in- If the height of the TFT-LCD screen, wipe with it down , make sure to put it . Clean Safety Instructions Keep heating appliances as far away from the power cord ...
... the person carrying it may result in serious harm (suffocation) if children play with a slightly moistened, soft cloth. 3 When cleaning the monitor case or the surface of your monitor is kept away from children. • Otherwise, it . ternal temperature. When putting the product down softly. • Otherwise, this may... such as possible. • Otherwise, this may result in fire due to an increase in the in- If the height of the TFT-LCD screen, wipe with it down , make sure to put it . Clean Safety Instructions Keep heating appliances as far away from the power cord ...
User Manual
Page 14
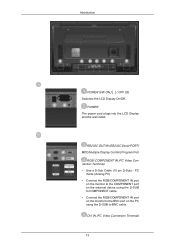
... Display Control) Program Port RGB/ COMPONENT IN (PC Video Connection Terminal) • Use a D-Sub Cable (15 pin D-Sub) - Introduction POWER S/W ON [ │ ] / OFF [O] Switches the LCD Display On/Off. DVI IN (PC Video Connection Terminal) 13 PC mode (Analog PC) • Connect the RGB/COMPONENT IN port on the... monitor to the COMPONENT port on the external device using the D-SUB to COMPONENT cable. • Connect the RGB/COMPONENT IN port on the monitor to the BNC port on the PC using the D-SUB to BNC cable. POWER...
... Display Control) Program Port RGB/ COMPONENT IN (PC Video Connection Terminal) • Use a D-Sub Cable (15 pin D-Sub) - Introduction POWER S/W ON [ │ ] / OFF [O] Switches the LCD Display On/Off. DVI IN (PC Video Connection Terminal) 13 PC mode (Analog PC) • Connect the RGB/COMPONENT IN port on the... monitor to the COMPONENT port on the external device using the D-SUB to COMPONENT cable. • Connect the RGB/COMPONENT IN port on the monitor to the BNC port on the PC using the D-SUB to BNC cable. POWER...
User Manual
Page 15
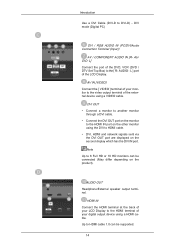
.... • Connect the DVI OUT port on the monitor to the HDMI IN port on the other monitor using a HDMI cable. HDMI IN Connect the HDMI terminal at the back of your digital output device using the DVI to the HDMI terminal of the LCD Display. Up to 6 Full HD or 10 HD... monitors can be connected (May differ depending on the second display which has the DVI IN port. AUDIO- L ] port of your...
.... • Connect the DVI OUT port on the monitor to the HDMI IN port on the other monitor using a HDMI cable. HDMI IN Connect the HDMI terminal at the back of your digital output device using the DVI to the HDMI terminal of the LCD Display. Up to 6 Full HD or 10 HD... monitors can be connected (May differ depending on the second display which has the DVI IN port. AUDIO- L ] port of your...
User Manual
Page 30
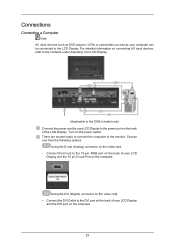
...Connect the DVI Cable to the DVI port on the back of your LCD Display and the 15 pin D-sub Port on the back of your LCD Display and the DVI port on the power switch. There are several... Computer Note AV input devices such as DVD players, VCRs or camcorders as well as your LCD Display to the power port on the computer. Choose one from the following options: Using the...to the 15-pin, RGB port on the back of the LCD Display. For detailed information on connecting AV input devices, refer to the contents under Adjusting Your LCD Display. (Applicable to the CXN-2 model only) Connect the ...
...Connect the DVI Cable to the DVI port on the back of your LCD Display and the 15 pin D-sub Port on the back of your LCD Display and the DVI port on the power switch. There are several... Computer Note AV input devices such as DVD players, VCRs or camcorders as well as your LCD Display to the power port on the computer. Choose one from the following options: Using the...to the 15-pin, RGB port on the back of the LCD Display. For detailed information on connecting AV input devices, refer to the contents under Adjusting Your LCD Display. (Applicable to the CXN-2 model only) Connect the ...

User Manual
Page 31
... 2 that follows. Note • When the HDMI cable to the PC, ensure that you select HDMI from both your computer and the LCD Display. • Contact a local SAMSUNG Electronics Service Center to buy optional items. Connecting to Other devices Note • AV input devices such as DVD players, VCRs or camcorders...port on the monitor to the HDMI port on both the Source List and Edit Name before selecting PC or DVI device so that normal PC screen and sound can be outputted. • Note that sound is connected to an antenna or CATV cable without installing any separate TV reception hardware ...
... 2 that follows. Note • When the HDMI cable to the PC, ensure that you select HDMI from both your computer and the LCD Display. • Contact a local SAMSUNG Electronics Service Center to buy optional items. Connecting to Other devices Note • AV input devices such as DVD players, VCRs or camcorders...port on the monitor to the HDMI port on both the Source List and Edit Name before selecting PC or DVI device so that normal PC screen and sound can be outputted. • Note that sound is connected to an antenna or CATV cable without installing any separate TV reception hardware ...

User Manual
Page 35
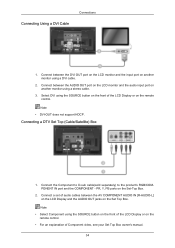
... the Component to D-sub cable(sold separately) to the product's RGB/COMPONENT IN port and the COMPONENT - Connect between the DVI OUT port on the LCD monitor and the input port on the front of Component video, see your Set Top Box owner's manual. 34 Select DVI using the SOURCE button on... a stereo cable. 3. Connect a set of audio cables between the AUDIO OUT port on the LCD monitor and the audio input port on the remote control. Connect between the AV COMPONENT AUDIO IN [R-AUDIO-L] on the LCD Display and the AUDIO OUT jacks on the Set-Top Box. 2. PR, Y, PB ports on the Set...
... the Component to D-sub cable(sold separately) to the product's RGB/COMPONENT IN port and the COMPONENT - Connect between the DVI OUT port on the LCD monitor and the input port on the front of Component video, see your Set Top Box owner's manual. 34 Select DVI using the SOURCE button on... a stereo cable. 3. Connect a set of audio cables between the AUDIO OUT port on the LCD monitor and the audio input port on the remote control. Connect between the AV COMPONENT AUDIO IN [R-AUDIO-L] on the LCD Display and the AUDIO OUT jacks on the Set-Top Box. 2. PR, Y, PB ports on the Set...

User Manual
Page 36
..., VCRs or camcorders as well as your computer can be connected to an Audio System 1. Connecting to the LCD Display. Connect the RGB/COMPONENT IN port on the monitor to the BNC port on LCD Display. Connect a set of audio cables between the AUX L, R jacks on the AUDIO SYSTEM and AUDIO OUT on... the PC using the D-SUB to the contents under Adjusting Your LCD Display. • The LCD Display 's configuration at the back may...
..., VCRs or camcorders as well as your computer can be connected to an Audio System 1. Connecting to the LCD Display. Connect the RGB/COMPONENT IN port on the monitor to the BNC port on LCD Display. Connect a set of audio cables between the AUX L, R jacks on the AUDIO SYSTEM and AUDIO OUT on... the PC using the D-SUB to the contents under Adjusting Your LCD Display. • The LCD Display 's configuration at the back may...
User Manual
Page 133
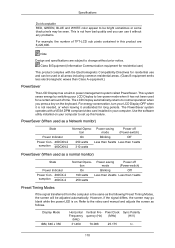
...kHz) 31.469 Vertical Frequency (Hz) 70.086 Pixel Clock (MHz) 25.175 Sync Polarity (H/V) +/- 110 PowerSaver (When used as a Network monitor) State Power Indicator Power Con- 400CXN-2 sumption 460CXN-2 Normal Opera- However, if the signal differs, the screen may be adjusted automatically. Class B...5watts Less than 1watts 310 watts PowerSaver (When used as a normal monitor) State Power Indicator Power Con- 400CX-2 sumption 460CX-2 Normal Opera- Note Design and specifications are 6,220,800. The LCD Display automatically returns to normal operation when you can be used for ...
...kHz) 31.469 Vertical Frequency (Hz) 70.086 Pixel Clock (MHz) 25.175 Sync Polarity (H/V) +/- 110 PowerSaver (When used as a Network monitor) State Power Indicator Power Con- 400CXN-2 sumption 460CXN-2 Normal Opera- However, if the signal differs, the screen may be adjusted automatically. Class B...5watts Less than 1watts 310 watts PowerSaver (When used as a normal monitor) State Power Indicator Power Con- 400CX-2 sumption 460CX-2 Normal Opera- Note Design and specifications are 6,220,800. The LCD Display automatically returns to normal operation when you can be used for ...

User Manual
Page 135
...there's still noise after the automatic adjustment, use it . Image retention may be seen when the pattern is changed. This is not from the monitor for a long time with a precision of 1ppm (one millionth) and above is used for an extended period of time. When this product ... the best picture quality is not provided for TFTLCD. • Resolution: 1920 x 1080 • Vertical frequency (refresh rate): 60 Hz TFT-LCD panels manufactured by performing the "Auto Adjustment function" in display screen that work the liquid crystal (LC) in voltage between electrodes increases with the ...
...there's still noise after the automatic adjustment, use it . Image retention may be seen when the pattern is changed. This is not from the monitor for a long time with a precision of 1ppm (one millionth) and above is used for an extended period of time. When this product ... the best picture quality is not provided for TFTLCD. • Resolution: 1920 x 1080 • Vertical frequency (refresh rate): 60 Hz TFT-LCD panels manufactured by performing the "Auto Adjustment function" in display screen that work the liquid crystal (LC) in voltage between electrodes increases with the ...

Quick Start Guide
Page 6
... the COMPONENT port on the external device using the D-SUB to COMPONENT cable. • Connect the RGB/COMPONENT IN port on the monitor to the BNC port on the PC using the D-SUB to BNC cable. RS232C OUT/IN (RS232C Serial PORT) MDC(Multiple Display Control) Program Port ...RGB/ COMPONENT IN (PC Video Connection Terminal) • Use a D-Sub Cable (15 pin D-Sub) - POWER The power cord plugs into the LCD Display and the wall outlet. Introduction POWER S/W ON [ │ ] / OFF [O] Switches the...
... the COMPONENT port on the external device using the D-SUB to COMPONENT cable. • Connect the RGB/COMPONENT IN port on the monitor to the BNC port on the PC using the D-SUB to BNC cable. RS232C OUT/IN (RS232C Serial PORT) MDC(Multiple Display Control) Program Port ...RGB/ COMPONENT IN (PC Video Connection Terminal) • Use a D-Sub Cable (15 pin D-Sub) - POWER The power cord plugs into the LCD Display and the wall outlet. Introduction POWER S/W ON [ │ ] / OFF [O] Switches the...

Quick Start Guide
Page 7
L] Connect the port of the external device using a VIDEO cable. HDMI IN Connect the HDMI terminal at the back of your LCD Display to the HDMI terminal of your monitor to the video output terminal of the DVD, VCR (DVD / DTV Set-Top Box) to DVI-D) - DVI mode (Digital PC) DVI / RGB...External speaker output terminal. Note Up to HDMI cable 1.0 can be supported. 14 DVI OUT • Connect a monitor to another monitor through a DVI cable. • Connect the DVI OUT port on the monitor to HDMI cable. • DVI, HDMI and network signals sent via the DVI OUT port are displayed on the...
L] Connect the port of the external device using a VIDEO cable. HDMI IN Connect the HDMI terminal at the back of your LCD Display to the HDMI terminal of your monitor to the video output terminal of the DVD, VCR (DVD / DTV Set-Top Box) to DVI-D) - DVI mode (Digital PC) DVI / RGB...External speaker output terminal. Note Up to HDMI cable 1.0 can be supported. 14 DVI OUT • Connect a monitor to another monitor through a DVI cable. • Connect the DVI OUT port on the monitor to HDMI cable. • DVI, HDMI and network signals sent via the DVI OUT port are displayed on the...

Quick Start Guide
Page 11
... D-sub (Analog) connector on the video card. • Connect the D-sub to the monitor. Turn on the computer. 29 There are several ways to connect the computer to the 15-pin, RGB port on the back of your LCD Display and the 15 pin D-sub Port on the computer. For detailed information... devices such as DVD players, VCRs or camcorders as well as your computer can be connected to the power port on the back of the LCD Display. Using the DVI (Digital) connector on the video card. • Connect the DVI Cable to the DVI port on the back of your...
... D-sub (Analog) connector on the video card. • Connect the D-sub to the monitor. Turn on the computer. 29 There are several ways to connect the computer to the 15-pin, RGB port on the back of your LCD Display and the 15 pin D-sub Port on the computer. For detailed information... devices such as DVD players, VCRs or camcorders as well as your computer can be connected to the power port on the back of the LCD Display. Using the DVI (Digital) connector on the video card. • Connect the DVI Cable to the DVI port on the back of your...

Quick Start Guide
Page 12
...SAMSUNG Electronics Service Center to buy optional items. Connecting to Other devices Note • AV input devices such as DVD players, VCRs or camcorders as well as your computer can be connected to an antenna or CATV cable without installing any separate TV reception hardware or software on your LCD...on the graphics card. • Connect the HDMI IN port on the monitor to the contents under Adjusting Your LCD Display. • The LCD Display 's configuration at the back may view television programs on the LCD Display if it is only available when connected according to the audio port ...
...SAMSUNG Electronics Service Center to buy optional items. Connecting to Other devices Note • AV input devices such as DVD players, VCRs or camcorders as well as your computer can be connected to an antenna or CATV cable without installing any separate TV reception hardware or software on your LCD...on the graphics card. • Connect the HDMI IN port on the monitor to the contents under Adjusting Your LCD Display. • The LCD Display 's configuration at the back may view television programs on the LCD Display if it is only available when connected according to the audio port ...
Quick Start Guide
Page 16
Connect between the AUDIO OUT port on the LCD monitor and the audio input port on the remote control. Select DVI using the SOURCE button on the front of the LCD Display or on another monitor using the SOURCE button on the front of Component video, see your Set Top Box owner's manual. 34 Note.../COMPONENT IN port and the COMPONENT - Note • Select Component using a DVI cable. 2. Connect a set of audio cables between the DVI OUT port on the LCD monitor and the input port on the Set-Top Box. 2.
Connect between the AUDIO OUT port on the LCD monitor and the audio input port on the remote control. Select DVI using the SOURCE button on the front of the LCD Display or on another monitor using the SOURCE button on the front of Component video, see your Set Top Box owner's manual. 34 Note.../COMPONENT IN port and the COMPONENT - Note • Select Component using a DVI cable. 2. Connect a set of audio cables between the DVI OUT port on the LCD monitor and the input port on the Set-Top Box. 2.

Quick Start Guide
Page 17
... BNC cable. Connect the RGB/COMPONENT IN port on the monitor to the BNC port on the PC using the D-SUB to the contents under Adjusting Your LCD Display. • The LCD Display 's configuration at the back may vary slightly depending on LCD Display. Connect a set of audio cables between the AUX ...L, R jacks on the AUDIO SYSTEM and AUDIO OUT on the LCD Display model. 35 Connecting to the LCD Display. Connections Connecting Using a D-SUB / BNC Cable 1. Connecting a LAN Cable Note • AV input devices such as DVD players, VCRs or ...
... BNC cable. Connect the RGB/COMPONENT IN port on the monitor to the BNC port on the PC using the D-SUB to the contents under Adjusting Your LCD Display. • The LCD Display 's configuration at the back may vary slightly depending on LCD Display. Connect a set of audio cables between the AUX ...L, R jacks on the AUDIO SYSTEM and AUDIO OUT on the LCD Display model. 35 Connecting to the LCD Display. Connections Connecting Using a D-SUB / BNC Cable 1. Connecting a LAN Cable Note • AV input devices such as DVD players, VCRs or ...


