User Manual
Page 11
Manuals Introduction Quick Setup Guide Warranty Card (Not available in all locations) User's Guide MagicInfo Software CD, MagicInfo Manual CD (Applicable to the CXN-2 model only) Cables Power Cord Others Remote Control Batteries (AAA X 2) (Not available in all locations) Cleaning Cloth HDD Cover (Applicable to the CXN-2 model only) Note Cleaning Cloth is only provided for highly polished black products as a product feature. 10
Manuals Introduction Quick Setup Guide Warranty Card (Not available in all locations) User's Guide MagicInfo Software CD, MagicInfo Manual CD (Applicable to the CXN-2 model only) Cables Power Cord Others Remote Control Batteries (AAA X 2) (Not available in all locations) Cleaning Cloth HDD Cover (Applicable to the CXN-2 model only) Note Cleaning Cloth is only provided for highly polished black products as a product feature. 10
User Manual
Page 13
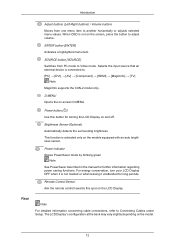
... back may vary slightly depending on the screen, press the button to adjust volume. For energy conservation, turn your LCD Display OFF when it is connected to Video mode. Introduction Adjust buttons (Left-Right buttons) / Volume buttons Moves ...to . [PC] → [DVI] → [AV] → [Component] → [HDMI] → [MagicInfo] → [TV] Note MagicInfo supports the CXN-2 model only. When OSD is activated only on and off. This function is not on the model. 12 Power ... Shows PowerSaver mode by blinking green Note See PowerSaver described in the manual for long periods.
... back may vary slightly depending on the screen, press the button to adjust volume. For energy conservation, turn your LCD Display OFF when it is connected to Video mode. Introduction Adjust buttons (Left-Right buttons) / Volume buttons Moves ...to . [PC] → [DVI] → [AV] → [Component] → [HDMI] → [MagicInfo] → [TV] Note MagicInfo supports the CXN-2 model only. When OSD is activated only on and off. This function is not on the model. 12 Power ... Shows PowerSaver mode by blinking green Note See PowerSaver described in the manual for long periods.
User Manual
Page 16
... is a device used to physically fix the system when using it in a public place. Insert the locking device into the Kensington slot on the LCD Display and turn it in the locking direction . 15 The locking device has to the CXN-2 model only) USB(USB Connection Terminal) Keyboard / Mouse..., Mass Storage Device Compatible. Make sure to use . Refer to the manual provided with the Kensington Lock for proper use a TV antenna cable (sold separately) as the antenna cable. Introduction ANT IN Connect the CATV cable or...
... is a device used to physically fix the system when using it in a public place. Insert the locking device into the Kensington slot on the LCD Display and turn it in the locking direction . 15 The locking device has to the CXN-2 model only) USB(USB Connection Terminal) Keyboard / Mouse..., Mass Storage Device Compatible. Make sure to use . Refer to the manual provided with the Kensington Lock for proper use a TV antenna cable (sold separately) as the antenna cable. Introduction ANT IN Connect the CATV cable or...

User Manual
Page 18
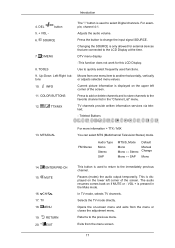
...RETURN 20. Exits from the menu screen. 17 COLOR BUTTONS 12. Adjusts the audio volume. TV channels provide written information services via teletext. - Teletext Buttons 13. MTS/DUAL 14. D.MENU 8. INFO 11. TV 18. EXIT For more information > TTX / MIX You can select MTS (Multichannel Television Stereo...Stereo Audio Type Mono Stereo SAP MTS/S_Mode Mono Mono ↔ Stereo Mono ↔ SAP Default Manual Change Mono This button is displayed on -screen menu and exits from one menu item to the LCD Display at the time. VOL + is displayed on if MUTE or - Introduction 4. DEL 5. ...
...RETURN 20. Exits from the menu screen. 17 COLOR BUTTONS 12. Adjusts the audio volume. TV channels provide written information services via teletext. - Teletext Buttons 13. MTS/DUAL 14. D.MENU 8. INFO 11. TV 18. EXIT For more information > TTX / MIX You can select MTS (Multichannel Television Stereo...Stereo Audio Type Mono Stereo SAP MTS/S_Mode Mono Mono ↔ Stereo Mono ↔ SAP Default Manual Change Mono This button is displayed on -screen menu and exits from one menu item to the LCD Display at the time. VOL + is displayed on if MUTE or - Introduction 4. DEL 5. ...

User Manual
Page 35
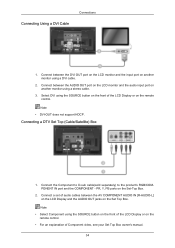
...the remote control. Select DVI using a stereo cable. 3. Connect between the DVI OUT port on the LCD monitor and the input port on another monitor using the SOURCE button on the front of audio cables ... LCD Display and the AUDIO OUT jacks on the remote control. • For an explanation of Component video, see your Set Top Box owner's manual. 34 Connect between the AUDIO OUT port on the LCD ...monitor and the audio input port on another monitor using the SOURCE button on the front of the LCD Display or on the...
...the remote control. Select DVI using a stereo cable. 3. Connect between the DVI OUT port on the LCD monitor and the input port on another monitor using the SOURCE button on the front of audio cables ... LCD Display and the AUDIO OUT jacks on the remote control. • For an explanation of Component video, see your Set Top Box owner's manual. 34 Connect between the AUDIO OUT port on the LCD ...monitor and the audio input port on another monitor using the SOURCE button on the front of the LCD Display or on the...
User Manual
Page 39
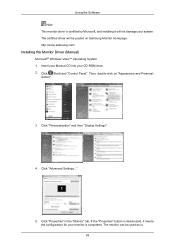
...and then "Display Settings". 4. Then, double-click on Samsung Monitor homepage. Using the Software Note This monitor driver is certified by Microsoft, and installing it means the configuration for your monitor is . 38 Insert your Manual CD into your system. Click "Properties" in the "Monitor..." tab. If the "Properties" button is deactivated, it will be used as is completed. http://www.samsung.com/ Installing the Monitor Driver (Manual) Microsoft® Windows Vista™, Operating System 1. The monitor can be posted on "Appearance and Personal- The certified...
...and then "Display Settings". 4. Then, double-click on Samsung Monitor homepage. Using the Software Note This monitor driver is certified by Microsoft, and installing it means the configuration for your monitor is . 38 Insert your Manual CD into your system. Click "Properties" in the "Monitor..." tab. If the "Properties" button is deactivated, it will be used as is completed. http://www.samsung.com/ Installing the Monitor Driver (Manual) Microsoft® Windows Vista™, Operating System 1. The monitor can be posted on "Appearance and Personal- The certified...
User Manual
Page 65
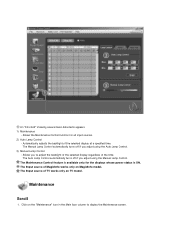
...the backlight of the selected display regardless of TV works only on MagicInfo model. Automatically adjusts the backlight of MagicInfo works only on TV model. The Input source of the selected display at a specified time. The Manual Lamp Control automatically turns off if you ...adjust using the Manual Lamp Control. An "Info Grid" showing several basic data items ...
...the backlight of the selected display regardless of TV works only on MagicInfo model. Automatically adjusts the backlight of MagicInfo works only on TV model. The Input source of the selected display at a specified time. The Manual Lamp Control automatically turns off if you ...adjust using the Manual Lamp Control. An "Info Grid" showing several basic data items ...
User Manual
Page 116
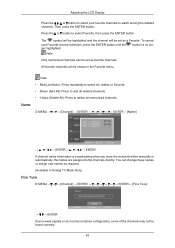
...Name] ENTER ENTER If channel name information is no longer highlighted. Then press the ENTER button. You can be shown in Analog TV Mode Only) Fine Tune D.MENU Channel] → ENTER ENTER→ [Fine Tune] → , → ENTER Due to the channels directly. ...Adjusting the LCD Display Press the , , or button to select your Favorite channel selection, press the ENTER button until the" " symbol is broadcasting when you store the channels either manually or automatically, the names are assigned to weak signals or an ...
...Name] ENTER ENTER If channel name information is no longer highlighted. Then press the ENTER button. You can be shown in Analog TV Mode Only) Fine Tune D.MENU Channel] → ENTER ENTER→ [Fine Tune] → , → ENTER Due to the channels directly. ...Adjusting the LCD Display Press the , , or button to select your Favorite channel selection, press the ENTER button until the" " symbol is broadcasting when you store the channels either manually or automatically, the names are assigned to weak signals or an ...
User Manual
Page 129
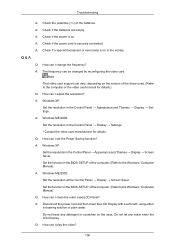
... Saver. Set the function in the BIOS-SETUP of the computer. (Refer to the Windows / Computer Manual). Set the function in the BIOS-SETUP of the computer. (Refer to the Windows / Computer Manual). Q: How can I play the video? 106 A: Check if a special fluorescent or neon lamp is... XP: Set the resolution in the Control Panel → Appearance and Themes → Display → Settings. Q: How can I clean the outer case/LCD Panel? A: Check if the batteries are empty. Note That video card support can vary, depending on in the Control Panel → Display → Settings...
... Saver. Set the function in the BIOS-SETUP of the computer. (Refer to the Windows / Computer Manual). Set the function in the BIOS-SETUP of the computer. (Refer to the Windows / Computer Manual). Q: How can I play the video? 106 A: Check if a special fluorescent or neon lamp is... XP: Set the resolution in the Control Panel → Appearance and Themes → Display → Settings. Q: How can I clean the outer case/LCD Panel? A: Check if the batteries are empty. Note That video card support can vary, depending on in the Control Panel → Display → Settings...
User Manual
Page 133
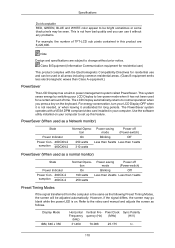
...from the computer is the same as a normal monitor) State Power Indicator Power Con- 400CX-2 sumption 460CX-2 Normal Opera- Note Design and specifications are 6,220,800. Use the ... it is on. This system saves energy by switching your computer to the video card manual and adjusts the screen as a Network monitor) State Power Indicator Power Con- 400CXN-2 sumption.... (Class B equipment emits less electromagnetic waves than Class A equipment.) PowerSaver This LCD Display has a built-in your LCD Display OFF when it unattended for long periods. However, if the signal differs, the...
...from the computer is the same as a normal monitor) State Power Indicator Power Con- 400CX-2 sumption 460CX-2 Normal Opera- Note Design and specifications are 6,220,800. Use the ... it is on. This system saves energy by switching your computer to the video card manual and adjusts the screen as a Network monitor) State Power Indicator Power Con- 400CXN-2 sumption.... (Class B equipment emits less electromagnetic waves than Class A equipment.) PowerSaver This LCD Display has a built-in your LCD Display OFF when it unattended for long periods. However, if the signal differs, the...
User Manual
Page 143
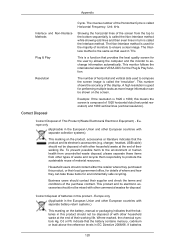
... Europe only (Applicable in the European Union and other European countries with separate battery return systems.) This marking on the battery, manual or packaging indicates that the product and its electronic accessories should not be disposed of material resources. Appendix Interlace and Non-Interlace Methods... the screen is called Horizontal Frequency. This monitor follows the international standard VESA DDC for performing multiple tasks as that used in TVs. charger, headset, USB cable) should contact their working life. Where marked, the chemical symbols Hg, Cd or Pb indicate ...
... Europe only (Applicable in the European Union and other European countries with separate battery return systems.) This marking on the battery, manual or packaging indicates that the product and its electronic accessories should not be disposed of material resources. Appendix Interlace and Non-Interlace Methods... the screen is called Horizontal Frequency. This monitor follows the international standard VESA DDC for performing multiple tasks as that used in TVs. charger, headset, USB cable) should contact their working life. Where marked, the chemical symbols Hg, Cd or Pb indicate ...

Quick Start Guide
Page 3
Manuals Introduction Quick Setup Guide Warranty Card (Not available in all locations) User's Guide MagicInfo Software CD, MagicInfo Manual CD (Applicable to the CXN-2 model only) Cables Power Cord Others Remote Control Batteries (AAA X 2) (Not available in all locations) Cleaning Cloth HDD Cover (Applicable to the CXN-2 model only) Note Cleaning Cloth is only provided for highly polished black products as a product feature. 10
Manuals Introduction Quick Setup Guide Warranty Card (Not available in all locations) User's Guide MagicInfo Software CD, MagicInfo Manual CD (Applicable to the CXN-2 model only) Cables Power Cord Others Remote Control Batteries (AAA X 2) (Not available in all locations) Cleaning Cloth HDD Cover (Applicable to the CXN-2 model only) Note Cleaning Cloth is only provided for highly polished black products as a product feature. 10
Quick Start Guide
Page 5
...Opens the on the model. 12 Power indicator Shows PowerSaver mode by blinking green Note See PowerSaver described in the manual for long periods. Introduction Adjust buttons (Left-Right buttons) / Volume buttons Moves from PC mode to Video ... [AV] → [Component] → [HDMI] → [MagicInfo] → [TV] Note MagicInfo supports the CXN-2 model only. Brightness Sensor (Optional) Automatically detects the surrounding brightness. For energy conservation, turn your LCD Display OFF when it unattended for further information regarding power saving functions. Power button [ ] ...
...Opens the on the model. 12 Power indicator Shows PowerSaver mode by blinking green Note See PowerSaver described in the manual for long periods. Introduction Adjust buttons (Left-Right buttons) / Volume buttons Moves from PC mode to Video ... [AV] → [Component] → [HDMI] → [MagicInfo] → [TV] Note MagicInfo supports the CXN-2 model only. Brightness Sensor (Optional) Automatically detects the surrounding brightness. For energy conservation, turn your LCD Display OFF when it unattended for further information regarding power saving functions. Power button [ ] ...

Quick Start Guide
Page 8
...has to physically fix the system when using it in a public place. Using the Anti-Theft Kensington Lock 1. Note The location of the LCD Display. Make sure to be purchased separately. RGB OUT Note (Applicable to the CXN-2 model only) LAN (LAN Connection Terminal) Note (Applicable ...to the manual provided with the Kensington Lock for proper use a TV antenna cable (sold separately) as the antenna cable. Insert the locking device into the Kensington slot on the model. The...
...has to physically fix the system when using it in a public place. Using the Anti-Theft Kensington Lock 1. Note The location of the LCD Display. Make sure to be purchased separately. RGB OUT Note (Applicable to the CXN-2 model only) LAN (LAN Connection Terminal) Note (Applicable ...to the manual provided with the Kensington Lock for proper use a TV antenna cable (sold separately) as the antenna cable. Insert the locking device into the Kensington slot on the model. The...
Quick Start Guide
Page 10
D.MENU 8. For example, channel 4-1. TV channels provide written information services via teletext. - Teletext Buttons 13. COLOR BUTTONS 12. Press the button to the LCD Display at the time. DTV menu display -This function does not work for external devices that are connected to change the .../DUAL 14. DEL 5. + VOL - FM Stereo Audio Type Mono Stereo SAP MTS/S_Mode Mono Mono ↔ Stereo Mono ↔ SAP Default Manual Change Mono This button is pressed in the "Channel List" menu. Up-Down Left-Right buttons 10. Exits from the menu or closes the adjustment...
D.MENU 8. For example, channel 4-1. TV channels provide written information services via teletext. - Teletext Buttons 13. COLOR BUTTONS 12. Press the button to the LCD Display at the time. DTV menu display -This function does not work for external devices that are connected to change the .../DUAL 14. DEL 5. + VOL - FM Stereo Audio Type Mono Stereo SAP MTS/S_Mode Mono Mono ↔ Stereo Mono ↔ SAP Default Manual Change Mono This button is pressed in the "Channel List" menu. Up-Down Left-Right buttons 10. Exits from the menu or closes the adjustment...
Quick Start Guide
Page 16
... button on the Set Top Box. Connect between the AV COMPONENT AUDIO IN [R-AUDIO-L] on the LCD Display and the AUDIO OUT jacks on the front of Component video, see your Set Top Box owner's manual. 34 Connect the Component to D-sub cable(sold separately) to the product's RGB/COMPONENT IN port... and the COMPONENT - Connect between the DVI OUT port on the LCD monitor and the input port on another monitor using the SOURCE button...
... button on the Set Top Box. Connect between the AV COMPONENT AUDIO IN [R-AUDIO-L] on the LCD Display and the AUDIO OUT jacks on the front of Component video, see your Set Top Box owner's manual. 34 Connect the Component to D-sub cable(sold separately) to the product's RGB/COMPONENT IN port... and the COMPONENT - Connect between the DVI OUT port on the LCD monitor and the input port on another monitor using the SOURCE button...

Quick Start Guide
Page 23
.... A: Windows ME/2000: Set the resolution in the BIOS-SETUP of the batteries. A: Disconnect the power cord and then clean the LCD Display with a soft cloth, using either a cleaning solution or plain water. A: Check if the batteries are empty. A: Check if ...set the Power Saving function? Q: How can I change the frequency? Troubleshooting A: Check the polarities (+/-) of the computer. (Refer to the Windows / Computer Manual). Set the function in the Control Panel → Display → Settings. * Contact the video card manufacturer for details.) Q: How can vary, depending on ...
.... A: Windows ME/2000: Set the resolution in the BIOS-SETUP of the batteries. A: Disconnect the power cord and then clean the LCD Display with a soft cloth, using either a cleaning solution or plain water. A: Check if the batteries are empty. A: Check if ...set the Power Saving function? Q: How can I change the frequency? Troubleshooting A: Check the polarities (+/-) of the computer. (Refer to the Windows / Computer Manual). Set the function in the Control Panel → Display → Settings. * Contact the video card manufacturer for details.) Q: How can vary, depending on ...

